LED LENSER®*
* English
* Deutsch
* Espanol
Thank you for choosing one of our products.
To familiarize yourself with this product, please read the following instructions.
Item
LED LENSER
8701 LED LENSER F1
8901 LED LENSER F1 blister
Version 1.0
Battery
1 x CR123A Lithium 3V
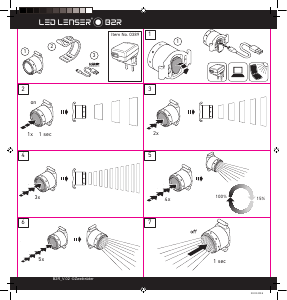
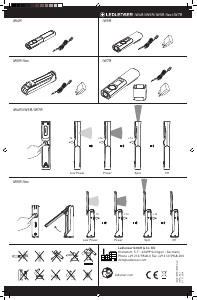
Turning the flashlight ON and OFF
To turn the flashlight ON and OFF, push the button at the end of the flashlight.
Brightness adjusting
When the lamp is off, push the button down, you can get 100% brightness; and push the button again, can
turn the lamp off;
When the lamp is off, touch the button down twice in 1 second, keep or push the button, you can get 15%
brightness;
When the lamp is off, touch the button 3 times in 1 second, keep or push the button, you can get strobe
function (12 Hz);
When the flashlight is off, touch the button down to use the Boost Function.
Over temperature protection
When the temperature of flashlight is too high, the system of flashlight will automatically start to adjust, to
make sure the lamp could work under normal work condition.
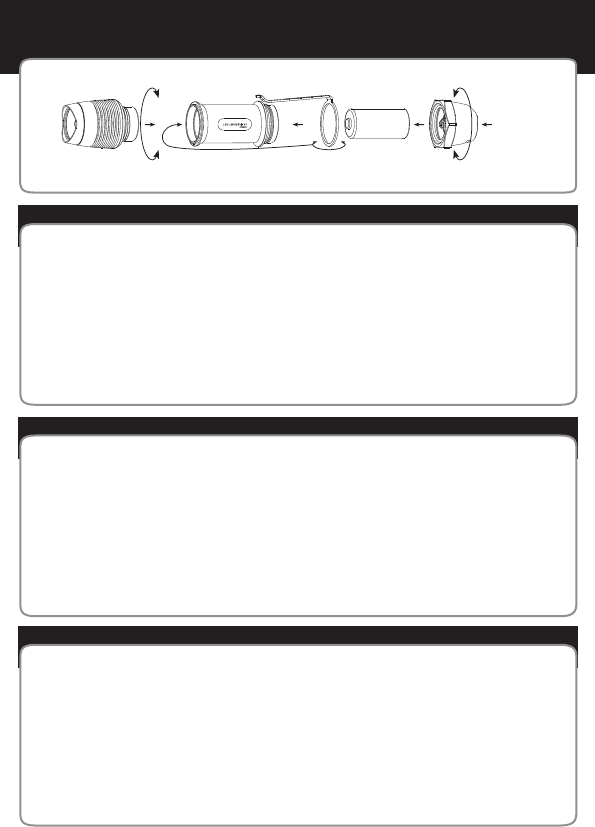
Clip reverse assemble function
Assemble the clip of flashlight in the other direction the flashlight still could work normally.
Screw off the end cap and take out the clip and battery first from tube, and screw out the neck of flashlight
from tube, put the clip on the neck and then screw the neck of flashlight into tube, and then fill in the battery
with anode contact (+) first into tube, and then screw the end cap into tube.
Replacing the batteries
The flashlight will signal low battery by blinking 3 times with 3Hz each 15 seconds. To replace the battery,
switch off the flashlight and then unscrew the end cap of the flashlight. Take out the used battery and dispose
of it properly. Fill in the new battery with the anode contact (+) first. Close the lamp by screwing the lamp end
cap into the body.
Important – When inserting the battery, please place the electrode of battery correctly. If you insert battery
the wrong way, there may be the risk of battery damage or maybe an explosion!
Batteries
Never try to use rechargeable battery on this flashlight and never try to recharge the battery. If you intend to
not use the flashlight for a long period of time, take the battery out to prevent it from leaking and damaging
the flashlight. Discharged battery should also be removed.
Used battery is hazardous waste and must be disposed of according to government regulations.
Accessories
The enclosed lanyard can be fastened to the small key ring.
The enclosed attack front cap can be changed into flashlight for use according to customer’s needs.
Safety advice
Do not shine the light directly in someone's eyes. If the light beam shines directly in your eye, look away
immediately. Do not use any magnifying instruments with this flashlight that could concentrate the light beam.
If used for commercial purposes, the flashlight should only be used in accordance with any local laws and
regulations. Use on the road, please follow the state regulations on road traffic signals.
Wir freuen uns, dass Sie sich für ein Produkt aus unserem Hause entschieden haben. Um sich mit Ihrem neuen Produkt
vertraut zu machen, finden Sie hier eine Gebrauchsanleitung.
Artikel
LED LENSER
8701 LED LENSER F1
8901 LED LENSER F1 Blister
Version 1.0
Batteriesatz:
1 x CR123 Lithium 3V
Ein- und Ausschalten
Durch Betätigung des Druckschalters lässt sich die Lampe ein- und ausschalten.
Mikrokontroller gesteuerter Schalter
Das in der LED LENSER F1 verwendete Schaltersystem nutzt einen Mikroprozessor, um den Lichtmodus
auszuwählen. In dem ein einziger Schalter verwendet wurde, konnte die Schnittstelle zum Nutzer sehr einfach und
anwenderfreundlich gehalten werden. Durch das System kann die Lampe mit einer reduzierten Lichtleistung, mit
maximaler Lichtleistung und in einem Stroboskopmodus betrieben werden.
Die maximale Lichtleistung wird erreicht, indem der Schalter einmal geschaltet wird.
Die reduzierte Lichtleistung wird erreicht, indem der Schalter innerhalb einer Sekunde einmal angetippt und dann
geschaltet wird.
Den Storboskopmodus (12 Hz) können Sie anwählen, indem Sie den Schalter innerhalb einer Sekunde zweimal
antippen und dann schalten.
Temperaturüberwachung
Die LED LENSER F1 ist mit einer Temperaturüberwachung ausgestattet. Diese verhindert ein Überhitzen der Lampe im
Betrieb. Dabei kann es zu einer Reduzierung der Helligkeit kommen.
Wechselbarer Clip
Der mitgelieferte Clip kann wahlweise am Kopf oder der Endkappe montiert werden. Dazu einfach die entsprechenden
Teile auseinander schrauben, den Clip dazwischen einfügen und wieder fest verschrauben.
Wechsel der Batterien
Wenn die Lampe während des Gebrauchs 3-mal alle 15 Sekunden anfängt zu Blinken, dann sind die Batterien
verbraucht und müssen gewechselt werden. Zum Wechsel der Batterie schrauben Sie bitte die Lampe hinten auf.
Entnehmen Sie die verbrauchte Batterie und entsorgen diese. Führen Sie die neue Batterie mit dem Pluspol (+) voran in
das Batteriefach ein. Danach schrauben Sie die Endkappe wieder zu.
Achtung!
Wenn Sie eine neue Batterie einlegen, beachten Sie unbedingt die Polaritätsmarkierungen (+) und (-) im Batteriefach.
Andernfalls besteht eventuell die Gefahr, dass Batterien beschädigt werden und explodieren!
Batterien
Verwenden Sie für Ihre LED LENSER F1 nur CR123 Lithium 3V Batterien. Falls Sie die Lampe längere Zeit nicht
verwenden wollen, entnehmen Sie unbedingt die Batterien, um Schäden zu vermeiden. Verwenden Sie keine
Akkumulatoren oder wieder aufladbare Batterien für diese Lampe. Leere Batterien müssen entnommen werden. Nicht
wieder aufladbare Batterien dürfen keinesfalls wieder aufgeladen werden. Verbrauchte Batterien und Akkus sind
Sondermüll und müssen gemäß der nationalen Gesetzgebung entsorgt werden.
Zubehör
Der Edelstahl Frontring kann durch den mitgelieferten taktischen Frontring ersetzt werden. Hierzu schrauben Sie einfach
den vorhandenen Ring ab und schrauben den taktischen Frontring an.
Die Handschlaufe kann an der Endkappe befestigt werden.
Sicherheitshinweis
Richten Sie niemals absichtlich den Lichtstrahl in die eigenen oder in die Augen anderer Personen. Falls ein Lichtstrahl
in die Augen trifft, sind die Augen bewusst zu schließen und der Kopf aus dem Lichtstrahl zu bewegen. Es dürfen keine
optisch stark bündelnden Instrumente zur Betrachtung des Lichtstrahls verwendet werden. Wenn jemand direkt in den
Lichtstrahl blickt, kann die hohe Leuchtkraft der Lampe zu Blenderscheinungen führen. Bei der Verwendung im
Straßenverkehr sind die jeweiligen gesetzlichen Vorschriften zu beachten.
Bei gewerblicher Nutzung oder der Nutzung im Bereich der öffentlichen Hand ist der Benutzer entsprechend der
Vorschriften für handgeführte LED Leuchten zu unterweisen.
Gracias por elegir uno de nuestros productos.
Para familiarizarse con este artículo, por favor lea las siguientes instrucciones.
Artículo
LED LENSER
8701 Led Lenser F1
8901 Led Lenser F1 blister
Version: 1.0
Batería
1x CR 123A Litio 3V
Encendido y apagado
Para encender y apagar la linterna presione el botón situado al final de la misma.
Ajuste del brillo
Cuando la linterna está apagada, presione el botón, puede tener el 100% de brillo; presionando el botón otra
vez puede apagar la linterna.
Cuando la linterna está apagada, toque el botón dos veces en 1 segundo, mantenga o presione el botón,
puede tener el 15% de brillo;
Cuando la linterna está apagada, toque el botón tres veces en 1 segundo, mantenga o presione el botón,
puede tener la función estroboscópica (12Hz);
Cuando la linterna está apagada, toque el botón hacia abajo para usar la Función Estímulo.
Protección contra Exceso de Temperatura
Cuando la temperatura de la linterna es demasiado alta, el sistema de la linterna empezará a ajustarla
automáticamente para asegurar que la linterna pueda funcionar en condiciones normales.
Función de invertir el montaje del clip
El clip de la linterna montado en la otra dirección aun permite que la linterna funcione normalmente.
Desenrosque la tapa final y quite el clip y la batería del tubo primero, y desenrosque el cuello de la linterna
del tubo, ponga el clip sobre el cuello y luego enrosque el cuello de la linterna en el tubo, entonces
introduzca la batería con el contacto ánodo (+) primero en el tubo, y luego enrosque la tapa final en el tubo.
Cambio de baterías
La linterna indicará que la batería está baja parpadeando 3 veces cada 15segundos con una frecuencia de
3Hz. Para cambiar la batería, apague la linterna y desenrosque la tapa final de la linterna. Retire la batería
usada y deshágase de ella de forma adecuada. Inserte la nueva batería con el contacto ánodo (+) primero.
Cierre la linterna enroscando la tapa final en su sitio.
Importante - Cuando inserte la batería por favor coloque el electrodo de la batería correctamente. Si la
batería se coloca de forma incorrecta puede resultar dañada o explotar.
Baterías
Nunca intente usar batería recargable con esta linterna y nunca intente recargar la batería. Si no tiene
intención de usar la linterna durante algún tiempo, quite la batería para prevenir posibles pérdidas que
puedan dañar la linterna. La batería descargada también debe ser quitada. La batería usada es un desecho
peligroso y debe de ser tratada de acuerdo con la legislación actual.
Accesorios
La correa puede ser ajustada al pequeño llavero.
El avance de la tapa frontal se puede cambiar en la linterna para usarse según las necesidades.
Advertencia de Seguridad
No enfocar directamente en los ojos. Si el haz de luz da en los ojos, volver la cabeza inmediatamente. No
usar ningún instrumento de aumento con esta linterna que pueda concentrar el haz de luz. En caso de uso
comercial, el usuario de la linterna sólo debe utilizar este producto de acuerdo con la normativa vigente. Para
uso en carretera, por favor siga las normas como indican las señales.
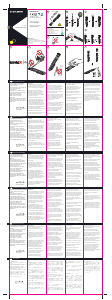
On/Off
An/ Aus
Encendido/Apagado
Marche/Arrêt
Aan/Uit
オン/オフ
켜짐/꺼짐
开/关
Close
Schließen
Cerrar
Fermer
Sluiten
閉める
닫다
关闭
Open
Önen
Abrir
Ouvrir
Open
開ける
열다
打开
Close
Schließen
Cerrar
Fermer
Sluiten
閉める
닫다
关闭
Open
Önen
Abrir
Ouvrir
Open
開ける
열다
打开
+ CR123 -
F1


Join the conversation about this product
Here you can share what you think about the Led Lenser F1 Flashlight. If you have a question, first carefully read the manual. Requesting a manual can be done by using our contact form.