
Getting started
• Plug the USB-C power cord into the back of the clock and connect the other
end to the included power adaptor. Then, plug the adaptor into a standard
electrical outlet.
Wireless speaker
• To turn the wireless speaker ON or OFF, press and hold the SPEAKER ON/OFF
button briey. The speaker will play a tone when turning on or off.
• On your Bluetooth-enabled device, search and connect to the device name:
71091CN.
• Note: The wireless speaker indicator light will ash on the display until it is
paired with a device. If no connection is made within 3 minutes, the clock will
stop waiting for a device. Once connected, the wireless speaker indicator will
stay illuminated.
• When your device is connected to the wireless speaker, the clock will
synchronise its time automatically with your wireless device.
• To adjust the volume, press and release the UP or DOWN buttons.
• To skip or go back a song, hold the UP or DOWN buttons.
• Note: When connected to the wireless speaker, the 12/24-hour time format
cannot be adjusted.
Night Light & Dimmer
• The SNOOZE/NIGHT LIGHT button allows you to control the night light. There
are four levels of brightness: 100%, 75%, 50%, and 25%. The button operates
in the following sequence:
• Press once to turn the light on to 100% brightness.
• Press again to reduce brightness to 75%.
• Press again to reduce brightness to 50%.
• Press again to reduce brightness to 25%.
• Press again to turn the light off.
Wireless Charging
• Place your phone at the centre of the wireless charging area. The charging light
indicator will illuminate while your phone is charging.
• Important Notes:
• Wireless charging power rating is 15 Watts (MAX).
• For maximum efciency, ensure the phone is aligned with the centre of the
charging area.
• Remove metal or thick third-party phone cases before charging.
• Keep at least 10 inches (25 cm) between the clock and medically implanted
devices.
• Do not place the clock near ID or banking cards to avoid damaging the
magnetic strip or embedded chip.
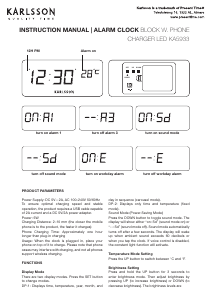
Setting the Time
• Hold the TIME SET button for 3 seconds. The hour digits will ash.
• Use the UP or DOWN buttons to adjust the hour.
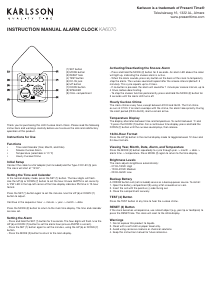
INSTRUCTION MANUAL ALARM CLOCK/WIRELESS SPEAKER
WIRELESS CHARGING
TOP SURFACE
(FOR SMARTPHONES)
WIRELESS
CHARGING
INDICATOR
INDOOR
TEMPERATURE
(°C/°F)
AM
PM
AM/ PM
INDICATORS
ALARM
(SET&ON/OFF)
TIME SETSNOOZE &
NIGHT LIGHT
(ON/OFF&DIMMER)
UP
SPEAKER
ON/OFF
DOWN
&
12/24 HOUR
USB C
POWER
INPUT
(MAX 12V-1.67A)
Printed in China
3) To adjust the volume, PRESS andrelease the UP or DOWN buttons.
Note: The clock will automatically connecttoapaired device if the device is
turned on, and within range.
2) On your bluetooth enabled device, search and connect to device name:
71091CN.
Note: The wireless speaker indicator light will flash on the display until it is
paired withadevice. The clock will automatically stop waiting foradevice to
connect after3minutes. When your device is connected the wireless speaker
indicator on the clock will stay illuminated.
Note: When your device
is connected to the wireless speaker, The clock will
automatically synchronize the time with your wireless device. The time will
update shortly after the device is connected.
1) To turn the wireless speaker ON or OFF. Press and hold the SPEAKER ON /
OFF briefly. The speaker will playamusic tone when turning on or o.
Wireless Speaker
4) To skip or go backasong, HOLD the UP or DOWN buttons.
Note: When your device is connected to the wireless speaker, the 12/24
Hour time format can not be adjusted.
- Press Once to turn the light ON-100%.
- Press Again to reduce the light brightness to 75%.
- Press Again to reduce the light brightness to 50%.
- Press Again to reduce the light brightness to 25%.
- Press Again to turn the light OFF.
The SNOOZE/NIGHT LIGHT button allows you to turn ON, Adjust Brightness
and turn OFF the night light. There are4levels of brightness (100%-75% -
50%-25%) The button controls the lightinthefollowing sequence:
Night Light&Dimmer
Plug the USBCpower cord into the back of the clock, and the other end into
the included power adapter. Plug the adapter intoastandard electrical
outlet. The display will turn on. The clock is now ready to be set.
Getting Started
Important: Use only a 5V-3A, 9V-2.22A, or 12V-1.67A power adapter or USB
power source.
Note:
- Wireless charging power rating is 15 Watt (MAX).
- May not work with all 3rd party phone cases. Metal cases should be
removed before wireless charging.
- For maximumchargingeciency, t he phone must be aligned with the
center of the charging area.
Important:
- Do NOT place too close to ID and banking cards. The wireless charger
may damage the magnetic strip or embedded chip.
- Keep at least 10” / 25cm between the clock and medical implanted
devices. The wireless charger may cause disruption to the medical device.
- Keep away from children. This is not a toy.
Place your phone on the center the of the wireless charging area. The
charging light indicator will illuminate on the frontoftheclock whileyour
phoneischar
ging.
Wireless Charging
Note: When the alarm is activated, the ALARM ON indicator will
illuminate on the display.
Press the ALARM button to turn the alarm ON or OFF.
Alarm On / O
Note: When setting the alarm, The alarm indicator on the display will flash
so you can be sure you are setting the alarm. If no adjustments are made
within 10 seconds,theclock will automaticallyexit the setting mode.
IMPORTANT: When using the 12hr time display format, Be sure to set the
alarm hour to the desired wake up time: AM or PM. Check for the AM or PM
indicator light on the display.
1) Hold the ALARM button fo r3seconds. The HOUR digits will flash. Use
the UP or DOWN buttons as needed to set the desired alarm hour.
2) Press the ALARM button once. The MINUTE digits will flash. Use the UP or
DOWN buttonsasneeded to set the desired alarmtime.
3) Press the ALARM button oncetosaveandexit.
Setting the Alarm
TIP: To automatically set the time, connect your device to the wireless
speaker. Refer to the Wireless Speaker section of this user manual. The clock
will automatically synchronize the time with your wireless device. The time will
update shortly after the device is connected.
Note: When setting the clock, if no adjustments are made within 10 seconds,
the clock will automaticallyexit the setting mode.
Note: When using the 12hr time display format, be sure to set the time to the
correct AM or PM time period. Check for the AM or PM indicator on the display.
1) Hold the TIME SET button for3seconds. The HOUR digits will flash. Use
the UP or DOWN buttonsasneededtosetthecorrect hour.
2) Press the TIME SET button once. The MINUTE digits will flash. Use the UP
or DOWN buttonsasneededtosetthecorrect minutes.
3) Press the TIME SET button oncetosaveandexit.
Setting the Time
Note: If the alarmisnotturned o, the alarm will ringfor5minutes.
To stop the alarm, press the ALARM button. The alarm will stop, but will
remain on for the next day.PresstheALARM button again to turn the
alarm o. Check for the ALARM ON indicator on the display.
When the alarmissounding, press SNOOZE/LIGHT button. The alarm will
be silenced temporarily, but will resume sounding after5minutes. The snooze
can be repea
ted as many times as desired.
Using the Snooze
Temperature °C / °F
Press the UP button to select Celsius or Fahrenheit(°C/ °F).
Note: When your device is connected to the wireless speaker, the 12/24
Hour time format can not be adjusted.
Press the DOWN button to switch between 12 and 24 Hourtimeformat.
12 / 24 Hour Display
1) Unplug the clock from the electrical source/outlet.
2) Press any button 2 -3times (This will drain a ny residual electricity).
3) Wait 30 seconds, then plug the clock back into the electrical source /
outlet.
Note: If you are experiencing any problems with the display, setting or
other issues, preformaHARD RESET:
Reset
TIME DISPLAY WIRELESS
SPEAKER
INDICATOR
ALARM ON
INDICATOR
INSTRUCTION MANUAL
WIRELESS CHARGING
TOP SURFACE
(FOR SMARTPHONES)
WIRELESS
CHARGING
INDICATOR
INDOOR
TEMPERATURE
(°C/°F)
AM
PM
AM/ PM
INDICATORS
ALARM
(SET&ON/OFF)
TIME SETSNOOZE &
NIGHT LIGHT
(ON/OFF&DIMMER)
UP
SPEAKER
ON/OFF
DOWN
&
12/24 HOUR
USB C
POWER
INPUT
(MAX 12V-1.67A)
Printed in China
3) To adjust the volume, PRESS andrelease the UP or DOWN buttons.
Note: The clock will automatically connecttoapaired device if the device is
turned on, and within range.
2) On your bluetooth enabled device, search and connect to device name:
71091CN.
Note: The wireless speaker indicator light will flash on the display until it is
paired withadevice. The clock will automatically stop waiting foradevice to
connect after3minutes. When your device is connected the wireless speaker
indicator on the clock will stay illuminated.
Note: When your device
is connected to the wireless speaker, The clock will
automatically synchronize the time with your wireless device. The time will
update shortly after the device is connected.
1) To turn the wireless speaker ON or OFF. Press and hold the SPEAKER ON /
OFF briefly. The speaker will playamusic tone when turning on or o.
Wireless Speaker
4) To skip or go backasong, HOLD the UP or DOWN buttons.
Note: When your device is connected to the wireless speaker, the 12/24
Hour time format can not be adjusted.
- Press Once to turn the light ON-100%.
- Press Again to reduce the light brightness to 75%.
- Press Again to reduce the light brightness to 50%.
- Press Again to reduce the light brightness to 25%.
- Press Again to turn the light OFF.
The SNOOZE/NIGHT LIGHT button allows you to turn ON, Adjust Brightness
and turn OFF the night light. There are4levels of brightness (100%-75% -
50%-25%) The button controls the lightinthefollowing sequence:
Night Light&Dimmer
Plug the USBCpower cord into the back of the clock, and the other end into
the included power adapter. Plug the adapter intoastandard electrical
outlet. The display will turn on. The clock is now ready to be set.
Getting Started
Important: Use only a 5V-3A, 9V-2.22A, or 12V-1.67A power adapter or USB
power source.
Note:
- Wireless charging power rating is 15 Watt (MAX).
- May not work with all 3rd party phone cases. Metal cases should be
removed before wireless charging.
- For maximumchargingeciency, the phone must be aligned with the
center of the charging area.
Important:
- Do NOT place too close to ID and banking cards. The wireless charger
may damage the magnetic strip or embedded chip.
- Keep at least 10” / 25cm between the clock and medical implanted
devices. The wireless charger may cause disruption to the medical device.
- Keep away from children. This is not a toy.
Place your phone on the center the of the wireless charging area. The
charging light indicator will illuminate on the frontoftheclock whileyour
phoneischar
ging.
Wireless Charging
Note: When the alarm is activated, the ALARM ON indicator will
illuminate on the display.
Press the ALARM button to turn the alarm ON or OFF.
Alarm On / O
Note: When setting the alarm, The alarm indicator on the display will flash
so you can be sure you are setting the alarm. If no adjustments are made
within 10 seconds,theclock will automaticallyexit the setting mode.
IMPORTANT: When using the 12hr time display format, Be sure to set the
alarm hour to the desired wake up time: AM or PM. Check for the AM or PM
indicator light on the display.
1) Hold the ALARM button fo r3seconds. The HOUR digits will flash. Use
the UP or DOWN buttons as needed to set the desired alarm hour.
2) Press the ALARM button once. The MINUTE digits will flash. Use the UP or
DOWN buttonsasneeded to set the desired alarmtime.
3) Press the ALARM button oncetosaveandexit.
Setting the Alarm
TIP: To automatically set the time, connect your device to the wireless
speaker. Refer to the Wireless Speaker section of this user manual. The clock
will automatically synchronize the time with your wireless device. The time will
update shortly after the device is connected.
Note: When setting the clock, if no adjustments are made within 10 seconds,
the clock will automaticallyexit the setting mode.
Note: When using the 12hr time display format, be sure to set the time to the
correct AM or PM time period. Check for the AM or PM indicator on the display.
1) Hold the TIME SET button for3seconds. The HOUR digits will flash. Use
the UP or DOWN buttonsasneededtosetthecorrect hour.
2) Press the TIME SET button once. The MINUTE digits will flash. Use the UP
or DOWN buttonsasneededtosetthecorrect minutes.
3) Press the TIME SET button oncetosaveandexit.
Setting the Time
Note: If the alarmisnotturned o, the alarm will ringfor5minutes.
To stop the alarm, press the ALARM button. The alarm will stop, but will
remain on for the next day.PresstheALARM button again to turn the
alarm o. Check for the ALARM ON indicator on the display.
When the alarmissounding, press SNOOZE/LIGHT button. The alarm will
be silenced temporarily, but will resume sounding after5minutes. The snooze
can be repea
ted as many times as desired.
Using the Snooze
Temperature °C / °F
Press the UP button to select Celsius or Fahrenheit(°C/ °F).
Note: When your device is connected to the wireless speaker, the 12/24
Hour time format can not be adjusted.
Press the DOWN button to switch between 12 and 24 Hourtimeformat.
12 / 24 Hour Display
1) Unplug the clock from the electrical source/outlet.
2) Press any button 2 -3times (This will drain a ny residual electricity).
3) Wait 30 seconds, then plug the clock back into the electrical source /
outlet.
Note: If you are experiencing any problems with the display, setting or
other issues, preformaHARD RESET:
Reset
TIME DISPLAY WIRELESS
SPEAKER
INDICATOR
ALARM ON
INDICATOR
INSTRUCTION MANUAL
KA6033
• Press the TIME SET button again. The minute digits will ash.
• Use the UP or DOWN buttons to adjust the minutes.
• Press the TIME SET button to save and exit.
• Note: Ensure the correct AM/PM time period is selected when using the 12-hour
format.
• If no adjustments are made within 10 seconds, the clock will automatically exit
the setting mode.
Setting the Alarm
• Hold the ALARM button for 3 seconds. The hour digits will ash.
• Use the UP or DOWN buttons to set the alarm hour.
• Press the ALARM button. The minute digits will ash.
• Use the UP or DOWN buttons to set the alarm minutes.
• Press the ALARM button to save and exit.
Note: When using the 12-hour time display, ensure the correct AM/PM time period
is selected.
When the alarm is active, the ALARM ON indicator will illuminate on the display.
Turning the Alarm ON/OFF
• Press the ALARM button to turn the alarm ON or OFF.
• When the alarm is sounding, press the SNOOZE/LIGHT button to temporarily
silence it. The alarm will resume after 5 minutes. The snooze feature can be
repeated as needed.
• To stop the alarm for the day, press the ALARM button. To turn it off completely,
press the ALARM button again.
• Note: If not turned off, the alarm will ring for 5 minutes before stopping auto-
matically.
Temperature Display
• Press the UP button to toggle between Celsius (°C) and Fahrenheit (°F).
12/24 Hour Display
Press the DOWN button to switch between 12-hour and 24-hour time formats.
Note: When connected to the wireless speaker, the 12/24-hour time format cannot
be adjusted.
Resetting the Clock
• Unplug the clock from the power source.
• Press any button 2-3 times to drain residual electricity.
• Wait 30 seconds, then plug the clock back in.
• Note: Perform a hard reset if experiencing issues with the display or settings.
Important Safety Information
• This product is not a toy. Keep it out of reach of children.
• Use only a power adaptor rated at 5V-3A, 9V-2.22A, or 12V-1.67A.
USB-C
POWER
INPUT
(MAX 12V-1.67A)
UPDOWN
&
12-24 HR
TIME SET
SNOOZE &
NIGHT LIGHT
(ON/OFF &
DIMMER)
ALARM
ON/OFF
INDICATOR
WIRELESS
SPEAKER
INDICATOR
TIME DISPLAY
AM/PM
INDICATORS
WIRELESS CHARGING
TOP SURFACE FOR
SMARTPHONES
WIRELESS
CHARGING
INDICATOR
INDOOR
TEMPERATURE
C°/F°
ALARM SET
(ON/OFF)
SPEAKER
(ON/OFF)


Join the conversation about this product
Here you can share what you think about the Karlsson KA6033GY Alarm Clock. If you have a question, first carefully read the manual. Requesting a manual can be done by using our contact form.