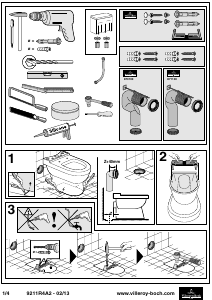
Positioning and Mounting
The Jabsco Manual Toilet is assembled at the factory for
operation with the right hand. If preferred, or required by
available space, the pump and bowl may be rotated 180
degrees to provide left hand operation. To do this, remove
hose from inlet elbow (back of bowl) and rotate elbow 180
degrees. It may be necessary to remove the elbow, loosen
spud retaining nut and rotate the spud fitting so elbow will
be tight when pointing in the opposite direction. Remove,
rotate 180 degrees and reinstall both the bowl and pump
assembly. Reconnect hose to inlet elbow and the toilet is
ready for left hand operation.
The toilet must be installed on a well supported flat surface.
Ideally, if underside of mounting surface is accessible, the
toilet base should be through-bolted (using 5/16" bolts,
washers and locknuts) to the mounting surface. If the
underside of mounting surface is not accessible, the use of
5/16" lag bolts and washers is an acceptable alternative.
Before installing, position toilet in location to be installed.
Ensure there is adequate space around toilet to easily
operate pump and raise seat and lid to a fully opened
position. Seat and lid should swing open at least 110
degrees and be supported when open to avoid strain on
hinges. Ensure the base drain plug is accessible and inlet
and discharge hoses can be attached to their respective
ports without inducing significant lateral force. The
discharge elbow may be rotated (by loosening two flange
screws, rotating elbow and retightening screws) to accept
the most convenient routing of the discharge hose.
When proper installation has been established mark the
four base mounting holes on mounting surface and remove
toilet. Ensure that no wiring or plumbing is positioned under
the mounting surface which may be accidentally damaged
when the surface is drilled. Drill appropriate size holes for
fasteners being used. Mount toilet using flat washers
between head of bolts and plastic toilet base. If desired a
small bead of silicone or latex sealant may be applied
around base where it contacts the mounting surface to
prevent moisture from getting under the toilet base.
NOTICE: Do not use Polysulfide base sealants because
they may chemically attack the plastic which can result in
breakage.
Plumbing
Do not plumb the toilet to vessel’s
potable water supply. To do so can cause
water contamination that can cause illness or death.
If installing a new inlet thru-hull/seacock, ensure that it is
positioned on a part of the hull which is wetted at all
angles of heel or trim and free of water turbulence at any
hull speed. If discharging waste overboard (check legal
restrictions for overboard discharge), ensure discharge
thru-hull/seacock is both aft of and higher than the inlet
thru-hull/seacock. All inlet plumbing should be a
minimum of 3/4" ID and discharge plumbing a minimum
of 1-1/2" ID. All hose ends should be double clamped
with stainless steel hose clamps. If the toilet is above
waterline route hoses to seacocks, holding tank or
treatment device via a route as direct as possible.
However, for maximum sealing effect on the discharge
joker valve, it is recommended that the discharge hose is
looped upward about 8" above the discharge elbow
before it descends to its termination point. All bends and
elbows in plumbing should be kept to a minimum. It
should not be necessary to use any sealing compound
when attaching hoses to the inlet or discharge ports.
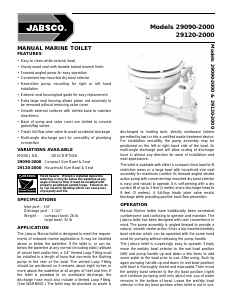
If the toilet is, or can be, below the waterline, at any normal
(including static) attitude of vessel heel and/or trim, a
3/4" vented loop must be installed in a length of hose
connecting the flushing pump to the rear of the bowl.The
vented loop fitting must be positioned 8" above the
waterline at all angles of heel and trim. To accomplish
this, remove the 3/4" hose supplied with toilet and
replace with a new length of hose long enough to properly
position the vented loop. If the toilet is plumbed for over-
board discharge, a 1-1/2" vented loop must be installed
in the discharge hose.The waste vented loop fitting must
also be positioned 8" above the waterline at all angles of
heel and/or trim and ideally should be located as close
to the toilet as practical. (See WARNING.)
If unfamiliar with proper plumbing requirements for
marine toilets, it is recommended that a qualified marine
plumbing technician is contacted to do the installation.
Flood hazard. If toilet is installed below the
properly positioned vented loops. Failure to do
of property and life.
Flood hazard. Close inlet and outlet seacocks
prior to disassembling toilet. Failure to do so
property and life.


Join the conversation about this product
Here you can share what you think about the Jabsco 29090-2000 Toilet. If you have a question, first carefully read the manual. Requesting a manual can be done by using our contact form.