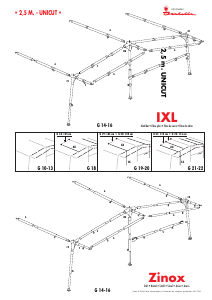
• Forum • • Forum•
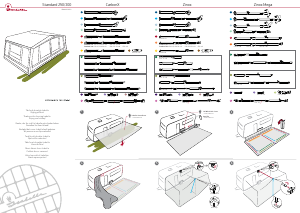
DK/NO: Rejs C V - /CH-ben med piggen op igennem hullet i taget .
Monter AF-sideoverligge r ne i C V - /CH-hjø r ne r . Sæt benene i reguleringsstroppene, og spænd ud .
GB: Mount CV/CH-co r ner poles and AF poles. Put the spike of the CV/CH poles
through the co r ner eyelets. Place the legs in the regulator tabs and tension.
DE: Montieren Sie die C V -/CH-Eckbeine. Führen Sie den Do r n durch die Öse im Dach.
NL: Plaats nu de C V -/CH-hoekstaanders met het puntje door het oog in het dak .
SE: Res C V -/CH-benen med piggen ut genom hålet i taket. MomteraAF-sidoöverliggare i C V -/CH-hö r nen sätt bene t
i reguleringsstroppen och spänn ut.
FR: Montez les ba r res de coin CV/CH et mettez la pointe dans l’œillet de coin. Montez les ba r res de côté du toit AF dans les
coins CV et CH. Placez la pointe des pieds dans les languettes de réglage et tendez.
Informatio n
Informatio n
A
A
A
CV
E
CH
CM
E
AF
AF
AF
Aqua- T e x
Nº 60062
E
E
A
CM
2
1
FixOn
FixOn 2 2
a. b.
LOCK
AF
E
E
CM
2
1
CV
A
A
CH
FixOn
FixOn2
F
F
G
G
MF
AF
AF
A
A
A
CV
E
CH
CM
E
AF
AF
AF
2
2
1
1
Forum Dorn
DK/NO: Monter udhængsrør (F- MF -rør). Skub G-stænger igennem kanale r ne i udhæng, og monter
dem mellem F- og MF -rø r .
GB: Mount the canopy poles F and M F . Inse r t the G-poles into the canopy sleeves
and connect them to the F and MF-poles.
Push the G-poles into the canopy sleeves and connect them to the MF -poles. Mount AX-poles.
DE: Montieren Sie die V ordachstangen (F-/MF-Stangen). Schieben Sie die G-Stangen durch die Kanäle im
V ordach und montieren Sie diese zwischen den F- und MF-Stangen.
NL: Plaats de petluifelstangen (F-/MF-stangen). Schuif de G-stangen door de sluizen in de petluifel, en plaats deze tussen
de F- en MF -stangen.
SE: Montera uthängsrören (F-MF rör)Skjut G-stänge r na igenom kanale r na i baldakinen och montera dem mellan F- och MF-rö r .
FR: Montez les ba r res de casquette F et M F . Poussez les ba r res G dans la pochette de la casquette et connectez les aux ba r res F et M F .
DK/NO: Bred et tæppe ud foran vognen, så snavsede stænger og telt undgås.
Stænge r ne samles, og lægges på tæppet, hvor de skal b r uges .
GB: Assemble and lay out the frame in its co r rect position on a carpet or other protective covering .
DE: So r tieren Sie das Gestänge anhand unseres Gerüstplanes. Legen Sie die Stangen jeweils an die Stelle ,
an der diese später auch benötigt werden.
NL: Allereerst zorgt u voor een droge ondergrond (b v . Bolon V oo r tenttapijt) waarop u de stokke n
so r tee r t volgens de frame-tekening. Leg de stokken daar neer waar u ze straks nodig heeft .
Controleer de caravanrail op beschadigingen en onregelmatigheden en maak deze schoon.
SE: Lägg ut tältmattan framför vagnen, fö r hindrar att tält och stänger blir smutsiga .
Montera stänge r na och lägg ut dem där de skall användas .
FR: Assemblez et prédisposez co r rectement l'a r mature sur le sol le long d e
votre caravane.
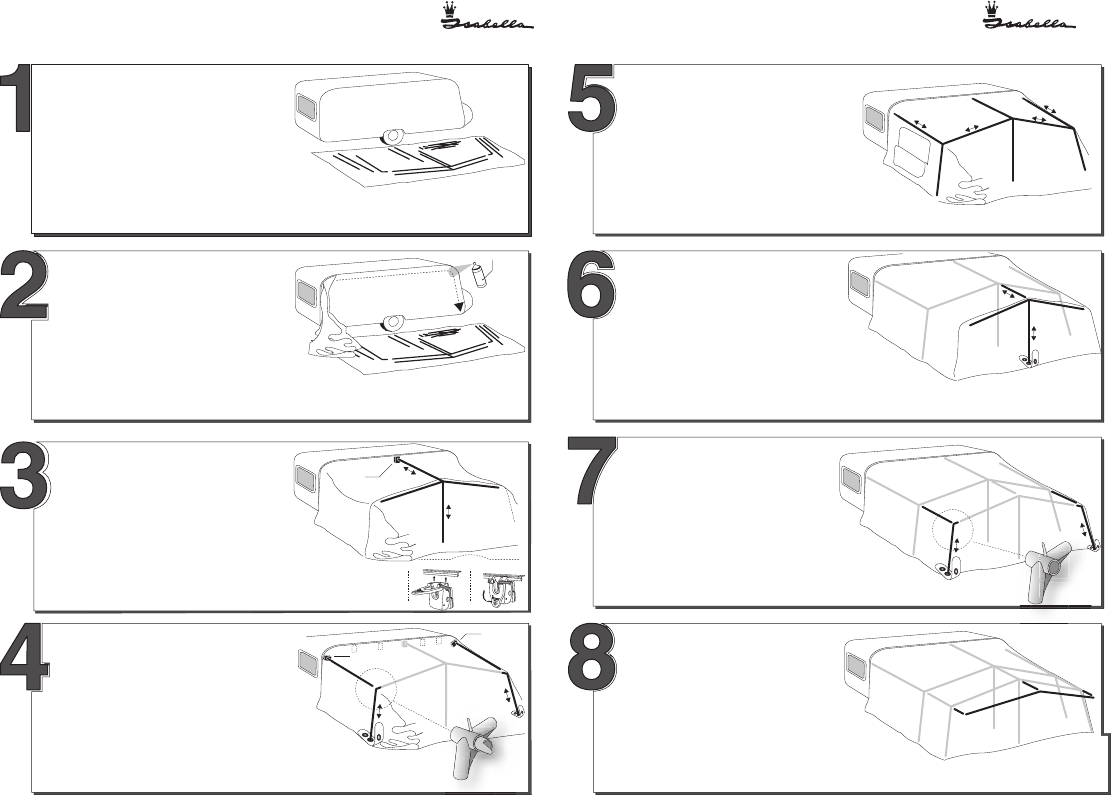
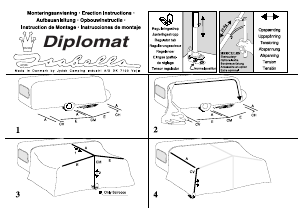
DK/NO: Sæt E-stang i CM-k r yds, og rejs CM-benet, med piggen igennem hullet i taget .
Monter A-overligger i CM-k r yds og FixOn, og spænd ud. Spænd CM-ben ud .
GB: Raise the CM-centre pole and put the point of the CM-cross through the centre eyelet of the canvas.
Place leg in regulator tab. Position the A-centre roof pole in the CM-cross and FixOn and tension
DE: Stellen Sie das mittlere Bein mit dem CM-Kreuz auf. Den Do r n durch die Öse im Dach. Plazieren Sie da s
Bein in die Regulie r ungsschnu r . Montieren Sie die mittlere A-Dachstange im CM-Kreuz und spannen diese aus .
NL: Plaats nu de middelste staander met het CM-k r uis. De punt van het hoekstuk moet door het oogje in het dak. Het voetj e
met punt onderaan de staander moet door één van de gaatjes in het regelsnoe r . De A-dakligger nu plaatsen in het FixOn blokje e n
bevestigen in het CM-k r uis en daa r na uitspannen .
SE: Montera E-stänge r na i CM-k r ysset, och res CM-benet med piggen ut genom hålet i taket .
Montera A-överliggaren i CM-k r ysset och FixOn, och spänn ut. Sätt CM-benet i reguleringsstroppen, och spänn ut .
FR: Prenez le pied central CM et mettez la pointe dans l’œillet central à l’avant de la toile. Mettez le pied central (CM) dans la languette de
réglage à oeillets de l'auvent puis assemblez la faîtière centrale du toit (A) au Fix On et au pied CM et tendez.
Insérez ensuite les faîtières latérales (E).
DK/NO: Rejs C V - /CH-ben med piggen op igennem hullet i taget .
Monter A-sideoverligge r ne i C V - /CH-hjø r ner og FixOn. Sæt benene i reguleringsstroppene, og spænd ud .
GB: Mount CV/CH-co r ner poles and A-roof poles. Put the point through the co r ner eyelet and place the le g
in the regulator tab. NB: If applicable, position FixOns for AX-poles. (see No. 4)
DE: Montieren Sie die C V - /CH-Eckbeine und die äußeren A-Dachstangen. Den Do r n durch die Öse im Dach,
plazieren Sie das Bein in die Regulie r ungsschnu r .
NL: Na montage van de E-stangen de CV en CH hoekstaanders plaatsen met de twee buitenste A-dakliggers.
Ook hier de punt van de hoekstukken door het oog in het dak en de staander in het regelsnoe r .
SE: Res C V -/CH-benen med piggen ut genom hålet i taket. Montera A-sidoöverligga r na i C V -/CH-hö r nen och FixOn.
Sätt benen i reguleringsstroppa r na, och spänn ut .
FR: Montez les angles droits et gauches. Mettez la pointe à travers l’œillet de coin et placez le pied dans la languette de réglage. Assemblez les pieds CV et CH avec les faîtières de toit latérales (A).
DK/NO: T ræk teltdugen i vognskinnen. Sprøjt evt. skinnen med imprægnering (Aqua T ex), så teltet glider bedre .
Kontrolle r , at teltside r nes højde over jorden, er ens i begge side r . Monter FixOn2 beslag på FixOn-skinnen .
GB: Pull the awning through the channel. T o avoid soiling, do not place the canvas on the caravan roof .
Check that both sides are level with the ground. Place FixOn2.
DE: Ziehen Sie die Zelthaut vorsichtig in die V o r zeltschiene ein. Beide Seiten des Dache s
sollten den gleichen Abstand zum Boden haben. Montieren Sie hie r nach die FixOn2 Beschläge auf den Fix-on Kede r .
NL: T rek nu de voo r tent door de caravanrail (2 personen, 1 persoon trekt de ander geleid de tent aan het begi n
van de rail) let erop dat de tent op een schone en droge ondergrond ligt. De tent moet aan beide kanten op een
zelfde hoogte van de grond staan.
SE: Dra i tältet i vagnsskenan. Spraya e v . tältskenan med impregnering (Aqua T ex) så tältet glider lättare .
Kontrollera att tältets höjd över marken är lika på båda sido r na .
FR: Afin de fixer l'auvent à la caravane, insérez le jonc de l'auvent dans le rail de la caravane et faites-le glisser jusqu' à c
e que les extrémités
de l'auvent soient à égale distance du sol.
DK/NO: Gavle lynes ned. 1. E-stænger spændes ud. 2. A-overliggere spændes ud.
GB: Unzip the side panels. T ension poles in the following order: 1. E-poles (front).
2. A-poles (roof).
DE: Die Seitenteile während des Ausspannens herabrollen. 1. Spannen Sie die
E-Stangen aus (Front). 2. Spannen Sie die A-Stangen aus (Dach).
NL: De zijwanden tijdens het uitspannen openritsen. 1. Span de E-stangen uit (Front). 2. Span de A-stangen uit (Dak).
SE: Gavlar läggs ner till hälften. 1. E-stänger spänns ut. 2. A-överliggare spänns ut.
FR: Zippez les panneaux de côtés. T endez les ba r res dans l’ordre suivant : 1) Ba r res E (face avant) 2. Ba r res A (toit )
DK/NO: Sæt E-stang mellem CM-k r yds, og rejs CM-benet, med piggen igennem hullet i taget .
Monter AF-overligger mellem CM-k r yds, og spænd ud. Sæt CM-ben i reguleringsstrop, og spænd ud. .
GB: Inse r t E-poles into CM-cross and raise the CM-leg. Put the spike of the CM -
cross through the centre eyelet of the canvas.
Position AF-roof pole between the two CM-cross joints and tension. Place CM-leg in regulator tab and tension.
DE: Montieren Sie die E-Stange im CM-Kreuz. Stellen Sie das CM-Bein auf mit dem Do r n durch die Öse im Dach.
Montieren Sie die AF-Dachstange zwischen den CM-Kreuz und spannen Sie diese aus. Plazieren Sie das CM-Bein in die
Regulie r ungsschnur und spannen Sie diese aus .
NL: Plaats de E-stang in het CM-k r uis. Plaats de CM-staander met het puntje door het oog in het dak. Plaats de AF-dakstang tussen de
CM-k r uis en span deze uit. Plaats nu de Cm-staander in het regelsnoer en span deze uit .
SE: Montera E-stänge r na i CM-kysset och res CM-benet med piggen ut genom hålet i taket. Montera AF-överliggaren mellan CM-k r yssen och spänn ut.
Sätt CM-benet i reguleringsstroppen och spänn.
FR: Mettez la ba r re E dans la croix CM et montez le pied CM. Mettez la pointe de la croix CM dans l’œillet central de la toile. Mettez la ba r re A F
entre les croix CM et tendez. Mettez le pied de la ba r re CM dans la languette de réglage .
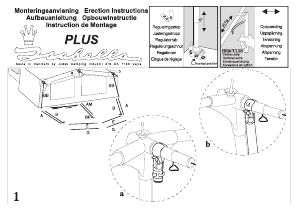
Monteringsanvisning • Erection Instructions • Aufbauanleitung • Opbouwinstructie • Instruction de Montage • Instrucciones de montaje
Monteringsanvisning • Erection Instructions • Aufbauanleitung • Opbouwinstructie • Instruction de Montage • Instrucciones de montaje

Join the conversation about this product
Here you can share what you think about the Isabella Forum Awning. If you have a question, first carefully read the manual. Requesting a manual can be done by using our contact form.
reply | This was helpful (0) (Translated by Google)