• After powering up the hob, wait 8 seconds to activate the
electronic controls.
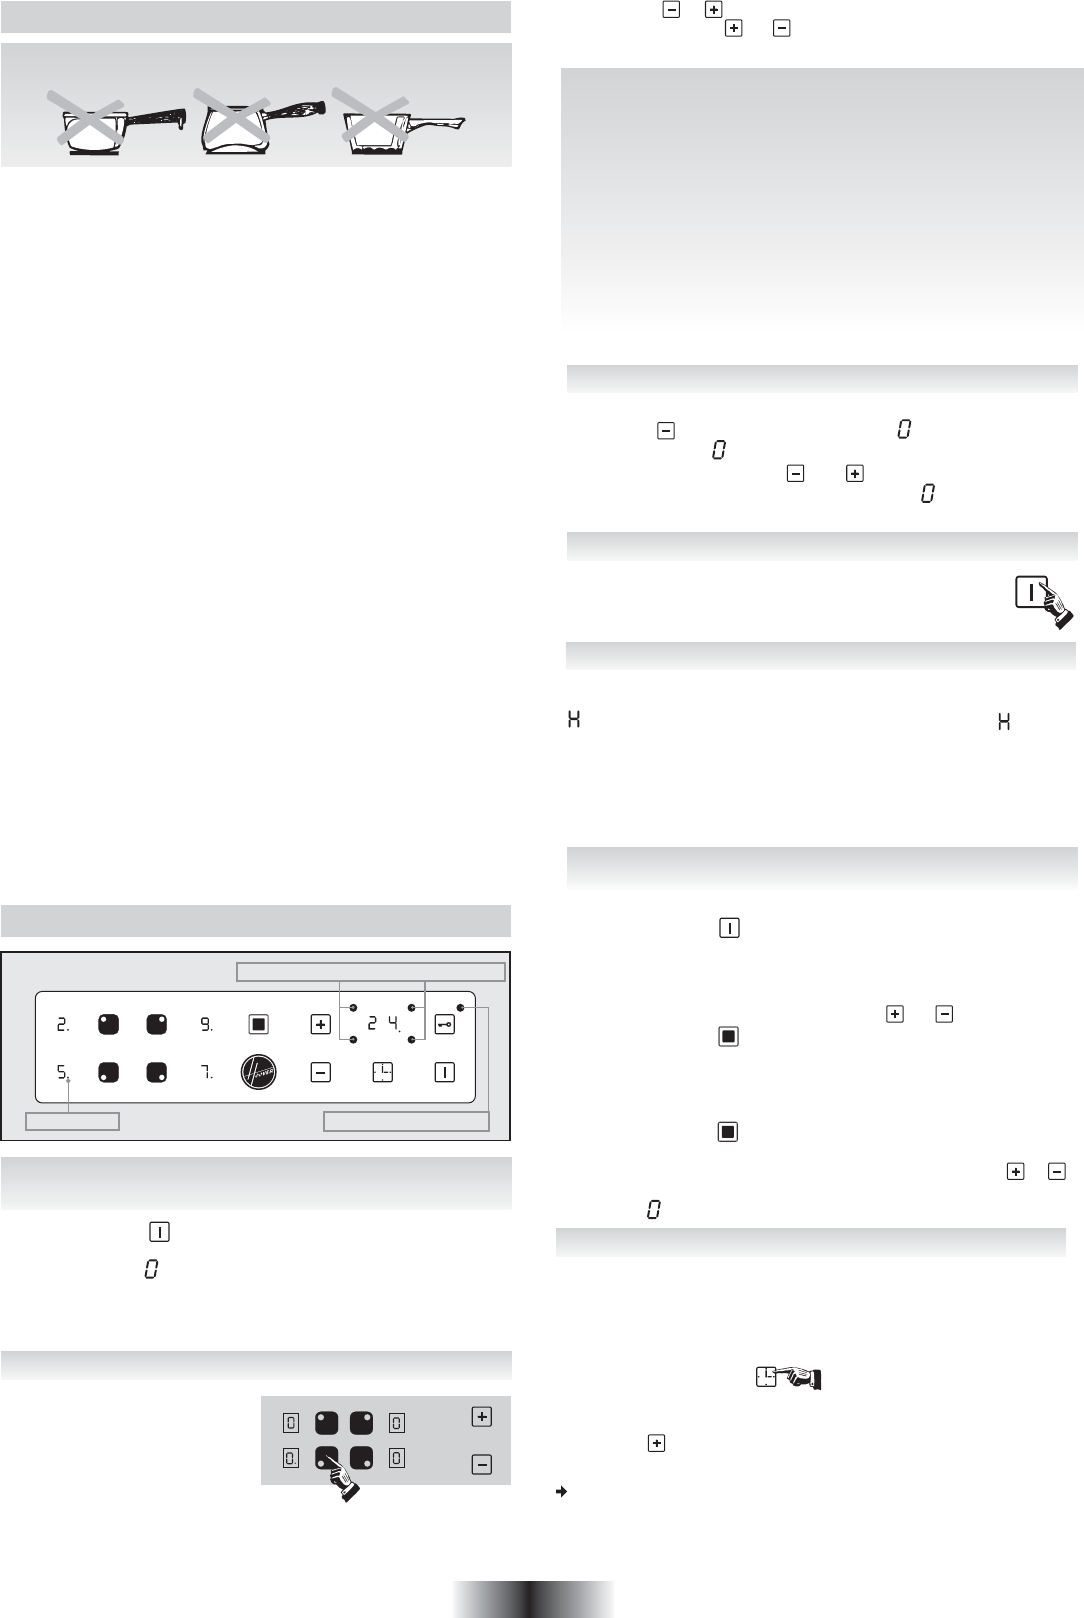
- Press the button , for 3 seconds.
Electronic control of the hob is activated. In each display zone
the heat level is displayed and the control LED blinks.
- After 10 seconds whithout use, the electronic control goes off
and the starting operation has to be repeated.
3 GB
HOW TO OPERATE THE GLASS CERAMIC HOB
HOB COOKWARE ADVICE
• Always use good quality cookware with perfectly flat and
thick bases : using this type of cookware will prevent hot spots
that cause food to stick. Thick metal pots and pans will provide
an even distribution of heat.
• Ensure that the base of the pot or pan is dry : when filling
pans with liquid or using one that has been stored in the
refrigerator, ensure that the base of the pan is completely dry
before placing it on the hob. This will help to avoid staining the hob.
• Use pans whose diameter is wide enough to completely
cover the surface unit : the size of the pan should be no smaller
than the heating area. If it is slightly wider the energy will be
used at its maximum efficiency.
THE CHOICE OF COOKWARE - The following information will
help you to choose cookware which will give good performance.
Stainless Steel :
highly recommended.
Especially good with a
sandwich clad base. The sandwich base combines the benefits
of stainless steel (appearance, durability and stability) with the
advantages of aluminium or copper (heat conduction, even heat
distribution).
Aluminium :
heavy weight recommended.
Good conductivity.
Aluminium residues sometimes appear as scratches on the hob,
but can be removed if cleaned immediately.
Because of its low melting point, thin aluminium should not be
used.
Cast Iron :
usable, but not recommended.
Poor performance.
May scratch the surface.
Copper Bottom / stoneware:
heavy weight recommended.
Good
performance, but copper may leave residues which can appear
as scratches. The residues can be removed, as long as the hob
is cleaned immediately. However, do not let these pots boil
dry. Overheated metal can bond to glass hobs. An overheated
copper pot will leave a residue that will permanently stain the hob.
Porcelain/enamel : Good perfomance only with a thiny smooth,
flat base.
Glass-ceramic :
not recommended.
Poor performance. May
scratch the surface.
Using good quality cookware is critical for setting the best
performance from your hob.
Control LED
Cooking zone programming indicator
Locking indicator lamp
• STARTING A COOKING ZONE
- Press the selection button of
the required cooking zone. In
the display zone, the control
LED is on steady. It shows that
the zone is live.
- Press the or button to select a heat level between 1 and
9. Hold down the or button and the heat level increases
or decreases gradually.
The following examples are for information only. Personal
experience should then let you adapt these settings to your taste
and habits.
0 : Off
1 : )
2 : ) ..... Melting heat
3 : Keeping hot
4 : Heating up
5 : Thawing, stewing, full cooking, low temperature
cooking
6 : Cooking without lid
7 : Frying, meat browning and roasting
8 : High temperature cooking and roasting, seizing
9 : Frying, boiling large quantities of water.......
• STOPPING A COOKING ZONE
- Press the selection button of the required cooking zone.
- Press the button to display heat level . Now the zone goes
off, the indicator goes off after 10 seconds.
- To stop rapidly, press the and buttons at the same time.
The heat level automatically goes down to .
The cooking zone goes off.
• GENERAL STOP
The cooking zones and the timer can be stopped at any
moment by pressing for 3 seconds on the On-Off button.
• RESIDUAL HEAT INDICATOR
The control panel tells the user when the surface temperature of
the cooking zones exceeds about 60°C, by the following displaying:
. When the temperature goes back below 60°C, the display
goes off.
For ending the cooking, we advise switching off the cooking zone
and using the residual heat of the zone to finish cooking gently.
N.B. After a cut in the current, the residual heat indicator disappears
completely, even if the surface temperature exceeds 60°C.
• OPERATING THE ADDITIONAL COOKING ZONE
( Only on some models)
• TO STOP THE ADDITIONAL ZONE:
- The cooking zone with addition must be live: in the display zone,
the lamp must be on. If not, select the relevant zone again.
- Press de button . The display LED for the additional zone
disappears. The additional cooking zone goes off.
- To rapidly stop the complete cooking zone, press the o
buttons at the same time. The heat level automatically goes
down to . The cooking zone goes off.
• TO START THE ADDITIONAL COOKING ZONE:
- Press the button . In the next 10 seconds
- Press the button for the zone with the addition. In the display
zone, the blinking lamp goes steady. It shows that the zone is
live.
- Select a heat level between 1 and 9. ( or )
- Press the button to start the additional zone.
• PROGRAMMING A COOKING ZONE
Every cooking zone can be programmed for a maximum time of
99 minutes. Only one zone, at a time, can be programmed.
- Start the required zone by following the previous instructions.
The control LED near the heat level must be displayed, it shows
that the zone is live.
- Press the Timer button.
The zone mark around the timer display shows the controlled
zone.
- Press the button to select the time in minutes.
This is saved automatically after three seconds.
The programmed time can be modified at any moment by pressing
the timer selection button, the timer control LED must be on.
When the time has run, the cooking zone goes off automatically
and an audible beep sounds for 1 minute. Press any button to
stop it.


Join the conversation about this product
Here you can share what you think about the Hoover HVH 750/1 B Hob. If you have a question, first carefully read the manual. Requesting a manual can be done by using our contact form.