
COMMUNICATOR MODEL 103
OWNER'S MANUAL AND OPERATING INSTRUCTIONS
Carefully remove your communicator from its Packing. If there is any
visible damage, do not attempt to operate this communicator. Return
it to the place of purchase.
Getting Started
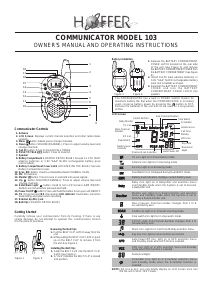
1. Antenna
2. LCD Screen: Displays current channel selection and other radio status
symbols.
3. Menu button: Allows you to change channels.
4. Down button (VOLUME/CHANNEL): Press to adjust volume level and
change channels.
5. Call C button: Press to transmit CALL TONES.
6. PUSH TO TALK PTT button: Press to transmit.
7. Speaker
8. Battery Compartment (LOCATED ON THE REAR): Houses 3 x 1.5V "AAA"
alkaline batteries or 3.6V "AAA" Ni-MH rechargeable battery pack
(not included).
9. Battery Compartment Cover Latch (LOCATED ON THE REAR): Secures
Battery Compartment cover.
10. Scan SC button: Used to activate/deactivate CHANNEL SCAN.
11. Mic: Microphone.
12. Monitor M button: Press to tune in and hold onto weak signals.
13. Up button (VOLUME/CHANNEL): Press to adjust volume level and
change channels.
14. Enter/Back Light button: Used to turn LCD Screen LAMP ON/OFF.
Buttons are locked when pressed and held.
15. Power On/Off button: Press and hold the button to turn your unit ON/OFF.
16. TX (Transmission)/RX (Receiving) LED indicator: Illuminates red when
transmitting and green when receiving.
17. External Sp./Mic. Jack
18. Belt Clip (LOCATED ON THE REAR)
Communicator Controls
9
10
11
12
13
15
16
17
18
1
2
3
4
5
6
7
8
14
Figure 1. Figure 2.
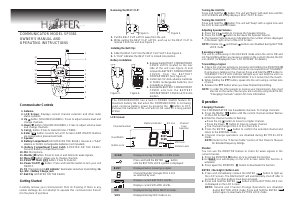
Removing the Belt Clip:
1. Pull the BELT CLIP LATCH away from the
unit.
2. While pulling the BELT CLIP LATCH, push
up on the BELT CLIP to remove it from
the unit. See Figure 1.
Installing the Belt Clip:
1. Slide the BELT CLIP into the BELT CLIP
SLOT. See Figure 2.
2. A "click" indicates the BELT CLIP is locked
into position.
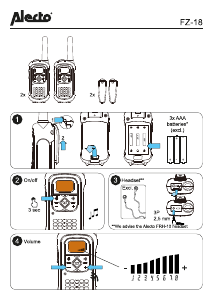
Battery Installation:
1. Release the BATTERY COMPARTMENT
COVER LATCH located on the rear side
of the unit (see Figure 3) and remove
the BATTERY COMPARTMENT COVER from
the BATTERY COMPARTMENT (See Figure
4).
2. Install 3x1.5V AAA alkaline batteries or
3.6V "AAA" Ni-MH rechargeable battery
pack (not included) as shown.
3. Reinstall the BATTERY COMPARTMENT
COVER and lock the BATTERY
COMPARTMENT COVER LATCH into
position.
Figure 3. Figure 4.
LCD Screen:
Call Tone
Melody
TX icon, light on in Transmission mode
Antenna icon, light on in Receiving mode
Rx icon, Light on in Receiving mode
Dual Watch icon, Displayed during Dual Watch mode.
Battery level indicators. Displays current Battery level.
Baby icon, light on in Babysitter unit selection menu
and Standby mode when the System is set to become
a Babysitter unit.
Monitor icon, light on in Parent-monitor unit selection
menu and Standby mode when the System is set to
become a Parent-monitor unit.
Main Channels, Channel number changes from 1 to 8
as selected by user.
SCAN icon, light on in Channel scanning mode.
Stop watch icon, light on in stop watch mode.
CTCSS code. Sub Channel Number changes from 1 to
38 selected by user.
Music icon, Light on in Call Tone Melody selection menu.
Key lock icon, light on when buttons are locked.
Auto-Power-Off icon, light on in APO selection menu
and Standby mode when APO timer is enabled.
VOX icon, light on in VOX selection menu and Standby
mode when VOX function is enabled.
Numerical digits
Scrambler icon, light on in Scrambler selection menu
and Standby mode when the Scrambler function is
enabled.
Baby Monitor
Battery level
Indicator
Numerical
digits
Channel Scan Selection
Parent Monitor
Dual Watch
VOX icon
Stop Watch
RX Icon
Key Lock
Auto Power Off
Sub Channel Number
Main Channel
Number
Scrambler
Antenna icon
TX Icon
NOTE: SQ icon & ALC icon only briefly display on LCD screen once turn
ON the unit in SELF-TEST mode.
The COMMUNICATOR has a built in POWER SAVER feature for
maximum battery life. But when the COMMUNICATOR is not being
used, conserve battery power by pressing the button to OFF.
Remove the batteries if the unit will not be used for a long period
of time.


Join the conversation about this product
Here you can share what you think about the Hoffer 103 Walkie-talkie. If you have a question, first carefully read the manual. Requesting a manual can be done by using our contact form.