103
Code No. C99142951 M
Printed in Malaysia
Item
No.
Part Name
1
TAPPING SCREW D5
25
2 PUSHING BUTTON
3 GEAR COVER ASS’Y
4 SPECIAL NUT M7
5 PINION
6 BALL BEARING 628VVC2PS2-L
7 BEARING HOLDER
8 ARMATURE
9 FAN GUIDE
10
TAPPING SCREW (W/FLANGE)
D4
70
11 STATOR
12 DUST SEAL
13 BALL BEARING 608VVC2PS2L
14 RETAINING RING FOR D11 SHAFT
15 WAVE WASHER
16 LOCK PIN
17 GEAR
18
SEAL LOCK SCREW (W/SP. WASHER)
M4
10
19 BEARING COVER
20 BALL BEARING 6201VVCMPS2L
21 FELT PACKING
22 PACKING GLAND
23
SEAL LOCK SCREW (W/SP. WASHER)
M4
12
24 WOODRUFF KEY
25 SPINDLE
26 FRINGER
27
MACHINE SCREW (W/SP. WASHER)
M5
16
28 SET PLATE
29 WHEEL GUARD ASS’Y
30 WHEEL WASHER
Item
No.
Part Name
31 D. C. WHEELS 100MMX4T A36Q
32 WHEEL NUT
33 GEAR AND PINION SET
34 HITACHI LABEL
35 HOUSING ASS’Y
36 NAME PLATE
37 TAIL COVER (A)
38
TAPPING SCREW (W/FLANGE)
D4
20
39
TAPPING SCREW (W/FLANGE)
D4
40
40 BRUSH CAP
41 CARBON BRUSH
42 BRUSH HOLDER
43 EARTH TERMINAL
44 TERMINAL
45 PILLAR TERMINAL
46 CONNECTOR 50091
47 NOISE SUPPRESSOR
48 TAIL COVER (B)
49
TAPPING SCREW (W/FLANGE)
D4
25
50
MACHINE SCREW (W/WASHER)
M3.5
6
51 SWITCH
52 TERMINAL
53 CORD ARMOR
54 CORD CLIP
55
TAPPING SCREW (W/FLANGE)
D4
16
56 CORD
501 WRENCH
502 SIDE HANDLE
12
34
56
78
English
中國語
Tiếng Việt
1
Wrench
扳手
Chìa vặn đai ốc
2
Wheel nut
砂輪螺帽
Khớp nối bánh mài
3
Depressed center wheels
砂輪
Bánh mài lõm giữa
4
Wheel washer
輪墊圈
Vòng đệm bánh mài
5
Spindle
主軸
Cần trục
6
Notched part
槽口部分
Phần khía rãnh
7
Wheel guard
砂輪保護裝置
Ốp chắn bánh mài
8
Tighten
緊
Siết chặt
9
Convex side
凸面
Mặt lồi
0
Lock pin
鎖定銷
Chốt hãm
!
Washer nut
墊片螺帽
Khớp nối vòng đệm
@
Sanding disc
砂盤
Đĩa mài
#
Rubber pad
橡膠墊圈
Miếng
đệm cao su
$
Washer
襯墊
Vòng đệm
%
Guide base
導軌基座
Bệ dẫn
^
Guide piece
導軌片
Tấm dẫn
&
Set plate (A)
支架板 (A)
Tấm kim loại cố định (A)
*
Screwdriver
螺絲刀
Tuốc nơ vít
(
Screw
螺絲釘
Đinh ốc
)
Diamond wheel
金剛石輪
Bánh mài kim cương
q
Wing bolt
蝶形螺栓
Bu lông có tai
w
Adjust the cutting depth by loosening
the wing bolt.
利用放鬆蝶形螺栓來調節切削深度
Điều chỉnh độ sâu vết cắt bằng cách
nới lỏng bu lông có tai.
e
Wear limit
磨損極限
Giới hạn mài mòn
r
No. of carbon brush
碳刷號
Mã số chổi than
r
e
1
2
2
3
4
5
6
7
7
8
9
0
8
8
9
1
!
$
5
@
#
0
0
1
)
4
5
w
q
%
*
(
&
^
21
5mm
12mm
15°~30°
AB
GENERAL SAFETY RULES
WARNING!
Read all instructions
Failure to follow all instructions listed below may result in
electric shock, fi re and/or serious injury.
The term ”power tool” in all of the warnings listed below
refers to your mains operated (corded) power tool or battery
operated (cordless) power tool.
SAVE THESE INSTRUCTIONS
1) Work area
a) Keep work area clean and well lit.
Cluttered and dark areas invite accidents.
b) Do not operate power tools in explosive
atmospheres, such as in the presence of
fl ammable liquids, gases or dust.
Power tools create sparks which may ignite the dust
of fumes.
c) Keep children and bystanders away while
operating a power tool.
Distractions can cause you to lose control.
2) Electrical safety
a) Power tool plugs must match the outlet.
Never modify the plug in any way.
Do not use any adapter plugs with earthed
(grounded) power tools.
Unmodifi ed plugs and matching outlets will reduce
risk of electric shock.
b) Avoid body contact with earthed or grounded
surfaces such as pipes, radiators, ranges and
refrigerators.
There is an increased risk of electric shock if your
body is earthed or grounded.
c) Do not expose power tools to rain or wet
conditions.
Water entering a power tool will increase the risk
of electric shock.
d) Do not abuse the cord. Never use the cord for
carrying, pulling or unplugging the power tool.
Keep cord away from heat, oil, sharp edges or
moving parts.
Damaged or entangled cords increase the risk of
electric shock.
e) When operating a power tool outdoors, use an
extension cord suitable for outdoor use.
Use of a cord suitable for outdoor use reduces
the risk of electric shock.
3) Personal safety
a) Stay alert, watch what you are doing and use
common sense when operating a power tool.
Do not use a power tool while you are tired
or under the infl uence of drugs, alcohol or
medication.
A moment of inattention while operating power
tools may result in serious personal injury.
b) Use safety equipment. Always wear eye
protection.
Safety equipment such as dust mask, non-skid
safety shoes, hard hat, or hearing protection used
for appropriate conditions will reduce personal
injuries.
c) Avoid accidental starting. Ensure the switch is
in the off position before plugging in.
Carrying power tools with your fi nger on the
switch or plugging in power tools that have the
switch on invites accidents.
d) Remove any adjusting key or wrench before
turning the power tool on.
A wrench or a key left attached to a rotating part
of the power tool may result in personal injury.
e) Do not overreach. Keep proper footing and
balance at all times.
This enables better control of the power tool in
unexpected situations.
f) Dress properly. Do not wear loose clothing or
jewellery. Keep your hair, clothing and gloves
away from moving parts.
Loose clothes, jewellery or long hair can be caught
in moving parts.
g) If devices are provided for the connection of
dust extraction and collection facilities, ensure
these are connected and properly used.
Use of these devices can reduce dust related
hazards.
4) Power tool use and care
a) Do not force the power tool. Use the correct
power tool for your application.
The correct power tool will do the job better and
safer at the rate for which it was designed.
b) Do not use the power tool if the switch does not
turn it on and off .
Any power tool that cannot be controlled with the
switch is dangerous and must be repaired.
c) Disconnect the plug from the power source
before making any adjustments, changing
accessories, or storing power tools.
Such preventive safety measures reduce the risk
of starting the power tool accidentally.
d) Store idle power tools out of the reach of
children and do not allow persons unfamiliar
with the power tool or these instructions to
operate the power tool.
Power tools are dangerous in the hands of
untrained users.
e) Maintain power tools. Check for misalignment
or binding of moving parts, breakage of parts
and any other condition that may aff ect the
power tools operation.
If damaged, have the power tool repaired
before use.
Many accidents are caused by poorly maintained
power tools.
f) Keep cutting tools sharp and clean.
Properly maintained cutting tools with sharp cutting
edges are less likely to bind and are easier to
control.
g) Use the power tool, accessories and tool bits
etc., in accordance with these instructions and
in the manner intended for the particular type
of power tool, taking into account the working
conditions and the work to be performed.
Use of the power tool for operations diff erent from
intended could result in a hazardous situation.
5) Service
a) Have your power tool serviced by a qualifi ed
repair person using only identical replacement
parts.
This will ensure that the safety of the power tool
is maintained.
PRECAUTION
Keep children and infi rm persons away.
When not in use, tools should be stored out of reach of
children and infi rm persons.
SPECIFICATIONS
Model PDA-100M
Power Source (by areas)
*1
(110V, 220V, 230V, 240V) 50/60 Hz
Power Input
*1
715 W
No-load speed 12,000/min
Wheel size Max. Peripheral Speed: 72 m/s (4300 m/min)
external dia. 100 mm
thickness 4 mm, 6 mm
hole dia. 16 mm
Weight
*2
1.5 kg
*1
Be sure to check the nameplate on product as it is subject to change by areas.
*2
Only main body.
STANDARD ACCESSORIES
(1) Depressed center wheel ..............................................1
(Resinoid Wheel)
external dia. 100 mm
thickness 4 mm
hole dia. 16 mm
(2) Wrench .........................................................................1
Standard accessories are subject to change without notice.
OPTIONAL ACCESSORIES . . . . sold separately
CAUTION
Always operate the grinder with the wheel guard
attached.
1. 100mm Sanding Disc Set
Washer Nut
Sanding Disc
Rubber Pad
Washer
In case when only a relatively small metal surface area
is to be polished and it is desired to give it a particularly
fi ne fi nish, this is used for preliminary polishing of the
metal surface before applying point, for removing rust,
and for removing point when a new test is to be applied.
There are eleven diff erent kinds of sanding discs,
having grains of #16, #20, #24, #30, #36, #40, #50,
#60, #80, #100, #120. When placing your order, please
specify the grain of the disc desired.
2. Diamond Wheel Set
This is used for cutting and scribing of concrete, stone,
tile etc.
Guide Base Ass’y
Diamond Wheel
Segment
Type
Optional accessories are subject to change without notice.
APPLICATIONS
○ Removal of casting fi n and fi nishing of various types of
steel, bronze and aluminum materials and castings.
○ Grinding of welded sections or sections cut by means of
a cutting torch.
○ Grinding of brick, marble, etc.
○ Cutting and scribing of concrete, stone, tile, (use the
diamond wheel)
PRIOR TO OPERATION
1. Power source
Ensure that the power source to be utilized conforms
to the power requirements specifi ed on the product
nameplate.
2. Power switch
Ensure that the power switch is in the OFF position. If
the plug is connected to a receptacle while the power
switch is in the ON position, the power tool will start
operating immediately, which could cause a serious
accident.
3. Extension cord
When the work area is removed from the power source,
use an extension cord of suffi cient thickness and rated
capacity. The extension cord should be kept as short as
practicable.
PRECAUTIONS ON USING DISC GRINDER
1. Never operate these power tools without Wheel
Guards.
2. Use only a depressed center wheel of permissible
peripheral speed 72 m/s (4300 m/min) or more.
3. Correct use for safe operation.
4. Mounting the standard depressed center wheel.
5. Have a trial run before grinding commence.
6. Keep away from a revolving depressed center wheel.
7. Pay strict attention to sparks.
8. Do not leave the revolving Grinder unattended on the
fl oor.
9. Follow the procedures of these Handling Instructions
on depressed center wheel replacement.
10. Avoid overload operation.
11. Do not push in the lock pin while the spindle is running.
12. Be careful those around one while operating.
4. Confi rming condition of the environment
Confi rm that the work site is placed under appropriate
conditions conforming to prescribed precautions.
When grinding a thin steel plate, depending upon the
state of the workbench, a loud noise will be created due
to resounding noise from the steel plate being ground.
To eliminate unwanted noise in this instance, place a
rubber mat beneath the material to be ground.
5. Mounting the wheel guard
Be sure to mount the wheel guard at an angle that will
protect the operator’s body from injury by a broken
wheel piece.
6. Confi rm the lock pin
Confi rm that the lock pin is disengaged by pushing lock
pin two or three times before switching the power tool
on.
7. Co nfi rming and mounting the depressed center
wheel.
Thoroughly check that a specifi ed depressed center
wheel is free of cracks and splits is mounted.
Confi rm that the depressed center wheel is mounted
under the specifi ed condition and is fi rmly clamped.
For details, refer to the item “Assembling and
Disassembling the depressed center wheel.”
8. Apply a trial run
To start grinding work without checking for possible
cracks and splits in the depressed center wheel is very
dangerous. Prior to start of grinding, direct the grinder
in a direction where no one is present, and apply a trial
run without fail to confi rm that the grinder displays no
abnormalities.
Duration of the trial run is as follows:
When depressed center wheels is replaced
.............................................. 3 minutes or more
When starting daily work ................. 1 minute or more
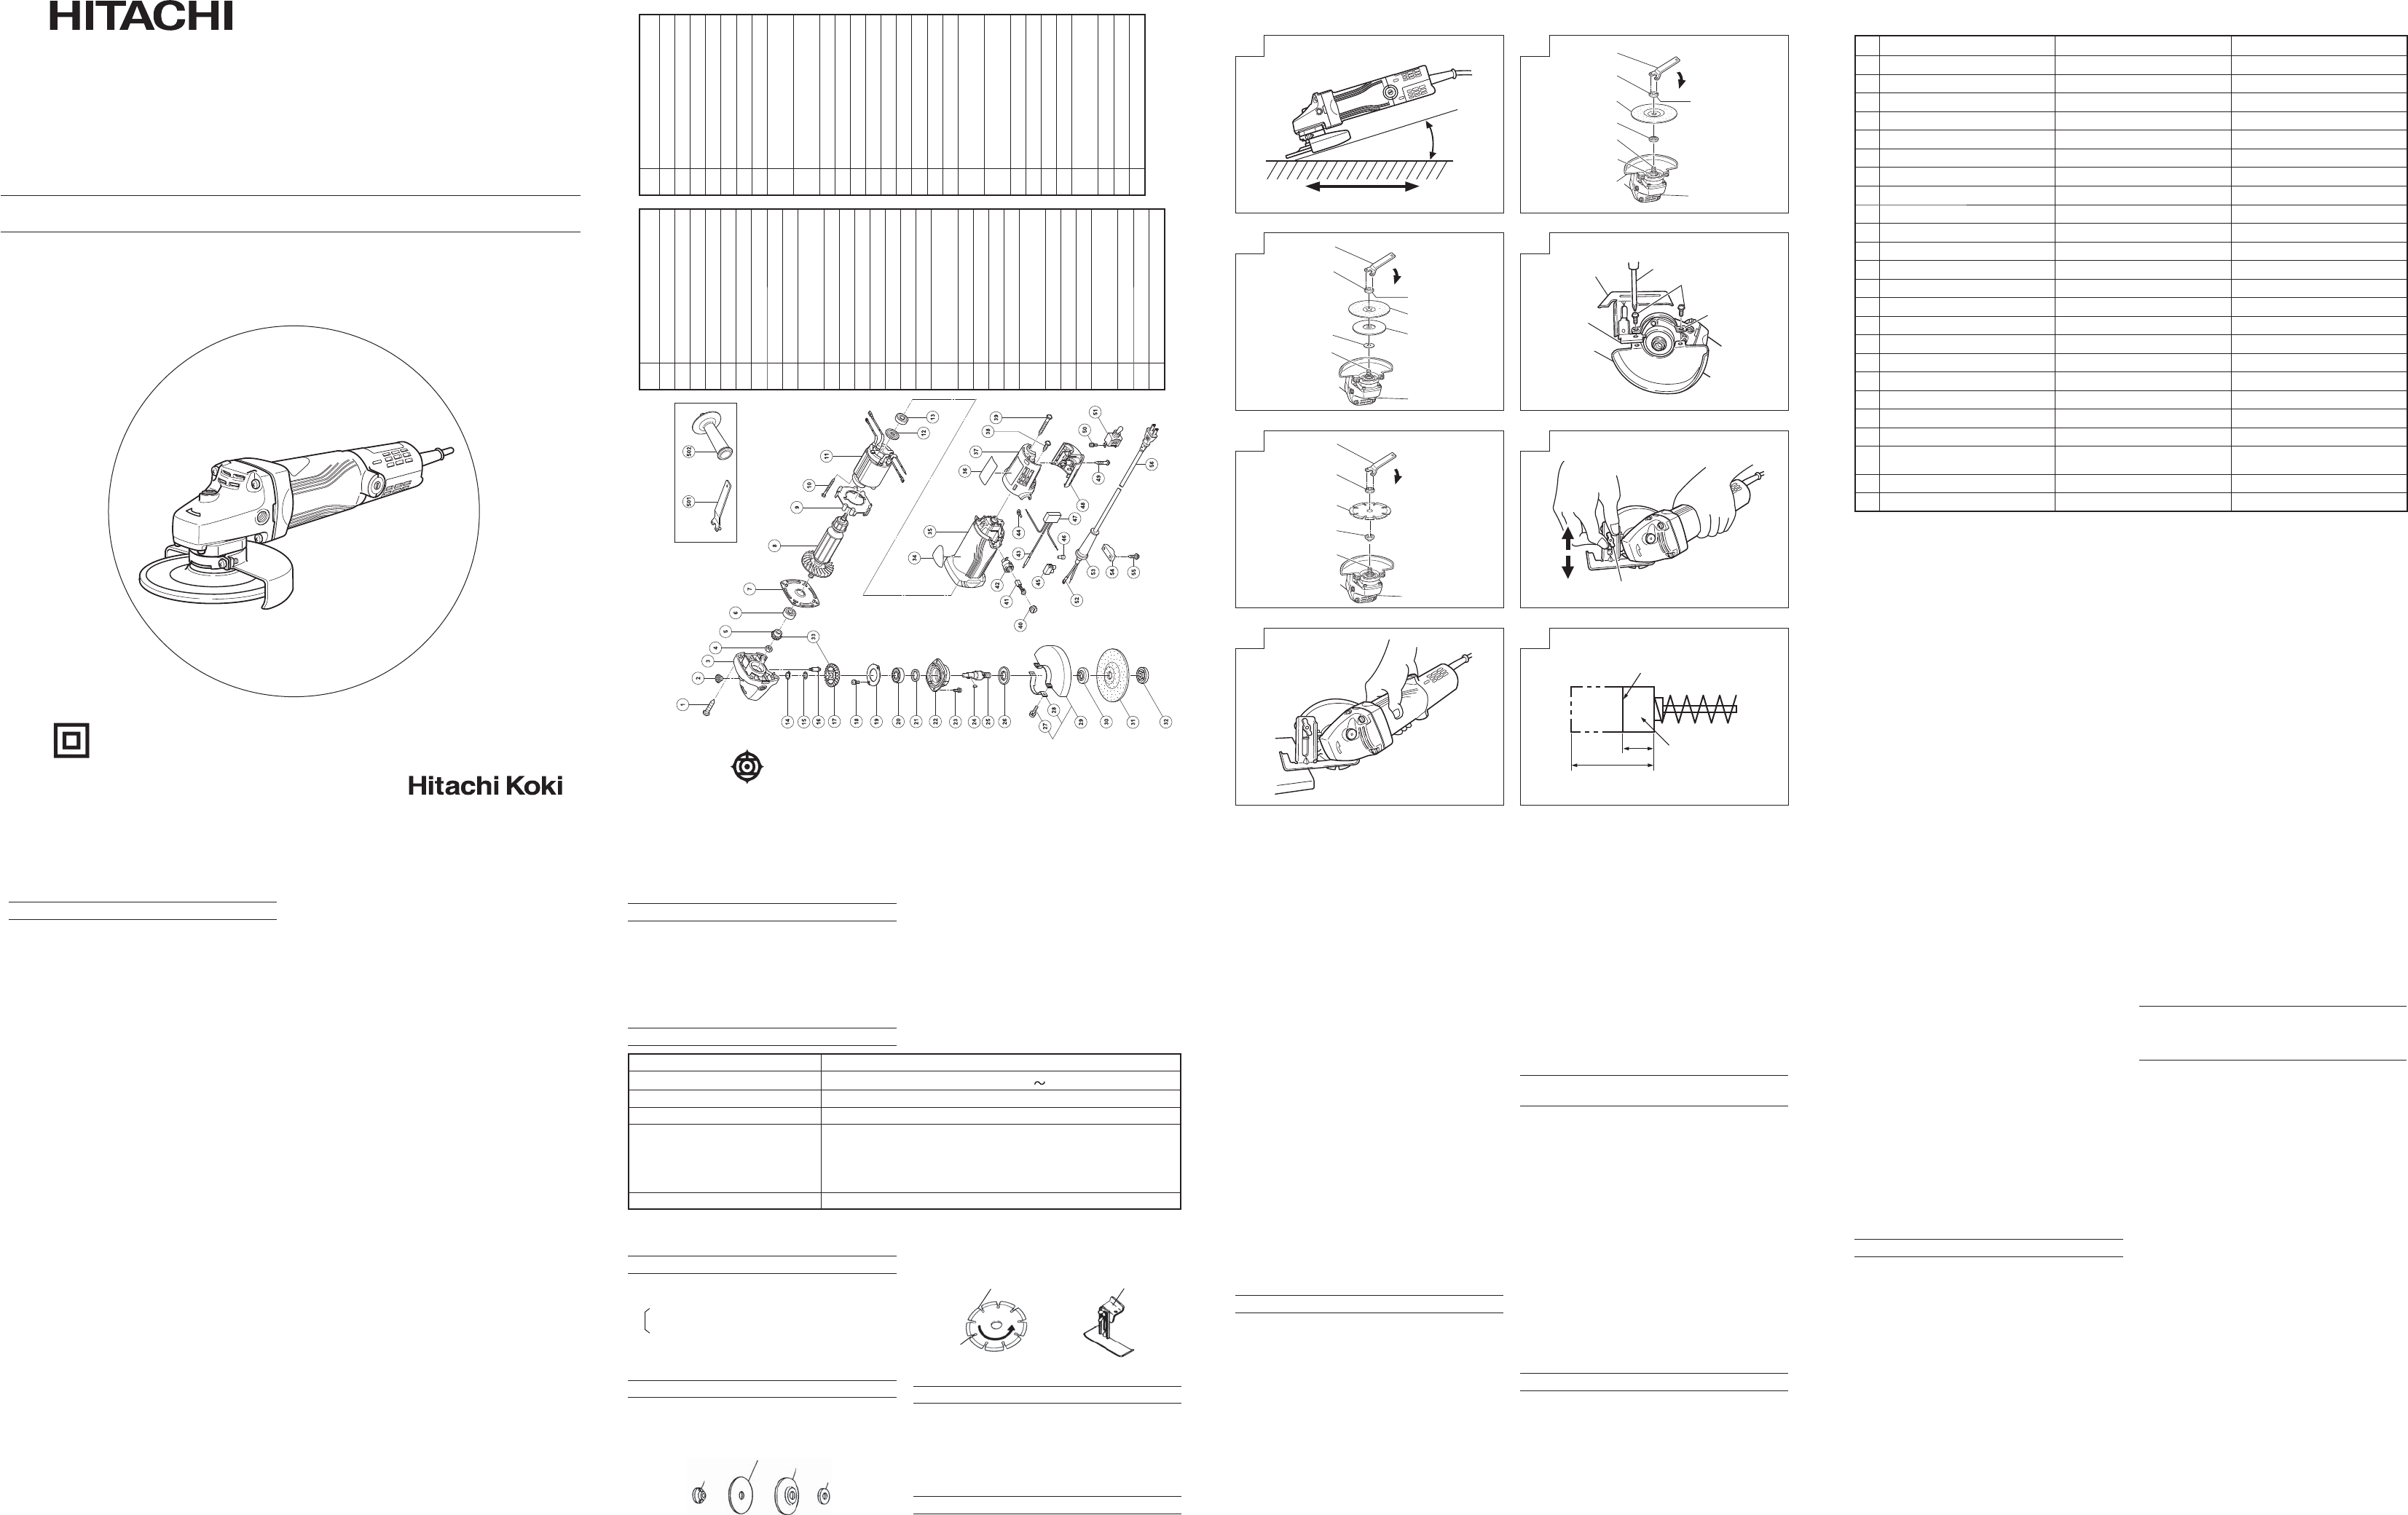
PRACTICAL GRINDER APPLICATIONS
1. Since grinding by utilizing only the grinder’s own weight
is feasible, the grinder should never be pressed forcibly
against the plane to be ground Hold the grinder lightly
so that it only slightly contacts the plane to be ground.
Heavy pressure will reduce the revolving speed and
such deteriorate the fi nished surface, and phenomena
as overload will lead to burning out of the motor.
2. Do not utilize the grinder entire surface when grinding.
Use only its peripheral surface by tilting the wheel at
an angle of 15-30°, as shown in Fig. 1.
3. When a grinder equipped with a new depressed center
wheel is pushed forward (direction A), the wheel edge
may occasionally cut into the material to be ground.
Always pull it backward (direction B) in this instance.
However, once the depressed center wheel angle has
been adequately abraded, both forward and backward
operations are permissible.
4. The provided depressed center wheel (resinoid wheel)
is rated as Class A grain and #36 grain size.
Accordingly, its range of applications cover a wide
variety, proving to be most suitable for heavy grinding
of general steel materials. Since the wheel grain size
is rather coarse, creating a fi ne-surfaced fi nish is very
diffi cult.
In this instance, hold the grinder lightly as through
trying to lift it, and apply grinding slowly at a constant
low speed. Whereby a fi ne fi nish similar to that
accomplished with a fi ne-grain depressed center wheel
is obtainable.
5. Switching on the grinder
The switch can be turned ON by turning its lever ON
side, or turn OFF by turning its lever to the OFF side.
6. Precaution after use
Do not lay the grinder down immediately after use in
a place where there are many shavings and much dirt
and dust until it has completely stopped revolving.
CAUTIONS
○ Shock to the main body can be the cause of cracks
or splits in the depressed center wheel. Be especially
careful to avoid sudden shocks when using the
equipment.
If the main unit is accidentally bumped or dropped,
make a careful check for cracks or splits on the
depressed center wheel before further use.
○ Do not press the lock pin when the equipment is
turning. Also, do not turn on the switch when the lock
pin is pressed down.
ASSEMBLING AND DISASSEMBLING
THE DEPRESSED CENTER WHEEL (Fig. 2)
CAUTION
Be sure to switch power OFF and disconnect the
attachment plug from the power receptacle to avoid
serious trouble.
(1) Turn the equipment upsidedown so that the spindle will
be facing up.
(2) Mount the wheel washer onto the spindle.
(3) Mount the protuberance of the depressed center wheel
onto the wheel washer.
(4) Mount the convex side of the wheel nut onto the
depressed center wheel, and screw the wheel nut onto
the spindle.
(5) As shown in Fig. 2 push in the lock pin to prevent
rotation of the spindle. Then, secure the depressed
center wheel by tightening the wheel nut with the
wrench.
CAUTION: Confi rm that the depressed center wheel is
mounted fi rmly.
Confi rm that the lock pin is disengaged by
pushing lock pin two or three times before
switching the power tool on.
○ Disassembling of the depressed center wheel is the
reverse of assembling.
HOW TO INSTALL THE OPTIONAL ACCESSORIES
CAUTIONS
○ Be sure to switch power OFF and disconnect the plug
from the power receptacle to avoid serious trouble.
When utilizing the optional accessories, keep the wheel
guard attached and wear protective glasses.
○ Do not use the optional accessories which exceed
the designated external diameter designated in the
paragraph.
1. Mounting the 100 mm Sanding Disc. (see Fig. 3)
NOTE
Do not use the wheel washer and wheel nut of the
depressed center wheel.
(1) Mount the washer, rubber pad and sanding disc onto
the spindle.
(2) Screw from the washer nut onto the spindle.
(3) As shown in Fig. 3, push in the lock pin to prevent
rotation of the spindle. Then, secure the sanding disc
by tightening the wheel nut with the wrench.
2. Mounting the Diamond Wheel
CAUTION
When utilizing the diamond wheel, pay particular
attention to the following points.
(1) Utilize the correct size diamond wheel (external dia.
105 mm, internal dia. 20 mm)
(2) Do not apply cooling water or grinding fl uid while
utilizing the diamond wheel.
(3) Hold the tool fi rmly to control the tendency of the tool to
be repelled by the material during cutting operation.
(4) Ensure that the cutting depth is kept within 2-5 mm to
prevent over-heating damage to the motor. Use with
moderate cutting speed, and do not apply excessive
pressure on the workpiece.
○ Mounting the Guide Base Assembly. (Fig. 4)
(1) Loosen the two small screws on the wheel guard.
(2) Insert the guide piece between the wheel guard and set
plate (A), and tighten one of the small screws. Ensure
that the guide will not move.
(3) Set the angle of the wheel guard to a suitable position
for operation, and securely tighten the remaining small
screw to fi x the wheel guard in position.
○ Mounting the Diamond Wheel. (Fig. 5)
NOTE
Mounting of the diamond wheel on the spindle is
illustrated in Fig. 5. Note that the wheel washer is
reversed from ordinary usage with depressed center
wheel.
(1) Mount the wheel washer and diamond wheel onto the
spindle.
(2) Mount the concave side of the wheel nut onto the
diamond wheel, and screw the wheel nut onto the
spindle.
(3) As shown in Fig. 5 push in the lock pin to prevent
rotation of the spindle. Then, secure the diamond wheel
by tightening the wheel nut with the wrench.
MAINTENANCE AND INSPECTION
1. Inspecting the depressed center wheel
Ensure that the depressed center wheel is free of
cracks and surface defects.
Replace the depressed center wheel when it has been
worn out to about 60mm in external diameter.
2. Inspecting the mounting screws
Regularly inspect all mounting screws and ensure that
they are properly tightened. Should any of the screws
be loose, retighten them immediately. Failure to do so
could result in serious hazard.
3. Maintenance of the motor
The motor unit winding is the very “heart” of the power
tool. Exercise due care to ensure the winding does not
become damaged and/or wet with oil or water.
4. Inspecting the carbon brushes (Fig. 8)
The motor employs carbon brushes which are
consumable parts. Since an excessively worn carbon
brush can result in motor trouble, replace the carbon
brush with a new one having the same carbon brush
No. shown in the fi gure when it becomes worn to or
near the “wear limit”. In addition, always keep carbon
brushes clean and ensure that they slide freely within
the brush holders.
5. Replacing carbon brushes
Disassemble the brush caps with a slotted-head
screwdriver. The carbon brushes can then be easily
removed.
6. If the supply cord of this tool damaged, it must be
replaced by a specially prepared cord available through
the service organization.
7. Service parts list
CAUTION
Repair, modifi cation and inspection of Hitachi Power
Tools must be carried out by an Hitachi Authorized
Service Center.
This Parts List will be helpful if presented with the tool to
the Hitachi authorized Service Center when requesting
repair or other maintenance.
In the operation and maintenance of power tools, the
safety regulations and standards prescribed in each
country must be observed.
MODIFICATION
Hitachi Power Tools are constantly being improved
and modifi ed to incorporate the latest technological
advancements.
Accordingly, some parts may be changed without prior
notice.
NOTE
Due to HITACHI’s continuing program of research and
development, the specifi cations herein are subject to
change without prior notice.
1 2 3 4
HANDLING INSTRUCTIONS
使用說明書
Hướng dẫn sử dụng
Disc Grinder
手提圓盤電磨機
Máy mài góc
PDA-100M
Read through carefully and understand these instructions before use.
使用前務請詳加閱讀
Đọc kỹ và hiểu rõ các hướng dẫn này trước khi sử dụng.
000SeetC99142951̲103.indd1000SeetC99142951̲103.indd1 2011/04/2711:05:422011/04/2711:05:42

Join the conversation about this product
Here you can share what you think about the Hitachi PDA-100M Angle Grinder. If you have a question, first carefully read the manual. Requesting a manual can be done by using our contact form.