
Introduction
Thank you for selecting the Hitachi DVR-100 Digital Voice
Recorder. The DVR-100 is ultra compact and easy to use,
making it ideal to bring along for voice memos, conversations,
and discussion recordings. This device allows you to record up
to 198 messages, totaling up to 265 minutes recording time and
has the ability to organize recordings into 2 separate folders.
This product also incorporates solid-state memory to keep
messages safe even when batteries run out.
OTHER FEATURES OF THIS PRODUCT INCLUDE
PC-Link
Transfer messages to and from PC.
Index Marking
Helps you search for desired sections in a message.
Important Marked Messages
Mark messages as important to prevent them from accidentally
being erased.
MIC Sensitivity Control (Hi or Lo)
Maintain good recording quality independent of voice loudness.
Voice Activated Recording (Auto)
Start and stop recording automatically when sound is
detected.
Two Folder Selection
Organize your memos by placing them in separate folders.
Jog Button Control
For easy navigation of features.
Button Lock
Lock your recorder to prevent buttons from being accidentally
activated.
IMPORTANT NOTE:
The earphone must be used for playback since
there’s no speaker included in the voice recorder.
KEY FEATURES
NOTE: Images are not drawn to scale.
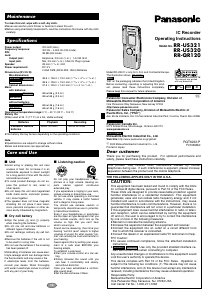
FRONT
Description
1. Strap Connector:
Use this to attach the supplied strap.
2. LCD:
Shows various statuses.
3. REC Switch:
Starts or stops recordings.
4. Jog Button:
- Fast Forward ( ) /Rewind ( ) or Play / Set.
- Play current message or Select / confirm various menu
options.
5. Stop Button (STOP):
- Interchange between standby and stop modes.
- To stop playback.
6. Menu / / Repeat Button:
- Menu: Select operation mode.
- : Mark messages important.
- Repeat: Repeat messages.
BACK
Indexes can be added to messages while recording is in progress
so you can later retrieve selected portions of the recording easily.
• A total of 125 indexes may be marked per message.
• A single message can be subdivided into indexes for review.
To mark an index:
You can add an important mark by pressing and holding for
two seconds during recording or playback.
Note: You can search for indexed portion of message in STOP
mode, just toggle or .
This prevents users from accidentally deleting important
information.
Note: To delete an important mark, press and hold for two
seconds during playback or recording.
Folder Selection
You can select two different folders ( or ) and store up
to 99 messages in each.
To select folders:
In STOP mode press MENU repeatedly until the FOL icon is
displayed
• Press to activate then choose the desired folder by
shifting or .
• Press to save the selection.
Record Quality Selection (SP /LP)
You can choose between two different recording quality settings.
“FULL” Displayed On-Screen
Under the following situations the word “FULL” will be displayed:
• Activating REC when the memory is already full.
• Activating REC when thE current folder already had 99
stored messages.
• During a recording the memory gets used up.
Note: You can erase messages to make extra room for recording.
Microphone Sensitivity (Sen)
You can choose between two different levels of sensitivity:
Hi
High sensitivity - clear and louder recording, but more susceptible
to noise and distortion.
DVR-100 Digital Voice Recorder
User’s Manual
1
Descriptions
7. VOL +/- Buttons:
Press to change volume.
8. On/Reset Switch
- Use a tooth pick or paper clip to switch the key to “On”
or “Reset” position.
- When the voice recorder will not be in use for an extended
period of time, slide the switch to “Reset” to prevent
battery drainage.
9. Erase Button:
Press to delete messages.
10. Button Lock Switch:
Locks button controls to prevent activation.
11. USB Port:
Attach Cable for PC-Link.
TOP
Descriptions
12. External Microphone Connection:
Accepts external condenser microphone.
13. Internal Microphone
14. Earphone Connection
(Earphone provided).
15. Strap Connector
CHARGE THE BATTERIES
IMPORTANT NOTE:
Fully charge the battery first when using this unit for the
first time or when you have not used the unit for a long time.
The charging time is approx. 4 hours.
• Slide the switch to ON position. (It must be ON to charge
the batteries.)
• Attach the supplied USB cable to the computer’s USB port
and the recorder’s digital terminal.
• PC must be switched on before charging will start.
• The battery status indicator will blink when the battery is
fully charged.
USING THE VOICE RECORDER
Turn the unit on by sliding the switch to the on position. Power
must be on for all recording, playback, and setting features to
work.
Note: The voice recorder will automatically switch to STANDBY
MODE if you do not press any keys for three minutes.
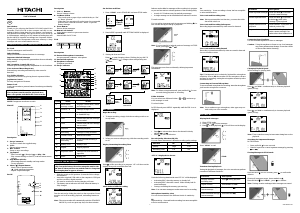
Set the Date and Time
1. Press “STOP” to exit STANDBY and enter STOP mode.
2. Press MENU repeatedly until SETTING MODE is displayed.
3. Setting the Date and Time:
Press to start changing values. Shifting the jog dial UP
( ) or DOWN ( ) changes values and pressing sets
them.
RECORDING
Begin Recording
1. To begin recording, simply slide the recording switch to on
in any mode.
2. When you want recording to stop, slide the recording switch
to off.
Display Remaining Recording Time
Press while recording is in progress. “rE” will show on the
display along with recordable time left.
Mark Indexes While Recording
Connecting Your Earphone
Use the included earphone to listen to messages.
Caution: Using the earphone to listen to very loud messages
may cause permanent ear damage. Lower the volume
of the recorder before listening.
Changing Playback Speed
While message is playing back:
Press and VOL - simultaneously to decrease playback
speed (S-Play).
Press and VOL + simultaneously to increase playback
speed (F-Play).
Note: Time count shown may be inaccurate during fast or slow
playback.
Searching for Important Messages
In STOP Mode:
• Press and hold for two seconds.
• Search for previous or next important message by pressing
or .
Erasing Messages in STOP mode
Press and hold for two seconds, press to confirm the
deletion.
Erasing all messages except those marked as :
Press and hold and “STOP” , press to confirm.
Note: Settings remain unchanged after messages are erased.
Lo
Low sensitivity - Lower recording volume, but less suseptible
to noise and distortion.
Voice Activated Recording (Aut)
Note: Having activated the Aut function, you must also slide
the record switch on.
Voice Activated Recording In Progress:
Recording begins automatically when sound is detected.
Voice Activated Recording Paused:
Recording is paused automatically when no sound is detected
for two seconds or more.
Tip: If background noise is relatively high and the microphone
sensitivity is set to Hi, the recorder will not recognize a silence
and keep on recording; setting the microphone sensitivity to Lo
should solve this.
Connecting an External Microphone
To use an external microphone for recording, insert the microphone
jack into the microphone connector.
Note: Use a condenser type microphone, other types may not
work with your voice recorder.
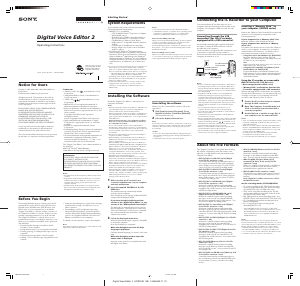
PLAYBACKS
Playing Back Messages:
1. Enter STOP mode.
2. Press or to select message.
3. Press to start playback, icon will show on the display.
Press “STOP” to end.
Functions During Playback
During the playback of messages, the voice recorder can perform
a number of different functions:
Selection SP LP
Quality High Low
Recording Time 132 265
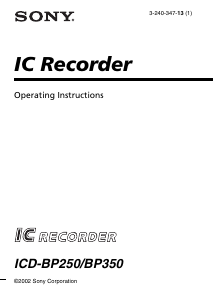
Icons
1
2
3
4
5
6
7
8
9
10
11
12
13
Name
Mode status /
message counter
Folder A / B
Recording Mode
Date
Time
Playback
Recording
United Locked
Voice Activated
Recording
Battery level
Repeat
Important Mark
Erase
Status
Displays current mode / status
and message count
Message storage folder
Recording format (Long Play
or Standard Play)
Current date and date message
was recorded
Current time and time message
was recorded
Message playback
Message is being recorded
Buttons are locked
Voice activated recording is
enabled
Battery Level
Repeat playback
Message has been marked as
important
Erasing File
Descriptions
Press and hold (2 seconds)
to mark current message
Press and hold (2 seconds)
to delete mark while
message is playing back
Press REPEAT to playback an
indexed portion only
Press REPEAT to playback an
entire current message if no
indexes have been marked on it
Functions
Mark important messages
Delete important mark
Repeat indexed section
playback
Repeat whole message
7
8
9
10
11
1
2
3
4
5
6
12 13 14 15
1
2
3
4
5
6
7
8
9
10
11
12
13
086-003005-185
GB
Functions
Display available
recording time
Adjust Volume
Scan forward through
current message
Scan backwards through
current message
Descriptions
Press during playback
Press VOL+ or VOL-
Press and hold
Press and hold
STANDBY
MODE
STOP
MODE
PRESS
STOP
STOP
3. Set Month1. Clock Mode 2. Set Year
4. Set Day 6. Set Minute5. Set Hour
7. The clock is
now set
8. Standby
Mode Screen
PRESS
PLAY
PRESS
PLAY
PRESS PLAY
PRESS PLAY
PRESS
PLAY
PRESS
PLAY
PRESS
STOP
TWICE

Join the conversation about this product
Here you can share what you think about the Hitachi DVR-100 Audio Recorder. If you have a question, first carefully read the manual. Requesting a manual can be done by using our contact form.