Toaster Oven
Four grille-pain
Horno eléctrico
Le invitamos a leer cuidadosamente este instructivo antes
de usar su aparato.
Read before use.
Lire avant utilisation.
Lea antes de usar.
840194702
H
e
l
p
H
a
m
i
l
t
o
n
B
e
a
c
h
M
a
k
e
a
D
i
f
f
e
r
e
n
c
e
!
In an effort to reduce paper waste, Hamilton Beach Brands,
Inc., has reduced the size of this Use and Care guide and
made it available online. We believe strongly in doing our
part to help care for the environment. To view Use and Care
guides, recipes, and tips, please visit:
proctorsilex.com
Aidez-nous à protéger l’environnement !
Dans le but de réduire la consommation de papier,
Hamilton Beach Brands, Inc., a réduit le format des manuels
d’utilisation et d’entretien et offre maintenant la version
complète en ligne. Nous croyons fermement que nous
contribuons à sauvegarder l’environnement. Pour voir les
manuels d’utilisation et d’entretien, les recettes et les
conseils, veuillez consulter le site :
proctorsilex.ca
¡Ayude a Hamilton Beach a Hacer la Diferencia!
En un esfuerzo por reducir el papel de desecho, Hamilton
Beach Brands, Inc., ha reducido el tamaño de este Uso
y Cuidado y lo puso disponible en línea. Creemos
fuertemente en hacer nuestra parte para ayudar a cuidar
el medioambiente. Para ver guías de Uso y Cuidado,
recetas y consejos, por favor visite:
proctorsilex.com.mx
USA: 1.800.851.8900
Canada: 1.800.267.2826
México: 01 800 71 16 100
When using electrical appliances, basic safety precautions
should always be followed to reduce the risk of fire, electric
shock, and/or injury to persons, including the following:
1. Read all instructions.
2. This appliance is not intended for use by persons
(including children) with reduced physical, sensory,
or mental capabilities, or lack of experience and
knowledge, unless they are closely supervised and
instructed concerning use of the appliance by a person
responsible for their safety.
3. Close supervision is necessary when any appliance is
used by or near children. Children should be supervised
to ensure that they do not play with the appliance.
4. Do not touch hot surfaces. Use handles or knobs.
5. To protect against electrical shock, do not immerse cord,
plug, or toaster oven in water or other liquid.
6. Unplug from outlet when not in use and before cleaning.
Allow to cool before cleaning appliance and putting on or
taking off parts.
7. Do not operate any appliance with a damaged cord or
plug, or after the appliance malfunctions or is dropped
or damaged in any manner. Call our toll-free customer
service number for information on examination, repair,
or adjustment.
8. The use of accessory attachments not recommended by
the appliance manufacturer may cause injuries.
9. Do not use outdoors.
10. Do not let cord hang over edge of table or counter, or
touch hot surfaces.
11. Do not place on or near a hot gas or electric burner, or
in a heated oven.
12. Extreme caution must be used when moving an
appliance containing hot oil or other hot liquids.
13. To disconnect, turn all controls to OFF (O) and then
remove plug from wall outlet.
14. Use extreme caution when removing pan or disposing of
hot grease.
15. Do not clean with metal scouring pads. Pieces can break
off the pad and touch electrical parts, creating a risk of
electrical shock.
16. Oversize foods or metal utensils must not be inserted
in a toaster oven since they may create a fi re or risk of
electric shock.
17. A fi re may occur if the toaster oven is covered, touching,
or near fl ammable material, including curtains, draperies,
walls, and the like, when in operation. Do not store any
item on top of the appliance when in operation, or before
the appliance cools down.
18. Extreme caution should be exercised when using
containers constructed of materials other than metal
or glass.
19. Do not store any materials, other than manufacturer-
recommended accessories, in this oven when not in use.
20. Do not place any of the following materials in the oven:
paper, cardboard, plastic, and the like.
21. Do not cover crumb tray or any part of the oven with
metal foil. This will cause overheating of the oven.
22. To turn oven off, turn Toast Shade Selector/Timer Knob
to OFF (O) position. See “Parts and features” section.
23. Do not place eyes or face in close proximity with tempered
safety glass door, in the event that the safety glass breaks.
24. Always use appliance with crumb tray securely in place.
25. Do not use appliance for other than intended use.
26. Clean oven interior carefully. Do not scratch or damage
heating element tube.
SAVE THESE INSTRUCTIONS!
Other consumer safety information
This appliance is intended for household use only.
Electrical Shock Hazard: This
product is provided with a polarized plug (one wide blade) to
reduce the risk of electric shock. The plug fi ts only one way
into a polarized outlet. Do not defeat the safety purpose of the
plug by modifying the plug in any way or by using an adapter.
If the plug does not fi t fully into the outlet, reverse the plug. If
it still does not fi t, have an electrician replace the outlet.
The length of the cord used on this appliance was selected
to reduce the hazards of becoming tangled in or tripping over a
longer cord. If a longer cord is necessary, an approved extension
cord may be used. The electrical rating of the extension cord
must be equal to or greater than the rating of the appliance.
Care must be taken to arrange the extension cord so that it will
not drape over the countertop or tabletop where it can be pulled
on by children or accidentally tripped over.
This appliance is equipped with a fully tempered safety glass
door. The tempered glass is four times stronger than ordinary
glass and more resistant to breakage. Tempered glass can
break; however, it breaks into pieces with no sharp edges.
Care must be taken to avoid scratching door surface or
nicking edges. If the door has a scratch or nick, call our
toll-free customer service number.
Always unplug your toaster oven from the outlet when not in use.
BEFORE FIRST USE:
Most heating appliances produce an odor and/or smoke when
used for the fi rst time. Plug the toaster oven into an outlet.
Turn the Function/Temperature Knob to 450°F (230°C). Heat
at this temperature for 10 minutes. The odor should not be
present after this initial preheating. Wash baking pan and
oven rack before using.
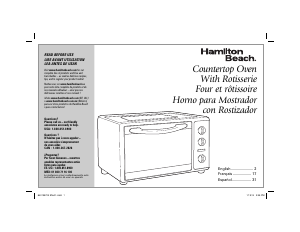
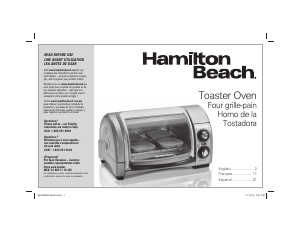
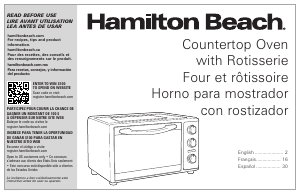
Parts and features
1. Drop-Down Crumb
Tray
2. Oven Rack
3. Function/Temperature
Knob
4. ON Indicator Light
5. Toast Shade Selector/
Timer
6. Baking Pan
Pour utiliser un appareil électroménager, vous devez toujours
prendre des mesures élémentaires de sécurité pour réduire le
risque d’incendie, d’électrocution et/ou de blessure corporelle,
en particulier les mesures suivantes :
1. Lire toutes les instructions.
2. Cet appareil n’est pas destiné à être utilisé par des
personnes (y compris les enfants) dont les capacités
physiques, sensorielles ou mentales sont réduites, ou
manquant d’expérience et de connaissance, sauf si elles
sont étroitement surveillées et instruites sur l’utilisation
de l’appareil par une personne responsable de leur
sécurité.
3. Une surveillance étroite est requise pour tout appareil
utilisé par ou près des enfants. Surveiller que les enfants
ne jouent pas avec l’appareil.
4. Ne pas toucher les surfaces chaudes. Utiliser les poignées
ou boutons.
5. Pour protéger contre le risque de choc électrique, ne pas
immerger le cordon, la fi che ou le four grille-pain dans l’eau
ou autre liquide.
6. Débrancher l’appareil de la prise de courant électrique
lorsqu’il n’est pas utilisé et avant un nettoyage. Le laisser
refroidir avant le nettoyage et avant d’y placer ou d’y
enlever des pièces.
7. Ne pas faire fonctionner un appareil électroménager
avec un cordon ou une fi che endommagée, ou lorsque
l’appareil ne fonctionne pas bien ou a été échappé ou
endommagé d’une manière quelconque. Appeler notre
numéro sans frais de service à la clientèle pour des
renseignements concernant l’examen, la réparation ou
l’ajustement.
8. L’utilisation d’accessoires non recommandés par le
fabricante d’appareil peut causer des blessures.
9. Ne pas utiliser à l’extérieur.
10. Ne pas laisser le cordon pendre du bord d’une table ou
d’un comptoir, ou toucher des surfaces chaudes.
11. Ne pas placer l’appareil sur ou près d’un brûleur chaud à
gaz ou d’un élément électrique, ou dans un four chauffé.
12. Une précaution extrême doit être employée lors du
déplacement d’un appareil électroménager contenant
de l’huile chaude ou autre liquide chaud.
13. Pour débrancher l’appareil, tourner tous les réglages à
ARRÊT (O), ensuite retirer la fi che de la prise de courant
murale.
14. Une prudence extrême s’impose lors de l’enlèvement du
plateau ou de la vidange de graisse chaude.
15. Ne pas nettoyer avec des tampons à récurer en métal.
Des particules peuvent se détacher du tampon et toucher
les pièces électriques, créant un risque de choc électrique.
16. Des aliments ou des ustensiles de métal de grosseur
excessive ne doivent pas être insérés dans un four grille-
pain, car ils peuvent créer un incendie ou un risque de
choc électrique.
17. Un incendie peut survenir si le four grille-pain est
recouvert, touche ou est près de matériaux infl ammables,
y compris rideaux, tentures, murs et autres articles
semblables, lorsqu’il fonctionne. Ne pas remiser des
articles sur le dessus de l’appareil lorsqu’il est utilisé,
ou avant le refroidissement de l’appareil.
Fire Hazard.
• If contents ignite, do not open oven door. Unplug oven and
allow contents to stop burning and cool before opening
door.
• Do not leave appliance unattended when in operation.
• Always unplug toaster oven when not in use.
How to toast
PRÉCAUTIONS IMPORTANTES
Fire Hazard.
• If contents ignite, do not open oven door. Unplug oven and
allow contents to stop burning and cool before opening door.
• Do not operate unattended while in Toast or Broil modes.
• Do not use with oven cooking bags.
• Always allow at least one inch between food and heating
element.
• Always unplug toaster oven when not in use.
• Regular cleaning reduces risk of fi re hazard.
1.
Place oven rack in HI POSITION.
Place food item on rack.
2. Turn Function/Temperature Knob to
TOAST .
3. Rotate Toast Shade Selector/Timer
past 10 and then back to desired
toast color. A bell will sound when
the toast cycle is complete.
4. When fi nished, turn Toast Shade Selector/Timer to O (OFF)
and unplug.
Toasting tips:
• To toast bagels or English muffi ns, place bread cut-side
down. This will toast the cut side more than the outside.
English muffi ns may need a darker setting than regular bread
to achieve the same color.
• To toast frozen pastry or waffl es, select a light color and toast
directly on oven rack. If pastry has a glaze or frosting, use
baking pan to prevent dripping.
• When toasting, condensation may form on oven door. A
conventional toaster is open and allows moisture to escape.
A toaster oven is a closed space and so moisture is slow to
escape.
• At the end of the toast cycle, remove toast immediately or the
heat remaining in the toaster oven will continue to toast and
dry out your toast.
Fire Hazard.
• If contents ignite, do not open oven door. Unplug oven and
allow contents to stop burning and cool before opening
door.
• Do not use oven cooking bags.
• Always allow at least 1 inch between food and heating
element.
• Always unplug toaster oven when not in use.
1. Place oven rack in LO POSITION
or place baking pan into oven.
2. Turn Function/Temperature Knob to
desired temperature.
3. Set Toast Shade Selector/Timer to
ON . Let preheat for 5 minutes
prior to placing food in oven.
4. Turn Toast Shade Selector/Timer to a desired time or
leave ON . If setting time, rotate timer past 10 before
setting any time below 10 minutes.
5. When fi nished, turn Toast Shade Selector/Timer to O
(OFF) and unplug.
Baking tips:
• Do not totally enclose foods in aluminum foil. Foil can
insulate foods and slow down heating.
• To reheat rolls or biscuits, place on baking pan and heat
at 300°F (149°C) for 10 minutes.
• Reheat leftover roasts or casseroles at 350°F (177°C) for
20 to 30 minutes or until heated through.
• Bake foods, such as a whole chicken, using the baking
pan.
• PIZZA TIP: When cooking pizza, place oven rack in
HI POSITION (the traditional TOAST position); then
bake as directed on package. This will help melt the
cheese and keep bottom crust from getting too brown.
How to bake
1. Place oven rack in HI POSITION
with the baking pan directly
beneath in the same slot. Place
food item(s) on rack.
2. Turn Function/Temperature Knob
to BROIL . The indicator light
will come on.
3. Set Toast Shade Selector/Timer to desired time or ON .
Turn foods when browned or halfway through cooking
time. If setting time, rotate timer past 10 before setting
any time below 10 minutes.
4. When fi nished, turn Toast Shade Selector/Timer to O (OFF)
and unplug.
Broiling tips:
• Cook beef and pork to at least 160°F (71°C).
• Cook chicken to at least 165°F (73°C).
• Cook fi sh until at least 145°F (63°C) or until opaque or
fl akes with a fork.
• Visit foodsafety.gov for more safe cooking temperature
information.
• When browning bread crumbs that top a casserole, set the
Toast Shade Selector/Timer at medium .
• To melt cheese, set the Toast Shade Selector/Timer at
light .
Electrical Shock Hazard.
• Failure to clean the oven interior regularly may result in fi re
hazard.
• Do not clean with metal scouring pads. Pieces can break
off pad and touch electrical parts, causing a risk of electric
shock.
For best performance and long life, clean toaster oven
regularly.
1. Unplug oven and allow to cool.
2. Wash oven rack and baking pan in hot, soapy water. Rinse
and dry. Do not use abrasive cleansers or steel wool.
3. To clean the inside of the oven, wipe oven walls, bottom
of oven, and glass door with a damp, soapy cloth. Repeat
with a damp, clean cloth. For stubborn stains, use a
plastic scouring pad.
4. To clean outside of oven, wipe with damp cloth. Do not
use abrasive cleansers.
To clean crumb tray:
1. Ensure oven is completely cool.
2. Remove baking pan and rack from
oven. Tilt oven back. Push handle
down to unlock crumb tray.
3. Pull tray down and out. Gently shake
crumbs out of tray and wipe with a
damp, clean cloth.
4. Push tray back and lock into place.
NOTE: Crumb tray is not removable.
Cleaning the oven
w WARNING
The toaster oven will not heat.
• Make sure electrical outlet is working and oven is
plugged in.
• Set Function/Temperature Knob to 350°F (175°C).
• Turn Toast Shade Selector/Timer to ON .
• The ON indicator light should now be lit.
The toaster oven will not toast.
• Make sure electrical outlet is working and oven is
plugged in.
• Set Function/Temperature Knob to TOAST .
• Select toast color.
• The ON indicator light should now be lit. The oven will
not toast properly unless the Function/Temperature Knob
is set to TOAST .
Troubleshooting
Danger d’incendie.
• Si le contenu de votre grille-pain se met à brûler, n’ouvrez
jamais la porte du grille-pain. Débranchez l’appareil et laissez
le contenu s’arrêter de brûler avant d’ouvrir la porte.
• Ne faites jamais fonctionner en modes TOAST ou BROIL
sans surveillance.
• N’utilisez jamais avec des sacs de cuisson au four.
• Laissez toujours au moins un pouce libre entre les aliments
et l’élément de chauffage.
• Débranchez toujours votre grille-pain quand vous ne
l’utilisez pas.
• Un nettoyage régulier réduit le danger d’incendie.
w AVERTISSEMENT
Cet appareil est destiné à l’utilisation domestique
seulement.
Risque de choc électrique :
Ce produit est fourni avec une fi che polarisée (une broche large)
pour réduire le risque d’électrocution. Cette fi che n’entre que
dans un seul sens dans une prise polarisée. Ne contrecarrez pas
l’objectif sécuritaire de cette fi che en la modifi ant de quelque
manière que ce soit ou en utilisant un adaptateur. Si vous
ne pouvez pas insérer complètement la fi che dans la prise,
inversez la fi che. Si elle refuse toujours de s’insérer, faire
remplacer la prise par un électricien.
La longueur du cordon installé sur cet appareil a été
sélectionnée afi n de réduire les risques d’enchevêtrement
ou de faux pas causés par un fi l trop long. L’utilisation d’une
rallonge approuvée est permise si le cordon est trop court.
Les caractéristiques électriques de la rallonge doivent être
équivalentes ou supérieures aux caractéristiques de l’appareil.
Prendre toutes les précautions nécessaires pour installer la
rallonge de manière à ne pas la faire courir sur le comptoir ou
sur une table pour éviter qu’un enfant ne tire sur le cordon ou
trébuche accidentellement.
Cet appareil est doté d’une porte en verre renforcé de sécurité.
Le verre renforcé est quatre fois plus fort que le verre ordinaire
et plus résistant aux bris. Le verre renforcé peut se briser, mais
il se brise en pièces sans bords coupants. Il faut prendre soin
d’éviter d’égratigner la surface de la porte ou d’endommager
le contour. Si la porte a une égratignure ou un bris, composer
notre numéro sans frais d’interurbain d’assistance à la clientèle.
Toujours débrancher votre four grille-pain de la prise de
courant lorsqu’il n’est pas utilisé.
AVANT LA PREMIÈRE UTILISATION :
La plupart des appareils ménagers qui chauffent produisent
une odeur et/ou une fumée lors de l’utilisation pour la première
fois. Brancher le four grille-pain dans une prise de courant.
Tourner le bouton de commande de fonction/ température à
230 °C (450 °F). Chauffer à cette température pendant 10
minutes. L’odeur ne devrait pas survenir après ce préchauffage
initial. Nettoyer le plat de cuisson et la grille du four avant
l’utilisation.
IMPORTANT SAFEGUARDS
1. Ramasse-miettes
rabattable
2. Grille du four
3. Bouton fonction/
Température
4. Témoin lumineux
« ON » (marche)
5. Sélecteur du degré de
brunissage/Minuterie
6. Plat de cuisson
w WARNING
w WARNING
w WARNING
CONSERVER CES
INSTRUCTIONS !
18. Une grande précaution doit être prise lors de l’utilisation
de contenants construits en matériaux autre que le métal
ou le verre.
19. Ne pas remiser des matériaux autres que les accessoires
recommandés par le fabricant dans cet appareil lorsqu’il
n’est pas utilisé.
20. Ne pas placer l’un des matériaux suivants dans le four :
papier, carton, plastique et articles semblables.
21. Ne pas couvrir le plateau à miettes ou toute pièce du four
avec du papier métallique. Ceci causera un surchauffage
du four.
22. Pour éteindre le four, tourner la bouton de Sélecteur
du degré de brunissage/Minuterie à la position ARRÊT
(O). Voir la section « Pièces et caractéristiques ».
23. Ne pas placer les yeux ou le visage près de la porte en
verre renforcé de sécurité, au cas où le verre de sécurité
se briserait.
24. Toujours utiliser cet appareil avec le plateau à miettes
bien en place.
25. Ne pas utiliser cet appareil pour tout autre usage que
celui recommandé.
26. Nettoyer l’intérieur du four avec précaution. Ne pas
égratigner ou endommager le tube de l’élément chauffant.
This warranty applies to products purchased and used in the U.S.
and Canada. This is the only express warranty for this product and
is in lieu of any other warranty or condition.
This product is warranted to be free from defects in material and
workmanship for a period of fi ve (5) years from the date of original
purchase in Canada and one (1) year from the date of original
purchase in the U.S. During this period, your exclusive remedy is
repair or replacement of this product or any component found to
be defective, at our option; however, you are responsible for all
costs associated with returning the product to us and our returning
a product or component under this warranty to you. If the product
or component is no longer available, we will replace with a similar
one of equal or greater value.
This warranty does not cover glass, fi lters, wear from normal use,
use not in conformity with the printed directions, or damage to
the product resulting from accident, alteration, abuse, or misuse.
This warranty extends only to the original consumer purchaser or
gift recipient. Keep the original sales receipt, as proof of purchase
is required to make a warranty claim. This warranty is void if the
product is used for other than single-family household use or
subjected to any voltage and waveform other than as specifi ed
on the rating label (e.g., 120V ~ 60 Hz).
We exclude all claims for special, incidental, and consequential
damages caused by breach of express or implied warranty. All
liability is limited to the amount of the purchase price. Every
implied warranty, including any statutory warranty or
condition of merchantability or fi tness for a particular purpose,
is disclaimed except to the extent prohibited by law, in which
case such warranty or condition is limited to the duration
of this written warranty. This warranty gives you specifi c legal
rights. You may have other legal rights that vary depending on
where you live. Some states or provinces do not allow limitations on
implied warranties or special, incidental, or consequential damages,
so the foregoing limitations may not apply to you.
To make a warranty claim, do not return this appliance to the
store. Please call 1.800.851.8900 in the U.S. or 1.800.267.2826
in Canada or visit proctorsilex.com in the U.S. or proctorsilex.ca
in Canada. For faster service, locate the model, type, and series
numbers on your appliance.
Limited warrantyHow to broil
Fire Hazard.
• If contents ignite, do not open oven door. Unplug oven
and allow contents to stop burning and cool before
opening door.
• Do not leave oven unattended during operation.
• Keep 1 inch between food and heating element.
• Do not use oven cooking bags.
• Do not heat foods in plastic containers.
• Follow food manufacturer’s instructions.
w WARNING
Risque d’incendie.
• Si les aliments s’enfl amment, ne pas ouvrir la porte du
four. Débrancher le four et laisser les aliments s’éteindre et
refroidir avant d’ouvrir la porte.
• Ne pas laisser l’appareil sans surveillance pendant le
fonctionnement.
•
Toujours débrancher le four grille-pain dès la fi n de l’utilisation.
1.
Placer la grille du four dans la
POSITION HAUTE. Déposer les
aliments sur la grille.
2. Tourner le bouton fonction/
température à TOAST (brunissage).
3. Régler le sélecteur de degré de
brunissage/minuterie au-delà de 10
puis revenir en arrière jusqu’au degré de brunissage désiré.
La sonnerie se fera entendre à la fi n du programme.
4. Dès la fi n de l’utilisation, tourner le sélecteur de degré de
brunissage/minuterie à O (ARRÊT) puis débrancher l’appareil.
w AVERTISSEMENT
Conseils pour griller les aliments :
• Pour brunir les bagels ou muffi ns anglais, placer la face
coupée du pain vers le bas. Ceci permet de brunir davantage
la face coupée de l’aliment. Les muffi ns anglais peuvent
nécessiter un réglage supérieur au pain pour atteindre des
résultats de brunissage semblables.
• Brunissage des pâtisseries ou gaufres congelées, choisir une
nuance légère et faire brunir directement sur la grille du four.
Si les pâtisseries sont givrées ou glacées, utiliser le plat de
cuisson pour recueillir les écoulements.
• Pendant le brunissage, de la condensation peut se former sur
la porte du four. Le grille-pain conventionnel est un appareil
ouvert permettant à l’humidité de s’échapper. Un four grille-
pain est un appareil à espace clos alors, l’humidité s’échappe
plus lentement.
• Dès la fi n du cycle de brunissage, retirer immédiatement les
rôties pour éviter que la chaleur résiduelle du four ne cuise
davantage ou n’assèche votre rôtie.
Renseignements de sécurité
aux consommateurs
Pièces e caractéristiques
Pour faire griller
w WARNING
w AVERTISSEMENT


Join the conversation about this product
Here you can share what you think about the Hamilton Beach 31138 Oven. If you have a question, first carefully read the manual. Requesting a manual can be done by using our contact form.