
e is ≥0.80M
5 6
3 4
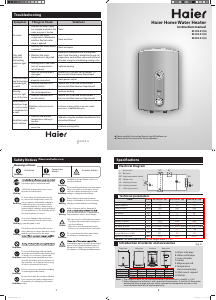
Must be installed by personnel in our company's After-sales Department or designated installation personnel.
The water heater is wall-mounted type.
Determine the installation position of the water heater. Based
on the measurements indicated in Fig. 2, use impact drill to
drill two holes of 12mm in diameter and 65mm in depth.
Insert the expandable hooks into the holes and ensure that
they are securely xed. Lift the water heater and slip its wall-
mount support onto the expandable hooks (as show in Fig.1).
Check to make sure the machine is securely suspended.
For accessories such as safety valve, please refer to the
“Installation of Safety Valve” (for reference only). Make sure to
seal the joints with Teon tapes to prevent water leakage.
For ease of installation and removal of water heater, we
would recommend that G1/2 loose joints be installed at
appropriate locations on the water inlet and outlet pipes of the water heater. Determine the position of
the hot water supply. Connect the water inlet and outlet pipe together with the water pipe to the positions
reserved for use of hot water. Hot water pipe should preferably not be too long in order to prevent heat loss.
Note: Make sure that the water heater is securely attached to the hook before letting it go; otherwise it
may drop and cause injury or property damage.
When installing the water heater, certain space should be reserved (not less than 250mm from the top
and bottom and not less than 700 mm from the front and the sides), for ease of subsequent maintenance
and repair. If the water heater was to be built into clip boards, the bottom section of the clip board should
be movable for ease of removal of plastic cover during maintenance.
Make sure the pressure on the water inlet is not less than 0.05MPa, and not more than 0.75MPa.
The water heater should be installed indoors in a place where the ambient temperature is above 0
o
C. The
pipes should be closely laid out. The hot water outlet should not be too far away from the point of usage. If the
distance exceeds 8 meters, the hot water pipe should have insulation protection, in order to prevent heat loss.
The wall on which the water heater should be strong such as it is able to withstand fourth the weight of the
water heater when lled with water. If the wall was not weight-bearing wall or made of hollow bricks, adequate
protective measures such as addition of support and high-strength wall screw with back panel should be adopted.
The water heater should be installed in places such as it is easy to use and maintain and with oor drain,
in order that it will not cause damage to nearby facilities or those in the lower levels during a leakage
of the water tank or water pipe. It should not be installed over toilet bowls, bathtub, wash basin or door
frame in order that users do not feel oppressed or insecure.
Power socket for the water heater should be installed in dry places which do not easily come into contact with
Do not reverse the installation for the water inlet and outlet. The safety valve should be installed in the
designated position and should not be moved without permission. The safety valve's pressure-relief hole
should be connected to the atmosphere and free from blockage at all times.
Use pen multimeter to check whether the live line and neutral line are reverse. Turn on power supply only
when you have ensured that the heater is lled with water and that there is no water leakage. The power
supply should also conform with requirements.
Safety reminder: In order to prevent accidents, please use our company's accessories during installation. Do not
replace them on your own or use substitutes. Please make sure to contact our Maintenance Department if the pipes
or accessories are damaged and replace them with the accessories supplied by our company. Our company shall not
be liable for any direct or indirect losses caused as a result of accidents for failure to comply with the aforesaid.
All water pipes should be installed by qualied water pipe installation workers. The pipelines should
comply with the national standards and regulations on the prohibition of prevention tools to draw water
to water source pipelines by way of inverse siphon, as well as local building codes.
Installation method
Installation Precautions
Fig.1
Wall-mount support
Expandable
hook
Instruction manual
Operation
After completion of installation, make sure to turn on the water inlet valve and mixing valve
since there is no water in the inner chamber. Turn the mixing valve to the maximum for hot
Inspect all connections to ensure that there is not water leakage before connecting to power.
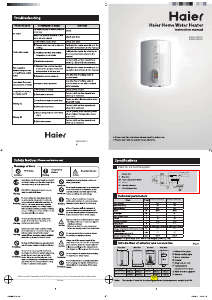
Adjust the water temperature knob at the bottom
of the water heater to set the temperature.
Maximum water temperature setting is 75
o
C
Temperature adjustment knob: Slowly turn the knob clockwise
to raise the temperature setting. The knob will not continue to
turn once it reaches maximum temperature setting. Turn it anti-
clockwise gradually to reduce the temperature setting. Once the
minimum temperature setting is reached, the water heater's power
If the heating indicator light is lit, it means that the water heater is heating.
Observe the water temperature indicator for
the current water temperature.
Water heating will be on standby automatically
when the water temperature reaches the set temperature. Once it lowers
to certain temperature, power will be automatically connected.
Do not connect the power before lling the inner chamber with water in order to
prevent damage to the water heater.
Adjust the water temperature to the suitable level before use in order to prevent scalding.
Insofar as there is adequate hot water, set a lower temperature to reduce heat loss, high
temperature corrosion and scaling. This will extend the water heater's lifespan.
To avoid danger caused by accidental resetting of the heating breaker, the power for
the heat cannot be supplied by timer and other external switch devices or connected to
circuit with frequent switching for facility use.
Observe the water drainage of the safety valve's pressure-relief hole.
When the water pressur Pa and the pressure-relief hole on the safety valve emits
large volume of water, it means that the water pressure is excessive. In such case, please notify
the After-sales Department.
1
2
3
1
2
3
4
5
4
Things to note during use
Water
temperature
knob
Heating
indicator light
OFF MAX
Temp
Hea tin g
Water temperature indicator
Cleaning
Check
Not in use for an extended period of time
Warning!
The water heater must be repaired or maintained by qualied professionals. Improper
methods may cause serious injury or damage to property.
Cleaning and Maintenance·Packing List
External cleaning
Take a wet cloth and dab it with small quantity of neutral detergent. Lightly wipe the water heater.
Do not use petrol or other solvents. Finally use a dry cloth to wipe,
make use to dry the water
heater thoroughly. Make sure not to use detergents containing abrasive agents (e.g. toothpaste); acidic
substances; chemical solvents (e.g. alcohol) or polish to clean the water heater.
Internal cleaning
In order to ensure that the water heater works eciently, the heating pipe and inner chamber should
be cleaned once every three years. Take care not to damage the exterior of the heating pipe or the
protective layer on the surface of the inner chamber. Depending on the local water quality and the
usage habit, the magnesium rod might need to be regularly changed. If maintenance is required,
please contact the local Maintenance Department.
When the water heater is in use, the safety valve should be checked once every month. To check it, turn
the safety valve's small handle on the side of the water inlet pipe (take care not to hurt your hand). If there
is water owing out, the safety valve is working normally. Please contact the local After-sales Department
if no water ows out. In the event of damage to the safety valve, please replace it with a safety valve of
similar specications.
Regularly engage service personnel to carry out safety inspection and promptly clear the water heating pipes
of the scale. Check also the consumption of the magnesium rod; change it if consumption becomes excessive.
If the water heater is not used for an extended period of time, please carry out the following steps:
Screw the water drainage pipe to the safety valve's pressure-relief hole; turn on the safety valve handle.
Turn the hot water valve to the maximum (at the same time unscrew the sprinkler head soft pipe from the water
outlet valve; take care not be scalded by hot water), drain the inner chamber of water.
When the water heater needs to be used again, our recommendation is to open hot water valve before
switching on the power in order to prevent accidents. Allow any gas that may be trapped in the pipe to be
discharged. Do not smoke or allow other exposed re to be near the opened valve. At the same time, make
sure to carefully examine all the parts of the water heater and ensure that they are in a perfect condition.
Make sure to ll the inner chamber with water before use.
1
2
3
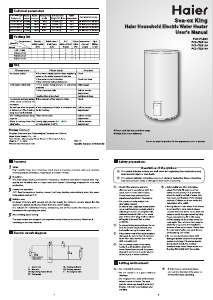
Packing list
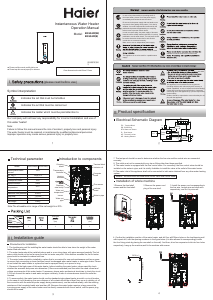
Install the safety valve which has a rated pressure of 0.80MPa (its connection
is G1/2) into the water inlet pipe with the arrow on the safety valve pointing
at the water heater. When the water heater is heated by electricity, a small
amount of water will ow from the safety valve's pressure-relief hole due to
the expansion of water in the heater. This is normal. The pressure-relief hole
should be connected to the atmosphere and free from blockage at all times.
Installation method for safety valve's drainage pipe: Attach an end of the
water drainage pipe onto the pressure-relief hole on the safety valve. You
may cut the water drainage pipe to make it shorter, or extend it depending on the situation.
Connect to the other end of the water drainage pipe to the lower water outlet. This will prevent
the water from the pressure relief hole from splashing. The water drainage pipe connected to the safety
valve should be installed in a slanted manner and in an environment which is not prone to frost.
Note: If your water heater is not installed in a bathroom with sewer, our recommendation would be that
you add safety valve water drainage pipe.
Installation instruction
Description of parts
Installing safety valve
Small handle
for safety valve
Pressure-relief hole (connected
to water drainage pipe)
Sprinkler head
Cold water inlet
Hot water
outlet
Hot water pipe
Cold water pipe
Safety valve
Direction of cold water
Direction of hot water
OFF MAX
Temp
Heating
Water
temperature
knob
Heating
indicator light
OFF MAX
Temp
Hea tin g
Water temperature indicator
Product Model No.
Electric Water
Heater (unit)
Safety Valve/Water
Drainage Pipe (set)
Instruction Manual
(book)
Expandable Hook
(pcs.)
ES10V-E1 (H)
1 1 1 2
ES15V-E1 (H)
ES25V-E1 (H)
Quantity
Name of
parts
(Fig. 3)


Join the conversation about this product
Here you can share what you think about the Haier ES15V-E1(H) Boiler. If you have a question, first carefully read the manual. Requesting a manual can be done by using our contact form.