
CLOCK RADIO
Sonoclock 3500 BT DAB+
These additives can corrode the
device supports, leaving resi-
dues on the furniture surfaces
which can be difficult or impos-
sible to remove.
▪
Only use the device in a moder-
ate climate.
▪
Do not use any cleaning agent,
as this may damage the casing.
Clean the device with a clean,
moist leather cloth.
▪
Do not expose the back-up bat-
tery to extreme heat, caused for
example by direct sunlight, heat-
ers or fire.
▪
Never open the device casing.
No warranty claims are ac-
cepted for damage caused by
incorrect handling.
Compliance with RoHS Directive
The product you have purchased complies with EU
RoHS Directive (2011/65/EU). It does not contain
harmful and prohibited materials specified in the Di-
rective.
Package information
Packaging materials of the product are
manufactured from recyclable materials in
accordance with our National Environ-
ment Regulations. Do not dispose of the
packaging materials together with the domestic or
other wastes. Take them to the packaging material
collection points designated by the local authorities.
This device is noise-suppressed accord-
ing to the applicable EU directives. This
product fulfils the European directives
2014/53/EU, 2009/125/EC and
2011/65/EU. You can find the CE declaration of
conformity for the device in the form of a pdf file on
the Grundig Homepage
www.grundig.com/downloads/doc
Power supply:
Manufacturer of AC Adaptor: Dongguan Turnmax
Electronic Co., Ltd.
Adress: Erxiafang Industrial Zone, Xiansha, Gabou
Town, Dongguan, Guangdong Province 523287,
P.R. China
Model: TM-K007VC-00501500PE-02
AC Adaptor Input:100 - 240V
~
, 50/60 Hz 0.25A;
Output: 5V 1.5A 7.5W
Average active efficiency: 76,65%
No-load power consumption: <0.1W
Max. Power consumption:
<11 W (operation)
<1W (standby)
Output:
USB host: 5V 1A charge out
Back up micro batteries:
Back up DC Batt: 2 x 1.5v UM4/R03/AAA
Frequency bands:
DAB/DAB+ 174.928 – 239.200 MHz
BT Frequency: 2402 - 2480 MHz
BT maximum transmitted power: 4dBm
FM 87.5 ...108.0 MHz
Circuit features:
Loudspeaker: 3 inch
Output Power: 2 W
Dimensions:
W x H x L 200 x 120 x 65 cm
Weight: 450 gr
Technical and design modifications reserved.
POWER SUPPLY
Mains operation
Check that the mains voltage on the type plate (on
the bottom of the device) corresponds to your local
mains supply. If this is not the case, contact your spe-
cialist dealer.
1 Plug the power adaptor into the socket
(100 - 240V
~
, 50/60 Hz).
Caution:
▪
The device is connected to the mains with the
power plug. To fully disconnect the device from
the mains, pull out the plug.
▪
The mains plug is used to disconnect the device. It
shall remain readily operable and should not be
obstructed during intended use.
Inserting the back-up battery
The back-up batteries ensure that the stored set¬tings
are not lost in the case of a power failure.
1 Open the battery compartment by pressing the
area market and pushing down the cover.
2 Observe the polarity marked on the base of the
battery compartment when inserting the batteries
(micro batteries, 2 x 1.5 V, R03/ UM 4/ AAA).
3 Close the battery compartment.
Note:
▪
Remove the back-up battery when it is flat or when
you know that the device will not be used for a
long period of time.
Environmental note:
▪
Batteries, including those which do not contain
heavy metal, should not be disposed of with
household waste. Always dispose of used batter-
ies in accordance with local environmental regu-
lations.
DAB MODE
Antenna
For the best DAB and FM (UHF) reception it is suf-
ficient to align the wire antenna accordingly.
Switching “ON/OFF”
1 Switching the device from standby with
»ON/OFF« button;
2 Switch the device to standby with »ON/OFF«
button
Searching for and saving radio sta-
tions - automatically
The radio will perform ATS when you use the radio
for the first time. The radio will search for the DAB
stations and store into the DAB radio list. And then, it
will search for FM stations and store into FM presets.
Selecting a DAB station
1 Press and release the »ON/OFF« button to
switch on your radio.
2 Press the »MODE/MENU« button until the DAB
mode is selected.
3 Press the »TUNING +« or »TUNING -« button
to choose the DAB station from the list.
4 When the desired station name ap-
pears on the display, press the
»SNOOZE/SLEEP/INFO/SELECT« button to
select the station. The radio will select the new
station.
Display DAB information
Manual tuning allows you to tune your radio to a
particular DAB frequency in Band III.
1 Press and hold the »MODE/MENU« button for 2
seconds, the display will show DAB menu.
2 Press the »TUNING +« or »TUNING -« button
until ‘MANUAL’ shows on the display.
3 Press the »SNOOZE/SLEEP/INFO/SELECT«
button to enter manual tuning mode.
4 Press the »TUNING +« or »TUNING -« but-
ton to select the desired DAB channel. press the
»SNOOZE/SLEEP/INFO/SELECT« button to
tune to the chosen frequency.
5 If a signal is present, this will be indicated on a
signal strength display. The minimum signal mark-
er (|) shows the minimum signal strength needed
for good DAB reception.
6 Press the »SNOOZE/SLEEP/INFO/SELECT«
button to store the new DAB stations into the list
and return to normal tuning.
Display DAB information
Your radio has a range of display op-
tions when in DAB mode, press the
»SNOOZE/SLEEP/INFO/SELECT« button
to cycle through the various displays, including:
Station name, DLS, Program type, Multiplex name,
Frequency, Bit rate, Signal strength, time and data.
All display options except the text display will revert
to the clock display after 10 seconds.
Dynamic Range Control (DRC)
The Prune stations function will delete the marked
DAB stations from your station list.
1 Press the »ON/OFF« button to switch on your
radio and press the »MODE/MENU« button to
switch until DAB mode.
2 Press and hold the »MODE/MENU« button for 2
seconds, the display will show DAB menu.
3 Press the »TUNING +« or »TUNING -« button
until ‘PRUNE’ shows on the display.
4 Press the »SNOOZE/SLEEP/INFO/SELECT«
button, then ‘SELECT’ will be shown on the dis-
play.
5 Press the »SNOOZE/SLEEP/INFO/SELECT«
button to cause the invalid station names to be
removed from the station list. The display will re-
turn to station name display after several seconds.
FM MODE
Automatically and manually tuning for FM radio sta-
tions
You can store 10 radio stations on presets.
The DRC facility can make quieter sounds easier to
hear when your radio is used in a noisy environment.
1 Press the »ON/OFF« button to switch on your
radio.
2 Press and hold the »MODE/MENU« button for 2
seconds, the display will show DAB menu.
3 Press the »TUNING +« or »TUNING -« button
until ‘DRC’ shows on the display.
4 Press the »SNOOZE/SLEEP/INFO/SELECT«
button to enter adjustment mode.
5 Press the »TUNING +« or »TUNING -« button
to select required DRC setting, DRC 0, DRC 1 or
DRC ½;
6 Press and release the
»SNOOZE/SLEEP/INFO/SELECT« button to
confirm the setting. The display will return to the
station name display after several seconds.
Prune stations - DAB
If you move to a different part of the country, some of
the stations which were listed may no longer be avail-
able. Stations which cannot be found, or which have
not been received for a very long time are shown in
the station list with a question mark.
SETUP AND SAFETY EN
▪
This device is designed for the
playback of audio signals. Any
other use is expressly prohibited.
▪
Protect the device from moisture
(water drops or splashes). Do
not place any vessels such as
vases on the device. These may
be knocked over and spill fluid
on the electrical components,
thus presenting a safety risk.
▪
Do not place any naked flames
such as candles on the device.
▪
Thunderstorms are a danger to
all electrical devices. Even if the
device is switched off, it can be
damaged by a lightning strike to
the mains cable.
1 Activate the auto FM station tuning by press-
ing and holding the »TUNING +« or
»TUNING -« buttons until the frequen-
cy display changes to rapid run-through.
The search stops when a station is found.
Note:
▪
To move the frequency forward in steps, briefly
press »TUNING +« or »TUNING -« several
times.
2 Or to start FM manual tuning by briefly pressing
the »TUNING +« or »TUNING -« buttons, the
radio will step up or down for 50kHz by each
pressed.
Display FM information
Your radio has a range of display op-
tions when in FM display mode, press the
»SNOOZE/SLEEP/INFO/SELECT« button to cy-
cle through the various displays, including: Station
name, Radio text, PTY, Frequency, time and data. All
display options except the text display will revert to
the clock display after 10 seconds.
FM scanning settings
Your radio includes a local FM for strong FM sta-
tions, and distant option for all the strong and weak
▪
The type plate is located on the
bottom of the device.
▪
Do not expose the device to ex-
treme heat, caused for example
by direct sunlight, heater fire.
Compliance with the WEEE Directive
and Disposing of the Waste Product:
This product complies with EU WEEE Directive
(2012/19/EU). This product bears a classification
symbol for waste electrical and electronic equipment
(WEEE).
This symbol indicates that this product
shall not be disposed with other house-
hold wastes at the end of its service life.
Used device must be returned to offical
collection point for recycling of electrical
and electronic devices. To find these collection sys-
tems please contact to your local authorities or re-
tailer where the product was puchased. Each house-
hold performs important role in recovering and
recycling of old appliance. Appropriate disposal of
used appliance helps prevent potential negative con-
sequences for the environment and human health.
Always disconnect the mains
cable during a storm.
▪
If malfunctions occur due to
static electricity charges or brief
mains voltage surges, reset the
device. To do this, pull out the
mains adapter and connect it
again after a few seconds.
▪
Make sure the device is ade-
quately ventilated. Do not cover
the ventilation slots with newspa-
pers, table cloths, curtains, etc.
▪
When deciding where to place
the device, please note that furni-
ture surfaces are covered by var-
ious types of varnish and plastic,
most of which contain chemical
additives.
EN DE
FM stations.
1 Press the »ON/OFF« button to switch on the radio
to FM mode.
2 Press and hold the »MODE/MENU« button, the
display will show Setting.
3 Press the »SNOOZE/SLEEP/INFO/SELECT«
button to enter Setting.
4 Press the »TUNING +« or »TUNING -« button
to select Local FM or Distant;
5 Press the »SNOOZE/SLEEP/INFO/SELECT«
button to confirm the setting.
Searching for and saving radio sta-
tions for DAB or FM
You can store 10 radio stations on presets for each of
the DAB mode or FM mode.
1 Switch on the radio to DAB or FM mode.
2 Select the desired DAB station from the list,
or search the desired FM station by pressing
»TUNING +« or »TUNING -« buttons.
3 Press and hold the »PRESET« button to activate
the memory function.
4 Press »TUNING +« or »TUNING -« buttons to
select the preset.
5 Press the »SNOOZE/SLEEP/INFO/SELECT«
button to save the station.
Note:
▪
If the stations are already stored on the presets,
they are overwritten when new stations are stored.
6 To store more stations, repeat the steps 1 to 4.
Selecting stored stations
7 Select the preset by pressing the »PRESET« but-
ton to select the preset stations one after another.
Adjusting the volume
8 Adjust the volume with »VOLUME -/AL1« or
»VOLUME +/AL2« buttons.
BLUETOOTH MODE
Connect to mobile device with Blue-
tooth
1 Switching the device from standby with
»ON/OFF« button.
2 Press the »MODE/TIME« button repeatedly until
»bt« is shown on display;
3 The Bluetooth icon will be flashing on LCD;
4 Go to your mobile device, and find the “Sonoclock
3500” from the available Bluetooth device list.
Then press to connect to the radio.
5 When Sonoclock 3500 BT DAB+ has been con-
nected to the mobile device, the Bluetooth icon
will be stopped flashing.
Playback control via Bluetooth
1 Press the »ON/OFF« button to switch on the ra-
dio.
2 Connect the Sonoclock 3500 BT DAB+ to mobile
device via Bluetooth.
3 Press the »PRESET« button to toggle the music
playback in between play or pause status.
4 Press the »TUNING-« button to skip back to pre-
vious played songs.
5 Press the »TUNING+« button to skip to the next
songs.
Pairing mode
1 Press the »ON/OFF« button to switch on the ra-
dio;
2 If the Sonoclock 3500 BT DAB+ is connecting to
any mobile device via Bluetooth, press and hold
the »PRESET« button to disconnect the current
Bluetooth connection.
3 The Sonoclock 3500 BT DAB+ will be in Bluetooth
pairing mode with flashing the Bluetooth icon.
4 You can repeat the steps in “Connect to mobile
device with Bluetooth” for a new Bluetooth con-
nection.
Adjusting the volume
1 Adjust the volume with »VOLUME -/AL 1« or
»VOLUME +/AL 2« buttons.
Power saving in Bluetooth
If there is no Bluetooth connection from the radio to
any mobile devices, the Sonoclock 3500 BT DAB+
will switch to standby mode after 15 minutes.
TIMER MODE
Synchronise the time from either DAB
or FM
1 Switch the device from standby with
»ON/OFF« button, then press and hold the
»MODE/MENU« button for two seconds to acti-
vate the menu setting.
2 Press the »TUNING +« or
»TUNING -« button find ‘SYSTEM’, then press
the »SNOOZE/SLEEP/INFO/SELECT« button
to enter system menu;
3 Press the »TUNING +« or
»TUNING -« button find ‘TIME’, then press the
»SNOOZE/SLEEP/INFO/SELECT« button to
enter;
4 Press the »TUNING +« or
»TUNING -« button find ‘UDPATE’, then press
the »SNOOZE/SLEEP/INFO/SELECT« button
to enter;
5 Now you can use the »TUNING +« or
»TUNING -« button choose the time source from
‘ANY’, ‘DAB’, ‘FM’ or ‘NONE’, then press the
»SNOOZE/SLEEP/INFO/SELECT« button to
enter system menu;
Manual set time
1 You can enter the time manually by following the
step 1 to 3 from the ‘Synchronise the time from
either DAB or FM’.
2 Select ‘SET TIME’, then press the
»SNOOZE/SLEEP/INFO/SELECT« button to
enter manual set time.
3 Please use the »TUNING +« or »TUNING -«
button to select the desired time and date, and
use the »SNOOZE/SLEEP/INFO/SELECT«
button to confirm the settings.
Set time display format
1 You can enter the time display format by following
the step 1 to 3 from the ‘Synchronise the time from
either DAB or FM’.
2 Select ‘SET FORMAT, then press the
»SNOOZE/SLEEP/INFO/SELECT« button to
enter set time display format.
3 Please use the »TUNING +« or
»TUNING -«button to select the ‘12’ or ‘24’, and
use the »SNOOZE/SLEEP/INFO/SELECT«
button to confirm the settings.
Setting the alarm time
1 Switch the device to standby with »ON/OFF« but-
ton;
2 Press and hold the »VOLUME -/AL 1« button
for alarm 1 or »VOLUME +/AL 2« for alarm 2;
3 For example, press and hold
»VOLUME -/AL 1« button to en-
ter alarm 1 setting menu, then press the
»SNOOZE/SLEEP/INFO/SELECT« button to
start alarm 1 setup.
4 Please choose »ON« to activate the alarm, or
»OFF« to deactivate the alarm, then press the
»SNOOZE/SLEEP/INFO/SELECT« button to
next.
5 Please use the »TUNING +« or
»TUNING -« button to select the alarm time, and
use the »SNOOZE/SLEEP/INFO/SELECT«
button to next step.
6 Please use the »TUNING +« or
»TUNING -« button to choose from ‘WEEKDAYS’,
‘WEEKENDS’, ‘DAILY’ or ‘ONCE’, and then use
the »SNOOZE/SLEEP/INFO/SELECT« button
to the next settings.
Note:
▪
If you choose ‘ONCE’ alarm, you must set the spe-
cific date for the alarm.
7 Please use the »TUNING +« or
»TUNING -« button to select the desired alarm
from ‘DAB’, ‘FM’ or ‘BUZZER’, then press the
»SNOOZE/SLEEP/INFO/SELECT« button to
confirm the settings.
Note:
▪
If you have chosen either ‘DAB’ or ‘FM’ as the
alarm source, you must choose the preset station
or the last listened station of the mode.
8 Please use the »TUNING +« or »TUNING -«
button to select the desired alarm volume, then
press the »SNOOZE/SLEEP/INFO/SELECT«
button to confirm the settings. The display will be
showing ‘SAVED’ to exit the alarm setup.
Notes:
▪
The device wakes you up at the set alarm time, the
alarm duration is 60 minutes.
▪
After activating the alarm, the corresponding
alarm icon will be lightened.
Snooze the alarm
1 Press the »SNOOZE/SLEEP/INFO/SELECT«
while the alarm is sounding.
2 During snooze, the SNOOZE LED will be light-
ened.
Note:
▪
The alarm signal will be stopped, and the alarm
will be sounded again after nine minutes.
Cancelling the alarm
1 Press »ON/OFF« while the alarm is sounding.
Note:
▪
The alarm will be sounded again at the next set
alarm time.
Activating and deactivating the alarm
1 In standby mode, press »VOLUME -/AL 1« or
»VOLUME +/AL 2« button to activate the alarm
with last used alarm settings or to deactivate the
alarm.
Sleep timer
1 Press and hold the
»SLEEP/SNOOZE/INFO/SELECT« button for
about 2 seconds to activate the sleep timer.
2 Then repeatedly press the »TUNING +« or
»TUNING -« button to select the auto switch-off
timer from 90 minutes to 10 minutes, then press
the »SNOOZE/SLEEP/INFO/SELECT« button
to confirm.
3 To switch off the sleep timer before the set time
press and hold
»SNOOZE/SLEEP/INFO/SELECT« button
for about 2 seconds, then repeatedly press
»TUNING +« or »TUNING -« button until
»OFF« is displayed, then press the
»SNOOZE/SLEEP/INFO/SELECT« button to
confirm.
Brightness settings
1 Switch the device from standby with »ON/
OFF« button, then press and hold the »MODE/
MENU« button for two seconds to activate the
menu setting.
2 Press the »TUNING +« or
»TUNING -« button find ‘SYSTEM’, then press
the »SNOOZE/SLEEP/INFO/SELECT« button
to enter system menu;
3 Press the »TUNING +« or
»TUNING -« button find ‘DIMMER’, then press
the »SNOOZE/SLEEP/INFO/SELECT« button
to enter;
4 If you wish to setup the brightness level of radio
modes, please choose ‘NORMAL’; if you wish
to setup the brightness level of standby mode,
please choose ‘STANDBY’.
5 Press the »TUNING +« or
»TUNING -« button find ‘desired brightness lev-
el from ‘HIGH’, ‘MID’ or ‘LOW’, then press the
»SNOOZE/SLEEP/INFO/SELECT« button to
confirm;
Language settings
Factory reset
1 Switch the device from standby with
»ON/OFF« button, then press and hold the
»MODE/MENU« button for two seconds to acti-
vate the menu setting.
2 Press the »TUNING +« or
»TUNING -« button find ‘SYSTEM’, then press
the »SNOOZE/SLEEP/INFO/SELECT« button
to enter system menu;
3 Press the »TUNING +« or
»TUNING -« button find ‘FACTORY’, then press
the »SNOOZE/SLEEP/INFO/SELECT« button
to enter;
4 If you wish to reset all the set-
tings to factory default, press the
»SNOOZE/SLEEP/INFO/SELECT« button to
confirm;
Charging a mobile phone
The USB socket on the back side can provide DC
power of 5V for charging a mobile phone. Connect
the mobile phone to the USB socket with an appro-
priate cable. The USB power is available in all the
operating modes and including standby mode. Refer
to the user manual or the manufacturer of the mobile
phone to verify if it supports charging from an USB
power. The USB socket is suitable for DC power-out
only and cannot be used for e.g. playback of music
from a USB stick.
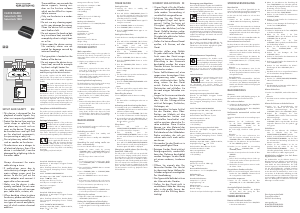
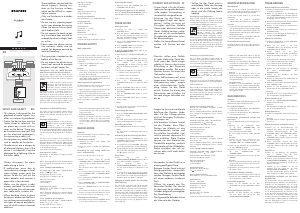
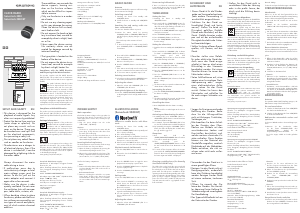
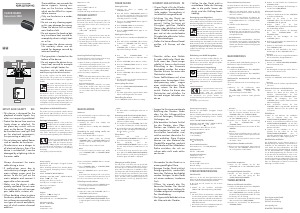
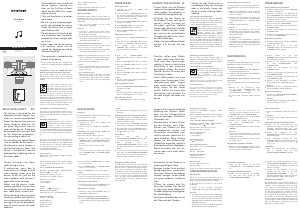
TUNING+ VOL+/AL 2
VOL-/AL 1
TUNING-
ON/OFF
USB
SLEEP
SNOOZE
INFO/SELECT
PRESET
PLAY/PAUSE MODE/MENU


Join the conversation about this product
Here you can share what you think about the Grundig Sonoclock 3500 BT DAB+ Alarm Clock Radio. If you have a question, first carefully read the manual. Requesting a manual can be done by using our contact form.
reply | This was helpful (0) (Translated by Google)
reply | This was helpful (0) (Translated by Google)
reply | This was helpful (0) (Translated by Google)
reply | This was helpful (0) (Translated by Google)
reply | This was helpful (0) (Translated by Google)