PORTINE PER CANI E GATTI
DOG AND CAT FLAPS
PORTES POUR CHIENS ET CHATS
TÜRE FÜR KATZEN UND HUNDE
DEUR VOOR HONDEN EN KATTEN
PUERTAS PARA PERROS Y GATOS
Mod. 1
Cod. 721010
Mod. 3
Cod. 721020
MONTAGGIO
ASSEMBLING
MONTAGE
BAUANLEITUNG
MONTAJE
1
3
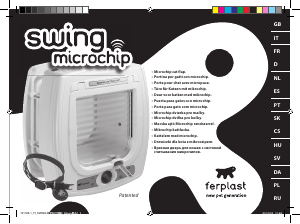
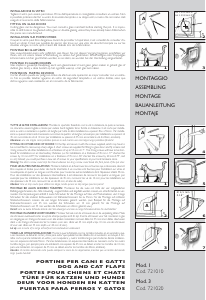
TUTTE LE ALTRE INSTALLAZIONI: Montate lo sportello fissandolo con le viti in dotazione, le quali, se necessario,
dovranno essere tagliate e limate per evitare bordi taglienti. Sono fornite in dotazione 4 viti corte per installazioni
su vetro e zanzariere e quattro viti lunghe per tutte le altre installazioni su spessori fino a 55mm. Per installazioni
su spessori intermedi è necessario accorciare le quattro viti lunghe (ad esempio: per installazioni su spessori di 45
mm accorciate le viti di 10 mm; per installazioni su spessori di 35 mm accorciate le viti di 20mm, eccetera).
Attenzione: una vite troppo corta potrebbe spanare le sedi mentre una vite troppo lunga potrebbe sfondarle!
FITTING ON OTHER KIND OF DOORS: Fit the flap and secure it with the screws supplied, which may have to
be cut and filed to remove any sharp edges. 4 short screws are supplied for fitting to glass doors and fly screens
and 4 long screws for all other installations on a thickness of up to 55 mm-2.17”. The 4 long screws will have to
be shortened for installations on an intermediary thickness (i.e.: for installations on a thickness of 45 mm-1.77”
shorten the screws by 10 mm-0.39”; for installations on a thickness of 35 mm-1.38” shorten the screws by 20
mm-0.79”, and so on). Instead, you could purchase a new set of screws to your specifications at your local
hardware store. Warning: too short a screw could strip the thread whereas too long a screw could break the front
panel of the pet door.
POUR LES AUTRES INSTALLATIONS: Montez le battant en le fixant avec les vis fournies qui, si nécessaire,
devront être coupées et limées pour éviter des bords tranchants. 4 vis courtes sont fournies pour l’installation sur
vitres et moustiquaires et quatre vis longues sont fournies pour toutes les autres installations dont l’épaisseur
atteint 55mm. Pour des installations sur des épaisseurs intermédiaires, il est nécessaire de raccourcir les quatre vis
longues (par exemple: pour les installations sur des épaisseurs de 45 mm, raccourcir les vis de 10 mm; pour les
installations sur des épaisseurs de 35 mm, raccourcir les vis de 20 mm, et ainsi de suite). Attention: une vis trop
courte peut abîmer les sièges, tandis qu’une vis trop longue peut les percer!
MONTAGE BEI ALLEN ANDEREN TÜRARTEN: Montieren Sie die Luke mit Hilfe der vier mitgelieferten
Befestigungsschrauben, die - falls notwendig - zugeschnitten und abgefeilt werden müssen, um scharfe Kanten
zu vermeiden. Das Verpackungsset enthält 4 kurze Schrauben für die Montage auf Glas und Mückennetzen, und
4 lange Schrauben für alle anderen Einbauweisen mit Stärkedurchmessern bis zu 55mm. Für die Montage auf
mittleren Stärkedurchmessern müssen die vier langen Schrauben gekürzt werden (zum Beispiel: für die Montage
auf Stärkedurchmessern von 45 mm werden die Schrauben um 10 mm gekürzt; für die Montage auf
Stärkedurchmessern von 35 mm werden die Schrauben um 20mm gekürzt, usw.). Vorsich: eine zu kurze Schraube
könnte den Sitz abwürgen und eine zu lange Schraube könnte ihn durchstoßen!
MONTAGE IN ANDERE SOORT DEUREN: Monteer het luik met de schroeven die in de verpakking zitten. Maak
de schroeven eventueel korter en vijl de scherpe puntjes eraf. Er zijn 4 korte schroeven voor het monteren in glas
en vliegengaas en 4 lange schroeven voor alle andere materialen met een dikte tot 55 mm. Voor diktes daartussen
dient u de 4 lange schroeven korter te maken (voor een dikte van 45 mm snijdt u bijv. 10 mm van de schroeven
af; voor een dikte van 35 mm snijdt u er 20 mm af, enz.). Let op: een te korte of te lange schroef kan het
eindresultaat verknoeien!
TODAS LAS OTRAS INSTALACIONES: Monte la puerta fijándola con los tornillos incluidos en el suministro, que,
a ser necesario, se deberán cortar y limar para evitar que queden bordes afilados. En el suministro se incluyen 4
tornillos cortos para la instalación en vidrio y en mosquitera, y cuatro tornillos largos para todas las demás
instalaciones con espesores de hasta 55mm. Para las instalaciones con espesores intermedios es necesario cortar
los cuatro tornillos largos (por ejemplo: para una instalación con espesor de 45 mm se deben acortar los tornillos
de 10 mm; para una instalación con espesor de 35 mm se deben acortar los tornillos de 20mm, etcétera).
Atención: Un tornillo demasiado corto puede estropear la rosca de los alojamientos, mientras que un tornillo
demasiado largo ¡puede hundirlo!
A
1
3
5
7
4
6
Ø 4,5 mm
0.18“
A
2
A
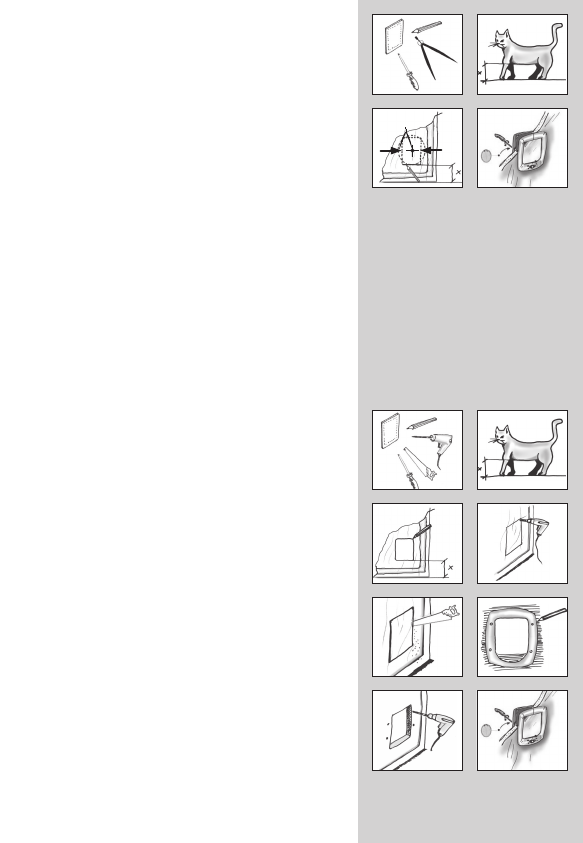
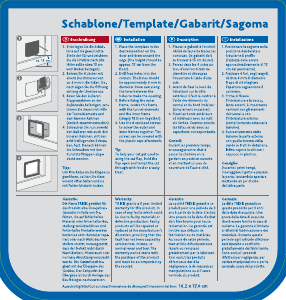
INSTALLAZIONE SU VETRO
Tagliare il vetro può essere pericoloso. Prima dell’operazione è consigliabile consultare un vetraio. Non è
possibile praticare dei fori su vetro di sicurezza temprato o su doppi vetri, a meno che non siano stati eseguiti al
momento della fabbricazione. Misurate l’altezza della pancia dell’animale e posizionate la dima (lato A) con il
lato inferiore alla stessa altezza. Tracciate con il pennarello il lato inferiore. Lo userete come base per centrare il
compasso nei punti indicati nella DIMA. Praticare un foro circolare di raggio 102 mm se la vostra portina è la
versione piccola Swing 1, oppure di 108 mm se è la versione piccola Swing 3. Il centro per il foro è segnato sulla
dima.
FITTING ON GLASS DOORS
Cutting glass can be dangerous. You must consult a glass merchant before starting the job. It is impossible to
drill holes in toughened safety glass or double-glazing unless they have already been drilled when the panes are
manufactured. Measure the belly height of your pet from the floor and position the template (side A) on the
door with the bottom at the same height. Mark the bottom side using a marker, you will use it as the base to
center the compasses on the points marked on the template. Then follow these instructions: drill a circular hole
with radius of 102 mm, if your pet flap is the small Swing 1, or of 108 mm if it is the small Swing 3. The centre
of the hole is marked on the template.
INSTALLATION SUR PORTES VITREES
Couper le verre peut être dangereux. Avant de procéder à l’opération, il est conseillé de consulter d’abord un
vitrier. Il n’est pas possible de percer des trous sur une vitre de sécurité trempée ou sur les doubles vitrages, à
moins qu’ils n’aient été réalisés lors de la fabrication. Mesurez la hauteur du ventre de l’animal et positionnez le
gabarit (côté A) avec le côté inférieur à cette même hauteur. Avec le feutre, tracez le côté inférieur. Il vous servira
de base pour centrer le compas sur les points indiqués sur le gabarit. Pratiquer un trou circulaire d’un diamètre
de 102 mm pour la Swing 1, ou de 108 mm pour la Swing 3. Le repère pour le trou est marqué sur le gabarit.
MONTAGE BEI GLASTÜREN
Glas zuzuschneiden kann sehr gefährlich sein. Bevor Sie mit diesem Vorgang beginnen, empfehlen wir Ihnen,
sich mit einem Glaser in Verbindung zu setzen. Auf gehärtetem Sicherheitsglas oder Doppelglas können keine
Löcher geschnitten werden, es sei denn, sie wurden bei der Herstellung eingearbeitet. Messen Sie die untere
Bauchhöhe des Tiers und legen Sie die Schablone (Seite A) mit der unteren Seite auf derselben Höhe an.
Markieren Sie den unteren Schablonenansatz mit einem Filzstift. Dies wird als Vorlage verwendet, um den Zirkel
auf der entsprechenden Markierung auf der Schablone zu zentrieren. Danach sind folgende Arbeitsschritte zu
beachten: Bohren Sie ein Loch mit einem Durchmesser von 102 mm bei einer Katzenklappe Swing 1 mit kleiner
Tür oder 108 mm bei der Ausführung Swing 3 mit kleiner Tür. Die Lochmitte ist auf der Schablone eingezeichnet.
MONTAGE IN GLAZEN DEUREN
Glas snijden is gevaarlijk. Raadpleeg eerst een glazenmaker. U kunt geen gaten maken in gehard glas of dubbel
glas, tenzij u deze bestelt op het ogenblik waarop u het glas laat maken. Meet de buikhoogte van uw huisdier
en houd de mal (kant A) met de onderkant op de gemeten hoogte tegen het glas. Markeer de onderkant met
een viltstift; dit vormt de basis om de kompaskruizen op de mal te centreren. Vervolgens boor een rond gat met
een straal van 102 mm als u een mini huisdierdeur Swing 1 heeft, of van 108 mm als u een mini huisdierdeur
Swing 3 monteert. Het middelpunt van de cirkel is op de mal aangeduid.
MONTAJE EN PUERTAS DE VIDRIO
Cortar el vidrio puede ser peligroso. Antes de efectuar esta operación es mejor consultar con un vidriero. No es
posible taladrar agujeros en vidrio de seguridad templado o en vidrios dobles, salvo que dichos agujeros sean
realizados en el momento de la fabricación. Mida la altura del vientre del animal y coloque el patrón (lado A)
con el lado inferior a la misma altura. Con el marcador marque el lado inferior. Lo utilizará como base para
dibujar con el compás los puntos indicados nel patrón y para taladrar un agujero circular con un radio de 102
mm si su puerta es la versión pequeña Swing 1, de 108 mm si su puerta es la versión pequeña Swing 3. El centro
para el agujero está marcado en el patrón.
2
Mod. 1- R 102 mm-4.15”
Mod. 3- R 108 mm-4.25”
A
101071-2_Swing 1SB & 3B.indd 1101071-2_Swing 1SB & 3B.indd 1 31/08/11 15.4331/08/11 15.43


Join the conversation about this product
Here you can share what you think about the Ferplast Swing 3 Cat Flap. If you have a question, first carefully read the manual. Requesting a manual can be done by using our contact form.
reply | This was helpful (8) (Translated by Google)
reply | This was helpful (2) (Translated by Google)
reply | This was helpful (0) (Translated by Google)
reply | This was helpful (0)