Connecting the hob to the mains power supply
This hob must be connected to the mains power supply only by a suitably qualified person.
Before connecting the hob to the mains power supply, check that:
1. the domestic wiring system is suitable for the power drawn by the hob.
2. the voltage corresponds to the value given in the rating plate
3. the power supply cable sections can withstand the load specified on the rating plate.
To connect the hob to the mains power supply, do not use adapters, reducers, or branching devices, as they can cause
overheating and fire.
The power supply cable must not touch any hot parts and must be positioned so that itstemperature will not exceed 75˚C at any point.
Check with an electrician whether the domestic wiring system is suitable without alterations. Any alterations must only be made
by a qualified electrician.
The power supply should be connected in compliance with the relevant standard,or a single-pole circuit breaker.the method of
connection is shown below.
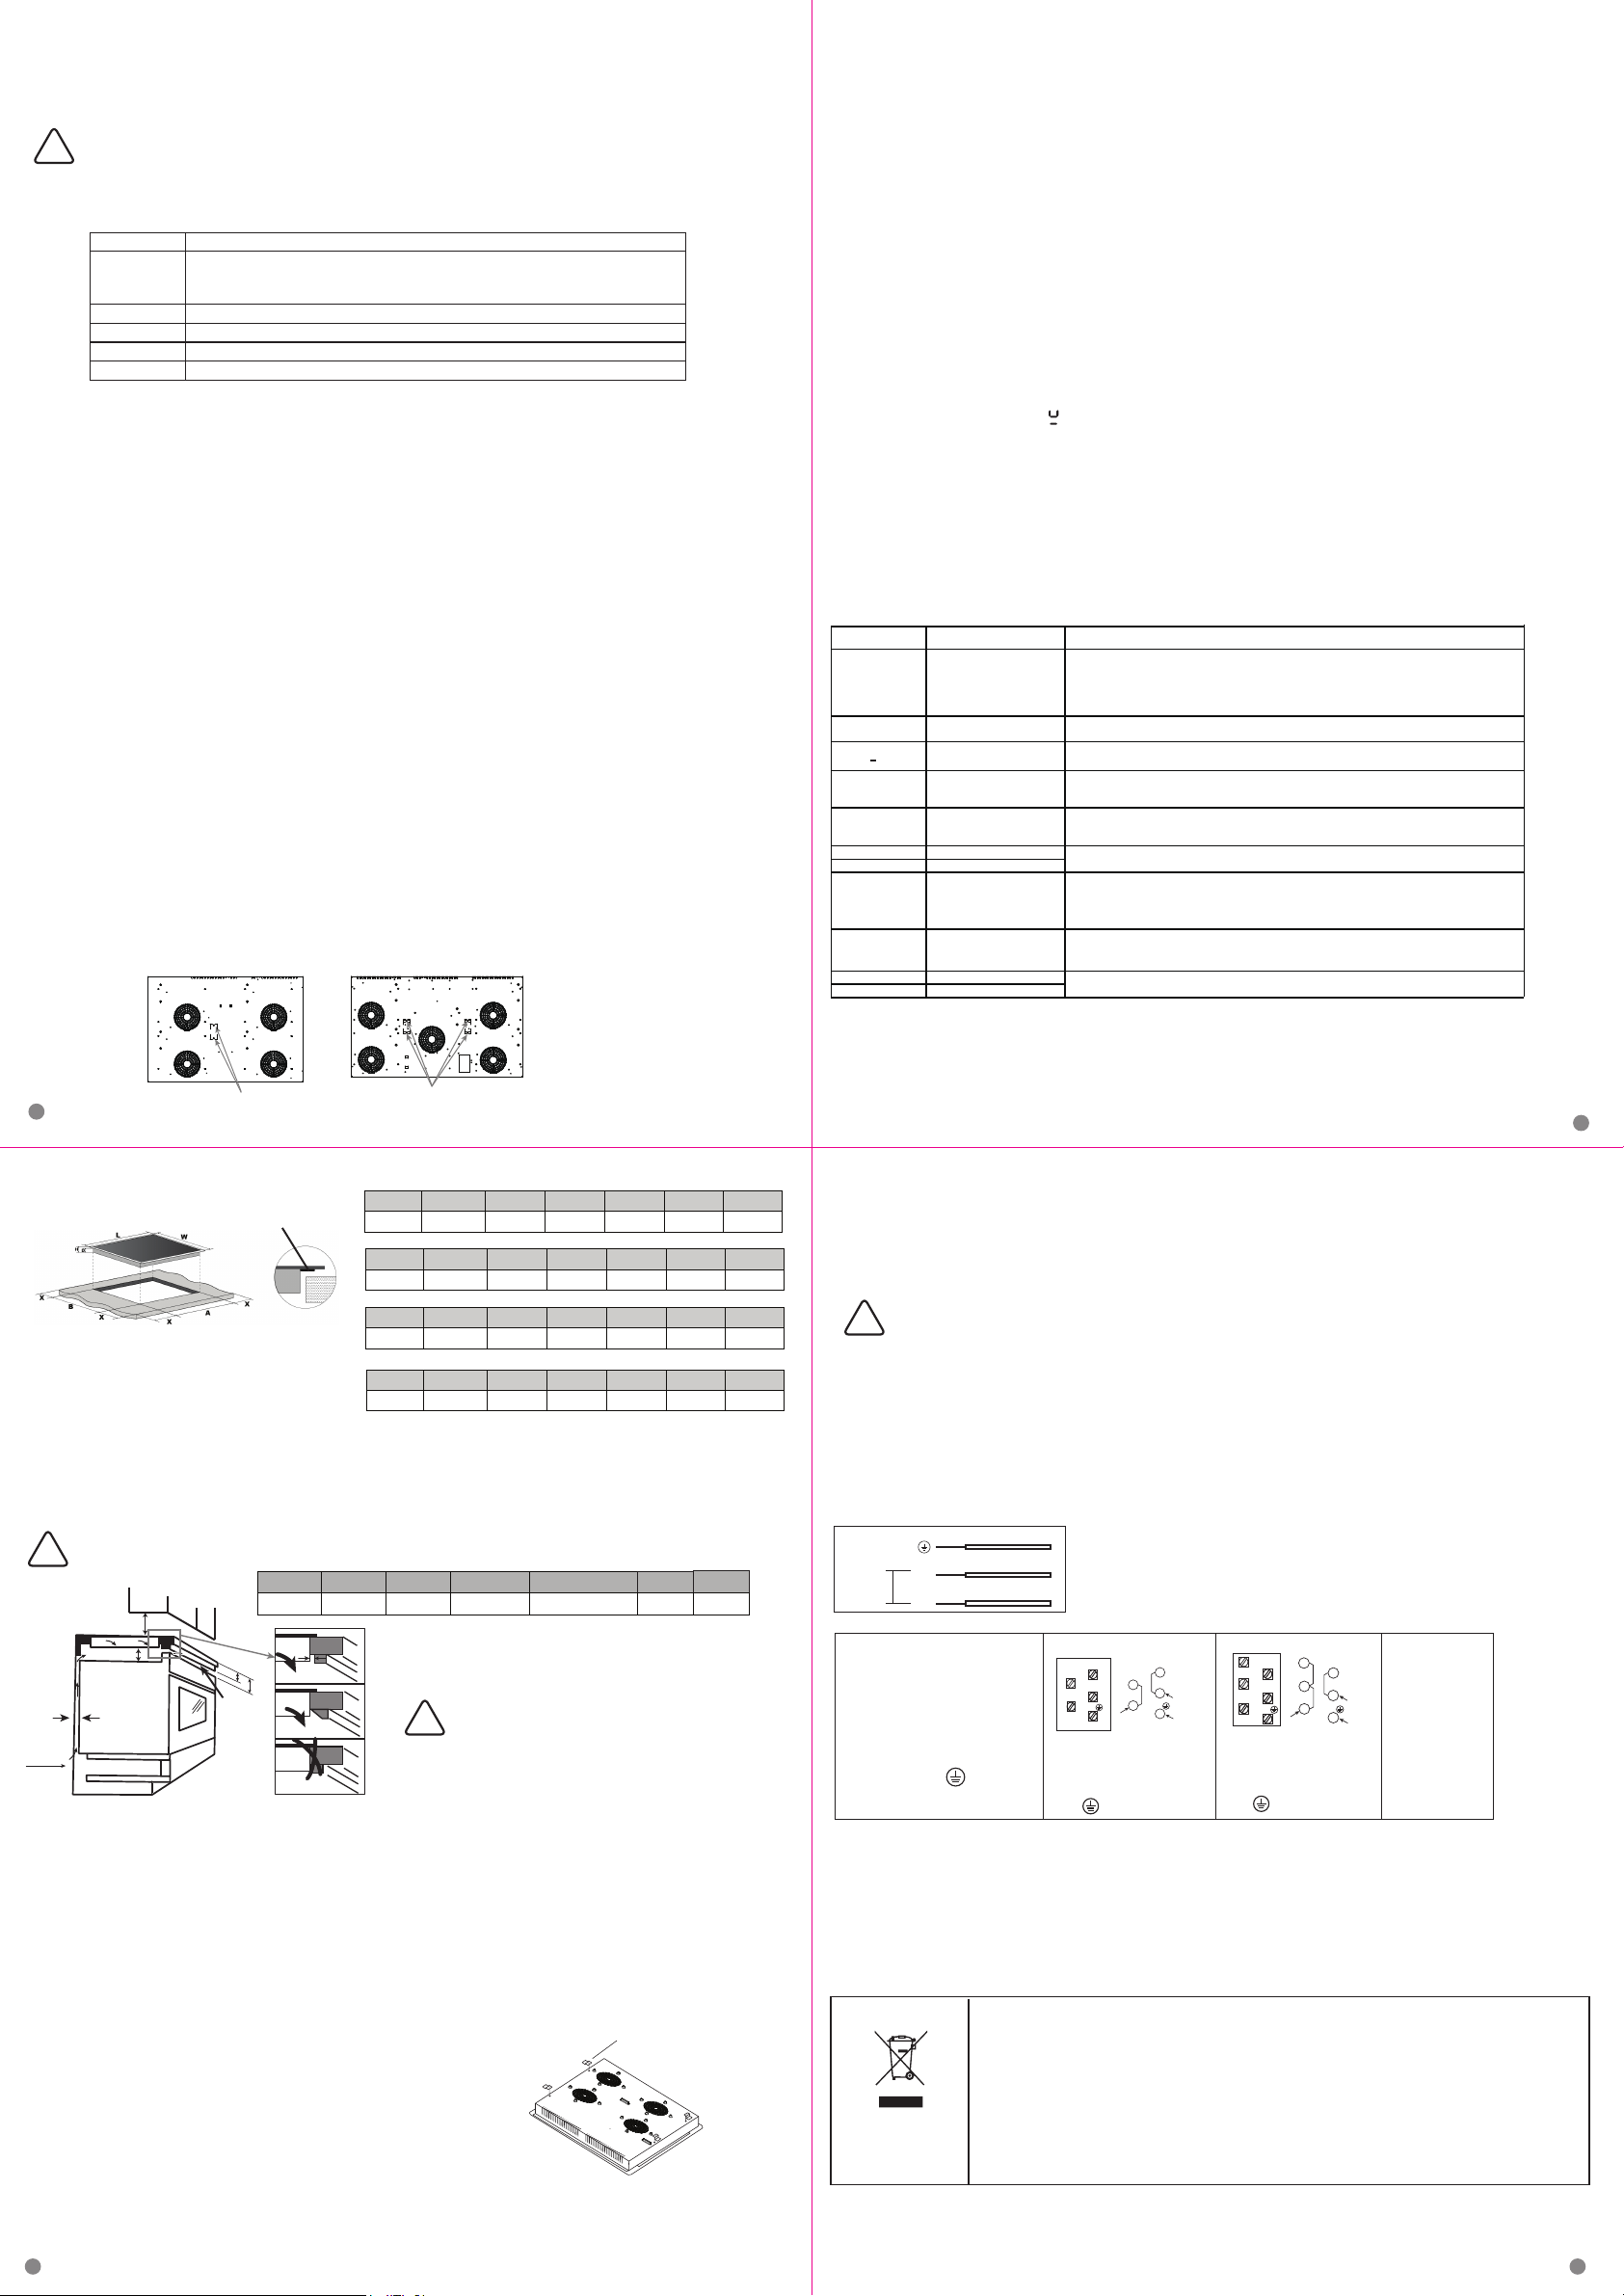
ED-IC30T
ED-IC60T
ED-IC75T
ED-IC90T
Heat setting Suitability
1-2
3-4
5-6
7-8
9
● Delicate warming for small amounts of food
● Melting chocolate, butter, and foods that burn quickly
● Gentle simmering ● Slow warming
● Reheating ● Rapid simmering ● Cooking rice
● Pancakes
● Cooking pasta
● Stir-frying ● Searing ● Bringing soup to the boil ● Boiling water
!
!
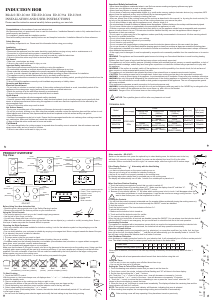
L(mm) W(mm) H(mm) D(mm) A(mm) B(mm) X(mm)
288 520 62 56 268 500 50 mini
L(mm) W(mm) H(mm) D(mm) A(mm) B(mm) X(mm)
590 520 77 72 560 490 50 mini
L(mm) W(mm) H(mm) D(mm) A(mm) B(mm) X(mm)
750 520 77 72 720 490 50 mini
L(mm) W(mm) H(mm) D(mm) A(mm) B(mm) X(mm)
860 520 77 72 830 490 50 mini
!
A(mm) B(mm) C(mm) D E
760 50 mini 20 mini Air intake Air exit ≥5mm
F
>35mm
G
<50mm
D
E
A
C
B
>2cm
F
G
7 8
6
5
Blue
Bronw
Yellow/Green
PE
N
L
220-240V
ED-IC30T
ED-IC75T
SEAL
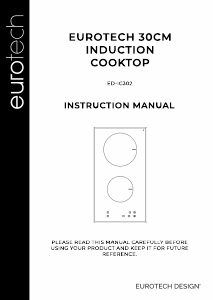
2 bigger Screws need to removed
4. Disassembly bottom base (ED-IC75T ED-IC90T)
bigger screws need to be removed first before bottom base disassembly. (Bottom base removal need to be done by
professional person. Normal user is not allowed to disassembly bottom base).
Brackets
!
Boost Control ( ED-IC60T ED-IC75T ED-IC90T)
To enable the boost function, first press the heating zone selection control and then the “Boost” control. A buzzer will beep once
and “P” symbol will illuminate up on the display showing the function has been activated. Depending on the zone, the heating
will either be increased. This function will run for 5 minutes and then return to the previous setting. To cancel the function, simply
press the “Boost” key again and the hob will return to the previous setting.
Heat Settings
The settings below are guidelines only. The exact setting will depend on several factors, including your cookware and the
amount you are cooking. Experiment with the induction hob to find the settings that best suit you.
Cooking Guidelines
Take care when frying as the oil and fat heat up very quickly, particularly if you’re using the “Boost” function.
At extremely high termperatures oil and fat will ignite spontaneously and this presents a serious fire risk.
Care and cleaning
1. Everyday soiling on glass (fingerprints, marks, stains left by food of non-sugary spillovers on the glass).
1)Switch off the power to the cooktop.
2)Apply a cooktop cleaner while the glass is still warm (but not hot!)
3)Rinse and wipe dry with a clean cloth or paper towel.
4)Switch the power to the cooktop back on.
● When the power to the cooktop is switched off, there will be no hot surface indication but the cooking zones may
still be hot! Take extreme care.
● Heavy-duty or some nylon scourers and harsh/abrasive cleaning agents may scratch the glass surface, so please
do check that they are suitable for induction hob care before use.
● Never leave cleaning residue on the cooktop: the glass may become stained.
2. Boil-overs, melts and hot sugary spills on the glass
Remove these immediately with a palette knife or razor blade scraper suitable for induction glass cooktops but
beware of hot cooking zone surfaces:
1). Switch off the power to the cooktop via the isolation switch.
2). Hold the blade or utensil at a 30°angle and scrape the soiling or spill to a cool area of the cooktop.
3). Clean the soiling or spill up with a dish cloth or paper towel.
4). Follow steps 2 to 4 for everyday soiling on glass above.
● Remove stains left by melts and sugary food or spillovers as soon as possible. If left to cool on the glass, they
may be difficult to remove or even permanently damage the glass surface.
● Cut hazard: when the safety cover is retracted, use with extreme care and always store safely and out of reach
of children.
3. Spillovers on the touch controls
1). Switch off the power to the cooktop.
2). Soak up the spill.
3). Wipe the touch control area with a clean damp sponge or cloth.
4). Wipe the area completely dry with a paper towel.
5). Switch the power to the cooktop back on.
The cooktop may beep and turn itself off, and the touch controls may not function while there is liquid on them.
Make sure you wipe the touch control area dry before turning the cooktop back on.
NOTE:
NOTE:
NOTE:
Hints and Tips
1. The induction hob cannot be turned on.
Make sure the induction hob is connected to the power supply and that it is switched on.
Check whether there is a power outage in your home or local area. If you’ve checked everything and the problem persists,
call a qualified technician.
2. The touch controls are unresponsive.
The controls are locked: Unlock the controls. See section using your induction cooktop for instructions.
3. The touch controls are difficult to operate.
There may be a slight film of water over the controls or you may be using the tip of your finger when touching the controls:
Make sure the touch control area is dry and use the ball of your finger when touching the controls.
6. The induction hob makes a low humming noise when used on a high heat setting.
This is caused by the technology of induction cooking: This is normal, the noise should quieten down or disappear
completely when you decrease the heat setting.
7. Fan noise coming from the induction hob.
A cooling fan built into your induction hob has come on to prevent the electronics from overheating. It may continue to run
even after you’ve turned the induction hob off: This is normal and needs no action. Do not switch the power to the
induction hob off at the wall while the fan is running.
8. Pans do not become hot and “ ” appears in the display.
The induction hob cannot detect the pan because it is not suitable for induction cooking. The induction hob cannot detect
the pan because it is too small for the cooking zone or not properly centred on it: Use cookware suitable for induction
cooking. See section “Choosing the Right Cookware”.
Centre the pan and make sure that its base matches the size of the cooking zone.
9. The induction hob or a cooking zone has turned itself off unexpectedly, a tone sounds and an error code is
displayed (typically alternating with one or two digits in the cooking timer display).
Technical fault: Please note down the error letters and numbers, switch the power to the induction hob off at the wall, and
contact a qualified technician.
4. The glass is being scratched.
Tough-edged cookware. Unsuitable, abrasive scourer or cleaning products being used: Use cookware with flat and
smooth bases. See “Choosing the Right Cookware” and “Care and Cleaning” for further advice.
5. Some pans make crackling or clicking noises.
This may be caused by the construction of your cookware (layers of different metals vibrating differently): This is normal,
the noise should quieten down or disappear completely.
Failure Display and Inspection
If an abnormality comes up, the induction hob will automatically enter the protective state and display
corresponding protective codes:
Installation
Selection of Installation Equipment
Cut out the work surface according to the sizes shown in the drawing.
For the purpose of installation and use, a minimum of 5cm space should be preserved around the hole.
Ensure the thickness of the work surface is at least 35mm. Please select a heat-resistant work surface material to avoid
deformation caused by the heat radiation from the hotplate.
The above are the judgment and inspection of common failures.
Please do not disassemble the unit by yourself to avoid any danger or damage to the induction hob.
Make sure the induction hob is well ventilated and the air inlet and outlet are not blocked. Ensure the induction hob is in good
working order.
Note: The distance between the hotplate and the cupboard above should be at least 760mm.
The hob has a special seal which prevents liquid from entering the cabinet. Follow these instructions in order to correctly apply
this seal: Detach the seals from their backing. Turn the hob over and correctly position the seal under the edge of the hob so
that the outer part of the seal perfectly matches the outer edge of the hob. Fix the seal to the hob evenly and securely, pressing
it firmly in place.
Note: There must be a 560x5mm opening in the front
(position E) to dissipate the air.
After installation, ensure the airflow opening is not
blocked by the worktop.
Before you install the hob, make sure that:
• The work surface is square and level, and that no structural units interfere with the space requirements.
• The work surface is made of a heat-resistant material.
• If the hob is installed above an oven, the oven has a built-in cooling fan.
• The installation will comply with all clearance requirements and applicable standards and regulations.
• A suitable isolating switch providing full disconnection from the mains power supply is incorporated in the permanent wiring,
mounted and positioned to comply with the local wiring rules and regulations.
The isolating switch must be of an approved type and provide a 3 mm air gap contact separation in all poles (or in all active
[phase] conductors if the local wiring rules allow for this variation of the requirements).
• The isolating switch will be easily accessible after installation.
• You consult local building authorities and by-laws if in doubt regarding installation.
• You use heat-resistant materials (such as ceramic tiles) for the wall surfaces surrounding the hob.
When you have installed the hob, make sure that:
• The power supply cable is not accessible through cupboard doors or
drawers.
• There is adequate flow of fresh air from outside the cabinets to the base
of the hob.
• If the hob is installed above a drawer or cupboard space, the hob bottom
temperature may be too high,in order to prevent hand or other flammable
/combustion contact,a thermal protection barrier is installed below the
base of the hob.
• The isolating switch is easily accessible.
Before locating the fixing brackets
The unit should be placed on a stable, smooth surface to prevent damage. Do not apply force onto the controls protruding from
the hob.
Adjusting the bracket position
Fix the hob on the work surface by screwing 4 brackets on the bottom of hob (see picture) after installation.
Cautions
1. The induction hot must be installed by qualified personnel or technicians.
2. The hob must not be installed directly above a dishwasher, fridge, freezer, washing machine or a dryer as the humidity may
damage the hob electronics.
3. The induction hot must be installed in a way that better heat radiation can be ensured to enhance its reliability.
4. The wall and induced heating zone above the worksurface must withstand heat generated by the hob.
5. To avoid any damage, the sandwich layer and adhesive must be resistant to heat.
• If the cable is damaged or to be replaced, the operation must be carried out the by a service agent or a suitably qualified
professional.
• If the appliance is being connected directly to the mains, an omnipolar circuit breaker must be installed with a minimum
opening of 3mm between contacts.
• The installer must ensure that the correct electrical connection has been made and that it is compliant with all applicable
standards and safety regulations.
• The cable must not be bent or compressed.
• The cable must be checked regularly and replaced by authorised technicians only.
This appliance is labelled in compliance with European directive 2012/19/EC for Waste Electrical and Electronic
Equipment (WEEE). By ensuring that this appliance is disposed of correctly, you will help prevent any possible harm
to the environment and to human health which might otherwise be caused if disposed of in the wrong way.
The symbol on the product indicates that it may not be treated as normal household waste.
It should be taken to a collection point for the recycling of electrical and electronic goods.
This appliance requires specialist waste disposal. For further information regarding the treatment, recovery and
recycling of this product, please contact your local council, household waste disposal service or the shop where you
purchased the product.
For more detailed information about treatment, recovery and recycling of this product, please contact your local local
council, household waste disposal service or the shop where you purchased the product.
Problem
U
Possible causes What to do
The appliance
does not work
Break in power supply
Please check the main power is normal; if the leakage protection switch is off; if there is a blown fuse,
replace it with a new one; if the main power is normal, check if the plug is connect with socket
appropriately; If the hob is wire connection type, disconnect the power, check if the wire is loose;
disconnect the power, check if main plug is off; Exclude above reasons, should be appliance fault, send
it to service center for repairing.
During heating,
the unit stop work.
Delay off timer activates.
No pan or pan unsuitable
Input power too low
Input power too high
Thermistor of coil short circuit.
Thermistor of coil open circuit.
Too high temperature
of IGBT thermistor.
Too high temperature
of coil thermistor.
IGBT thermistor short circuit
IGBT thermistor open circuit
Please check if set delay off function. If set delay off function, the unit will stop once delay off time out.
No pan, please put proper pan. PCB synchronization or drive circuit fault, please send the
appliance to service center for repairing.
E2
E1
F3
F4
E5
E3
F9
FA
Low voltage, voltage of the main power is less 180V. Please check if voltage of the main power is normal.
Once voltage of the main power returns normal, re-start the unit. Voltage of PCB fault, please send the
unit to service center for repairing.
High voltage, voltage of the main power exceeds 250V. Please check if voltage of the main power is
normal. Once voltage of the main power returns normal, re-start the unit. Voltage of PCB fault, please
send the unit to service center for repairing.
Sensor of coil thermistor connection error. Or detection part of PCB coil thermistor failure,
send to service center for reparing.
Too high temperature of IGBT thermistor, air outlet is blocked. Open air outlet, re-start the unit. If still
unsolved, it is possible that cooling fan connection error, cooling fan damaged, or drive circuit of fan
failure, send to service center for repairing. IGBT temperature sensor open circuit /short circuit.
Temperature detection part of PCB IGBT failure, send to service center for repairing.
Too high temperature on induction glass surface, please check if there is no water in pan. After
treatment, connect with power again. If still unsolved, it is possible that sensor of cooktop failure, send to
service center for repairing.
Senor of IGBT thermistor connection error. Or detection part of IGBT PCB sensor failure,
send to service center for repairing.
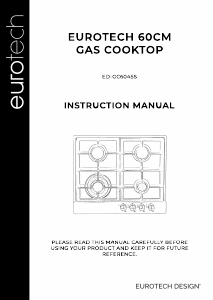
CONNECTION DIAGRAM
Caution! Voltage of heating
elements 220-240V Caution!
In the event of any connection
the safety Wire must be
connected to the E terminal.
Recommended
type of
connection lead
For 220-240V earthed
one-phase connection,
bridges connect L
①-②
terminals and N
④-⑤
terminals, safety wire
to
For 220-240V earthed
one-phase connection,
bridges connect L
①-②-③
terminals and N
④-⑤
terminals, safety wire
to
E
N
L
①
②
④
⑤
①
②
④
⑤
①
②
④
⑤
③
E
N
L
①
②
④
⑤
③
ED-IC60T
ED-IC90T
ED-IC754
ED-IC905
4 bigger Screws need to removed

Join the conversation about this product
Here you can share what you think about the Eurotech ED-IC905 Hob. If you have a question, first carefully read the manual. Requesting a manual can be done by using our contact form.