Tastiera Remota
Remote Keypad
KP100
KP100D
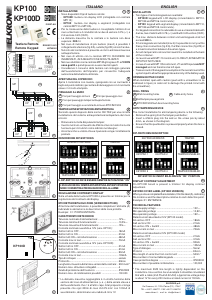
INSTALLAZIONE
• Sono disponibili 2 tipi di tastiere remote:
- KP100D: tastiera con display LCD (collegabile con centrale
MP110);
- KP100: tastiera con display a segmenti (collegabile con
centrali MP110 e MP105).
• Per la connessione delle tastiere è consigliabile l'utilizzo di un
cavo schermato a 4 conduttori di cui due di sezione 0.75 (+/-) e
2 di sezione 0.22 (CK/D).
• La distanza massima tra la centrale e le tastiere non deve
superare i 500 mt.
• Nel caso di installazione di più tastiere (max4) è possibile il
collegamento a festone (fig.2/A), a stella (fig.2/B) o misto fra i due.
• Sul retro del contenitore è presente un micro antimanomissione
antiasportazione.
• Nel caso di utilizzo con la centrale MP110 CHIUDERE GLI
INGRESSI Z1, Z2 A NEGATIVO SE NON UTILIZZATI
• Nel caso di utilizzo con la centrale MP105 gli ingressi Z1 e Z2 NON
sono gestiti e quindi possono essere lasciati aperti.
• Considerare il consumo delle tastiere nel conteggio generale
dell'assorbimento dell'impianto per consentire l'adeguata
autonomia della batteria utilizzata.
Fori per fissaggio al muro Fori per passaggio cavi
Foro per passaggio tamper antiasportazione
Fori per fissaggio su scatola da incasso BTICINO 503
FISSAGGIO AL MURO
TAMPER ANTIASPORTAZIONE/ANTIAPERTURA
Secondo quanto disposto dalle norme CEI 79/2 per una corretta
installazione del sistema antiasportazione/antiapertura dal muro
occorre:
• Rimuovere la molla dal pulsante tamper;
• Inserire nel muro un tassello da 4/5mm e fare in modo che la vite
fuoriesca per circa 4mm come indicato nel disegno;
• Accertarsi che a scatola chiusa il pulsante venga correttamente
premuto.
CARATTERISTICHE TECNICHE
Tensione nominale di alimentazione: ............................ 12V—
Tensione minima di funzionamento: .............................. 10,5V—
Tensione massima di funzionamento: ........................... 15V—
Corrente nominale assorbita a 12V (vers. KP100):
Settori tutti in OFF ....................................................... 18mA
Settori tutti in ON ......................................................... 21mA
Settori tutti ON + retroilluminazione ............................. 48mA
Corrente max in test..................................................... 70mA
Corrente nominale assorbita a 12V (vers. KP100D):
Settori tutti in OFF ....................................................... 21mA
Settori tutti in ON ......................................................... 31mA
Settori tutti ON + retroilluminazione ............................. 90mA
Corrente max in test..................................................... 105mA
Tipo di colloquio ...........................................................seriale
Protocollo ..................................................................... Elkron
Lunghezza massima della linea seriale dalla centrale: . 500 metri*
Numero max. di tastiere collegabili............................... 4
Grado di protezione dell’involucro: ................................ IP30/IK02
Numero max. di combinazioni possibili: ....................... 100.000
* La distanza massima raggiungibile è in stretta funzione della
sezione del cavo di alimentazione (+ e –) della seriale stessa e
dell’assorbimento che c’ è all’altro capo. A tal proposito si tenga
presente che ogni 200m di cavo 2x0.75 mm² con 100mA di
assorbimento, determinano una caduta di circa 1V.
ETICHETTA RIEPILOGO ZONE (VERSIONE KP100D)
Al termine dell’installazione, è possibile completare l’etichetta (A)
indicando le ubicazioni e le descrizioni delle zone protette.
Esempio: 01: PORTA ENTRATA.
A B
C
D
B
A
DESCRIZIONE DIP-SWITCHES
INDIRIZZO TASTIERA
TASTIERA 1
TAMPER
TASTIERA 2
TASTIERA 3 TASTIERA 4
TAMPER ABILITATO
TAMPER DISABILITATO
IL DIP-SWITCH N.3 DEVE ESSERE SEMPRE IN POSIZIONE “ON”
L’ESCLUSIONE DEL TAMPER ANTIAPERTURA-ANTIASPORTAZIONE
NON E’ CONSENTITA AI FINI DEL MARCHIO IMQ- ALLARME
ITALIANO
REGOLAZIONE CONTRASTO DISPLAY
Sulla scheda della tastiera KP100D è presente un trimmer per la
regolazione del contrasto del display.
A
A
A A BB
B
B
B
C
DD
KP100D
A
APERTURA DEL COPERCHIO
Aprire il contenitore con cautela, (spingendo con un cacciavite a
taglio nel punto indicato) per evitare di danneggiare con il cacciavite
stesso il circuito stampato.
INSTALLATION
• Two types of remote keypads are available:
- KP100D: keypad with LCD display (connectable to MP110,
MP108 and MP106 control units);
- KP100: keypad with segment display (connectable to MP110,
MP108 and MP105 control units).
• For keypad connection it is advisable to use a screened cable with
4 wires, two of which with 0.75 (+/-) and 2 with 0.22 section (CK/D).
• The max. distance between control unit and keypads shall not
exceed 500 m.
• If more keypads are installed (max 4) it is possible to carry out the
Daisy chain connection (fig.2/A), the Star connection (fig.2/B) or
a mixed connection between these two types.
• An anti-tamper/anti-removal microswitch is installed on the back
of the container.
• In case of use with MP110 control unit, CLOSE Z1,Z2 NEGATIVE
INPUTS IF NOT USED.
• In case of use with MP 105 control unit, Z1 and Z2 inputs are NOT
managed and can therefore be left open.
• Take account of the keypad consumption in the overall count of the
system input to allow the appropriate autonomy of the battery used.
Wall mounting holes Cable entry holes
Antitamper passage hole
BTICINO 503 flush box mounting holes
WALL FIXING
ANTI-TAMPERING DEVICE
The correct installation for anti-tampering device is the following:
• Remove the spring from the tamper pushbutton;
• Insert a 4/5mm plug into the wall so the screw juts by about
4mm, as shown in the diagram;
• Ensure that the pushbutton is pressed properly when the box is
closed.
TECHNICAL FEATURES
Rated supply voltage .................................................... 12V—
Min operating voltage ................................................... 10,5V—
Max operating voltage .................................................. 15V—
Rated current absorbed at 12V (KP100 model)
All sectors OFF ........................................................... 18mA
Aall sectors ON ........................................................... 21mA
All sectors ON + backlit ............................................... 48mA
Max current on test ...................................................... 70mA
Rated current absorbed at 12V (KP100D model)
All sectors OFF ........................................................... 21mA
Aall sectors ON ........................................................... 31mA
All sectors ON + backlit ............................................... 90mA
Max current on test ...................................................... 105mA
Type of dialogue ........................................................... Serial
Protocol ....................................................................... Elkron
Max.length of serial line from control unit ..................... 500m *
Max.number of connectable keypads ........................... 4
Case protection degree ................................................ IP30/IK02
Max.number of possible combinations ......................... 100,000
* The maximum BUS line length is tightly dependent on the
conductors cross section. As an example it should be considered
that with a cable (2x0.75+2x0.22+SH) a typical line voltage drop
is about 1V for every 200 metres at rated current of 100mA.
KEYPAD COVER LABEL (KP100D VERSION)
When you have completed the installation, fill in the label (A), indicating
the locations and the descriptions relative to each detection point.
Example: 01: ENTRANCE.
A B
C
D
DIP-SWITCHES DESCRIPTION
KEYPAD ADDRESS
KEYPAD 1
TAMPER
KEYPAD 2
KEYPAD 3 KEYPAD 4
TAMPER ENABLED
TAMPER DISABLED
DIP-SWITCH N.3 MUST BE ALWAIS IN “ON” POSITION
ENGLISH
DISPLAY CONTRAST ADJUSTMENT
On KP100D board is present a trimmer for display contrast
adjustment.
OPENING KEYPAD COVER
When installed, open with caution (push with a screwdriver in as
indicated in figure) in order not to damage the printed circuit with
the screwdriver).
ELKRON S.p.A.
Via Cimarosa, 39 - 10154 Torino (TO) - ITALY
TEL. +39.011.3986711 - FAX +39.011.3986790
21
3
4
5
6
7
7
6
5
4
3
1 2
1
2
3
4
5
6
7
MP
KP KPKP
KP KPKP
MP
IS0097-AH
DS80KP21-001
LBT80020


Join the conversation about this product
Here you can share what you think about the Elkron KP100D Alarm System. If you have a question, first carefully read the manual. Requesting a manual can be done by using our contact form.
reply | This was helpful (5) (Translated by Google)
reply | This was helpful (2) (Translated by Google)