Remote control
Wall mount bracket installation
Wall mount bracket installation
Bluetooth operationBasic operation
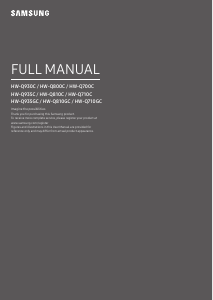
Connection
S70DB Active Speaker System
Home Theatre/Home Entertainment/Lifestyle
1
Drill hole on the wall
2
Fix wall mount bracket on the wall
3
Put the speaker onto the wall mount bracket
Note:
1. Only the standard PCM audio signals (44.1KHz/48KHz/96KHz/192KHz) function in optical/
coaxial mode.
2. The system does not support compression-format digital signal like Dolby and DTS etc, it will
automatically shut down the amplifier if input from those digital signals are detected.
1. Press in the "Master volume control" knob on the speaker or the corresponding audio source button on the
remote control to select audio source.
2. Play music and adjust to the comfortable volume.
AUX LINE IN Bluetooth OPTICAL COAXIAL
or
1. Press in the "Master volume control" knob on the speaker or “ ” button on the remote control to select Bluetooth
mode. The display window shows up Bluetooth mode.
2. Set your Bluetooth device (mobile phone, tablet etc.) to search and select “EDIFIER S70DB”.
3. PIN code for connection is “0000” if needed.
Note:
1. Bluetooth connectivity and compatibility may be different between different source devices, depending on the software
versions of source devices.
2. To enjoy all Bluetooth functions of this product, please ensure your mobile device has A2DP profile.
EDIFIER S50DB
Bluetooth
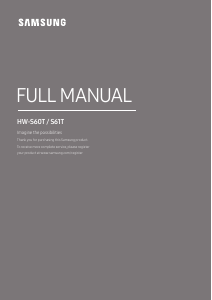
Align mounting bracket to the holes and use screws to attach wall mount bracket
Manual Edition 1.0, July 2017
IB-200-S0070D-00
NOTICE:
NOTICE:
For the need of technical improvement and system upgrade,information contained herein may be subject to change
from time to time without prior notice.
Products of EDIFIER will be customized for different applications. Pictures and illustrations shown on this manual may
be slightly different from actual product. If any difference is found, the actual product prevails.
Suit 2207, 22nd floor,
Tower II,Lippo centre,
89 Queensway
Hong Kong
Tel: +852 2522 6989
Fax: +852 2522 1989
www.edifier.com
© 2017 Edifier International Limited. All rights reserved.
Printed in China
Important safety instruction Important safety instruction
11
English
12
English
9
English
10
English
7
English
8
English
5
English
6
English
1
English
2
English
3
English
4
English
Troubleshooting
Problem Solution
• Check if the power indicator light is ON
• Try to turn up the volume using either the master volume
control or remote control.
• Ensure the audio cables are firmly connected and the
input is set correctly on the speakers.
• Check if there is a signal output from the audio source.
• Make sure the speaker is switched to Bluetooth input. If
it is in other audio input modes, Bluetooth will not connect.
Disconnect from any Bluetooth device by pressing and
holding the volume dial in Bluetooth mode, then try again.
• Effective Bluetooth transmission range is 10 meters;
please ensure that operation is within the range.
• Try another Bluetooth device for connection.
• Check if main power is connected, or if the wall outlet is
switched on.
No sound
Cannot connect via Bluetooth
The S70DB does not turn on
To learn more about EDIFIER, please visit www.edifier.com
For Edifier warranty queries, please visit the relevant country page on www.edifier.com and review the
section titled Warranty Terms.
South America: Please visit www.edifier.com (English) or www.edifierla.com (Spanish/Portuguese) for local
contact information.
Specification
Power output: R/L (Treble): 12W+12W
R/L (Mid-range and bass): 32W+32W
SW: 70W
Frequency response: 45Hz~20KHz
Noise level: ≤25dB(A)
Sensitivity: AUX input: R/L: 400±50mV SW: 320±20mV
Line in input: R/L: 600±50mV SW: 450±20mV
OPT/COX input: R/L: 350±50mFFs SW: 220±20mFFs
Bluetooth input: R/L: 500±50mFFs SW: 420±20mFFs
Tweeter unit: ¾ inch (ø19mm)
Mid-range unit: 2 ¾ inch (70mm)
Bass unit: 8 inch (210mm)
Input type: AUX/Line in/Bluetooth/Optical/Coaxial
Frequency Band: 2.402GHz~2.480GHz
RF Power output: ≤20 dBm (EIRP)
There are no restrictions of use.
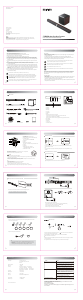
Unpack the box
User manual | Manuel d’utilisateur | Manual de usuario | Bedienungsanleitung | Manuale dell’utente | Manual do utilizador
1. Power ON/Standby
2. OPT/COX (press to switch OPT/COX input)
3. Bluetooth input(press and hold to disconnect Bluetooth)
4. Sound effect selection
Press to switch between MUSIC/MOVIE/NEWS
5. LINE IN input
6. AUX input
7. Bluetooth mode: previous track
Mute status: press and hold to show system software version
8. Volume up
9. Volume down
10. Bluetooth mode: press to play/pause
OPT/COX/LINE IN/AUX mode: press to mute
11. Bluetooth mode: next track
①
②
③
④
⑤
⑥
⑦⑧ ⑨
10 11
Battery installation and replacement
Rotate the battery cover based on the arrow direction and remove, correctly install the
CR2025 battery into the battery compartment and close cover.
WARNING!
1. Don’t swallow the battery; danger of chemical burn.
2. The product includes a wafer battery. Swallowing this battery may lead to injury or death. Do not place the new or old
battery in where children can get to it.
3. Don’t use the product if the battery cover is missing or not closed, and keep the remote inaccessible to children.
4. Please go to the hospital immediately if the battery is swallowed.
Note:
1. Do not place the remote control in places that are hot and humid.
2. Do not charge the batteries.
3. Remove the batteries when unused for a long period of time.
4. The battery should not be exposed to excessive heat such as direct sun, fire or similar.
5. Danger of explosion if battery is incorrectly replaced. Replace only with the same or equivalent type.
Drill 4 holes (Depth: 40mm/1.5”, Hole size: 8mm/1/4”) in the wall using the wall mount bracket as a template,
then knock wall anchor into holes.
Note:
Hole’s dimension may vary depending on wall materials, please adjust drill size to existing conditions for proper
installation.
Please make sure all audio cable connections are secure before mounting the speaker.
Warning: please carefully follow installation instructions to avoid damage.
Bluetooth input
Illustrations
Pair the main speaker with the active subwoofer:
1. After the active subwoofer is powered on, turn on power switch and red LED blinks slowly.
2. Press the “Pair” button on the active subwoofer, red LED blinks quickly.
3. Press and hold the “PAIR” button on the main speaker.
4. When the red light is constantly lit, the connection is successful.
Box contents
Wall mount bracket
Speaker
Subwoofer
1 2 3 4 5
7
1. Pair button
2. Optical input
3. Coaxial input
4. Line in input
5. Auxiliary input
6. Display
7. Master volume control (rotate to adjust volume)
Audio source selection (press to switch AUX→Line in→Bluetooth→OPT→COX)
Standby control (press and hold to Power ON/Standby)
System reset (press and hold to reset factory settings when showing system software versions)
8. Status indicator
9. Bass adjustment
10. Pair button
11. Power switch
12. Power cable connector
6
Aux InLine InCoaxialOPTPAI R
8
9
10
11
12
Fiber optic input audio cable
Power cable for subwoofer
3.5mm to RCA audio cable
3.5mm adapter audio cable
User manual
Remote control
Screw x4
Plastic wall anchor x4
This symbol is to alert the user to the presence of un-insulated dangerous voltage within the product's enclosure
that may be of sufficient magnitude to constitute a risk of electric shock to persons.
This symbol is to warn the user not to disassemble the enclosure of the product and there is no user-replaceable
part inside. Take the product to an authorized service center for repair.
Excessively loud music may lead to hearing loss. Please keep the volume in a safe range.
This symbol indicates that the product is for indoor use only.
This symbol indicates that the product is a CLASS II or double insulated electrical device with no earth requirement.
Correct Disposal of this product. This marking indicates that this product should not be disposed with other household
wastes throughout the EU. To prevent possible harm to the environment or human health from uncontrolled waste disposal,
recycle it responsibly to promote the sustainable reuse of material resources. To return your used device, please use the
return and collection systems or contact the retailer where the product was purchased. They can take this product for
environmental safe recycling.
Use only with the cart, stand, tripod, bracket, or table specified by the manufacturer, or sold with the apparatus. When a cart
is used, use caution when moving the cart/apparatus combination to avoid injury from tip-over.
1. Please read the instructions carefully. Keep it in safe place for future reference.
2. Use only accessories approved by the manufacturer.
3. Install the instrument properly by following the instructions in the device connection section.
4. Using the product in a 0-35℃ environment is recommended.
5. To reduce the risk of fire and electric shock, do not expose the product to rain or moisture.
6. Do not use this product near water. Do not immerge the product into any liquid or have it exposed to dripping or splashing.
7. Do not install or use this product near any heat source (e.g. radiator, heater, stove, or other devices that generate heat).
8. Do not place any object filled with liquids, such as vases on the product; neither should any open fire, such as lighted candles
be placed on the product.
9. Do not block any ventilation openings. Do not insert any object into ventilation openings or slots. It may cause fire or electric
shock.
10. Keep sufficient clearance around the product to maintain good ventilation (minimum 5cm is recommended).
11. Do not force a plug into the jack. Before connection, check for blockage in the jack and whether the plug matches the jack and
is oriented to the right direction.
12. Keep the provided accessories and parts (such as screws) away from children to prevent from being swallowed by mistake.
13. Do not open or remove the housing yourself. It may expose you to dangerous voltage or other hazardous risks. Regardless
the cause of damage (such as damaged wire or plug, exposure to liquid splash or foreign object falling in, exposure to rain or
moisture, product not working or being dropped, etc.), the repair has to be performed by an authorized service professional
immediately.
14. Before cleaning the product with dry cloth, always turn off the product and disconnect the power plug first.
15. Never use strong acid, alkali, gasoline, alcohol, or other chemical solvents to clean the product surface. Use only neutral
solvent or clear water for cleaning.
Power warning:
1. Place the product near the power outlet.
2. Before use, make sure that the operating voltage is the same as your local power supply. Correct operating voltage can
be found on the product plate.
3. For safety purpose, unplug the product during lightning storms or when unused for extended periods of time.
4. Under normal conditions, the power supply may get hot. Please keep good ventilation in the area and exercise caution.
5. Safety warning labels on the housing or bottom of the product or power adaptor.
For wireless product:
1. Wireless product may generate shortwave radio frequencies and interfere with the normal use of other electronic devices or
medical equipment.
2. Turn off the product when it’s disallowed. Do not use the product in medical facilities, on airplane, at gas stations, near
automatic gates, automatic fire alarm system or other automated devices.
3. Do not use the product in the vicinity of a pacemaker within a 20cm range. The radio waves may affect the normal operation
of the pacemaker or other medical devices.
Products with grounding pin shall be connected to a power outlet with earth protection. For devices with detachable power
cord, the product can be easily disconnected from the wire coupler. For devices without detachable power cord, unplug the
product from wall socket to disconnect. For products equipped with all-pole mains switch, use the power switch as the
disconnection device.


Join the conversation about this product
Here you can share what you think about the Edifier S70DB Home Theater System. If you have a question, first carefully read the manual. Requesting a manual can be done by using our contact form.