WARNING: Always wear proper personal hearing protection that conforms to ANSI
S12.6 (S3.19) during use. Under some conditions and duration of use, noise from this product
may contribute to hearing loss.
• The label on your tool may include the following symbols. The symbols and their definitions
are as follows:
V .....................volts A .........................amperes
Hz ...................hertz W ........................watts
min .................minutes or AC .............alternating current
or DC .....direct current or AC/DC......alternating or direct current
...................Class I Construction
n
o .......................no load speed
(grounded) n .........................rated speed
................... Class II Construction .......................earthing terminal
(double insulated)
........................safety alert symbol
…/min ............per minute BPM ...................beats per minute
IPM .................impacts per minute RPM ...................revolutions per minute
SPM ...............strokes per minute sfpm ...................surface feet per minute
SAVE THESE INSTRUCTIONS FOR FUTURE USE
Motor
Be sure your power supply agrees with the nameplate marking. Voltage decrease of more than
10% will cause loss of power and overheating. D
EWALT tools are factory tested; if this tool does
not operate, check power supply.
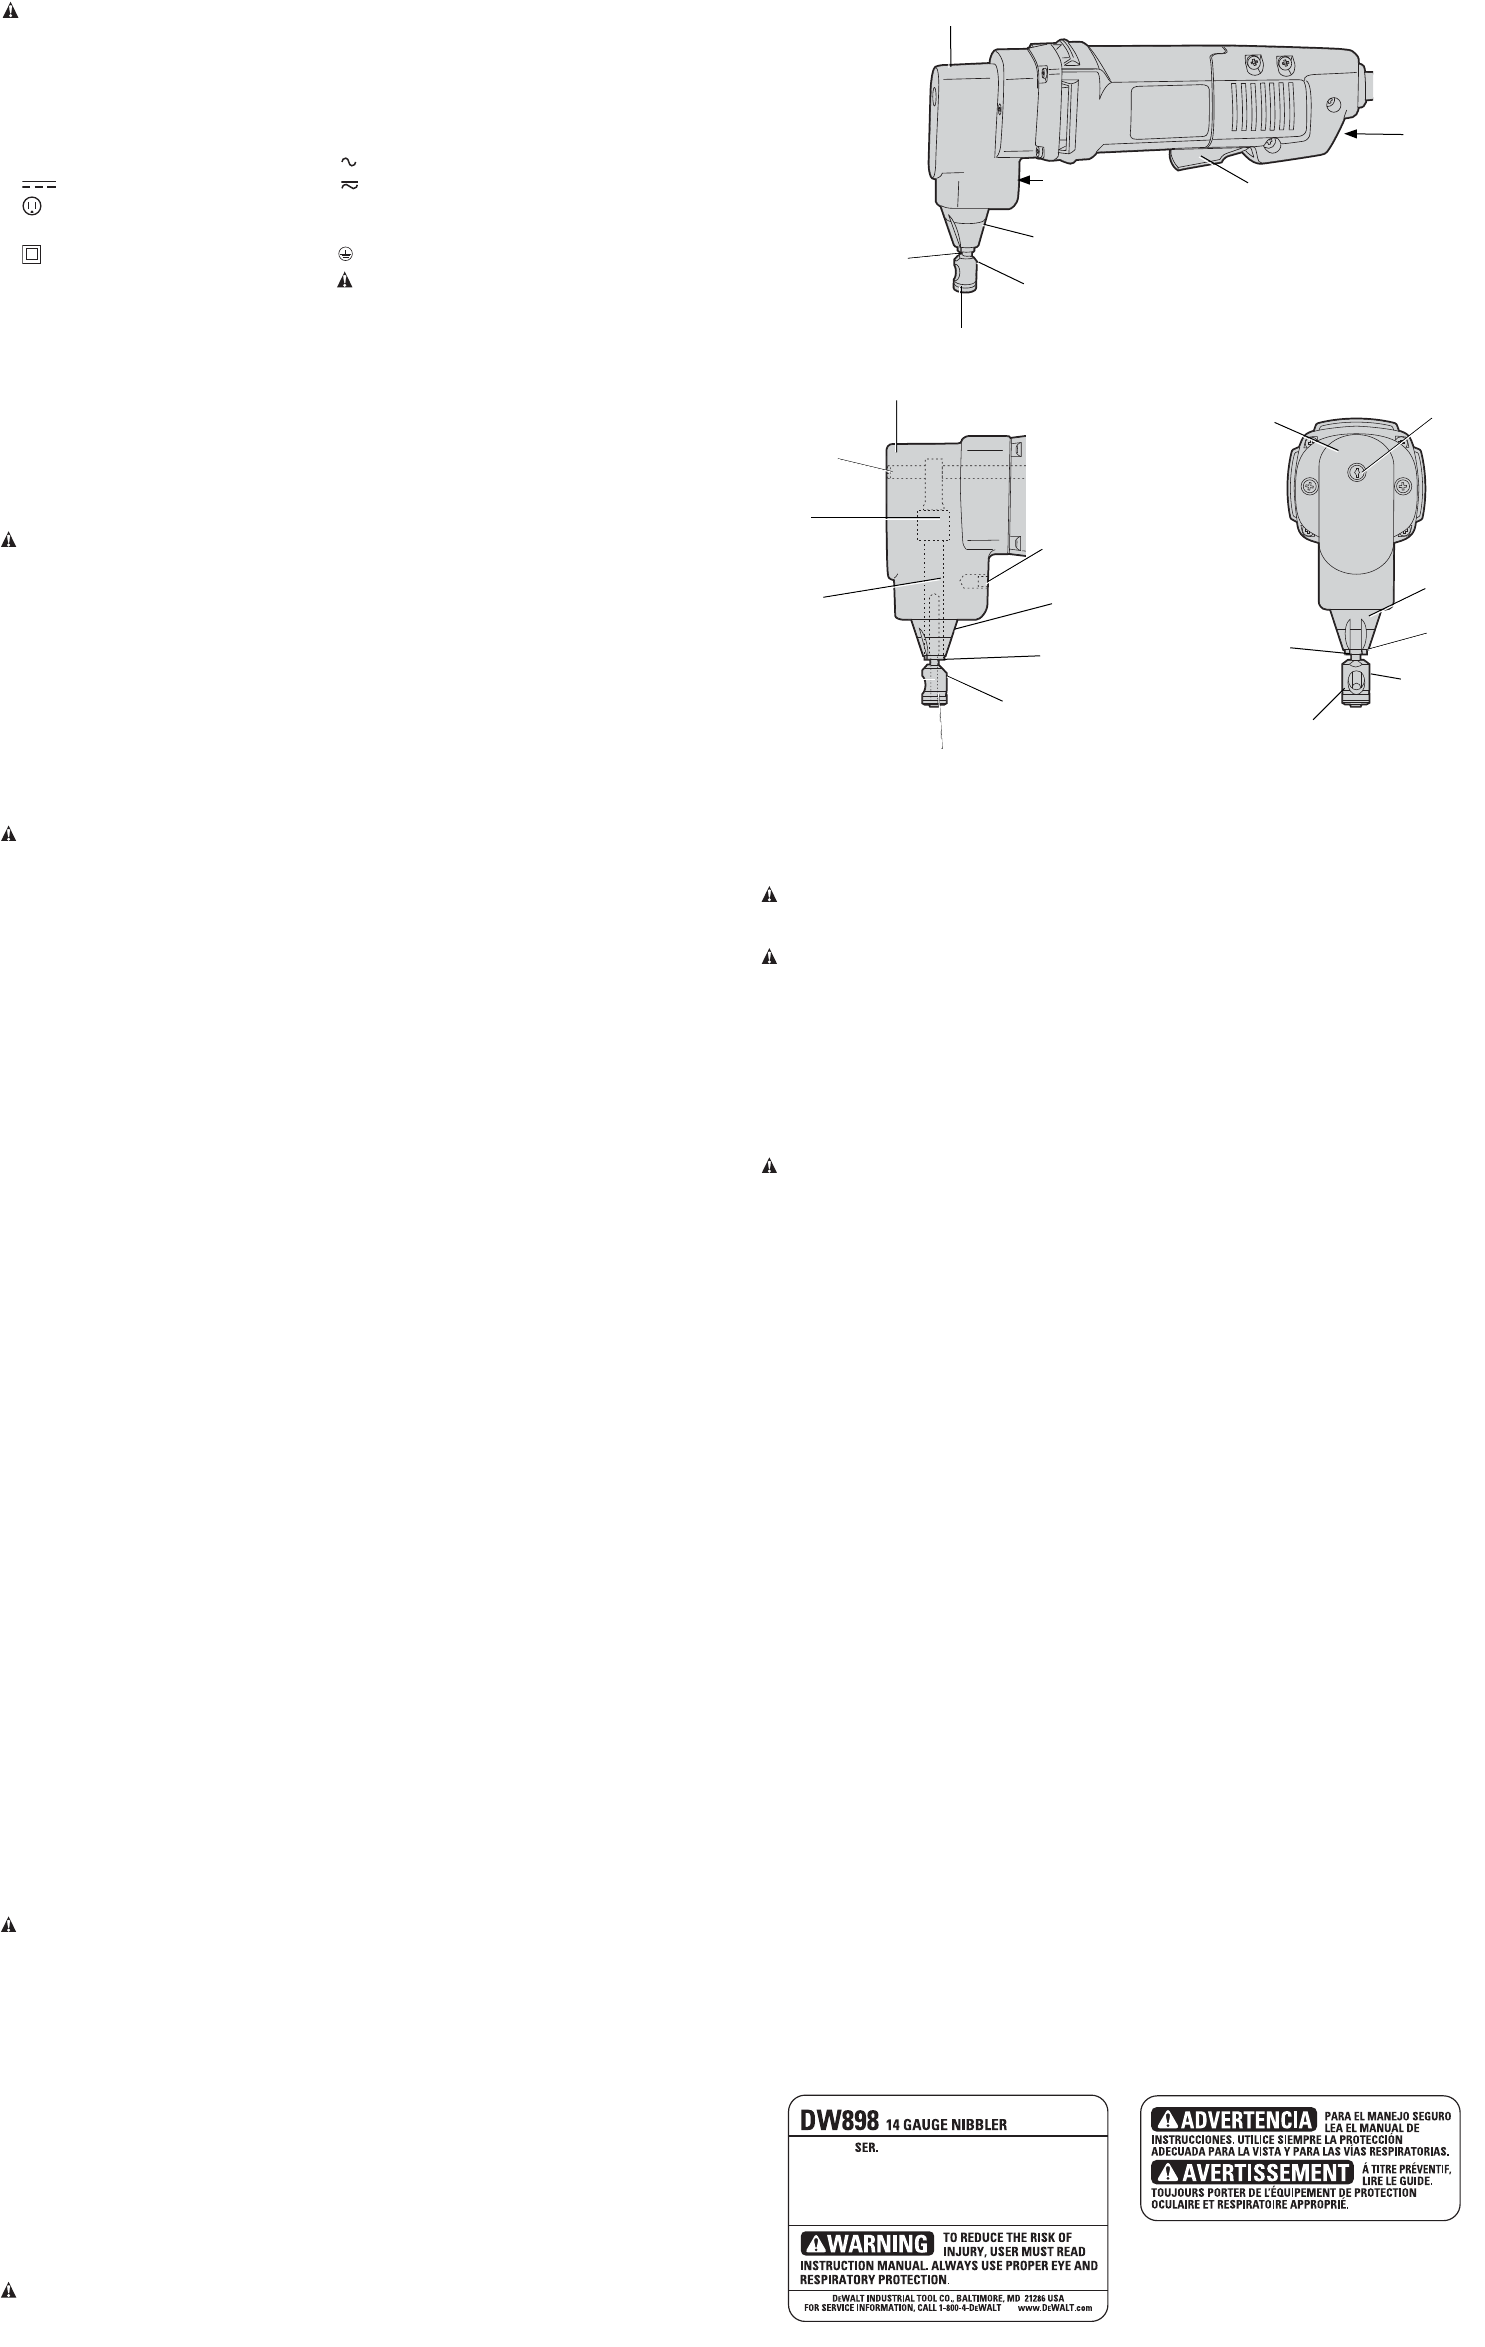
COMPONENTS (Fig. 1)
WARNING: Never modify the power tool or any part of it. Damage or personal injury could
result.
A. Head E. Housing
B. Punch F. Paddle switch
C. Cover ring G. Switch lock button
D. Die H. Set screw
INTENDED USE
The DW898 14-gauge nibbler is designed for professional cutting at various work sites (i.e.,
construction sites). DO NOT use under wet conditions or in presence of flammable liquids or
gases.
The14-gauge nibblers are professional power tools. DO NOT let children come into contact with
the tool. Supervision is required when inexperienced operators use this tool.
ADJUSTMENTS
WARNING: To reduce the risk of injury, turn unit off and disconnect it from power
source before installing and removing accessories, before adjusting or when making
repairs. An accidental start-up can cause injury.
To Rotate Head (Fig. 2, 3)
The head (A) can be aligned in three positions: left, forward, and right (See Fig. 2). To rotate the
head (A), loosen the set screw (H). Turn the head in the desired direction.
NOTE: Do not rotate the head in a complete circle as this will change the punch engagement
in the die.
Rotate the housing (E) in the head (A) and turn the set screw (H) in until you feel the set screw
engage a recess in the shoe. Tighten the set screw firmly. Periodically recheck this screw for
tightness.
The nibbler head (A) is designed to fit through a 3/4" (19 mm) diameter hole for starting a cut in
the middle of the work. Nibbling can be done in any direction from this hole. A punch width
indicator is provided on the front of the housing to allow users to follow a line closely (Fig. 3).
The bottom of the housing has a .51" (13 mm) diameter template guide (L) to allow for use of
templates. See Figures 2 and 3 for template guide surface. The thickness of the template
should be such that the total thickness of the template and workpiece is 13/64" to 1/4"
(5 to 6.5 mm). The shape of the template must be .1" (2.5 mm) away from the shape to be
nibbled. The tool should be guided so that the outside diameter (.51" or 13 mm) of the housing
always rests on the template.
Changing Punches (Fig. 2)
Never cut with a blunt, dull punch. Punches can be sharpened until they reach a length of
2.72" (69 mm). Shorter punches are unserviceable. To remove the punch (B), loosen the head
set screw (H) about 4–5 turns (See Fig. 2). Slide the housing (E) from the head (A). Unscrew
the punch (B) from the connecting rod bushing (J). Punch may be resharpened carefully on a
bench grinder with a fine grit wheel. Be careful that the punch does not become shorter than
the minimum length. Punches shorter than this will not engage the die sufficiently and must be
replaced. The ground face must be square to the punch axis. After grinding, carefully stone the
ground edges to remove burrs. Do not round over corners.
Reassembly of Nibbler Head (Fig. 2)
Screw the punch (B) fully into the connecting rod bushing (J). Slide the housing (E) over the
end of the punch and into the head. Turn the housing (E) to desired cut orientation. Tighten set
screw (H). Next, check punch engagement.
Checking Punch Engagement (Fig. 2)
Since the punch (B) length is now changed, the punch engagement may have to be adjusted.
Check punch engagement by placing a flat blade screwdriver in the cam shaft (I) slot and turning
the shaft (See Fig. 2). Punch should dip .020" to .06" (.5 to 1.15 mm) into the die at the full down
stroke position. Too much punch dip into the die will result in a loss of capacity (bottom of punch
will not clear die enough on up stroke.)
Punch Engagement Adjustment (Fig. 2)
If the punch engagement should need adjustment, loosen the set screw (H) and rotate shoe
either clockwise (punch deeper into die) or counterclockwise (punch out of die). Tighten set
screw firmly. Turn cam shaft (I) with screwdriver in slot to check punch engagement (moving
punch fully down). Repeat as necessary.
Die Replacement (Fig. 2)
If the die (D) becomes dull, replace it. Replace old die by pushing the cover ring (C) up and out
of the die groove. Knock out the retaining pin under the cover ring with a drift punch. Pull die off
the carrier shaft (K). Install new die (D) on carrier shaft (K). Align cross hole in die with groove in
carrier shaft. Install pin. Snap cover ring (C) over die in groove provided.
OPERATION
WARNING: To reduce the risk of injury, turn unit off and disconnect it from power
source before installing and removing accessories, before adjusting or when making
repairs. An accidental start-up can cause injury.
Switches (Fig. 1)
To start tool, depress the paddle switch (F). To turn the tool off, release the paddle. The paddle
switch can be locked on by engaging the lock button (G) located near the rear of the tool, while
holding the paddle depressed. Always be sure that the tool is not locked on before plugging in.
To turn the tool off when it is locked on, squeeze and release the paddle once.
Cutting Tips (Fig. 1)
• Lubricate surface of material with oil. The nibbler is designed to cut flat and shallow
corrugated metal.
NOTE: Punch and die should be lubricated by immersing in a good quality cutting oil
approximately every 30 feet (9 m) of cutting
• The tool is factory assembled with the punch (B) oriented forward for cutting flat and shallow
corrugated material.
MAINTENANCE
WARNING: To reduce the risk of injury, turn unit off and disconnect it from power
source before installing and removing accessories, before adjusting or when making
repairs. An accidental start-up can cause injury.
• Check that the punch and die are sharp. If either is dull, sharpen or replace.
• Periodically dip the shoe in oil.
• This is a precision tool. Use it carefully and store it in a protected place..
Cleaning
WARNING: Blow dirt and dust out of all air vents with clean, dry air at least once a week.
To minimize the risk of eye injury, always wear ANSI Z87.1 approved eye protection when
performing this.
WARNING: Never use solvents or other harsh chemicals for cleaning the non-metallic parts
of the tool. These chemicals may weaken the plastic materials used in these parts. Use a cloth
dampened only with water and mild soap. Never let any liquid get inside the tool; never immerse
any part of the tool into a liquid.
Lubrication
Self lubricating bearings are used in the tool and periodic relubrication is not required. However,
it is recommended that, once a year, you take or send the tool to a service center for a thorough
cleaning and inspection.
Accessories
WARNING: Since accessories, other than those offered by DEWALT, have not been tested
with this product, use of such accessories with this tool could be hazardous. To reduce the risk
of injury, only D
EWALT recommended accessories should be used with this product.
Recommended accessories for use with your tool are available at extra cost from your local dealer
or authorized service center. If you need assistance in locating any accessory, please contact
D
EWALT Industrial Tool Co., 701 East Joppa Road, Baltimore, MD 21286, call 1-800-4-DEWALT
(1-800-433-9258) or visit our website: www.dewalt.com.
Repairs
To assure product SAFETY and RELIABILITY, repairs, maintenance and adjustment (including
brush inspection and replacement) should be performed by a D
EWALT factory service center,
a D
EWALT authorized service center or other qualified service personnel. Always use identical
replacement parts.
Register Online
Thank you for your purchase. Register your product now for:
• WARRANTY SERVICE: Registering your product will help you obtain more efficient
warranty service in case there is a problem with your product.
• CONFIRMATION OF OWNERSHIP: In case of an insurance loss, such as fire, flood or
theft, your registration of ownership will serve as your proof of purchase.
• FOR YOUR SAFETY: Registering your product will allow us to contact you in the unlikely
event a safety notification is required under the Federal Consumer Safety Act.
Register online at www.dewalt.com/register.
Three Year Limited Warranty
DEWALT will repair, without charge, any defects due to faulty materials or workmanship for
three years from the date of purchase. This warranty does not cover part failure due to normal
wear or tool abuse. For further detail of warranty coverage and warranty repair information, visit
www.dewalt.com or call 1-800-4-D
EWALT (1-800-433-9258). This warranty does not apply to
accessories or damage caused where repairs have been made or attempted by others. This
warranty gives you specific legal rights and you may have other rights which vary in certain states
or provinces.
In addition to the warranty, D
EWALT tools are covered by our:
1 YEAR FREE SERVICE
D
EWALT will maintain the tool and replace worn parts caused by normal use, for free, any time
during the first year after purchase.
90 DAY MONEY BACK GUARANTEE
If you are not completely satisfied with the performance of your D
EWALT Power Tool, Laser, or
Nailer for any reason, you can return it within 90 days from the date of purchase with a receipt
for a full refund – no questions asked.
LATIN AMERICA: This warranty does not apply to products sold in Latin America. For products
sold in Latin America, see country specific warranty information contained in the packaging, call
the local company or see website for warranty information.
FREE WARNING LABEL REPLACEMENT: If your warning labels become illegible or are
missing, call 1-800-4-D
EWALT (1-800-433-9258) for a free replacement.
FIG 2
A
I
B
H
K
J
D
E
L
C
A
C
FIG 3
L
I
E
D
B
FIG. 1
F
G
E
A
C
D
B
H


Join the conversation about this product
Here you can share what you think about the DeWalt DW898 Nibbler. If you have a question, first carefully read the manual. Requesting a manual can be done by using our contact form.