
— E1 — — E2 —
— E4 —— E3 — — E5 —
CAUTION
USE OF CONTROLS OR ADJUSTMENTS OR PERFORMANCE OF PROCEDURES
OTHER THAN THOSE SPECIFIED HEREIN MAY RESULT IN HAZARDOUS RADIATION
EXPOSURE.
THIS SHOULD NOT BE ADJUSTED OR REPAIRED BY ANYONE EXCEPT QUALIFIED
SERVICE PERSONNEL.
IMPORTANT : Since movement of the CD mechanism and the sensitive circuitry may cause
interference to the radio tuner nearby, switch this unit off while operating other
radio devices.
PREPARATIONS BEFORE USING
Battery Installation
1. Open Battery Compartment cover.
2. Insert 2 batteries (LR6, “AA” size, or equivalent)
in the correct polarity as indicated.(Batteries not included)
(Heavy duty batteries are recommended.)
3. Close the cover properly.
AC Power Adaptor
1. Plug the DC output of the adaptor to the DC Jack.
2. Connect the adaptor (4.5V/600mA) to a power outlet.(Adaptor not included)
Make sure the voltage is compatible.
SETTING DUAL CLOCK
1. Set CD/RADIO SWITCH to CD position.
2. Press BAND (DUAL CLOCK) BUTTON to choose Clock "1"
3. Press MODE/MEM (CLOCK SET) BUTTON , the display will blink. Then press TUN
UP (HR) OR TUN DN (MIN) BUTTON until the desired time is shown.
4. Press MODE/MEM (CLOCK SET) BUTTON again to complete setting.
5. To set Clock "2", repeat above steps 2 to 4.
6. To check the time, press BAND (DUAL CLOCK) BUTTON to choose between Clock "1"
or "2" time display.
NOTE - i). Clock "1" displays the current home time.
ii). Clock "2" displays the time of a city/country in a different time zone other than
the home city/country.
iii). Clock "1" and "2" display the same MINUTE. For Clock "2",adjust HOUR
only otherwise the minute of Home Time will be changed.
RADIO RECEPTION
1. Insert the plug of your headphone into the PHONE JACK.
2. Set the CD/RADIO SWITCH to “Radio” and press the BAND (DUAL CLOCK) BUTTON
for the AM or FM radio band as shown on the LCD Panel. The frequency reading will be
displayed.
3. Press the TUN DN BUTTON or TUN UP BUTTON briefly to tune in the desired radio
station manually.
4. Keep the TUN DN BUTTON or TUN UP BUTTON depressed for more than 1 second will
activate the auto-tuning function of the digital tuner. When a radio station of sufficient strength
is found, auto-tuning will stop automatically and the radio station will be tuned in. The Frequency
Reading of the radio station will be displayed on the LCD Panel . When a FM stereo program
is being received, the STEREO INDICATOR will appear.
5. Adjust the VOLUME CONTROL to obtain the desired sound level.
6. Slide the BASS BOOST SWITCH to 'ON' for enhanced bass effect of the radio program.
7. When you wish to turn the Digital Tuner 'OFF', set the CD/RADIO SWITCH to the “CD”
position.
Storing and Recalling Radio Stations in Preset Memory
The digital tuner has a capacity of 10 preset stations for both AM and FM bands which allow you
to store and recall your favourite AM or FM radio stations at the touch of a button.
A. To Store a Station
1. Tune in the station you want to store in preset memory by manual or auto tuning.
2. Press the MODE/MEM (CLOCK SET) BUTTON and the MEMORY INDICATOR
will flash in the LCD panel for 5 seconds.(Press again for cancel)
3. Before the flashing stops, press MEM UP or MEM DN BUTTON to select channel
no. #1 to #10, press the MODE / MEM (CLOCK SET) BUTTON again to store the
current radio station into the preset memory.
4. Repeat steps 1 to 3 to store a radio station into the rest of the Preset Memories.
B. To Recall a Station
Press MEM UP or MEM DN buttons to recall #1 to #10 preset stations.
NOTES - The headphone cord works as a FM antenna. To insure maximum FM tuner
sensitivity, always keep the headphone cord fully extended. Do not wind or
fold the headphone cord while listening to the radio.
- When tuning in AM reception, be sure to place the unit in a horizontal
position. For maximum AM sensitivity, keep turning the unit slowly while
keeping it horizontal until the best reception is obtained.
DISC PLAYING
This CD player is designed to play the 8cm and 12cm compact disc without using adaptor.
Hold Switch
Set the HOLD button to “ON” position, all the buttons will be locked. Before operation, be sure
to set the switch to “OFF” position, for normal operation.
Getting Start
1. Insert the headphone/earphone plug to PHONE JACK.
2. Push the OPEN button to right side, and then the door open, put a disc into the CD compartment
with label side upward.
3. Push the disc gently around the centre area until it clicks so that the disc fits into the pivot.
(To remove the disc : Pick up the disc, holding the edge, while pressing the pivot gently.)
4. Close the door and press the PLAY/PAUSE button once.
5. The Display will show the total number of tracks of the disc, then begin to play the first track.
General Operation
Play/Pause Buttons — Press once to start playback in the original order.
Press again to stop the disc play temporarily.
Stop Button — Press once to stop playback.
Press again to turn off power
Skip / Search Buttons — Press once to skip to next track or back to
previous track .
— Press continuiously to search forward
or backward .
Directory UP Button — Directory UP (For MP3 Disc).
Various Playing Modes
MODE/PROG Button — There are 3 kinds of functions : (FOR CD)
A. Repeat Play
During PLAY mode
• Press the MODE/PROG button once to play the current track repeatedly.
• The repeat indicator will appear in the display.
During PLAY mode
• Press the MODE/PROG button twice to play the entire disc repeatedly.
• The repeat indicator will appear in the display.
NOTE - To cancel REPEAT simply press the MODE/PROG button until the repeat indicator
disappears.
B. Random Play
During PLAY mode
• Press the MODE/PROG button 3 times.
• The SHUF will appear in the display.
• Press the PLAY button, all the tracks on a disc to be played in a random sequence and after
all tracks are played, system will stop automatically.
NOTE - To cancel RANDOM PLAY simply press the MODE/PROG button until the SHUF
indicator disappears.
C. Intro Scan
During PLAY mode
• Press the MODE/PROG button 4 times.
• The INTRO indicator will appear in the display.
• Press the PLAY button to play the first 10 seconds of each track on the disc.
NOTE - To cancel INTRO SCAN simply press the MODE/PROG button until the INTRO
indicator disappears.
MODE/PROG button - there are 3 kinds of functions: (FOR MP3 DISC)
A. Repeat Play
1. During PLAY mode
• Press the MODE/PROG button once to play the current track repeatedly.
• The repeat indicator will appear in the display.
2. During PLAY mode
• Press the MODE/PROG button twice to play the current DIRECTORY repeatedly.
• The repeat indicator will appear in the display.
3. During PLAY mode
• Press the MODE/PROG button three times to play the ENTIRE DISC repeatedly.
• The repeat indicator will appear in the display.
NOTE - To cancel REPEAT simply press the MODE/PROG button until the repeat indicator
disappears.
B. Random Play
During PLAY mode
• Press the MODE/PROG button 4 times.
• The SHUF will appear in the display.
• Press the PLAY button, all the files on a disc to be played in a random sequence and after
all files are played, system will stop automatically.
NOTE - To cancel RANDOM PLAY simply press the MODE/PROG button until the SHUF
display disappears.
C. Intro Scan
During PLAY mode
• Press the MODE/PROG button 5 times.
• The INTRO indicator will appear in the display.
• Press the PLAY button to play the first 10 seconds of each file on the disc.
NOTE - To cancel INTRO SCAN simply press the MODE/PROG button until the INTRO
indicator disappears.
PROGRAM PLAY (FOR CD)
1. In stop mode, press the MODE/PROG button to make program memory.
2. “ PGM CD 00 P-01” will be displayed, “00” means track number to memory and “P-01”
means program number.
3. Press or button to select the desired track.
4. Press the MODE/PROG button to enter the track into memory, the program numbers which
will be increment one step.
* The program no. “P-01” has become “P-02” on the display.
5. Repeat step 3 and 4 until memory is full.
6. Press button to start the program play.
7. To stop the program play, press the STOP button.
8. For program play in step “ 7 ” , press the MODE/PROG button & button.
9. To erase the program memory, TURN off the power or open the door.
CD256
M
E
M
.
D
N
M
E
M
.
U
P
B
A
N
D
TUN. –
MIN
TUN. +
HR
ON
OFF
M
O
D
E
/
P
R
O
G
.
E
Q
D
U
A
L
C
L
K
D
I
R
.
U
P
M
E
M
.
OFF BB S ON
CD RADIO
123 56 8 91011
13
14
15
16
17
18
4
ENGLISH
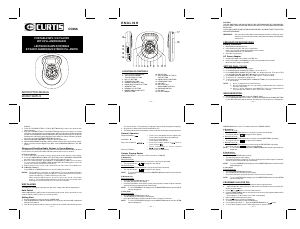
LOCATION OF CONTROLS
1. PLAY / PAUSE (POWER ON)
2. SKIP/SEARCH DOWN/
TUN DN (MIN) BUTTON
3. DIR. UP BUTTON
4. STOP/OFF BUTTON
5. MEMORY DOWN BUTTON
6. BAND (DUAL CLOCK) BUTTON
7. OPEN BUTTON
8. MEMORY UP BUTTON
9. MODE/PROG/(CLOCK SET)/
MEM BUTTON
10. EQ BUTTON
11. SKIP/SEARCH UP/TUN UP
(HR) BUTTON
12. HOLD SWITCH (BOTTOM)
13. HEADPHONE JACK
14. VOLUME
15. B.B.S. SWITCH
(BASS BOOST SWITCH)
16. CD/RADIO SWITCH
17. DC JACK
18. BATTERY DOOR
7
12
ENGLISH
INSTRUCTION MANUAL
M
E
M
.
D
N
M
E
M
.
U
P
B
A
N
D
TUN. –
MIN
TUN. +
HR
ON
OFF
M
O
D
E
/
P
R
O
G
.
E
Q
D
U
A
L
C
L
K
D
I
R
.
U
P
M
E
M
.
MODE D’EMPLOI
PORTABLE MP3 / CD PLAYER
WITH PLL AM/FM RADIO
LECTEUR CD-MP3 PORTABLE
ET RADIO NUMERIQUE STÉRÉO PLL AM/FM

Join the conversation about this product
Here you can share what you think about the Curtis CD256 Discman. If you have a question, first carefully read the manual. Requesting a manual can be done by using our contact form.