59
Calculating the Shutter Speed
During stroboscopic ash, the shutter remains open until the r-
ing stops. Use the formula below to calculate the shutter speed
and set it with the camera.
Number of Flashes / Flash Frequency = Shutter Speed
For example, if the number of ashes is 10 and the ring fre-
quency is 5 Hz, the shutter speed should be at least 2 seconds.
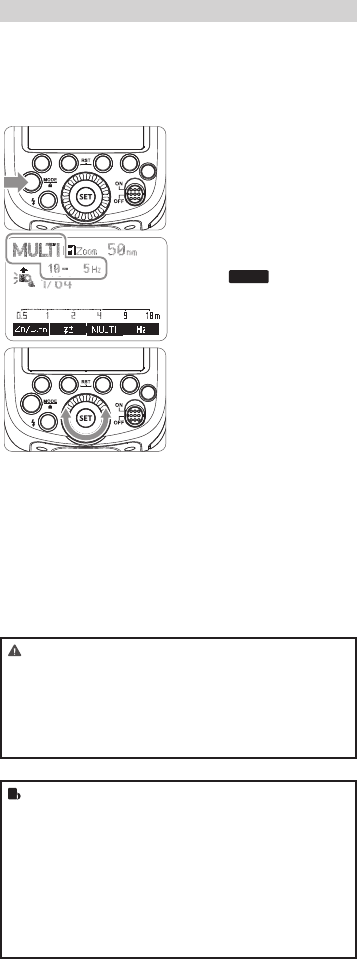
Multi: Stroboscopic Flash
With stroboscopic ash, a rapid series of ashes is red. It can
be used to capture a multiple images of a moving subject in a
single photograph.
You can set the ring frequency (number of ashes per sec.
expressed as Hz), the number of ashes, and the ash output.
1
Press < MO DE > button so
that < MULTI > is displayed.
2
Turn the Select Dial to choose
a desired ash output.
3
Set the ash frequency and
ash times.
• Press <
MU LTI
> button to
select the item (blinks).
• Turn the Select Dial to set the
number and press< > button
again to conrm. The next item
to be set will blink.
• After you nisth the setting,
press <SET> button and all the
settings will be displayed.
To avoid overheating and deteriorating the ash head, do
not use stroboscopic ash more than 10 times in succes-
sion. After 10 times, allow the camera ash to rest for at
least 15 minutes. If you try to use the stroboscopic ash
more than 10 times in succession, the ring might stop au-
tomatically to protect the ash head. If this happens, allow
at least 15 minutes’ rest for the camera ash.
• Stroboscopic ash is most effective with a highly reec-
tive subject against a dark background.
• Using a tripod and a remote control is recommended.
• A ash output of 1/1 and 1/2 cannot be set for strobo-
scopic ash.
• Stroboscopic ash can be used with “bulb”.
• If the number of ashes is displayed as “--”, the ring will
continue until the shutter closes or the battery is exhaust-
ed. The number of ashes will be limited as shown by the
following table
The flash output is adjustable from 1/1 full power to 1/128th power
in 1/3rd stop increments. To obtain a correct flash exposure, use a
hand-held flash meter to determine the required flash output.
M: Manual Flash
Press < MODE > button so
1 that < M > is displayed.
Turn the Select Dial to choose
2 a desired flash output amount.
Press < SET> button again to
3 confirm the setting.
Figures displayed when reducing flash output level
←Figures displayed when increasing flash output level
1/41/2
1/1
1/1-0.3
1/2+0.7
1/1-0.7
1/2+0.3
1/2-0.3
1/4+0.7
1/2-0.7
1/4+0.3
······
······
Flash Output Range
The following table makes it easier to see how the stop changes in
terms of f/stop when you increase or decrease the flash output. For
example, when you decrease the flash output to 1/2, 1/2-0.3, or 1/2-
0.7, and then increase the flash output to more than 1/2, 1/2+0.3,
1/2+0.7, and 1/1 will be displayed.
Optic S1 Secondary Unit Setting
In M manual flash mode, press <S1/S2> button so that this flash can
function as an optic S1 secondary flash with optic sensor. With this
function, the flash will fire synchronously when the main flash fires,
the same effect as that by the use of radio triggers. This helps create
multiple lighting effects.
Optic S2 Secondary Unit Setting
Press <S1/S2> button so that this flash can also function as an optic
S2 secondary flash with optic sensor in M manual flash mode. This
is useful when cameras have pre-flash function. With this function,
the flash will ignore a single “preflash” from the main flash and will
only fire in response to the second, actual flash from the main unit.
● S1 and S2 optic triggering is only available in M manual
flash mode.
Set the flash frequency and
3 flash times.
● Press < > button to
select the item (blinks).
● Turn the Select Dial to set
the number and press
< > button again to
confirm. The next item to be
set will blink.
● After you finish the setting,
press <SET> button and all
the settings will be
displayed.
Multi: Stroboscopic Flash
With stroboscopic flash, a rapid series of flashes is fired. It can be
used to capture a multiple images of a moving subject in a single
photograph.
You can set the firing frequency (number of flashes per sec.
expressed as Hz), the number of flashes, and the flash output.
Press <MODE> button so
1 that < > is displayed.
Turn the Select Dial to choose
2 a desired flash output.
Calculating the Shutter Speed
During stroboscopic flash, the shutter remains open until the firing
stops. Use the formula below to calculate the shutter speed and set
it with the camera.
For example, if the number of flashes is 10 and the firing frequency is
5 Hz, the shutter speed should be at least 2 seconds.
Number of Flashes / Flash Frequency = Shutter Speed
To avoid overheating and deteriorating the flash head, do not
use stroboscopic flash more than 10 times in succession.
After 10 times, allow the camera flash to rest for at least 15
minutes. If you try to use the stroboscopic flash more than 10
times in succession, the firing might stop automatically to
protect the flash head. If this happens, allow at least 15
minutes’ rest for the camera flash.
● Stroboscopic flash is most effective with a highly reflective
subject against a dark background.
● Using a tripod and a remote control is recommended.
● A flash output of 1/1 and 1/2 cannot be set for stroboscopic
flash.
● Stroboscopic flash can be used with“buLb”.
● If the number of flashes is displayed as “--”, the firing will
continue until the shutter closes or the battery is
exhausted. The number of flashes will be limited as shown
by the following table.
MULTI
MULTI
Hz
- 51 - - 52 -


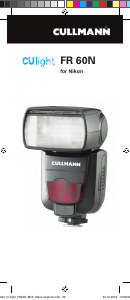

Join the conversation about this product
Here you can share what you think about the Cullmann CUlight FR 60C (for Canon) Flash. If you have a question, first carefully read the manual. Requesting a manual can be done by using our contact form.
reply | This was helpful (0) (Translated by Google)