IMPORTANT: RETAIN FOR FUTURE REFERENCE.
READ CAREFULLY. YOUR CHILD’S SAFETY MAY BE AFFECTED
IF YOU DO NOT FOLLOW THESE INSTRUCTIONS
user guide
Thank you for choosing a Cosatto product. Please take a little time to read the important safety
notes detailed below. This will ensure many years of happy, safe use.
safety: take note
WARNING: A CHILD’S SAFETY IS YOUR RESPONSIBILITY
•
WARNING: Do not place this child’s bed near heat sources, windows and other furniture.
•
WARNING: Do not use the cot if any part is broken, torn or missing and only use spare parts
provided by Cosatto.
•
WARNING: Do not leave anything in the cot or place the cot close to another product which
could provide a foothold or present danger of suffocation or strangulation, e.g. strings,
blind, curtain cords.
•
WARNING: Do not use more than one mattress in the cot.
•
The cot base is the safest in its lowest position and the cot MUST be assembled with the
mattress base in the lowest position as soon as your child can sit up unaided.
•
The thickness of the mattress used shall be such that the internal height (surface of the
mattress to the upper edge of the cot frame) is at least 500mm in the lowest position of the
mattress base and at least 200mm in the highest position of the mattress base (See parts page).
•
All assembly fittings should always be tightened properly and care should be taken that no
screws are loose, because a child could trap parts of the body, or clothing (e.g. strings,
necklaces, ribbons for babies’ dummies), which could pose a risk of suffocation and
strangulation.
•
To prevent injury when the child is able to climb out of the cot, the cot shall no longer be used
for that child.
•
Recommended mattress size 120 x 60 cm from the Cosatto range or no less than a
minimum size of 118 x 58 cm.
•
All assembly fittings should always be tightened properly and regularly checked and
retightened when necessary.
•
If you leave the child unattended in the cot, always make sure that the movable side is closed.
•
The safety of the cot could be adversely affected by fitting flammable drapes.
•
The cot is only ready for use, only when the drop-side and wheel locking mechanisms are
engaged, check the mechanisms are fully engaged before use.
•
Conforms to BS716:2008.
•
This product is suitable from birth up to the age of 3 years.
GB
You will also need a at end screwdriver
También necesitará un destornillador plano
Allen key
Llave Allen
2
3
1
5
4
A
B
C
6
7
200mm height guide
Guía de altura de
200 mm.
1
3
A
2
A
1
4
2
B
C
montaje y uso de la cuna
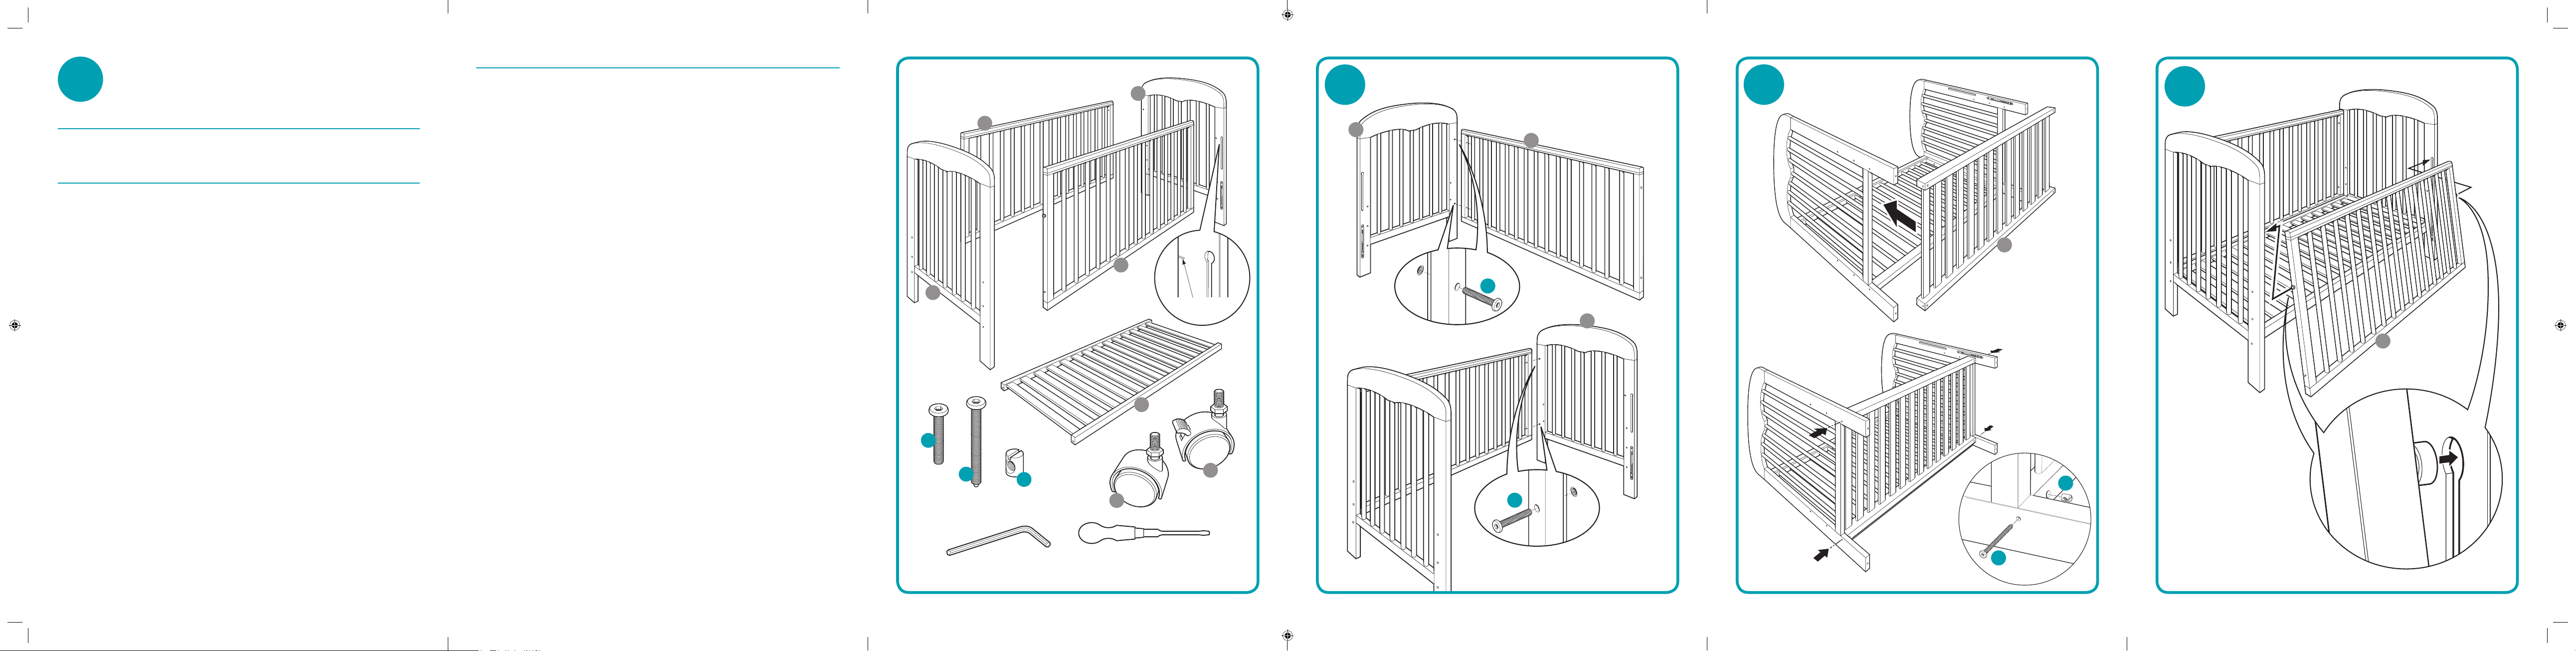
1: Acoplamiento de la sección lateral ja
Acople la sección lateral fija (3) al extremo izquierdo de la cuna (1). Asegúrese de que el mecanismo de la
sección regulable esté en el lado opuesto a la sección fija. Inserte 2 de los pernos cortos (A) a través del
extremo del lateral de la cuna e introdúzcalos en las roscas del extremo de la cuna. Monte la cuna sin
apretar los elementos de fijación.
Repita el procedimiento con el extremo derecho de la cuna.
2: Acoplamiento de la base del colchón
Elija la altura adecuada de la base del colchón de entre las 3 opciones disponibles.
Gire con cuidado la cuna sobre su sección lateral y coloque la base del colchón (4) en su posición.
Coloque las tuercas de seguridad (C) en la parte inferior de la base del colchón. Use un destornillador
plano para alinear los orificios de las tuercas de seguridad con los orificios de los tornillos. Coloque los
pernos largos (B) en los orificios en los extremos de la cuna y atorníllelos en las tuecas de seguridad.
Monte la cuna sin apretar los elementos de fijación.
3: Acoplamiento de la sección regulable 1
Deberá haber cierto movimiento en la cuna, ya que todavía no se han apretado completamente los pernos.
Acople la sección regulable (5) a los extremos de la cuna. Inserte los mecanismos de deslizamiento de las
ruedas de la sección regulable en la parte superior de la ranura de los extremos de la cuna.
4: Acoplamiento de la sección regulable 2
Permita que los pasadores de la sección regulable reposen contra los extremos de la cuna.
Levante la sección regulable ‘W’ hasta que los pasadores estén dentro de la zona ‘X’ en los canales.
Ejerza presión sobre los pasadores de resorte ‘Y’. Proteja la superficie de la cuna utilizando un
destornillador o un ejemplo plano similar, y, con cuidado, empuje la parte inferior de la sección
regulable hacia dentro ‘Z’, hasta que los resortes salgan y encuentren el canal.
Para completar el proceso de montaje, apriete TODOS los pernos.
5: Acoplamiento de las ruedas
Gire con cuidado la cuna sobre su sección lateral y atornille las ruedas (6) y (7) en la parte inferior de los
extremos de la cuna.
Importante: Asegúrese de que ambas ruedas bloqueables (7) estén fijadas en el mismo extremo de la cuna.
6: Descenso de la sección regulable 7: Elevación de la sección regulable
1 Suba la sección regulable. 4 Suba completamente la sección regulable
2 Presione hacia dentro el margen inferior. 5 Presione hacia fuera el margen inferior.
3 Baje la sección regulable. 6 Bájela, asegurándose de que ambas esquinas
inferiores estén acopladas.
8: Extracción de la sección regulable
Afloje todos los tornillos que sujetan los extremos de la cuna a la sección lateral y la base del colchón.
Ajuste la posición de la sección regulable hasta que los pasadores estén alineados con el canal cerca del
centro del raíl.
Estire la sección regulable hacia delante y hacia abajo. Esto empujará los pasadores de resorte hacia
dentro, permitiendo que la sección regulable pueda extraerse del raíl.
Proteja la superficie de la cuna utilizando un destornillador plano o un objeto plano similar para así
mantener el pasador en su posición.
9: Bloqueo de las ruedas
Para bloquear las ruedas, presione hacia bajo la palanca que encontrará en las dos ruedas bloqueables.
Para desbloquear las ruedas, levante las palancas.
5
3
Sara Extended Inside.indd 1 14/05/2010 13:16







Join the conversation about this product
Here you can share what you think about the Cosatto Sara Cot. If you have a question, first carefully read the manual. Requesting a manual can be done by using our contact form.