Manual Casio Baby-G BGA-240-3AER Watch

Need a manual for your Casio Baby-G BGA-240-3AER Watch? Below you can view and download the PDF manual for free in English. This product currently has 7 frequently asked questions, 0 comments and has 0 votes. If this is not the manual you want, please contact us.

Is your product defective and the manual offers no solution? Go to a Repair Café for free repair services.

Manual

Loading…

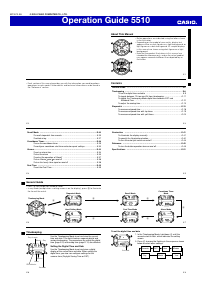
Operation Guide 5510
E-19
To measure elapsed time with lap times
1. When the stopwatch display shows all zeros, press
A
to display the lap time screen (indicated by
/
LAP
).
2. Press
D
to start an elapsed time measurement.
At the time, both the upper and lower displays will
show identical times.
3. Press
A
to record the time of the first lap.
This freezes the current lap time in the upper part of
the digital display for about eight seconds, while
measurement of total elapsed time and the next lap
time continue internally. The lap number of the
displayed time appears in the lower digital display.
After eight seconds, the ongoing elapsed time
measurement re-appears in the lower digital display.
4. Repeat step 3 to record more lap times.
5. Press
D
to stop the stopwatch.
l
l
l
l
l
l
l
l
l
l
l
l
l
l
l
l
l
l
l
l
l
l
l
l
l
l
l
l
l
l
l
l
Lap time
Elapsed time
E-18
More than 10 hours
More than one hour
Minutes
Seconds
1/100 second
Hours
Minutes
Seconds
Minutes
Hours
Seconds
1/100 second
Hours
Minutes
Seconds
To measure elapsed time
Note
You can perform the following steps starting from either the lap time screen or the
split time screen.
1. Press
D
to start the stopwatch.
2. Press
D
again to stop the stopwatch.
You can resume the measurement operation by pressing
D
.
3. Press
A
to clear the stopwatch to all zeros.
E-17
See “To measure elapsed time with lap times” (page E-19) and “To measure elapsed
time with split times” (page E-20) for more information about each type of measurement.
You can perform elapsed time measurement starting from either the lap time screen
or the split time screen (page E-19 and E-20). Whenever you enter the Stopwatch Mode,
the screen (lap time or split time) that was displayed when you last exited the mode
will appear first.
During a stopwatch elapsed time operation, the upper display initially shows
minutes, seconds, and a 1/100-second value. This changes to hours, minutes, and
seconds when the time in the upper display exceeds 60 minutes.
The lower display initially shows hours, minutes, seconds, and a 1/100-second
value. This changes to hours, minutes, and seconds when the time in the lower
display exceeds 10 hours.
E-16
The stopwatch measurement operation continues even if you exit the Stopwatch
Mode.
For information about how stopwatch times are stored in memory, see “Memory
Management” (page E-22).
Viewing the Stopwatch Digital Displays
The information that appears in the watch’s upper and lower digital displays depends
on whether you are measuring lap times or split times.
Lap Time Measurement
Upper Display: Lap time
Lower Display: Elapsed time
Split Time Measurement
Upper Display: Lap time
Lower Display: Elapsed time (Split time appears here for eight seconds as it is stored
in memory.)
E-15
Stopwatch
The stopwatch lets you measure elapsed time, lap times,
and split times. Lap times and split times can be stored in
memory.
The display range of the stopwatch is 99 hours,
59 minutes, 59 seconds.
All of the operations in this section are performed in the
Stopwatch Mode, which you enter by pressing
C
(page E-6).
Note
“Lap time” is the time spent to cover a specific segment
of a race, such as one lap around a track. “Split time” is
the time spent from the beginning of a race up to a
certain point.
The stopwatch continues to run, restarting from zero
after it reaches its limit, until you stop it.
Minutes
Seconds
1/100
second
Hours
Remaining
free records
E-14
High-speed hand movement will stop automatically after the time advances 12
hours or if an alarm (daily alarm, Hourly Time Signal, or countdown beeper) starts
to sound.
4. Press
A
to exit the setting screen.
The minute hand will be adjusted slightly to match the seconds when you exit the
setting screen.
To return to the Timekeeping Mode, press
C
.
E-13
Setting the Analog Time
Perform the procedure below when the time indicated by the analog hands does not
match the time of the digital display.
To adjust the analog time
1. In the Timekeeping Mode, press
C
six times to enter
the Hand Setting Mode (page E-6).
2. Hold down
A
until the current digital time starts to
flash, which indicates the setting screen.
3. Use
D
to adjust the analog setting.
Press
D
once to advance the hands 20 seconds.
Hold down
D
to advance the hands at high speed.
To lock high speed hands movement, hold down
D
to start it and then press
B
to lock. The hands will continue to advance for one 12-hour cycle or until you
press any button to stop them.
l
l
l
l
l
l
l
l
l
l
l
l
l
l
E-12
Daylight Saving Time (DST) Setting
Daylight Saving Time (summer time) advances the time setting by one hour from
Standard Time. Remember that not all countries or even local areas use Daylight
Saving Time.
To toggle the Timekeeping Mode digital time between DST and Standard Time
1. In the Timekeeping Mode, hold down
A
until the
seconds start to flash, which indicates the setting
screen.
2. Press
C
once and the DST setting screen appears.
3. Press
D
to toggle between Daylight Saving Time (
displayed) and Standard Time (
displayed).
4. Press
A
to exit the setting screen.
The
DST
indicator appears on the Timekeeping,
Alarm, and Hand Setting Mode screens to indicate
that Daylight Saving Time is turned on.
l
l
l
l
l
l
l
l
l
l
l
l
l
l
l
l
l
l
l
l
On/Off status
DST indicator
E-11
4. Press
A
to exit the setting screen.
The day of the week is displayed automatically in accordance with the date
(year, month, and day) settings.
See “Daylight Saving Time (DST) Setting” below for details about the DST setting.
To toggle between 12-hour and 24-hour timekeeping
In the Timekeeping Mode, press
D
to toggle between 12-hour timekeeping and
24-hour timekeeping.
With the 12-hour format, the
P
(PM) indicator appears to the left of the hour digits
for times in the range of noon to 11:59 p.m. and the
A
(AM) indicator appears to the
left of the hour digits for times in the range of midnight to 11:59 a.m.
With the 24-hour format, times are displayed in the range of 0:00 to 23:59, without
any indicator.
The 12-hour/24-hour timekeeping format you select in the Timekeeping Mode is
applied in all other modes.
The
A
and
P
indicators are not displayed with the Timekeeping Mode time on the
Countdown Timer Mode and Dual Time Mode screens.
E-10
3. When the setting you want to change is flashing, use
D
and
B
to change it as
described below.
Screen: To do this: Do this:
Reset the seconds to
Press
D
.
Toggle between Daylight Saving Time
(
) and Standard Time ( )
Press
D
.
Change the hour or minute Use
D
(+) and
B
(–).
Change the year, month, or day Use
D
(+) and
B
(–).
Download manual in English (PDF, 0.42 MB)
(Consider the environment and only print this manual if it is really necessary)

Loading…

Rating

Let us know what you think about the Casio Baby-G BGA-240-3AER Watch by leaving a product rating. Want to share your experiences with this product or ask a question? Please leave a comment at the bottom of the page.
Are you satisfied with the Casio Baby-G BGA-240-3AER Watch?
Yes No
Be the first to rate this product
0 votes

Join the conversation about this product

Here you can share what you think about the Casio Baby-G BGA-240-3AER Watch. If you have a question, first carefully read the manual. Requesting a manual can be done by using our contact form.

More about this manual

We understand that it’s nice to have a paper manual for your Casio Baby-G BGA-240-3AER Watch. You can always download the manual from our website and print it yourself. If you would like to have an original manual, we recommend you contact Casio. They might be able to provide an original manual. Are you looking for the manual of your Casio Baby-G BGA-240-3AER Watch in a different language? Choose your preferred language on our homepage and search for the model number to see if we have it available.

Specifications

Brand Casio
Model Baby-G BGA-240-3AER
Category Watches
File type PDF
File size 0.42 MB

All manuals for Casio Watches
More manuals of Watches

Frequently Asked Questions about Casio Baby-G BGA-240-3AER Watch

Our support team searches for useful product information and answers to frequently asked questions. If you find an inaccuracy in our frequently asked questions, please let us know by using our contact form.

A battery in my device is oxidized, can I still safely use it? Verified

Ja, the device can still be safely used. Firstly, remove the oxidizd battery. Never use bare hands to do this. Then clean the battery compartment with a cotton swab dipped in vinegar or lemon juice. Let it dry and insert new batteries.

This was helpful (782) Read more

My mechanical watch runs fast, what can I do? Verified

This might be caused by exposure to a magnetic field. It can be solved by a demagnetisation process performed by a professional watchmaker.

This was helpful (753) Read more

What do AM and PM stand for? Verified

AM stands for Ante Meridiem and indicates that the time is before midday. PM stands for Post Meridiem and indicates that the time is past midday.

This was helpful (650) Read more

What is a 'Chronograph'? Verified

A 'Chronograph' is literally a 'writer of time'. The term is used to describe clocks and watches that tell the time of day as well as measure a certain period of time, like a stopwatch.

This was helpful (562) Read more

What is GMT? Verified

GMT stands for Greenwich Mean Time (sometimes called UTC, standing for Coordinated Universal Time). It is the time for the longitude 0, that passes through Greenwich near London.

This was helpful (389) Read more

What is a quartz movement? Verified

Watches and clocks with a quartz movement are driven by a battery. This sends an electric current through quartz crystals that will vibrate. These vibrations are passed on to the movement. Because the vibrations have a fixed frequency, watches and clocks with a quartz movement are extremely precise.

This was helpful (386) Read more

There is moisture on the inside of the glass of my Casio watch, what should I do? Verified

Casio states that if the moisture appeared after an extreme change in temperature and disappears relatively quickly afterwards, there is probably nothing wrong. If the moisture does not disappear, you should have your watch repaired as soon as possible.

This was helpful (55) Read more
Manual Casio Baby-G BGA-240-3AER Watch

Related products

Related categories