
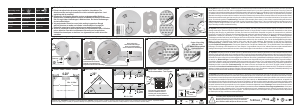
12
A
C
B
6833/01-84
2CKA000073B9837 / 04.09.2019
DE EN FR NL
Deutsch
Busch-Rauchalarm
ProfessionalLINE
GEFAHR
Bei direktem oder indirektem Kontakt mit spannungs-
führenden Teilen kommt es zu einer gefährlichen
Körperdurchströmung. Elektrischer Schock,
Verbrennungen oder der Tod können die Folge sein. Bei
unsachgemäß ausgeführten Arbeiten an
spannungsführenden Teilen besteht Brandgefahr.
– Vor Montage und Demontage Netzspannung
freischalten!
– Arbeiten am 230 V-Netz nur von Fachpersonal
ausführen lassen.
■
Arbeiten von Fachpersonal ausführen lassen.
■
Montageanleitung sorgfältig lesen und aufbewahren.
■
Weitere Benutzerinformationen und Informationen zur Planung
unter http://BUSCH-JAEGER.de oder durch Scannen des
QR-Codes.
Bestimmungsgemäßer Gebrauch
Der Busch-Rauchalarm reagiert frühzeitig und zuverlässig auf
Schwelbrände und offene Feuer mit Rauchentwicklung.
Situationen vermeiden, in denen der Busch-Rauchalarm Zugluft
(offenes Fenster und/oder Ventilatoren) ausgesetzt wird.
Verbrauchte Batterien nicht mit dem Hausmüll entsorgen.
Defekte Lithiumbatterien dürfen nicht per Luftfracht
verschickt werden. Bei anderen Transportarten muss die
Sondervorschrift 188 der ADR beachtet werden.
■
Gerät nicht mit Farbe überstreichen!
■
Gerät nicht tapezieren!
■
Gerät nicht verkleiden oder abdecken!
Funktion
Der Busch-Rauchalarm arbeitet nach dem Streulichtprinzip. Dabei
werden in der Luft schwebende Rauchpartikel erkannt.
– Darauf achten, dass jederzeit ungehindert Luft in die
Lamellen [6] des Busch-Rauchalarm einströmen kann.
Technische Daten
Stromversorgung
(fest eingebaute Lithium-
Batterie):
3V, 1600 mAh
Batterielebensdauer
(Jahre): 10
Schalldruck auf 3 Meter: 85 dB(A)
Betriebs- und Lagertemperatur: -10 °C … +40 °C
Maße: 115 mm x 45 mm
Standards: DIN EN 14604 / DIN 14676 / CE
Gewicht: 200 g
Feuchtigkeit, keine Betauung: 15 % … 95 % rel
Montageort
[
Hinweis
Für ausführliche Informationen über die korrekten Montageorte und
Montagebedingungen, siehe Bedienungsanleitung Montageorte.
Bedienung
[1] Montageplatte
[2] Kabeldurchführung
[3] Busch-Rauchalarm
[4] Position der LED
[5] Test-/Stummschaltknopf
[6] Lamellen
[7] Steg
[8] Anschluss-Klemmen-Block
[9] Kontakte für Funkmodul
[10] Mulde für Funkmodul
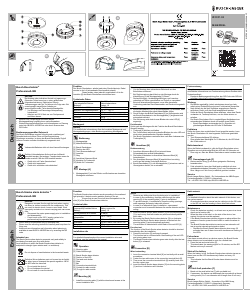
Montage [A]
1. Montageplatte [1] mit den Dübeln und Schrauben am korrekten
Montageort montieren.
Hinweis
■
Vor der Montage den vorhandenen Bohrstaub aus den
Bohrlöchern entfernen!
■
Bei Drahtvernetzung das Kabel vor der Montage durch die
Kabelöffnung [2] der Montageplatte [1] führen!
■
Deckenöffnungen, Verkabelungsöffnungen und Leerrohre
unbedingt mit Silikon verschließen um Zugluft zu vermeiden!
■
Bei einer alternativen Montageart, muss eine dauerhafte
Verbindung zwischen Rauchwarnmelder und Decke sichergestellt
sein.
2. Busch-Rauchalarm [3] so in die Montageplatte [1] einsetzen, dass
die beiden Markierungen direkt übereinander liegen.
3. Durch Drehen des Busch-Rauchalarm [3] im Uhrzeigersinn wird
der Busch-Rauchalarm in der Montageplatte [1] eingerastet und
automatisch aktiviert.
– Die Aktivierung wird durch kurzes Blinken der roten LED [4]
angezeigt.
Funktionstest
Sofort nach der Montage sollte die Funktion der Busch-Rauchalarm
überprüft werden.
1. Testknopf [5] drücken und halten.
– Der Funktionstest wird durch schnelles Blinken der roten LED und
durch einen anschwellenden Signalton bestätigt.
– Der Busch-Rauchalarm verstummt kurz nach dem Loslassen des
Testknopfes [5].
Anschluss [B]
Drahtvernetzung
1. Anschluss-Klemmen-Block [8] mit einem kleinen
Schraubendreher vertikal heraushebeln.
2. Die beiden Kabeladern im Anschluss-Klemmen-Block [8]
festschrauben.
3. Den Anschluss-Klemmen-Block [8] anschließend vorsichtig
zurück auf die beiden Sockelstifte drücken.
4. Busch-Rauchalarm [3] in die Montageplatte [1] einsetzen und im
Uhrzeigersinn drehen, bis er einrastet.
Funkvernetzung
Hinweis
usführliche Informationen zur Funkvernetzung dieses Gerätes siehe
Systemhandbuch.
– Erweiterte Bedienungsanleitung über den QR-Code oder QR-Link
aufrufbar, siehe Kopf in dieser Kurzanleitung.
Wartung
■
Die Melder regelmäßig, jedoch mindestens einmal pro Jahr
mittels einer Sichtprüfung und einem Funktionstest überprüfen.
■
Nach Ablauf des auf dem Aufkleber angegebenen Datums,
seitlich am Gerät, muß das Gerät ausgetauscht werden.
■
Sollte der Busch-Rauchalarm Alarm auslösen, ohne dass Rauch
vorhanden ist, Testknopf drücken, um den Alarm stumm zu
schalten.
■
Der Busch-Rauchalarm führt in regelmäßigen Abständen einen
automatischen Selbsttest durch und meldet einen Defekt.
– Busch-Rauchalarm austauschen bei 2 x Signalton mit
gleichzeitigem Blinken der LED alle 32 Sekunden
Fehlalarm
Sollte der Alarm ohne ersichtlichen Grund ausgelöst werden, kann
der Busch-Rauchalarm für eine begrenzte Zeit stumm geschaltet
werden.
1. Test-/Stummschaltknopf [5] drücken.
– Dies schaltet das Warnsignal für 10 Minuten ab, die LED blinkt
alle 8 Sekunden rot.
Batteriezustand
Wenn die Batterie schwach ist, gibt der Busch-Rauchalarm einen
Signalton aus und gleichzeitig blinkt die LED alle 32 Sekunden rot.
– Dies zeigt an, dass der Busch-Rauchalarm ersetzt werden muss.
Demontageschutz [C]
1. Kleinen weißen Steg [7] mit einem geeigneten Werkzeug
herausbrechen.
2. Falls erforderlich, kann das Gerät auch zusätzlich mit einer
gewindeschneidenden Schraube (2 bis 3 mm Durchmesser mit
einer Länge von 6 bis 8 mm) zusätzlich gesichert werden.
Service
Busch-Jaeger Elektro GmbH - Ein Unternehmen der ABB Gruppe,
Freisenbergstraße 2, D-58513 Lüdenscheid,
Tel.: +49 2351 956-1600; http://BUSCH-JAEGER.de
English
Busch-Smoke alarm detector
ProfessionalLINE
DANGER
Dangerous currents flow through the body when coming
into direct or indirect contact with live components. This
can result in electric shock, burns or even death. Work
improperly carried out on current-carrying parts can cause
fires.
– Disconnect the mains power supply prior to installation
and disassembly!
– Permit work on the 230 V supply system to be
performed only by specialist staff.
■
Permit work to be performed only by specialist staff.
■
Please read the mounting instructions carefully and keep them for
future use.
■
Additional user information and information about planning is
available at www.BUSCH-JAEGER.de or by scanning the QR
code.
Intended use
The Busch-Smoke alarm detector responds early and reliably to
smoldering fires and open fires with smoke.
Avoid situations in which the Busch-Smoke alarm detector is
subjected to draught (open window and / or ventilators).
Do not dispose of used batteries in the household waste.
Defective lithium batteries must not be sent via air freight.
For other types of transport the special regulation 188 of
the ADR must be observed.
■
Do not paint the device!
■
Do not wallpaper the device!
■
Do not case or cover the device!
Function
The Busch-Smoke alarm detector works according to the scattered
light principle. It detects smoke particles floating in the air.
– Ensure that air can flow at all times unimpeded into the
slats [6] of the Busch-Smoke alarm detector.
Technical data
Power supply
(permanently installed lithium
battery):
3 V, 1600 mAh
Battery service life
(years): 10
Sound pressure at 3 metres: 85 dB(A)
Operating and storage
temperature:
-10°C - +40°C
Dimensions: 115 mm x 45 mm
Standards: DIN EN 14604 / DIN 14676 / CE
Weight: 200 g
Humidity, no condensation: 15% to 95% rel
Installation site
[
Notice
For detailed information about the correct installation sites and
conditions, see the Installation site manual.
Operation
[1] Mounting plate
[2] Cable feed-through
[3] Busch-Smoke alarm detector
[4] Position of the LED
[5] Test and mute button
[6] Slats
[7] Bar
[8] Connection terminal block
[9] Contats for radio module
[10] Trough for radio module
Mounting [A]
1. Install the mounting plate [1] with the dowels and screws at the
correct installation site.
Notice
■
Remove any drilling dust from the holes prior to installation!
■
In case of wire networking, feed the cable through the cable
opening [2] of the mounting plate [1] prior to installation!
■
To prevent draught, it is essential to close the ceiling openings,
cable openings and empty tubes with silicone!
■
In case of an alternative type of installation, a permanent
connection must be ensured between the smoke detector and the
ceiling.
2. Insert the Busch-Smoke alarm detector [3] into the mounting plate
[1] in such a way that both marks are positioned directly above
each other.
3. By turning the Busch-Smoke alarm detector [3] in a clockwise
direction the Busch-Smoke alarm detector is latched into the
mounting plate [1] and automatically activated.
– The activation is indicated with a brief flash of the red LED [4]..
Function test
The function of the Busch-Smoke alarm detector should be checked
immediately after the installation.
1. Press the test button [5] and keep it pressed.
– The function test is confirmed with a fast flashing of the red LED
and a rising alarm tone.
– The Busch-Smoke alarm detector goes mute shortly after the test
button [5] is released.
Connection [B]
Wired networking
1. Lever the connection terminal block [8] out vertically with a small
screwdriver
2. Fasten the two cable cores in the connection terminal block [8].
3. Then press the connection terminal block [8] carefully back onto
the two contact pins.
4. Insert the Busch-Smoke alarm detector [3] into the mounting plate
[1] and turn it clockwise until it latches.
Radio network
Notice
For detailed information about the radio network of this device, see
the system manual.
– An extended operation manual can be called up via the QR code
or the QR link, see the heading in these brief instructions.
Maintenance
■
Check the detectors regularly, or at least once a year via a visual
check and a function test.
■
When the date on the label, on the side of the device, has
expired, the device must be replaced.
■
If the Busch-Smoke alarm detector triggers an alarm without the
presence of smoke, press the test button to switch the alarm to
mute.
■
The Busch-Smoke alarm detector carries out an automatic self-
test at regular intervals and signals a defect.
– Replace the Busch-Smoke alarm detector when every 32
seconds there are 2 alarm tones with simultaneous flashing of
the LEDs.
False alarm
If an alarm sounds without an obvious reason, the Busch-Smoke
alarm detector can be switched to mute for a limited time.
1. Press the test and mute button [5].
– This deactivates the warning signal for 10 minutes, and the lED
flashes red every 8 seconds
State of the battery
When the battery is low, the Busch-Smoke alarm detector issues an
alarm tone and the LED simultaneously flashes red every 32
seconds.
– This indicates that the Busch-Smoke alarm detector must be
replaced.
Anti-theft protection [C]
1. Break out the small white bar [7] with a suitable tool.
2. If necessary, the device can additionally be secured with a thread-
cutting screw (2 to 3 mm diameter with a length from 6 to 8 mm).
Service
Busch-Jaeger Elektro GmbH - A member of the ABB Group,
Freisenbergstraße 2, D-58513 Lüdenscheid, Germany,
Tel.: +49 2351 956-1600; www.BUSCH-JAEGER.de


Join the conversation about this product
Here you can share what you think about the Busch-Jaeger 6833/01-84 Smoke Detector. If you have a question, first carefully read the manual. Requesting a manual can be done by using our contact form.