
Link
On
Off
Set a reminder
You can set an alert to remind you of something you need to do,
for example when your baby’s next feed is due. You can set it for
2, 4 or 6 hours.
1. Press , then press to display and press .
2. Press or to select the reminder time (2H, 4H or 6H),
then press to save. The will be displayed on the top right
of the screen.
3. To cancel the alert, select .
Set the screen to turn on and o automatically
You can set the screen to turn on by pressing any button. On this
setting, the screen will turn o automatically when no button is
pressed during 1, 3 or 5 minutes.
1. Press , then press to display and press .
2. Press and to select 1, 3 or 5 minutes and press .
3. To turn the screen back on at any time, press any button. If you want
to set the screen on all the time, set the screen setting to o .
Turn sound activated screen mode on or o
When set to On, the screen will turn on if noise is detected from the
Baby unit. If it’s set to O, the screen will stay o even if noise is
detected. To use this feature, you need to set the standby mode rst
to 1, 3 or 5 minutes as described above.
1. Press , then press to display and press .
2. Press and to select (for On) or (for O) and press .
3. To turn the screen back on at any time, press the .
Temperature sensor
The reading from the temperature sensor will be displayed at the top
of the Parent unit screen.
To change the temperature display from C to F:
1. Press , then press to display and press .
2. Press or to select °C or °F, then press .
Other screen icon descriptions
Power on/o
Slide button up to
turn on and slide
down to turn o.
Temperature
sensor
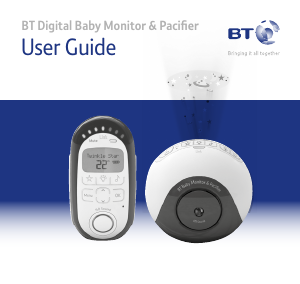
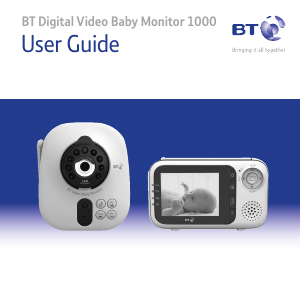
Get to know your Baby unit
Sound level display
LED lights show the level
of sound being detected
from the Baby unit.
Press and hold to turn
the unit on and o.
Press once to switch to
standby mode.
Press to open/exit
the main menu.
Press and hold to
talk to your baby.
Microphone
Press to increase or
decrease the speaker
volume, when in
normal mode (X1).
Press to move up or down
when in the zoom mode (X2).
Press to scroll up or down
when you’re in the menu.
Press to increase
or decrease the
brightness level, or
press to move left
or right when in the
zoom mode (X2).
Manual pan and tilt
Gently move
the camera to
adjust the angle.
Press to select
an option in
the menu.
Get to know your Parent unit
Stand
Lift and twist.
Speaker
Power socket
Camera
Power socket
Using the Parent unit
Turn on and o
Press and hold for 2 seconds to turn on and o.
Using the menu
• Press
to open the main menu. Scroll through the menu options
using and . When the menu option you want is displayed,
press . Use or to scroll through the sub menus and press
to select.
• Press to exit the menu and return to the main monitoring screen.
Monitoring volume and mute
There are 8 volume settings.
1. In normal monitor mode (X1), press or to change
the volume.
2. Press to conrm.
3. To turn the sound o completely, turn the volume down to 0. will be
displayed on top of the screen.
Screen brightness
There are 8 brightness levels. The default is 4.
1. In normal monitor mode (X1), press or
to select the
brightness level.
2. Press to conrm.
Lullabies
There are 5 lullabies to choose from or you can play all 5 in sequence.
1. Press ,
is displayed, press .
2. Press or to choose the lullaby 1-5 or press
to play all ve,
then press .
3. Press or to select the volume from 1-3 and press
to save.
4. To stop the lullaby playing, select .
Talk to your baby
To give your baby some words of comfort, press and hold down
on the Parent unit and speak into the Parent unit’s microphone.
The icon will be displayed at the bottom right corner. Release the
button when you’ve nished speaking.
Zoom in and out
1. Press , then press to display and press .
2. Press or to select the zoom level (X1 or X2), then press
to save.
3. Press to return to the main monitoring screen.
4. Whilst in X2 mode, press , , or to move the image.
5. To adjust the volume or screen brightness when in X2 zoom mode,
press
and select the or option and press .
Charging/
battery light
Blue when mains
power adapter
is on, red when
battery low.
Power on light
Green when Parent
unit turned on.
(Remains green for one
minute while charging,
after the parent unit
is turned o).
Link button
The units are pre-linked.
(Link button used if re-link ever required).
Add camera
Delete camera
View camera
Using the Baby unit
Turn on and o
1. Slide the
button on the side of the unit up to turn On and
press down to turn O.
Night vision
So that you can see your baby at night, the Baby unit automatically
uses the light from its infrared LED lights to capture images in a dark
room. Because of that, it can only show images in black and white.
The icon will be displayed at the top of the screen.
Signal strength
Baby unit switched on
Camera identication
number e.g. Camera 1
Sound on
Mute
Battery status (Full battery shown,
scrolling when charging)


Join the conversation about this product
Here you can share what you think about the BT 3000 Baby Monitor. If you have a question, first carefully read the manual. Requesting a manual can be done by using our contact form.