
Release
PROBLEM SOLUTION
No Cadence Reading
Inaccurate Cadence
Reading
Inaccurate maximum
Speed reading
No Speedometer readin g
Inaccurate Speedometer
Reading
Slow Display
No Trip Distance
Display shows
irregular figures
Black Display
Check magnet and cadence
sensor alignment
Check magnet and cadence
sensor alignment
Atmospheric or RF interference.
Reset Max. speed
1) Check magnet and transmitter
alignment
2) Check/Replace Transmitter
Battery
RF interferance from
electromagnetic sources
Temperature outside of operating
limits
1) Check magnet and transmitter
alignment
2) Check/Replace Transmitter
Battery
Take out Main Unit battery and
install again
Temperature too hot, or display
exposed to direct sunlight too long,
Remove from direct sunlight and
allow unit to cool down
No Display Check replace main computer
battery
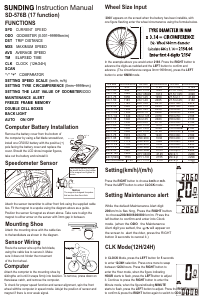
Wheel
Diameter d
Wheel
Factor c
26 x 1.0
26 x 1.25
26 x 1.4
26 x 1.5
26 x 1.75
26 x 1.95
26 x 2.0
26 x 2.1
26 x 2.3
700 x 18
700 x 20
700 x 23
700 x 25
700 x 28
700 x 30
27 x 1"
27 x 1 1/8"
27 x 1 1/4"
1913
1953
2005
2010
2023
2050
2055
2068
2170
2070
2086
2096
2105
2136
2170
2145
2155
2161
1
2
d
x x
c
Cadence ( RPM)
Average Cadence ( RPM)
Speedometer (SPD) (KPH or MPH)
Tripmeter (DST) (Km or Miles)
Odometer (ODO) (Km or Miles)
Auto trip timer (TM) (9:59:59)
Maximum Speed (MXS) (KPH or MPH)
Clock, 12/24 hour Selectable
Average Speed (AVS) (KPH or MPH)
Speed Comparator (+ or -)
Speed Tendency
Odometer Program Function (ODO)
Auto Scan
Maintenance Required Functions ( )
Speed Bar
Auto Start / Stop
Auto Power Off
Km / Mile Selection
Backlight
Thermometer
Fat Burnt
Calories
FEATURES
PROGRAMMING THE MAIN FUNCTIONS
COMPUTER FUNCTIONS
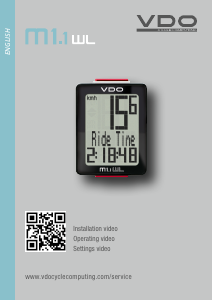
DISPLAY
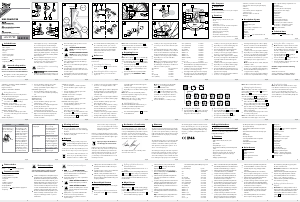
There are three main screens. Press the B button to
toggle between the three display screens.
Screen 1
Screen 2
Screen 3
Cadence
(RPM)
Current Speed
(SPD)
Trip Distance
(DST)
Trip Timer
(TM)
Speed Comparator
(+ or -)
Speed Tendency
Cadence
(RPM)
Current Speed
(SPD)
Average Speed
(AVS)
Maximum Speed
(MXS)
Speed Comparator
(+ or -)
Speed Tendency
Cadence
(RPM)
Current Speed
(SPD)
Clock
(CLK )
Total Distance/Odometer
(ODO) ,
Speed Comparator
(+ or -)
Speed Tendency
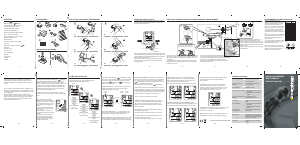
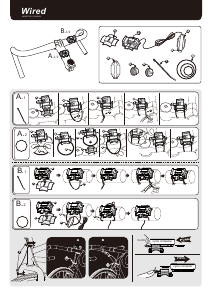
Slide the computer onto the mounting bracket until it snap s
firmly into position. Press the release button to remove th e
computer (see diagram below).
Ensure that everything is aligned and check that the speed and
cadence signals are being received by the computer, before you
finally fully tighten the cable ties holding the sensor / transmitter
unit in position on the chain stay.
NOTE: this computer has an antenna inside the mounting
bracket (A), it will only operate correctly when fitted to this
mounting bracket.
ACCESSORIES INSTALLING HANDLEBAR/ STEM BRACKET
INSTALLATION BATTERIES
COMPUTER INSTALLATION INSTALLING CADENCE SENSOR and WHEEL MAGNET/ CRANK MAGNET
Fig.8
distance in millimeter
per one turn
TROUBLE SHOOTING
-1- -2- -3- -4- -5- -6- -7- -8- -9-
-10- -11- -12- -13- -14- -16- -17- -15-
Inputting your bike’s wheel size
When you insert the battery, the screen
will flash a four digit number. This is for
inputting the wheel circumference.
Note: for your convenience, refer to the
right for your wheel’s circumference (C),
or for a more precise reading multiply
your wheel’s diameter (D) by 3.1416
to determine your wheel’s circumference
(C).
a. Input the number (C) by pressing the A
button to select the digit to be input and
the B button to adjust the digit to the
desired number.
b. Once all four digits have been entered,
press the A button to confirm and go to
the KM/Mile selection screen.
Note: You can return to the wheel size
input mode by pressing and holding both
buttons for 2 seconds. Removing the
battery will erase the wheel size.
Maintenance Required Function:
On the top line of the display a wrench icon will appear
with a flashing 3 digit number. The number represents the
distance travelled before the wrench icon appears and
flashes, reminding you that the need to perform maintenance
on your bike. You can set your maintenance reminder for
increments of either 200km or 200miles. Press the B button
to adjust the maintenance distance. Press the A button to
confirm and enter Temperature setup.
Temperature Set Up (°C/°F): Press B button to change
between °C and °F. Press A button to confirm and exit setup
mode.
After you replace the computer
battery the Odometer (ODO) will be
reset to zero. If you wish to maintain
your total odometer value, note your
ODO reading before replacing the
battery.
To enter this reading, Press the B
button to advance to the Odometer
screen mode.
Press and hold the A button for 5
secs until the last digit of the ODO is
flashing.
To adjust the value, press the B
button and then press the A button
to confirm and select the value.
Repeat this sequence to reach the
desired odometer value.
SPEED COMPARATOR: A '+' or '-' sign will appear on the
second line of the display to indicate whether your current
speed is higher or lower than your average speed.
SPEED TENDENCY: A cyclist symbol appears on the second
line of the display. The wheels will turn forward to show your
are accelerating or backwards to show your are decelerating.
AVERAGE CADENCE: To see the average cadence of your
ride press the A button. The average cadence will be
displayed (flashing) for 4 seconds.
CADENCE: Current Cadence ( ) is displayed on the top
line. Cadence is the rotational speed of your cranks in RPM
(revolutions per minute). When the 'brackets' around the
cadence icon ( ) are flashing ( ) the computer is
receiving a cadence signal.
Current
Cadence
Current
Cadence
Average
Cadence
Comparator
Tendency
AUTO SCAN (SCAN): In the SCAN mode there is no need to
press the B button to change from one mode to another. Each
mode will be displayed for approx. 4 seconds before changing
to the next mode. To activate SCAN mode press the B button
until the SCAN icon is displayed on the second line.
MAINTENANCE REMINDER FUNCTION: The maintenance
reminder function is based on the distance you entered during
the computer set up mode. The maintenance required icon
( ) will flash when this distance is reached as reminder to
carry out any scheduled maintenance.
Press the A button to stop the wrench ( ) from flashing.
CLOCK: 12h/24h clock displaying current time.
CURRENT SPEED AND SPEED BAR: Once you begin
your ride, your screen will display your riding speeds in two
ways. The first is the number on the second line of the
display. The second is the speed bar that runs up the left
side of the display.
FAT BURNT: This is the approximate number of grams of
fat burned during your ride.
To reset FAT, press and hold the A button for 2 seconds.
CALORIE COUNTER: This is the approximate amount of
calories burned during your ride.
To reset CAL, press and hold the A button for 2 seconds.
TRIP DISTANCE (DST): The Trip meter measures your
distance for any particular ride. To reset the Trip Distance
(DST), make sure DST is displayed on your screen, then
press and hold the A button for two seconds.
Note: Whenever DST is reset, TM and AVS will also be reset
AVERAGE SPEED (AVS): Your Average Speed (AVS) is
calculated by the Trip Distance (DST) divided by
Trip Timer (TM)
MAXIMUM SPEED (MXS): This is the Maximum Speed
reached. To reset MXS, make sure MXS is displayed on your
screen, then press and hold the A button for two seconds.
TRIP TIMER (TM): The Trip Timer is turned on and off
automatically based on input from the wheel sensor.
Therefore, it counts only your actual riding time. To reset
TM, make sure DST is displayed on your screen, then
press and hold the A button for 2 seconds.
Auto Start/Stop: To start the unit, press any button to turn on
the display. The unit will automatically stop when left
unused for over 5 minutes.
BACKLIGHT: Press button A to activate the backlight. The
backlight will be activated for approximately 4 seconds.
F
F
Image © Copyright Graham Watson
E
C
2mm
D
4
E
5
C
3
D
KM / MILE SELECTION: After the wheel size input, the
following step is selection of kilometers or miles as the
measurement for distance. Press the B button to choose
between kilometer (KM) and Mile (M) press the A button to
confirm.
Clock (12H/24H): After Km/Miles selection, a digital clock is
displayed. Press the B button to switch between the 12h and
24h format. Press the A button to confirm and advance to the
clock setting mode.
Press the B button to advance the hour. When the hour
display is correct, press the A button to confirm. Press the B
button to advance the minutes. When the minute display is
correct, press the A button to confirm and advance to the
Maintenance Required Function.
1a
1 2
1b
1c
2a
2b
2c
I
A
I
A
E
C
A
B
D
I
F
G
H
3V CR2032
Note: Follow the numbered sequence below. Only fully tighten the cable ties when all components are aligned
Align the cadence magnet (D) on
the inside face of the left crank.
Secure using cable ties provided.
wireless computer
with cadence
owner’s manual
A B
Fit the sensor / transmitter unit (E) over the non-drive side chain
stay, with the battery compartment facing outwards. Do not fully
tighten the cable ties as you may need to adjust the position of
the unit later.
If required; adjust the spacing / position of the two sensors by
loosening the screw at the point where the sensor arms attach
to the body of the unit.
Fit the cadence magnet (D) to the inside surface
of the non-drive crank using cable ties around the crank.
Ensure that it is aligned with the arrow marked on the cadence
sensor arm on the outside of the chainstay. For best
performance the gap between the magnet and the sensor
should be less than 2mm.
Fit the spoke speed sensor magnet (C) to a
spoke, so that it is aligned with the arrow
marked on the speed sensor arm on the inside
of the chainstay. For best performance the gap
between the magnet and the sensor should be
less than 2mm.
NOTE: the clamp is offset to fit both round and
bladed spokes.


Join the conversation about this product
Here you can share what you think about the Boardman Wireless Cycling Computer. If you have a question, first carefully read the manual. Requesting a manual can be done by using our contact form.
reply | This was helpful (4)
reply | This was helpful (0) Read more
This was helpful (3)