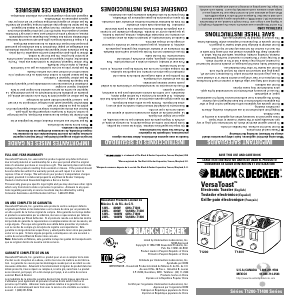
How to Use
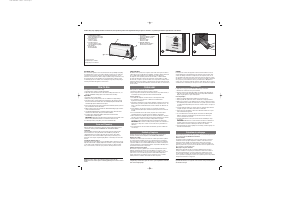
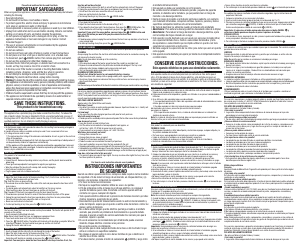
1. Self-Adjusting Bread Guides
Guías autoajustables para el pan
Guides autoréglables pour le pain
2. Toast Control Lever
Palanca de control
Levier de commande
3. Toast Shade Selector
Selector de grado de tostado
Sélecteur du degré de grillage
4. Cancel Button
Botón de cancelar
Bouton d'annulation
Always unplug the cord from the electrical outlet and allow the toaster to
cool before cleaning. DO NOT IMMERSE THE TOASTER IN WATER.
Crumb Tray
The Removable Crumb Tray (B) is located on the opposite side from the
Toast Control Lever. Grasp the handle of the Crumb Tray and pull out
completely. Dispose of crumbs and wash the Tray in hot, sudsy water.
Stubborn spots can be removed with a nylon mesh pad. The Tray is not
diswasher safe. Dry the Tray thoroughly before re-inserting in its slot in the
Toaster.
Cleaning the Outside Surfaces
Unplug the toaster and allow it to cool completely before cleaning. To clean,
wipe the exterior with a slightly dampened soft cloth or sponge and dry with
a soft cloth or paper towel. Do not use strong cleaners or abrasives that
may scratch surface, and never spray cleaners directly onto the toaster.
Este aparato es solamente para uso doméstico.
1. Enchufe el cable a una toma de corriente estándar.
2. Ajuste el grado de tostado al nivel deseado (A). Para la primera tanda, se
recomienda ajustar el grado de tostado al nivel intermedio.
Consejos prácticos:
• Las rebanadas delgadas se deben tostar a una temperatura baja.
• Los sándwiches y la repostería se deberá tostar utilizando las
regulaciones más bajas.
3. Coloque las rebanadas de pan o demás alimentos adentro de las ranuras
del tostador y presione la palanca del control hasta producir un clic. Las
guías se ajustarán automáticamente a fin de acomodar los alimentos en
su lugar.
4. Si los alimentos que uno desea tostar se encuentran congelados,
presione el botón (A) después de haber bajado la palanca de control de
tostado.
5. Una vez finalizado el ciclo de tostado, la palanca de control subirá
automáticamente y uno puede retirar los alimentos del tostador.
6. Utilice el botón de recalentar (A) para recalentar los alimentos. Presione
la palanca de control de tostado y luego presione el botón de recalentar.
7. Si los alimentos se llegasen a trabar, el dispositivo de apagado
automático apagará automáticamente el funcionamiento del aparato.
IMPORTANTE: Desconecte el cable y mueva la palanca de control hacia
arriba y hacia abajo unas cuantas veces hasta elevar y "destrabar" los
alimentos.
8. Para interrumpir el ciclo de tostado de inmediato, presione el botón de
cancelar (A).
L'appareil est conçu pour une utilisation domestique seulement.
1. Brancher le cordon dans une prise standard.
2. Régler le sélecteur du degré de grillage au réglage voulu (A). Régler le
sélecteur à la position de grillage moyen lors de la première utilisation.
Régler au goût pour les cycles subséquents.
Conseils pratiques
• Utiliser un réglage mininmal pour griller des tranches minces.
• Toujours griller des pâtisseries ou des sandwichs au réglage minimal.
3. Déposer les tranches ou les aliments dans les fentes et abaisser le levier
de commande jusqu’à l’émission d’un déclic. Les guides pour les tranches
se règlent automatiquement pour retenir les tranches minces ou épaisses
en place.
4. Lorsque l'aliment à griller est congelé, enfoncer le bouton pour aliments
congelés (A) après avoir abaissé le levier de commande.
5. À la fin du cycle de grillage, le levier de commande remonte et on peut
retirer l'aliment de l'appareil.
6. Se servir du bouton de réchaud (A) pour réchauffer un aliment grillé.
Abaisser le levier de commande jusqu’à l’émission d’un déclic puis
enfoncer le bouton de réchaud.
7. Lorsque l'aliment reste coincé, la fonction d'arrêt automatique coupe
le courant.
IMPORTANT : Débrancher le cordon et manier le levier de commande à
quelques reprises de haut en bas pour soulever l’aliment coincé. Ne
jamais utiliser d’ustensile en métal pour décoincer un aliment.
8. Pour interrompre le cycle de grillage en tout temps, il suffit d'appuyer sur
le bouton d'annulation (A).
Siempre desconecte el cable de la toma de corriente y espere que el
tostador se enfríe antes de limpiarlo. NO SUMERJA EL APARATO.
Bandeja de residuos
La bandeja de residuos (B) se encuentra al costado opuesto de la palanca
de control. Sujete la bandeja por el asa y retírela. Deseche las migajas y
lave la bandeja con agua caliente enjabonada. Las manchas persistentes
se pueden eliminar con una almohadilla de fibras de nailon. La bandeja no
se puede introducir en la máquina lavaplatos. Seque bien la bandeja antes
de instalarla nuevamente en el aparato.
Limpieza del exterior del aparato
Desconecte el aparato y permita que se enfríe completamente antes de
limpiarlo. El exterior del aparato se puede limpiar con un paño suave
ligeramente humedecido o con una esponja y luego se debe secar con un
paño suave o con una toalla de papel. No se debe utilizar limpiadores
fuertes ni abrasivos que pudiesen rayar la superficie y nunca se debe
utilizar productos rociadores directamente sobre el aparato.
Toujours débrancher le cordon de la prise et laisser refroidir l’appareil avant
de le nettoyer. NE PAS IMMERGER L’APPAREIL.
Plateau à miettes
Le plateau à miettes amovible (B) se trouve du côté opposé au levier de
commande. Saisir la poignée du plateau à miettes et le retirer hors de
l'appareil. Jeter les miettes et laver le plateau dans de l'eau chaude
savonneuse. On peut enlever les taches tenaces à l'aide d'un tampon en
nylon. Le plateau ne va pas au lave-vaisselle. Bien sécher le plateau avant
de le remettre au fond du grille-pain.
Nettoyage de la paroi extérieure
Débrancher l'appareil et le laisser refroidir complètement avant de le
nettoyer. Il suffit d'en essuyer la paroi extérieure à l'aide d'un chiffon ou
d'une éponge humide, puis assécher à l'aide d'un chiffon doux ou d'un
essuie-tout. Ne pas utiliser des produits nettoyants forts ni abrasifs car
ceux-ci peuvent en égratigner la surface et ne jamais vaporiser des produits
nettoyants directement sur l'appareil.
Care and Cleaning
Como usar
Cuidado y limpieza
Utilisation
Entretien et nettoyage
A
B
This appliance is for household use only.
1. Plug the power cord into a standard wall outlet.
2. Adjust the Toast Shade Selector to the desired setting (A). For first use, set
Selector to Medium setting; adjust as desired for future toasting.
Helpful Hints:
• Toast thin slices on low settings.
• Always toast any toaster pastries, tarts or sandwiches on Light settings.
3. Place bread slices or other item to be toasted in the slots and press down
the Toast Control Lever until it clicks. The Self-Adjusting Bread Guides will
automatically adjust to hold the food in place.
4. If the food to be toasted is frozen, touch the Frozen Button (A) after you have
pressed down the Toast Control Lever.
5. When toasting is done, the Control Lever will automatically pop up and toast
can be removed from toaster.
6. Use the Reheat Button (A) to re-warm toasted food. Press down the Toast
Control Lever until it clicks, then press the Reheat button.
7. If food becomes wedged, the built-in Auto Power-Off function will
automatically shut off the power.
IMPORTANT: Unplug the cord and move the Control Lever up and down a few
times to raise "jammed" food. Never use metal utensils to free food.
8. To interrupt toasting at any time, press the Cancel Button (A).
CABLE ELECTRICO
El cable de este aparato fue escogido a fin de evitar el riesgo de enredarse
o de tropezar con un cable de mayor longitud. Cualquier cable de extensión
que se deba emplear, deberá estar calificado para nada menor de
15 amperios. (Para aquellos productos de 220 voltios, se deberá utilizar
un cable de extensión no menor de 6 amperios). Cuando utilice un cable
de extensión, asegúrese que no interfiera con la superficie de trabajo ni que
cuelgue de manera que alguien se pueda tropezar. A fin de aumentar la vida
útil del cable, no tire de él ni maltrate las uniones del cable con el enchufe ni
con el aparato.
CORDON
La longueur du cordon de l'appareil a été choisie afin d'éviter les risques
d’enchevêtrement et de trébuchement que présente un long cordon. Tout
cordon de rallonge d’au moins 15 ampères (ou de 6 ampères, dans le cas
des produits de 220 volts) peut servir au besoin. Lorsqu'on utilise un cordon
de rallonge, s'assurer qu'il ne traverse pas la surface de travail ni qu'il pend
de façon qu'on puisse trébucher dessus par inadvertance. Manipuler le
cordon avec soin afin d’en prolonger la durée; éviter de tirer dessus et de le
soumettre à des contraintes près des prises ou des connexions de l’appareil.
ELECTRICAL CORD
The cord of this appliance was selected to reduce the possibility of tangling
in or tripping over a longer cord. If more length is needed, use an extension
cord rated no less than 15 amperes. (For 220 volts rated products, use an
extension cord rated no less than 6 amperes). When using an extension cord,
do not let it drape over the working area or dangle where someone could
accidentally trip over it. Handle cord carefully for longer life; avoid jerking or
straining it at outlet and appliance connections.
NOTE: If the power supply cord is damaged, it must be replaced by the
manufacturer or its service agent or a similarly qualified person in order to avoid a
hazard.
NOTA: Si el cable de alimentación/eléctrico se encuentra dañado, debe ser
reemplazado por el fabricante, agente de servicio o persona igualmente calificada a
fin de evitar cualquier peligro.
NOTE : Lorsque le cordon d'alimentation est endommagé, il faut en confier la
réparation au fabricant, à son agent de service autorisé ou une personne qualifiée
afin d'éviter tout risque.
Product may vary slightly from what is illustrated. / Este producto puede variar ligeramente del que aparece ilustrado. / Le produit peut différer légèrement de celui illustré.
5. Frozen Button
Función para alimentos congelados
Bouton pour aliments congelés
6. Reheat Button
Botón de recalentar
Bouton de réchaud
† 7. Removable Crumb Tray
Bandeja de residuos removible
Plateau à miettes amovible
† Consumer replaceable
Reemplazable por el consumidor
Remplaçable par le consommateur


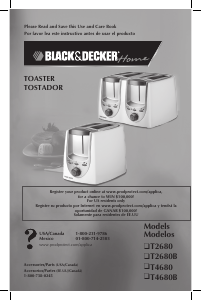
Join the conversation about this product
Here you can share what you think about the Black and Decker T2750 LongSlot Toaster. If you have a question, first carefully read the manual. Requesting a manual can be done by using our contact form.