How To Use – English
Care and Cleaning
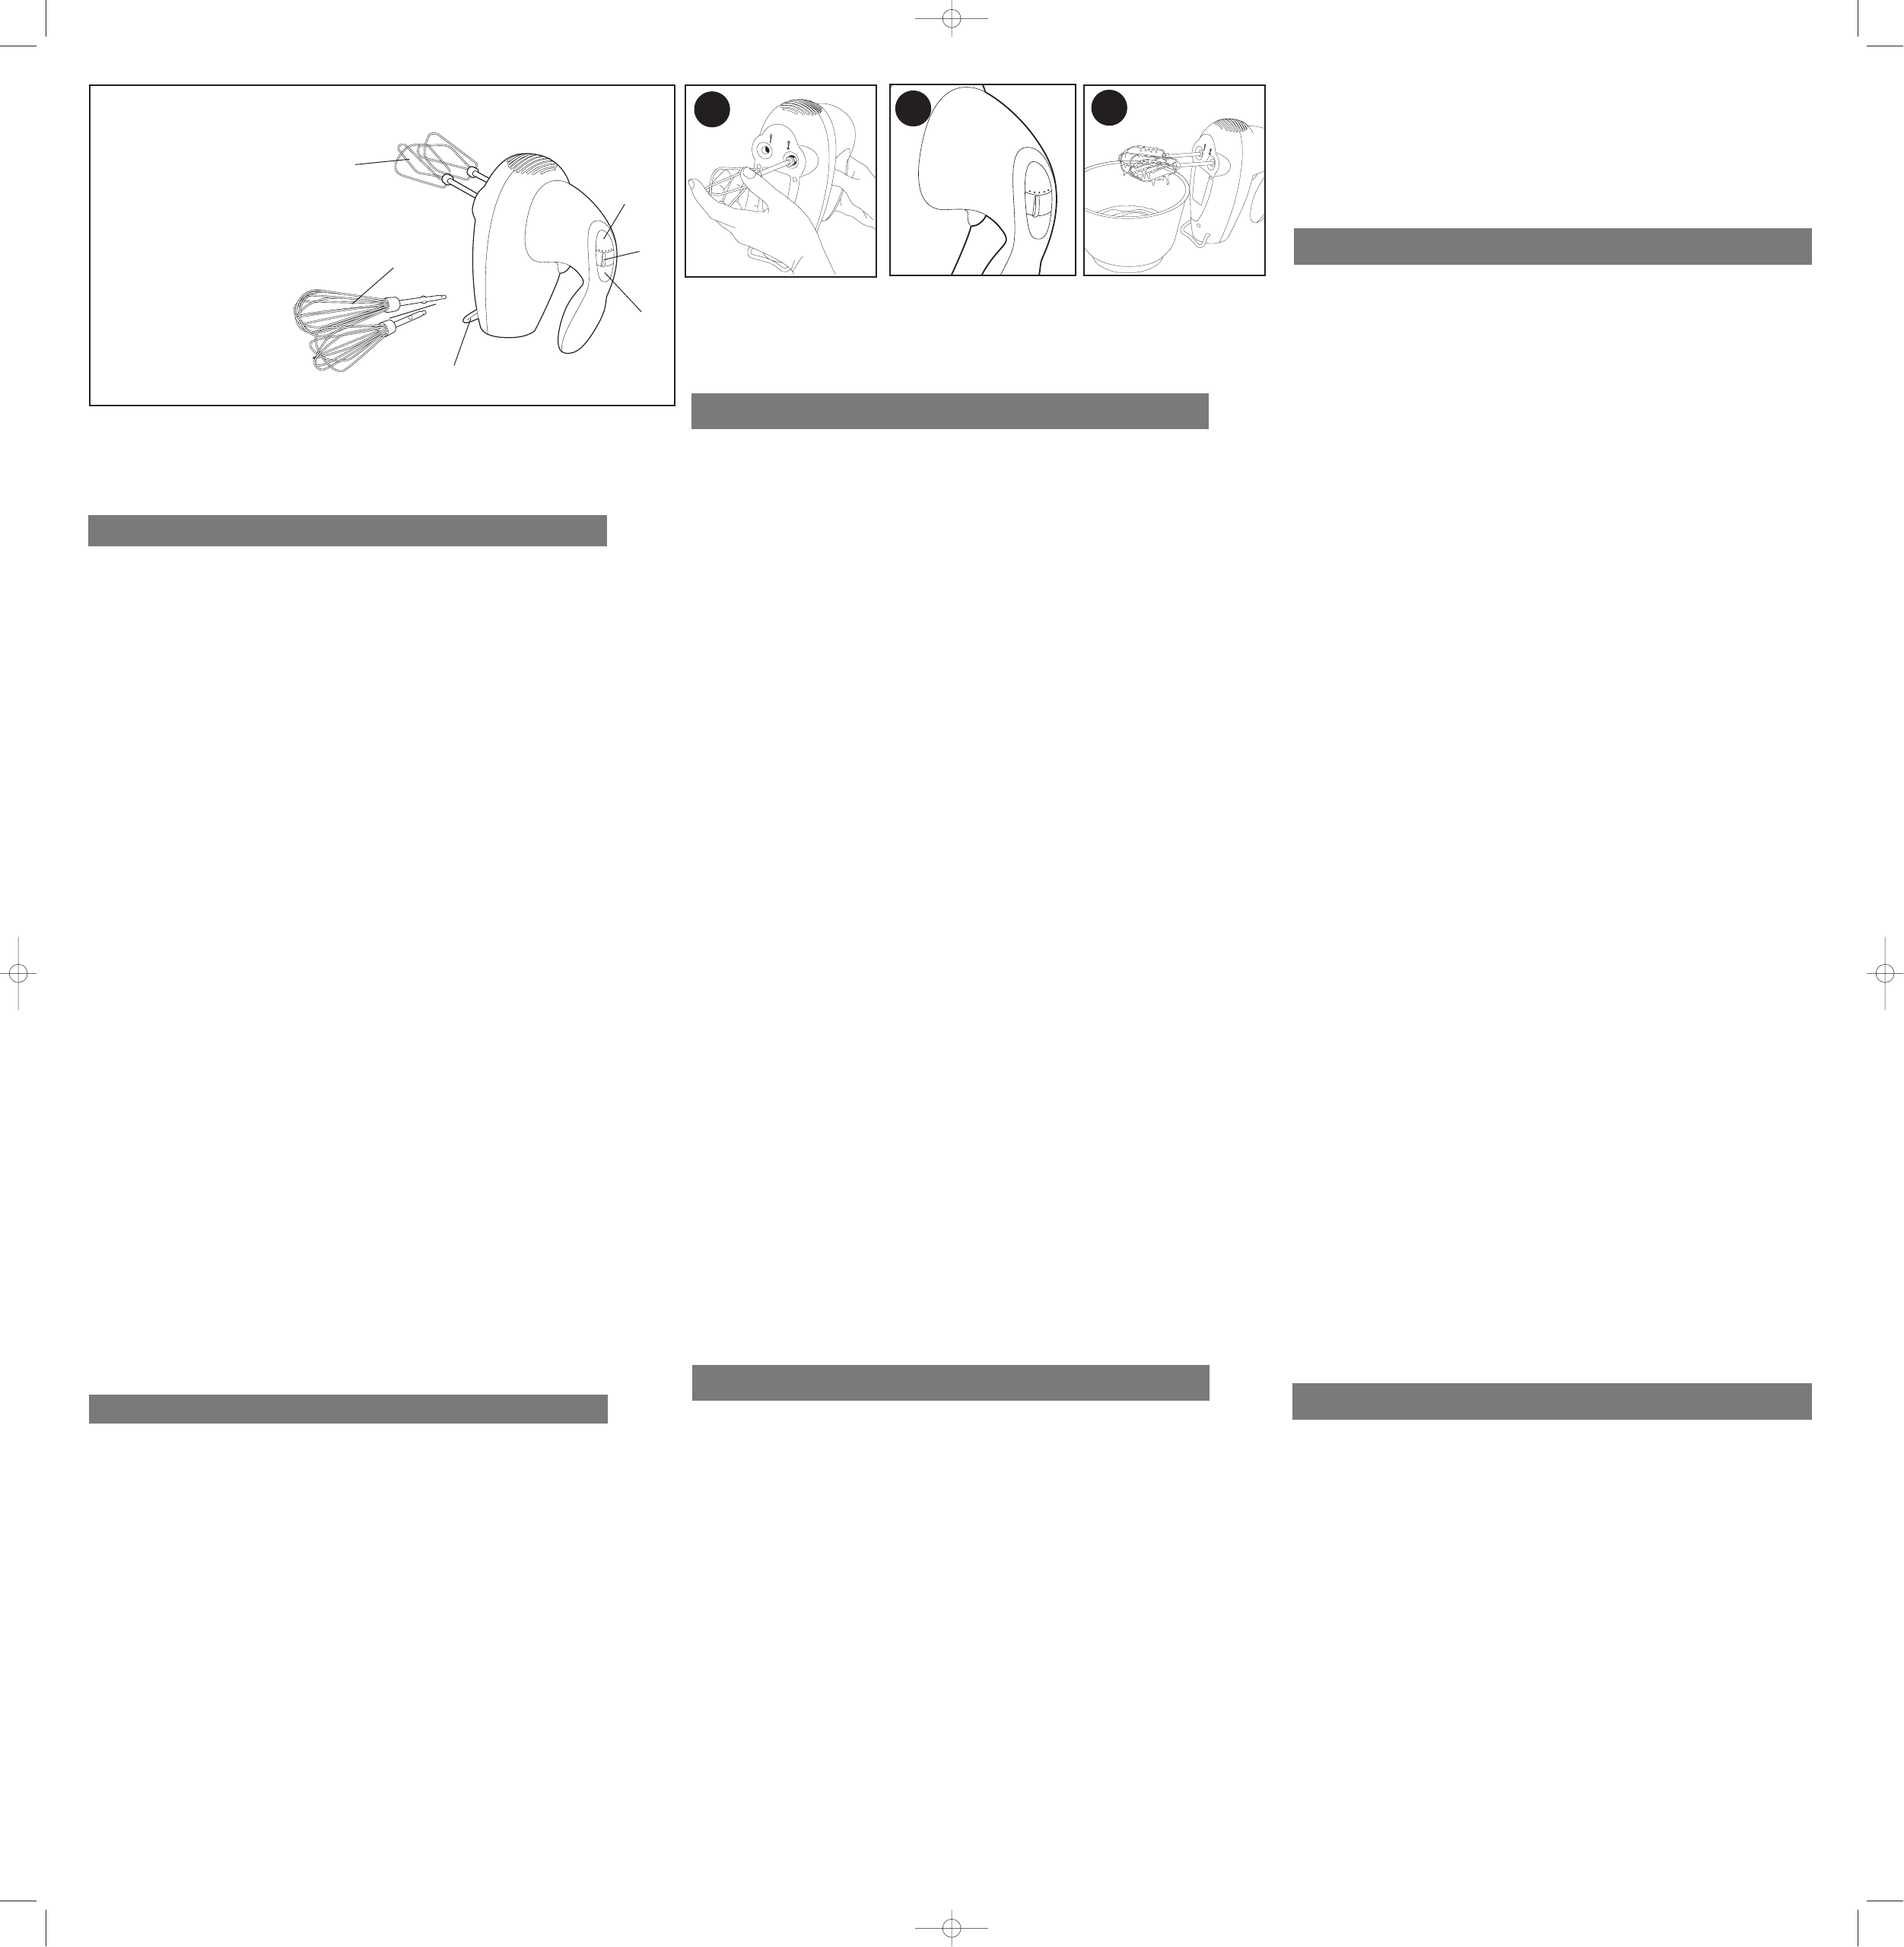
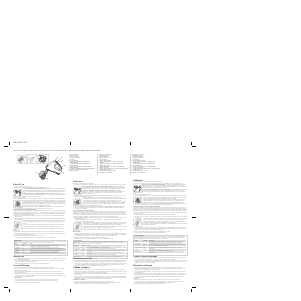
1. Be sure the Mixer is OFF (O) and unplugged before inserting or removing
attachments. Since one Beater has a "collar" on its stem while the other
doesn’t, each Beater fits only into one opening. Match the "collared" beater to
the illustration on the Mixer to help you place it into the right hole (A). You may
have to rotate it slightly until it locks into place. Beaters are not inter-
changeable. If a Beater does not lock in after rotating it, check the illustration
on the Mixer and be sure you are placing the correct Beater into the
appropriate opening. Do not force a Beater into a slot. NOTE: The Whisks,
however, are inter-changeable and either one can be inserted into either hole.
2. Plug the Cord into an outlet.
3. Place the ingredients into a bowl, grip the Mixer handle, and position the
Beaters/Whisks in the center of the food to be mixed.
4. Select the appropriate speed setting for the task (B). See the "Mixing Guide."
5. Guide the Beaters/Whisks continuously through the mixture for uniform mixing.
Be sure to turn the Speed Control Switch OFF (O) before you scrape the sides
or bottom of the bowl with a handheld utensil. Place the Mixer on the Heel
Rest so that batter can drain into the bowl (C).
6. To remove the Beaters/Whisk, pull the Beater Eject Lever up. CAUTION:
Beaters/Whisks come out of the Mixer quickly when ejecting. You may want to
eject them into the bowl or into a sink.
Power Boost
1. The Power Boost lets you increase the mixing speed to the maximum power
level from any setting. When you feel the Mixer slowing down or straining in
tough mixing tasks (such as mixing cookie dough), press the Power Boost
Button.
2. As soon as you release the Power Boost Button, the Mixer will return to your
pre-selected speed.
Mixing Guide
Use the following guide for speed selections. NOTE: Start mixing at the lowest
speed and gradually increase as needed. When using the Whisks to whip light,
fluffy mixtures, cream, or eggs, use speed #5.
SPEED FUNCTION USE
1 (Low) Blend To blend flour/dry ingredients, and liquids for
batters and cookie doughs. To blend nuts,
chips, raisins into cookie doughs.
2 (Low) Stir To prepare sauces, puddings, muffins, and
quick breads. To stir thin batters.
3 (Medium) Mix To prepare batters and cake mixes. To cream
butter and sugar or mix eggs into batters.
4 (Medium) Beat To beat whole eggs, frozen desserts, frostings.
To mix light batters like popovers.
5 (High) Whip To whip fluffy mixtures, whipped cream, egg
whites, and mashed potatoes.
Power Boost Use at any speed setting to get maximum
power for tough mixing tasks
1. Be sure the Speed Control Switch is in the OFF (O) position and the cord is
unplugged before cleaning any part of the Mixer. Eject the Beaters/Whisks.
2. Wash the Beaters and Whisks in hot, sudsy water or in a dishwasher. Dry all
parts thoroughly before storing.
3. Clean the Mixer or cord with a damp cloth. To remove stubborn spots, wipe
surfaces with a sponge or cloth moistened with dish detergent and water.
Follow with a clean, damp cloth. Do not use abrasive cleaners on any part of
the Mixer as they can damage the finish.
Storing the Mixer
1. Avoid jerking the Power Cord or straining it at the plug connection. To store,
coil the Cord in loops and secure it with the attached cord tie. Do not wrap the
cord around the Mixer.
2. Store the Beater and Whisks in a drawer or in the original packaging.
Mixing Tips
1. For best results when beating egg whites, use a stainless steel, copper, or
glass bowl; do not use an aluminum or plastic bowl.
2. For best results when whipping cream, chill the cream, Beaters, and bowl first.
Start with the lowest setting and gradually increase to WHIP (#5) as the cream
begins to thicken.
TAMPER-RESISTANT SCREW
This appliance is equipped with a tamper-resistant screw to prevent removal of the
bottom cover. To reduce the risk of fire or electric shock, do not attempt to remove
the bottom cover. There are no user serviceable parts inside. Repair should be done
only by authorized service personnel.
1. Speed Control Switch
Interruptor de velocidad
2. Power Boost Button
Botón de impulso
3. Beater Eject Lever
Palanca para extraer las aspas
4. Heel Rest
Talón de descanso
† 5. Beaters (283491-00)
Aspas
† 6. Whisks (2835079-00)
Batidores de alambre
† Consumer replaceable
† Reemplazable por el consumidor
† Remplaçable par le consommateur
A
B
C
Utilisation - Français
Entretien et nettoyage
VIS INDESSERRABLE
L’appareil est doté d’une vis indesserrable empêchant l’enlèvement du couvercle
inférieur. Pour réduire les risques d’incendie ou de secousses électriques, ne pas
tenter de retirer le couvercle inférieur. L’utilisateur ne peut pas remplacer les
pièces de l’appareil. En confier la réparation seulement au personnel des centres
de service autorisés.
TORNILLO DE SEGURIDAD
Esta unidad viene equipada con un tornillo de seguridad para evitar la remoción de la
cubierta inferior. Con el fin de reducir el riesgo de incendio o choque eléctrico, no trate
de retirar la cubierta inferior. La unidad no contiene partes servibles al usuario.
Cualquier reparación deberá ser efectuada únicamente por personal de servicio
autorizado.
Como usar - Español
1. Antes de instalar o retirar cualquier accesorio, asegúrese que la batidora esté
apagada en la posición OFF(O) y desconectada. Ya que una de las aspas tiene
un anillo en el vástago y la otra no, cada aspa debe ser instalada en la abertura
apropiada. Asegúrese de instalar el aspa de anillo de manera que haga juego
con la de la ilustración en la unidad (A). Gire el aspa despacio hasta caer en su
lugar. Las aspas no son intercambiables. Si el aspa no encaja después de
girarla, consulte la ilustración en la batidora y asegúrese que la está
introduciendo en la abertura apropiada. No introduzca las aspas a la fuerza.
NOTA: Los batidores por otra parte, sí son intercambiables y se pueden
introducir en cualquiera de las aberturas.
2. Enchufe el cable a una toma de corriente.
3. Coloque los ingredientes en un recipiente, sujete la batidora por el mango, y
coloque las aspas/batidores en el centro de los alimentos que desea mezclar.
4. Seleccione la velocidad apropiada según la función deseada (B). Consulte la
guía de mezclar a continuación.
5. Guíe las aspas continuamente adentro de la mezcla para batir de manera
uniforme. Si desea limpiar los costados o el fondo del tazón con un utensilio de
mano, asegúrese de apagar la batidora ajustando el control a la posición OFF
(O). Coloque la batidora sobre el talón de descanso de manera que la mezcla
gotee adentro del recipiente (C).
6. Para retirar las aspas/batidores de alambre, oprima el botón extractor de aspas.
PRECAUCION: Tenga cuidado al soltar las aspas ya que salen muy rápido.
Suéltelas adentro del recipiente o en un lavadero.
Botón de impulso
1. El botón de impulso le permite aumentar la velocidad del mezclado al máximo
desde cualquier posición. Cuando sienta que la batidora está perdiendo
potencia o esforzándose durante una función pesada (como al mezclar masa de
galletas), oprima el botón de impulso.
2. Una vez que se suelta el botón de impulso, la batidora regresa a la velocidad
seleccionada anteriormente.
Guía de mezclar
Use la guía a continuación para seleccionar velocidades. NOTA: Comience a
mezclar a la velocidad más baja y gradualmente auméntela conforme sea
necesario. Para obtener mejores resultados, utilice los batidores de alambre y
ajuste la batidora a la velocidad #5 para batir mezclas ligeras y espumosas, crema,
o huevos.
VELOCIDAD FUNCION USO
1 (Baja) Unir Para unir harina/ingredientes secos con
líquidos para las mezclas y la masa
de galletas. Para unir nueces, chocolates,
pasas a la masa de galletas.
2 (Baja) Remover Para preparar salsas, budines, y panes ligeros.
Para revolver mezclas ralas.
3 (Media) Mezclar Para preparar mezclas y queques. Para
cremar el azúcar con la mantequilla o para
unir los huevos a una mezcla.
4 (Media) Batir Para batir huevos enteros, postres
congelados, merengues. Para las mezclas
ligeras de los panes de huevo.
5 (Alta) Cremar Para batir mezclas ligeras, crema batida,
claras de huevo, y puré de papas.
Botón de impulso Utilícelo a cualquier velocidad para lograr
máxima potencia en las funciones pesadas.
Cuidado y limpieza
NOTE: If the power supply cord is damaged, it must be replaced by the
manufacturer or its service agent or a similarly qualified person in order to avoid
a hazard.
NOTE : Lorsque le cordon d'alimentation est endommagé, il faut en confier la
réparation au fabricant, à son agent de service autorisé ou une personne
qualifiée afin d'éviter tout risque.
1. Antes de limpiar cualquier parte de la batidora asegúrese que el control de
velocidad esté en la posición OFF (O) y que el cable esté desconectado. Extraiga
las aspas/batidores de alambre.
2. Las aspas y los batidores de alambre pueden lavarse a mano con agua caliente
enjabonada o en la máquina lavaplatos. Seque todas las partes cuidadosamente
antes de guardarlas.
3. Limpie la batidora y el cable con un paño humedecido. Para remover las
manchas persistentes, limpie las superficies con un paño humedecido o con un
limpiador suave, no abrasivo. Seque bien con un paño limpio. No use
limpiadores abrasivos en ninguna parte de la batidora para no dañarle el
acabado.
Almacenamiento de la batidora
1. No tire del cable ni aplique presión a las uniones con la unidad y el enchufe.
Para almacenar la batidora, enrolle el cable y átelo con el sujetador incluido. No
enrolle el cable alrededor de la batidora.
2. Guarde las aspas y los batidores de alambre en una gaveta o en la caja original
de empaque.
Consejos para batir
1. Para obtener mejores resultados al batir claras de huevo, utilice un recipiente de
acero inoxidable, cobre o vidrio; no use recipientes de plástico ni de aluminio.
2. Para batir crema con mejor resultado, enfríe la crema, las aspas, y el Recipiente.
Comience a mezclar a la velocidad más baja y a medida que la crema vaya
espesando, aumente la velocidad gradualmente al nivel #5 WHIP (cremar).
NOTA: Si el cordón de alimentación es dañado, este debe ser reemplazado por
el fabricante o su agente de servicio o por personal calificado para evitar un
riesgo.


Join the conversation about this product
Here you can share what you think about the Black and Decker MX100 Hand Mixer. If you have a question, first carefully read the manual. Requesting a manual can be done by using our contact form.