Size: 19.685" x 17.5"
Please Read and Save this Use and Care Book.
IMPORTANT SAFETY
INSTRUCTIONS
When using your iron, basic safety precautions should always be
followed, including the following:
❍ READ ALL INSTRUCTIONS BEFORE USING.
❍ Use iron only for its intended use.
❍ To protect against a risk of electric shock, do not immerse the
iron in water or other liquids.
❍ The iron should always be turned to the minimum (min) setting
before plugging or unplugging from outlet. Never yank cord
to disconnect from the outlet; instead grasp plug and pull to
disconnect.
❍ Do not allow cord to touch hot surfaces. Let iron cool completely
before putting away. Loop cord loosely around iron when storing.
❍ Always disconnect iron from electrical outlet when filling with
water or emptying, and when not in use.
❍ Do not operate iron with a damaged cord, or if the iron has been
dropped or damaged. To avoid the risk of electric shock, do not
disassemble the iron; take it to a qualified service person for
examination and repair, or call the appropriate toll-free number
on the cover of this manual. Incorrect reassembly can cause a
risk of electric shock when the iron is used.
❍ Close supervision is necessary for any appliance being used by or
near children. Do not leave iron unattended while connected or
on an ironing board.
❍ Burns can occur from touching hot metal parts, hot water or
steam. Use caution when you turn a steam iron upside down or
use the surge of steam—there may be hot water in the reservoir.
Avoid rapid movement of iron to minimize hot water spillage.
❍
The iron must be used and rested on a stable surface.
- When placing the iron on its stand, ensure that the surface
on which the stand is placed is stable.
- The iron is not to be used if it has been dropped,
if there are visible signs of damage or if it is leaking.
MODEL/MODELO
❍ IR1350S
PROFESSIONAL STEAM IRON
PLANCHA DE VAPOR PROFESIONAL
Product may vary slightly from what is illustrated.
SPECIAL INSTRUCTIONS
❍ To avoid a circuit overload, do not operate another
high-wattage appliance on the same circuit.
❍ If an extension cord is absolutely necessary, a 15-ampere and
120-volt should be used. Cords rated for less amperage may
overheat. Care should be taken to arrange the cord so that it
cannot be pulled or tripped over.
❍ This appliance is not intended for use by persons (including
children) with reduced physical, sensory or mental capabilities,
or lack of experience and knowledge, unless they have been
given supervision or instruction concerning use of the appliance
by a person responsible for their safety.
❍ Children should be supervised to ensure that they do not play
with the appliance.
SAVE THESE INSTRUCTIONS.
This product is for household use only.
POLARIZED PLUG
This appliance has a polarized plug (one blade is wider than the
other). To reduce the risk of electric shock, this plug is intended to
fit into a polarized outlet only one way. If the plug does not fit fully
into the outlet, reverse the plug. If it still does not fit, contact a
qualified electrician. Do not attempt to modify the plug in any way.
TAMPER-RESISTANT SCREW
Warning: This appliance is equipped with a tamper-resistant
screw to prevent removal of the outer cover. To reduce the risk of
fire or electric shock, do not attempt to remove the outer cover.
There are no user-serviceable parts inside. Repair should be
done only by authorized service personnel.
Note: If the power supply cord is damaged, it should be replaced
by qualified personnel or in Latin America by an authorized service
center.
How to Use
This product is for household use only.
GETTING STARTED
• Remove any labels, stickers or tags attached to the body or soleplate of the iron.
• Please go to www.prodprotect.com/applica to register your warranty.
Note: Use ordinary tap water for ironing. Do not use water processed through a
home softening system.
Important: For optimum performance, let the iron stand for 90 seconds before
beginning to iron.
Tip: If unsure of a garment’s fiber, test a small area (on an inside seam or hem)
before ironing.
FILLING WATER TANK
1. With iron on a flat surface with soleplate down or tilted at a 45-degree angle, open
the water-fill cover.
2. Using a clean measuring cup, pour water into opening until water reaches the
MAX level mark on the side of the water tank. Do not overfill.
AUTOMATIC SHUTOFF IN 3 POSITIONS
1. The iron will automatically turn to stand by mode after 30 seconds of inactivity if
left on its soleplate or on its side. If left vertically on its heel rest, it will turn off
after 8 minutes.
2. The red power indicator light starts blinking to let you know the iron has stopped
heating.
Important: The iron will have turned off but will still be hot.
3. Once the iron is picked up, an internal motion sensor is activated and the iron
starts heating again.
4. Allow iron to reheat completely before resuming ironing.
SELECTING FABRIC SETTING
1. Read fabric labels to help determine fabric type to be ironed.
2. Once you determine the fabric type, turn the fabric-select dial to select the
appropriate fabric setting.
Important: Always stand the iron on its heel when powered on but not in use.
USING VARIABLE STEAM
Note: Be sure the water tank is filled.
1. This iron produces steam at settings 4 through 6. Turn the fabric-select dial to the
appropriate setting for your fabric.
2. Push the variable steam selector to desired amount of steam. The higher the
setting selected, the more powerful the steam.
Note: For no steam, the variable steam selector should be set to the .
STEAM BUTTON
Note: Be sure the water tank is filled.
1. With the water tank filled to the MAX mark, turn the fabric select dial to
appropriate setting (between 4 and 6) and let iron stand on its heel rest about 90
seconds.
2. Press the steam button to generate a burst of steam. For best performance, leave
an interval of 5 seconds between bursts.
Note: On first use, pump the steam button several times.
HORIZONTAL STEAM IRONING
1. Fill water reservoir to MAX line.
2. Turn the fabric select dial to select desired setting.
3. Set the variable steam selector to desired amount of steam.
4. When finished ironing, turn the fabric-select dial to the lowest setting. Make sure
the variable steam selector is set to dry and unplug the iron.
5. Stand the iron on its heel rest and allow it to cool off.
VERTICAL STEAMING
Use to remove wrinkles or creases from hanging garments or drapes.
1. Turn the fabric-select dial to select desired setting for the fabric to be ironed.
2. Hold iron close to, but not touching fabric.
3. Pull fabric taut with your free hand and press the steam button as you move the
iron over the fabric.
Important: Do not bring iron too close to hand holding fabric to avoid heat.
4. For best performance, leave an interval of 5 seconds between bursts.
SPRAY BUTTON
Note: Be sure the water tank is filled.
1. Press the spray button to generate a spray of water.
Note: On first use, pump the spray button several times.
Important: Do not spray silk.
DRY IRONING
1. Set the variable steam selector to .
2. Turn the fabric-select dial to appropriate setting for your fabric.
3. When finished ironing, make sure to unplug the iron.
Important: Always stand the iron on its heel rest when powered on or not in use.
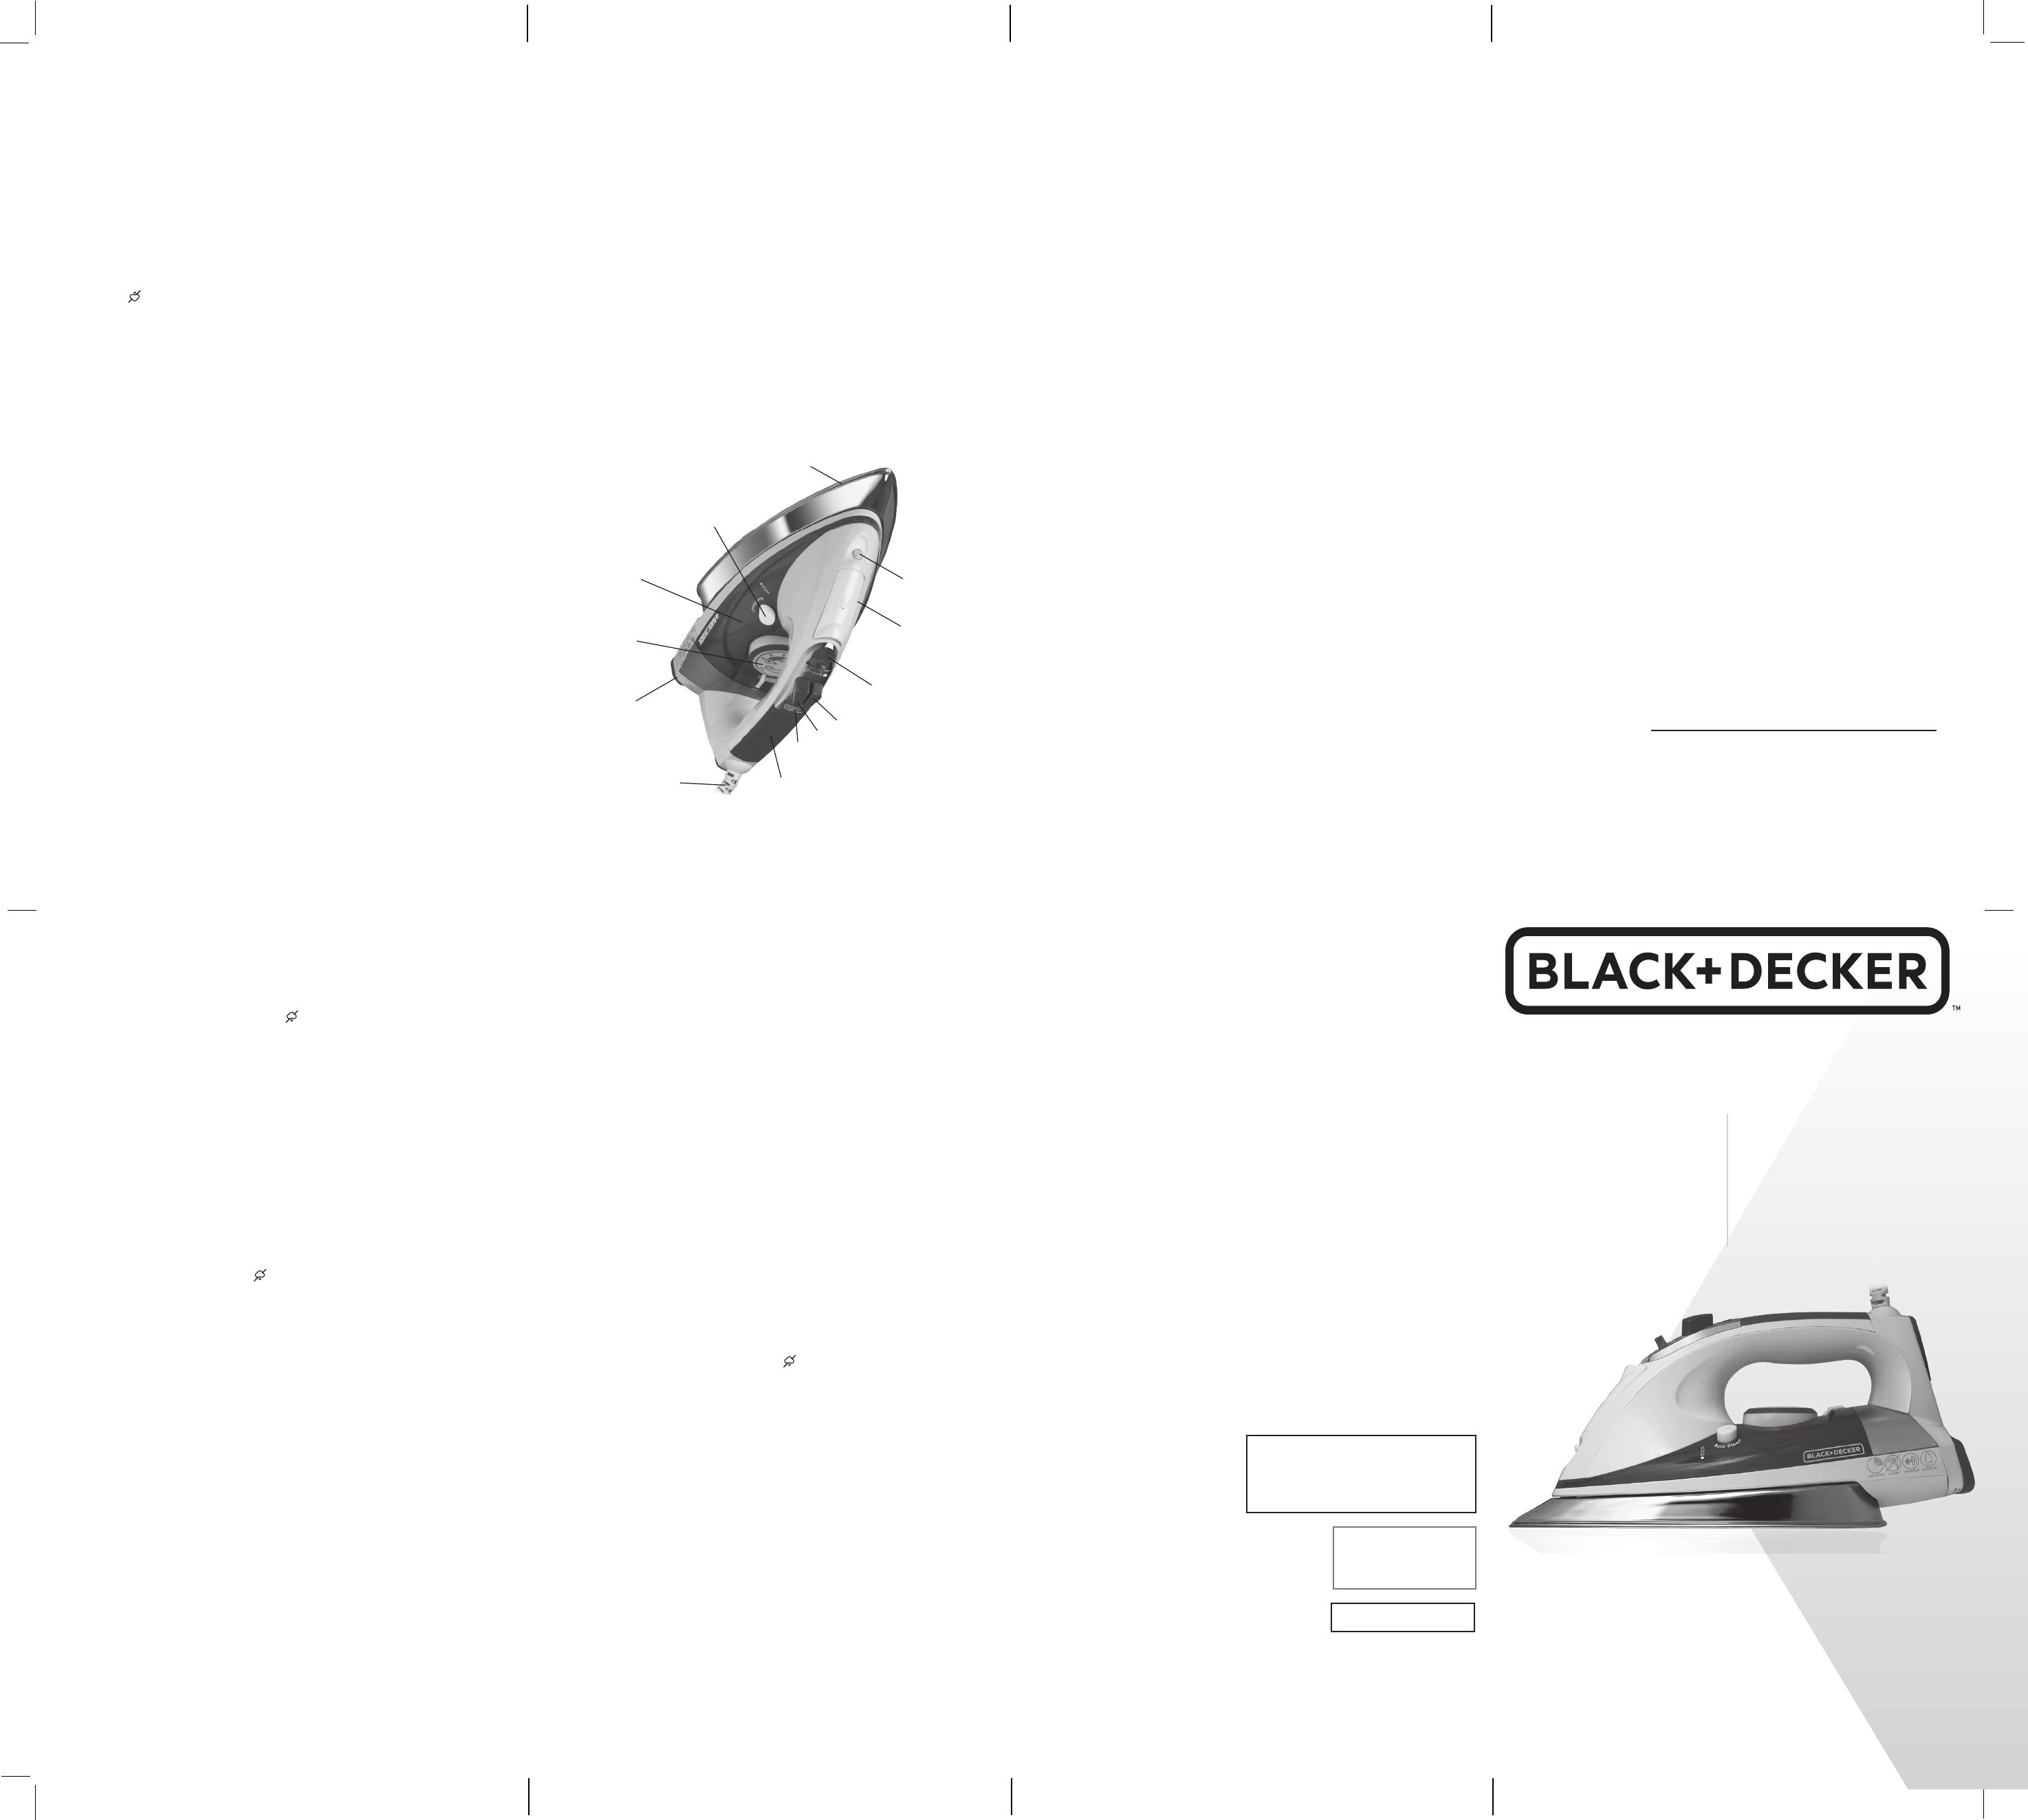
1. Spray nozzle
2. Water-fill cover
3. Variable steam selector
4. Steam button
5. Spray button
6. Power indicator light
7. Comfort Grip
TM
handle
8. 360° pivoting cord
9. Heel rest
10. Fabric-select dial
11. Water tank
12. Auto Clean® button
13. Soleplate
Care and Cleaning
This product contains no user serviceable parts. Refer service to qualified service
personnel.
CLEANING
1. Make sure iron is unplugged and has cooled completely. Wipe the soleplate
and outer surfaces with a soft cloth dampened with water and mild household
detergent. Never use abrasives, heavy-duty cleansers, vinegar or scouring pads
that may scratch or discolor the iron.
2. After cleaning, steam iron over an old cloth to remove any residue from the
steam vents.
AUTO CLEAN
TM
SYSTEM
To keep the steam vents free of any buildup, follow these instructions about once a
month.
1. Fill the water tank well below MAX line. Plug in the iron.
2. Select fabric setting 6 on the fabric-select dial and stand the iron on its
heel rest.
3. Wait 2 minutes for the iron to heat fully, then unplug the iron.
4. Hold iron over a sink with the soleplate facing down.
5. Press the Auto Clean
TM
button.
Important: Be careful, as after several seconds, hot water and steam will come
out of the steam vents.
6. Continue to hold Auto Clean
TM
button until all the water has emptied. If
necessary, move iron side-to-side and front-to-back.
7. When finished, release the button, stand the iron on its heel rest and plug
it in. Heat for about 2 minutes to dry out any remaining water.
STORING YOUR IRON
1. Unplug the iron and let it cool completely.
2. Check that the fabric-select dial is set to .
3. Store iron on its heel rest.
When using your iron for the first time,
you may notice water residue inside the
unit. This is normal.
Cuando use su plancha por primera
vez, notará que hay agua adentro de la
plancha. Esto es normal.
Customer Care Line:
USA 1-800-231-9786
Accessories/Parts (USA)
1-800-738-0245
For online customer service
and to register your product, go to
www.prodprotect.com/applica
Servicio para el cliente:
México 01-800 714-2503
Accesorios/Partes (EE.UU)
1-800-738-0245
Para servicio al cliente y para
registrar su garantía, visite
www.prodprotect.com/applica
Made and Printed in People’s Republic of China
Fabricado e Impreso en la República Popular de China
T22-5001304
10892-00 E/S
© 2014 The Black & Decker Corporation and Spectrum Brands, Inc.
Middleton, WI 53562
Por favor llame al número correspondiente que aparece en la lista a continuación
para solicitar que se haga efectiva la garantía y donde Ud. puede solicitar
servicio, reparaciones o partes en el país donde el producto fué comprado.
Sello del Distribuidor:
Fecha de compra:
Modelo:
Código de fecha / Date Code / Le code de date:
320 W 120V~ 60 Hz
Importado por / Imported by:
RAYOVAC ARGENTINA S.R.L.
Humboldt 2495 Piso #3
(C1425FUG) C.A.B.A. Argentina.
C.U.I.T NO. 30-70706168-1
Importado por / Imported by:
Rayovac de México S.A de C.V
Autopista México Querétaro No 3069-C Oficina 004
Colonia San Andrés Atenco, Tlalnepantla
Estado de México, C.P. 54040
Mexico.
Telefono: (55) 5831 – 7070
Para atención de garantía marque: 01 800 714 2503
Comercializado por:
Rayovac de México S.A de C.V
Autopista México Querétaro No 3069-C Oficina 004
Colonia San Andrés Atenco, Tlalnepantla
Estado de México, C.P. 54040
Mexico.
Telefono: (55) 5831 – 7070
Para atención de garantía marque: 01 800 714 2503
Servicio y Reparación
Art. 123 No. 95
Col. Centro, C.P. 06050
Deleg. Cuauhtemoc
Servicio al Consumidor,
Venta de Refacciones y Accesorios
01 800 714 2503
Argentina
Servicio Técnico
Monroe 3351
CABA Argentina
Tel: 0800 – 444 - 7296
servicios@rayovac.com.ar
Argentina
SERVICIO DE MAQUINAS Y
HERRAMIENTAS LTDA.
Portugal Nº 644
Santiago – Chile
Fonos: 02-6355208 / 02-6341169
Email: servicio@spectrumbrands.cl
Call center: 800-171-051
Colombia
Rayovac Varta S.A
Carrera 17 Número 89-40
Línea gratuita nacional
Tel. 018000510012
Costa Rica
Aplicaciones Electromecanicas, S.A.
Calle 26 Bis y Ave. 3
San Jose, Costa Rica
Tel. (506) 257-5716 / 223-0136
administracion@masterecuador.com
Ecuador
SERVICIO MASTER ECUADOR
ALMERIA N50-71 Y DE LOS ALAMOS
Tel. (593) 2281-3882 / 2240-9870
El Salvador
Calle San Antonio Abad 2936
San Salvador, El Salvador
Tel. (503) 2284-8374
Guatemala
MacPartes SA
3ª Calle 414 Zona 9
Frente a Tecun
Tel. (502) 2331-5020 / 2332-2101
Honduras
ServiTotal
Contigua a Telecentro
Tegucigalpa, Honduras,
Tel. (504) 235-6271
México
Articulo 123 # 95 Local 109 y 112
Col. Centro, Cuauhtemoc,
México, D.F.
Tel. 01 800 714 2503
Nicaragua
ServiTotal
De semáforo de portezuelo
500 metros al sur.
Managua, Nicaragua,
Tel. (505) 248-7001
Panamá
Servicios Técnicos CAPRI
Tumbamuerto Boulevard
El Dorado Panamá
500 metros al sur.
Tel. 3020-480-800 sin costo
(507) 2360-236 / 159
Panamá
Servicio Central Fast Service
Av. Angamos Este 2431
San Borja, Lima Perú
Tel. (511) 2251 388
Puerto Rico
Buckeye Service
Jesús P. Piñero #1013
Puerto Nuevo, SJ PR 00920
Tel.: (787) 782-6175
Republica Dominicana
Prolongación Av. Rómulo Betancourt
Zona Industrial de Herrera
Santo Domingo, República Dominicana
Tel.: (809) 530-5409
Venezuela
Inversiones BDR CA
Av. Casanova C.C.
City Market Nivel Plaza Local 153
Diagonal Hotel Melia,
Caracas.
Tel. (582) 324-0969
www.applicaservice.com
BLACK+DECKER and the BLACK+DECKER logo are trademarks of
The Black & Decker Corporation and are used under license. All rights
reserved
BLACK+DECKER y el logo tipo BLACK+DECKER son marcas
registradas de The Black & Decker Corporation y son utilizados bajo
licencia. Todos los derechos reservados.

Join the conversation about this product
Here you can share what you think about the Black and Decker IR1350S Iron. If you have a question, first carefully read the manual. Requesting a manual can be done by using our contact form.