
DO NOT PLACE ANY OF THE FOLLOWING IN THE BLENDER:
• Largepiecesoffrozenfoods
• Toughfoodssuchasrawturnips,sweetpotatoesandpotatoes
• Bones
• Hardsalami,pepperoni
• Boilingliquids(coolfor5minutesbeforeplacinginblendingjar)
OTHER DONT’S:
• Donotoperateblenderwithoutthelidontheblendingjar.
• Donotstorefoodsintheblendingjar.
• Donotoverlltheblender(theblenderismoreefcientwithlessratherthan
more).
• Donotputboilingliquidsintoblender.
• DonotusePULSEformorethan10secondsatatime;releasethePULSE/OFF
buttonregularly,allowtheblendertorestbriey,thencontinue.
• Donotrunblenderforlongerthan1½minutesatatime.Scrapedownsidesof
blendingjar,ifnecessary,andcontinueblending.
• Donotuseifblendingjarischippedorcracked.
TASKS NOT RECOMMENDED FOR THE BLENDER:
• Beatingeggwhites
• Mixingdough
• Mashingpotatoes
• Grindingmeats
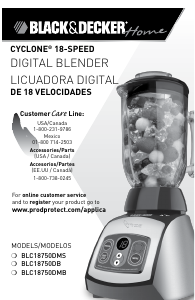
SPEED CHART
PULSE/OFF Useforthickmixtures
STIR (1) Reconstitutefrozenjuices,drinkmixesand
condensedsoups
Preparesaladdressings
Blendpuddings
Pureehotliquids
MIX (2) Mixbattersforpancakes,muffinsandquickbreads
Mixingredientsforbakedgoods
CRUMB (3) Makecookie,cerealandbreadcrumbs
CHOP (4) Chopfruitsandvegetables
Chopcookedmeats
WHIP (5) Whiphomemadewhippedcream
Makecreamcheeseschmears
Mixingupbutter
CLEAN (6) Blenddropofdishwashingliquidandhotwater
tocleanblender
BLEND (7) Blendsalsas
Preparesauces
Removelumpsfromgravies
GRIND (8) Grindhardcheese,cookedmeatsandcoconut
PUREE (9) Pureebabyfoods–fruitsandvegetables
LIQUEFY (10) Blendproteindrinks
Liquefyfrozendrinks;smoothies
SMOOTHIE (11) Blendmilkshakesandmalts
Preparesmoothies
ICE CRUSH (12) Crushiceandfrozenfood
HI/LOW SelecttochangespeedbetweenHiandLow
Hi–thebuttonisout
Low–thebuttonisin
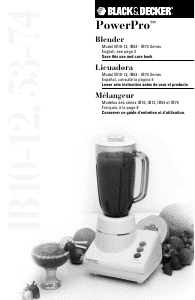
RECIPES
BLUE CHEESE SALAD DRESSING
Thiscreamy,freshdressingisgreatwithanysaladgreens.Tryitasadip
withchickenwingsorasadipforyourfavoriteveggies.
• ½cupsourcream
• ¼cupmayonnaise
• 1Tbsp.freshchoppedparsley
• 1garlicclove,peeledandchopped
• 2tsp.lemonjuice
• 1/8tsp.each,saltandpepper
Placeallingredientsinblenderjar.Cover;pressBlend/Stirandrun30
secondsoruntilblended.
Storecoveredinrefrigeratorupto2days.Stirbeforeusing.Foralarger
batch,doubletherecipeandprepareusingthefullsizeblenderjar.
Makesabout1cup.
QUICK AND EASY SALSA
Thisfastandeasyrestaurant-stylesalsaisagreatsubstitutionforfreshPico
deGallowhentomatoesarenolongerinseason.Serveitwithyourfavorite
chipsorasatoppingfortacos.
• 2cans(10oz.)dicedtomatoeswithgreenchilies
• ½smallonion,quartered
• 1smalljalapenopepper,seeded,deveined
• 1clovegarlic,peeledandsmashed
• 1/2cuplooselypackedcilantroleaves
• 1Tbsp.limejuice
• 1tsp.sugar
• 1/2tsp.cumin
• ½tsp.salt
Placeallingredientsinblenderjar.Coverandpulse30secondsortodesired
consistency.Forasmallbatch,cutrecipeinhalfandblendinyourpersonal
sizeblenderjar.
CARE AND CLEANING
Thisproductcontainsnouserserviceableparts.Referservicetoqualified
servicepersonnel.
CLEANING
1.Beforecleaning,turnoffandunplugtheappliance.
2.Lifttheblendingjarbythehandleoffthebaseturningslightly
counterclockwise.
3.Removejarbasebyturningitcounterclockwiseuntilloose.
4.Removethebladeassembly.
Caution: Blades are sharp, handle carefully.
5.Removelidandlidcap.
6.Washremovablepartsbyhandorinthedishwasher.Placethejaronthe
bottomrackandtherestofthepartsonthetoprackonly.
Helpful Tips:
• Forquickcleanup,combine1cuphotwaterandadropofliquiddishsoap
intheblendingjar.
• CoverandblendonCLEANforabout30seconds.
• Discardliquidandrinsethoroughly.
Important:
• Do not place the jar parts in boiling liquids.
• Do not immerse the base in liquid. Wipe the base with a damp cloth and
dry thoroughly.
• Remove stubborn spots by rubbing with a damp cloth and nonabrasive
cleaner.
Note:Ifliquidsspillontothebase,wipewithadampclothanddrythoroughly.
Donotuseroughscouringpadsorcleansersonpartsorfinish.
NEED HELP?
Forservice,repairoranyquestionsregardingyourappliance,calltheap-
propriate800number.PleaseDO NOTreturntheproducttotheplaceof
purchase.Also,pleaseDO NOTmailproductbacktomanufacturer,norbring
ittoaservicecenter.Youmayalsowanttoconsultthewebsitelistedonthis
sheet.
Two-Year Limited Warranty
(Applies only in the United States and Canada)
What does it cover?
• Anydefectinmaterialorworkmanshipprovided;however,Applica’sliability
willnotexceedthepurchasepriceofproduct.
For how long?
• Twoyearsfromthedateoforiginalpurchasewithproofofsuchpurchase.
What will we do to help you?
• Provideyouwithareasonablysimilarreplacementproductthatiseithernew
orfactoryrefurbished.
How do you get service?
• Saveyourreceiptasproofofdateofsale.
• Visittheonlineservicewebsiteatwww.prodprotect.com/applica,orcalltoll-
free1-800-231-9786,forgeneralwarrantyservice.
• Ifyouneedpartsoraccessories,pleasecall1-800-738-0245.
What does your warranty not cover?
• Damagefromcommercialuse
• Damagefrommisuse,abuseorneglect
• Productsthathavebeenmodiedinanyway
• Productsusedorservicedoutsidethecountryofpurchase
• Glasspartsandotheraccessoryitemsthatarepackedwiththeunit
• Shippingandhandlingcostsassociatedwiththereplacementoftheunit
• Consequentialorincidentaldamages(Pleasenote,however,thatsomestates
donotallowtheexclusionorlimitationofconsequentialorincidentaldamages,
sothislimitationmaynotapplytoyou.)
How does state law relate to this warranty?
• Thiswarrantygivesyouspeciclegalrights.Youmayalsohaveotherrights
thatvaryfromstatetostateorprovincetoprovince.
PLEASEREADANDSAVETHESE
INSTRUCTIONS.
IMPORTANT SAFEGUARDS
Whenusingelectricalappliances,basicsafetyprecautions
shouldalwaysbefollowed,includingthefollowing:
•Readallinstructions.
•Toprotectagainstriskofelectricalshock,donotputblender
base,cordorpluginwaterorotherliquid.
•Closesupervisionisnecessarywhenanyapplianceisusedbyor
nearchildren.
•Unplugfromoutletwhennotinuse,beforeputtingonortaking
offpartsandbeforecleaning.
•Avoidcontactingmovingparts.
•Donotoperateanyappliancewithadamagedcordorplugor
aftertheappliancemalfunctionsorisdroppedordamagedin
anymanner.Contactconsumersupportforexamination,repair,
orelectricalormechanicaladjustment.Or,calltheappropriate
toll-freenumberlistedonthecover.
•Theuseofattachments,includingcanningjars,not
recommendedorsoldbytheappliancemanufacturermaycause
re,electricshockorinjury.
•Donotuseoutdoors.
•Donotlettheplugorcordhangovertheedgeoftableorcounter,
ortouchwithhotsurfacesincludingstove.
•Keephandsandutensilsoutofcontainerwhileblendingto
reducetheriskofsevereinjurytopersonsordamagetothe
blender.Ascrapermaybeusedbutmustbeusedonlywhenthe
blenderisnotrunning.
•Bladesaresharp.Handlecarefully.
•Toreducetheriskofinjury,neverplacecutterassemblyblades
onbasewithoutthejarproperlyattached.
•Alwaysoperateblenderwithcoverinplace.
•Whenblendinghotliquids,removethelidcapfromthelid.
Donotblendhotliquidsforthepersonalblenderjar.
•Donotuseapplianceforotherthanintendeduse.
•Thisapplianceisnotintendedforusebypersons(including
children)withreducedphysical,sensoryormentalcapabilities,or
lackofexperienceandknowledge,unlesstheyhavebeengiven
supervisionorinstructionconcerninguseoftheappliancebya
personresponsiblefortheirsafety.
•Childrenshouldbesupervisedtoensurethattheydonotplay
withtheappliance.
SAVE THESE INSTRUCTIONS
This product is for household use only.
POLARIZED PLUG (120V MODELS ONLY)
Thisappliancehasapolarizedplug(onebladeiswiderthanthe
other).Toreducetheriskofelectricshock,thisplugisintendedtot
intoapolarizedoutletonlyoneway.Iftheplugdoesnottfullyinto
theoutlet,reversetheplug.Ifitstilldoesnott,contactaqualied
electrician.Donotattempttomodifythepluginanyway.
ELECTRICAL CORD
Thecordofthisappliancewasselectedtoreducethepossibilityof
tanglinginortrippingoveralongercord.Ifmorelengthisneeded,
useanextensioncordratednolessthan15-amperes.(For120volts
ratedproducts,useanextensioncordratednolessthan6-amperes).
Whenusinganextensioncord,donotletitdrapeovertheworking
areaordanglewheresomeonecouldaccidentallytripoverit.Handle
cordcarefullyforlongerlife;avoidjerkingorstrainingitatoutletand
applianceconnections.
TAMPER-RESISTANT SCREW
Warning: This appliance is equipped with a tamper-resistant screw
to prevent removal of the outer cover. To reduce the risk of fire or
electric shock, do not attempt to remove the outer cover. There are no
user-serviceable parts inside. Repair should be done only by authorized
service personnel.
Note: Ifthepowersupplycordisdamaged,itshouldbereplacedby
qualiedpersonnel;inLatinAmerica,byanauthorizedservicecenter.
HOW TO USE
Thisunitisforhouseholduseonly.
GETTING STARTED
• Removeallpackingmaterialandanystickersfromthe
product.
• Pleasegotowww.prodprotect.com/applicatoregister
yourwarranty.
• WashallremovablepartsasinstructedinCAREAND
CLEANINGsectionofthismanual.
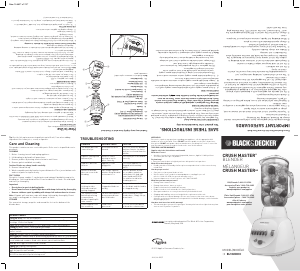
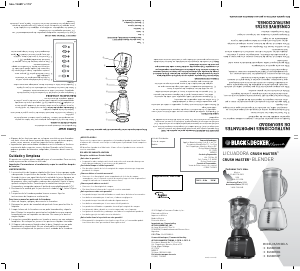
BLENDER JAR ASSEMBLY
1.Turnblendingjarupsidedownandplaceflaton
countertoporworksurface.
2.Placethebladeassemblyinbottomopeningofthejar
withbladesdown.
3.Placejarbaseontojarandrotateclockwiseuntilitis
tight(A).
4.Turnassembledjarrightsideup.
5.Placelidwithlidcaponblenderjar.
6.Uncoilpowercordfromstorageareaunderthebase.
7.Placejarassemblyonbase.(B).
8.Blenderisnowreadyforuse.
USING YOUR BLENDER
Important: Appliance should always have lid in
place when in use.
Caution: Do not place blender jar onto base when
motor is running.
1.MakesureapplianceisOFF.
2.Placefoodstobeblendedintojar.
3.Placelidonjar;makesurelidcapisinplace.
4.Plugpowercordintooutlet.
Note: Wheninuse,donotleaveblenderunattended.Whenusinghardfoods,
suchasiceorcheese,keeponehandonthelidtokeepblenderinplace.
5.Selectthespeedthatbestsuitsyourdesiredtask.(SeeSPEEDCHART)
6.Forblendingtasks–orwhenblendingthickmixtures–usethePULSE
buttonforseveralseconds,thenrelease.Repeatuntilfoodhasdesired
consistency.ReleasingthePULSEbuttonautomaticallyturnstheblender
off(C).
7.Openthelidcaptoaddingredientswhiletheblenderisrunninganddrop
ingredientsthroughtheopening(D).
Important: Do not remove the lid while the blender is running.
8.Whenfinished,pressthePULSE/OFFbutton.Makesurebladeshave
completelystoppedbeforeattemptingtoremovetheblendingjarfromthe
base.
9.Toremovethejar,graspthehandleandliftup.
10.Removelidtopour.
11.Alwaysunplugtheappliancewhennotinuse.
BLENDING TIPS AND TECHNIQUES
• Cutfoodintopiecesnolargerthan¾”foruseintheblender.
• Whenpreparingfoodsthathaveseveraldifferentkindsofingredients,always
addliquidingredientsrst.
• Wheningredientssplatterontothesidesofthejarorthemixtureisverythick,
pressthePULSE/OFFbuttontoturnapplianceoff.Removethelidandusea
rubberspatulatoscrapedownthesidesofthejarandtoredistributethefood,
pushingfoodtowardtheblades.Replacethelidandcontinueblending.
• Thelidcapholdsupto2oz.ofliquidandcanbeusedasameasurewhen
addingingredientssuchasjuices,milk,creamorliquor.
• Whenmakingbreadcrumbsmakesureblenderjariscompletelydry.
• WhenusingPULSEfunction,useshortbursts.Allowthebladestostoprotating
betweenpulses.DonotusePULSEformorethan2minutes.
• UsetheICECRUSHbuttonwhenpreparingbeveragesthatincludeicecubesor
anythingfrozen;thishelpstoproduceasmoothertexture.
• ThePULSEfunctionishelpfulwhenshortburstsofpowerareneeded,suchas
whenpreparingthicksmoothiesormilkshakes.
• Itishelpfultobegintheblendingprocessonthelowestspeedandthen
increasetoahigherspeed,ifnecessary.
• Tostopblendingatanytime,pressthePULSE/OFFbutton.
• Whenblendinghotingredients,removethelidcapandthenputitbackpartly
open,withtheopenedsidetiltedawayfromyou.Coverlidwithaclothtoavoid
splatteringandonlyusethelowestspeed.Donotblendmorethan2½to3
cupsatatime.
PORFAVORLEAESTEINSTRUCTIVO
ANTESDEUSARELPRODUCTO.
INSTRUCCIONES
IMPORTANTES DE SEGURIDAD
Cuandoseutilizanaparatoseléctricos,siempresedeberespetar
ciertasmedidasdeseguridad,incluyendolassiguientes:
•Porfavorleatodaslasinstrucciones.
•Andeprotegersecontraelriesgodeunchoqueeléctrico,
asegúresequelabasedelalicuadora,elcableyelenchufeno
puedanentrarencontactoconaguauotrolíquido.
•Todoaparatoeléctricoutilizadoenlapresenciademenoresde
edadoporellosmismosrequierelasupervisióndeunadulto.
•Desconecteelaparatodeltomacorrientecuandonoestéen
funcionamiento,antesdeinstalaroretirarlaspiezasyantesde
limpiarlo.
•Eviteelcontactoconlaspiezasmóviles.
•Nosedebeutilizarningúnaparatoeléctricoquetengael
cableoelenchufeaveriado,quepresenteunproblemade
funcionamientooqueestédañado.Devuelvaelaparatoalcentro
deservicioautorizadomáscercanoparaqueloexaminen,
reparenoajustenollamegratisalnúmeroqueapareceenla
cubiertadeestemanual.
•Elusodeaccesoriosnorecomendadosporelfabricantedel
aparato,podríaocasionarfuego,descargaeléctricaolesiones
personales.
•Esteaparatonosedebeutilizaralaintemperie.
•Nopermitaqueelcablecuelguedelbordedelamesanidel
mostrador,niquetoquesuperciescalientes.
•Mantengalasmanosyutensiliosfueradelvasocuandoesté
licuandoparareducirelriesgodelesionesgravesapersonaso
dañosalalicuadora.Unaespátulasepuedeutilizar,perodebe
usarsesólocuandolalicuadoranoestéenfuncionamiento.
•Lascuchillastienenloysedebenmanejarconprudencia.
•Andeevitarelriesgodelesiones,nuncacoloqueelmontajede
lascuchillassobrelabasesinantesajustarbienlajarra.
•Siemprehagafuncionarlalicuadoraconlatapaensulugar.
•Paralicuarlíquidoscalientes,sedeberetirareltapóndelcentro
delatapa.
•Esteaparatosedebeutilizarsolamenteconelnprevisto.No
licuelíquidoscalientesparaelvasodelalicuadorapersonal.
•Esteaparatonoestádiseñadoparaserusadoporpersonas
(incluídoniños)concapacidadlimitadafísica,mentalo
sensorialesdisminuidasyfaltadeexperienciaoconocimiento
quelesimpidautilizarelaparatocontodaseguridadsin
supervisiónoinstrucción.
•Sedebeasegurarlasupervisióndelosniñosparaevitarque
usenelaparatocomojuguete.
CONSERVE ESTAS
INSTRUCCIONES
Este aparato eléctrico es para uso domésti-
co únicamente.
ENCHUFE POLARIZADO (SOLAMENTE PARA LOS MODELOS DE 120V)
Esteaparatocuentaconunenchufepolarizado(uncontactoesmás
anchoqueelotro).Andereducirelriesgodeunchoqueeléctrico,
esteenchufeencajaenuntomacorrientepolarizadaenunsolo
sentido.Sielenchufenoentraeneltomacorriente,inviértaloysiaun
asínoencaja,consulteconunelectricista.Porfavornotratedealterar
estamedidadeseguridad.
CABLE ELÉCTRICO
Elcabledeesteaparatofueescogidoandeevitarelriesgode
enredarseodetropezarconuncabledemayorlongitud.Cualquier
cabledeextensiónquesedebaemplear,deberáestarcalicadopara
nadamenorde15amperios.(Paraaquellosproductosde120voltios,
sedeberáutilizaruncabledeextensiónnomenorde6amperios).
Cuandoutiliceuncabledeextensión,asegúresequenointerera
conlasuperciedetrabajoniquecuelguedemaneraquealguiense
puedatropezar.Andeaumentarlavidaútildelcable,notiredeélni
maltratelasunionesdelcableconelenchufeniconelaparato.
TORNILLO DE SEGURIDAD
Advertencia: Este aparato cuenta con un tornillo de seguridad para
evitar la remoción de la cubierta exterior del mismo. A fin de reducir el
riesgo de incendio o de choque eléctrico, por favor no trate de remover
la cubierta exterior. Este producto no contiene piezas reparables por
el consumidor. Toda reparación se debe llevar a cabo únicamente por
personal de servicio autorizado.
Nota: Sielcordóndealimentaciónesdañado,debesustituirseporpersonal
calificadooenAméricaLatinaporelcentrodeservicioautorizado.
COMO USAR
Esteproductoesparausodomésticosolamente.
PASOS PRELIMINARES
• Retiretodoelmaterialdeembalajeylaspegatinas.
• Porfavor,visitewww.prodprotect.com/applicapara
registrarsugarantía.
• Lavetodaslaspiezasdesmontablessiguiendolas
instruccionesindicadasenlaseccióndeCUIDADOY
LIMPIEZAdeestemanual.
ENSAMBLAJE DE LA JARRA
1.Pongalajarrabocaabajoycolóquelaplanasobrela
encimeraolasuperficiedetrabajo.
2.Coloquelascuchillasylajuntaenlaaperturadel
fondodelajarra,conlascuchillashaciaabajo.
3.Pongalajarraenlabasedelalicuadoraygireen
sentidohorariohastaquequedeherméticamente
colocada (A).
4.Unavezensambladalajarra,póngalabocaarriba.
5.Coloquelatapaconeltapónenlajarradela
licuadora.
6.Extraigaelcabledealimentacióndesualojamiento
situadobajolabasedelalicuadora.
7.Coloqueelconjuntovasoenlabase(B).
8.Lalicuadorayaestálistaparaeluso.
Importante: Licuadora debe tener siempre la tapa
en su lugar cuando está en uso.
Precaución: No coloque la jarra en la base cuando
el motor está en marcha.
USO DE LA LICUADORA
1.Asegúresedequeelaparatoestéapagado(OFF).
2.Introduzcalosalimentosquedeseebatirenlajarra.
3.Coloquelatapayasegúresedequeeltapónestéen
sulugar.
4.Enchufeelaparatoenunatomaeléctricaestándar.
Nota:Vigilelalicuadoraentodomomentoduranteeluso.Cuandovayaa
utilizaralimentossólidoscomohielooquesocoloqueunamanosobrelatapa
paraevitarquelalicuadorasemueva.
5.Seleccionelavelocidadquemejorseajustealafunciónquedeseerealizar.
(VeaGUÍADELASVELOCIDADES.)
6.Paramoler,oparabatirmezclasespesaspresioneelbotóndepulso(PULSE)
durantevariossegundosyseguidamentesuéltelo.Repitalaoperaciónhasta
queelalimentohayaadquiridolaconsistenciadeseada.Sisueltaelbotónde
pulso(PULSE),lalicuadoraseapagaráautomáticamente(C).
7.Quiteeltapónparaagregaringredientesmientraslalicuadoraestáen
funcionamiento;paraello,dejecaerlosingredientesatravésdelaabertura(D).
Importante: No retire la tapa mientras la licuadora esté en
funcionamineto.
8.Alterminar,pulseelbotóndepulso/deapagado(PULSE/OFF).Asegúrese
dequelascuchillashayanparadoporcompletoantesdeintentarretirarla
jarradelabasedelalicuadora.
9.Pararetirarlajarra,agarreelasaylevantelajarra.
10.Retirelatapaparaverter.
11.Desenchufeelaparatocuandonosevayaautilizar.
TRUCOS Y TÉCNICAS PARA BATIR
• Cortelosalimentosentrozosdenomásde¾pulgadaantesdeintroducirlos
enlalicuadora.
• Alahoradeprepararalimentoscondiferentestiposdeingredientes,vierta
siemprelosingredienteslíquidosenprimerlugar.
• Silosingredientessequedanadheridosalasparedesdelajarraosilamezcla
esdemasiadoespesa,presioneelbotóndepulso/deapagado(PULSE/OFF)
paraapagarelaparato.Retirelatapayuseunaespátuladeplásticopara
rebañarlasparedesdelajarrayredistribuirlosalimentosempujándoloshacia
lascuchillas.Vuelvaacolocarlatapaysigabatiendo.
• Eltapóndelatapatieneunacapacidadde60ml
(2oz.).Sepuedeutilizarcomomedidoryparaagregaringredientescomo
zumos,leche,nataylicores.
• Cuandovayaamolerpanasegúresedequelajarraestécompletamenteseca.
• Cuandoutilicelafuncióndepulso(PULSE),realicepresionesbreves.Espere
aquelascuchillasdejendegirarentrecadapulsación.Noutiliceelmodode
pulso(PULSE)durantemásde2minutos.
• Utiliceelbotónde(ICECRUSH)paraempezarabatircuandodeseepreparar
bebidasquecontengancubitosdehielooalgocongelado;estoayudaa
obtenerunatexturamássuave.
• Lafuncióndepulso(PULSE)resultaútilcuandoseprecisenbrevesráfagasde
potencia;ésteeselcasocuandodeseeprepararbatidosdeyoguroleche.
• Serecomiendaempezarelprocesodebatidoenlavelocidadmásbajay,si
fueranecesario,iraumentadolavelocidaddemaneraprogresiva.
• Paradetenerelbatidoencualquiermomento,pulseelbotóndepulso/de
apagado(PULSE/OFF).
• Cuandodeseemezclaringredientescalientes,quiteeltapónydéjelo
entreabiertodetalformaqueelladoabiertoestéalejadodeusted.Cubra
latapaconuntrapoparaevitarsalpicadurasyutilicelavelocidadmásbaja
posible.Nomezclemásde600a720ml(de2½a3tazas)almismotiempo.
NO INTRODUZCA NINGUNO DE ESTOS PRODUCTOS EN LA LICUADORA:
• Grandestrozosdealimentoscongelados
• Alimentosexcesivamenteduroscomonabos,boniatosopatatasencrudo
• Huesos
• Salamiochorizocurado
• Líquidoshirviendo(dejeenfriar5minutosantesdeverterenlajarra)
OTRAS OPERACIONES DESACONSEJADAS:
• Nopongalalicuadoraenfuncionamientosinhabercolocadoanteslatapa
sobrelajarra.
• Noconservealimentosenlajarradelalicuadora.
• Nolleneenexcesolalicuadora(lalicuadoraesmásecazmientrasmenos
alimentoscontiene).
• Noviertalíquidoshirviendoenlalicuadora.
• Noutiliceelfuncionamientoporimpulsos(PULSE)durantemásde10
segundosconsecutivos;suelteelbotóndepulso/deapagado(PULSE/OFF);
dejereposarlalicuadorabrevementeyprosiga.
• Nohagafuncionarlalicuadoradurantemásde1minutoymediodemanera
ininterrumpida;sifueranecesario,rebañelasparedesdelajarraysiga
batiendo.
• Noutilicelalicuadorasilajarraestárotaodeteriorada.
OPERACIONES NO RECOMENDADAS PARA LA LICUADORA:
• Batirclarasdehuevo
• A m a s a r
• Hacerpurédepatatas
• Picarcarnes
GUÍA DE LAS VELOCIDADES
PULSO/APAGADO Paramezclasespesas
REVOLVER (1) Reconstituirzumoscongelados,mezclasparabeber
ysopascondensadas
Prepararaderezosparaensaladas
Hacermezclastipopudín
Hacerpurédelíquidoscalientes
MEZCLAR (2) Mezclaringredientesparapanquequesy
otrosproductosdepanaderia
DESMIGAR (3) Molergalletas,cerealesyhacerpanrallado
PICAR (4) Picarfrutasyhortalizas
Picarcarnespreparadas
Batir (5) Batirmerengueobetúncasera
Batirquesocrema
Mezclarmantequilla
LIMPIAR (6) Mezcleunagotadelíquidolavavajillasconagua
calienteparalimpiarlalicuadora
MEZCLAR (7) Mezclarsalsas
Prepararaderezo
Eliminargrumosdelassalsas
PICAR (8) Rallarquesosdurosococo,ymolercarnescocidas
HACER PURÉ (9) Elaborarpapillasinfantiles–hacerpurédefrutasy
vegetales
LICUAR (10) Mezclarbebidasproteínicas
Licuarbebidascongeladas;prepararbatidosde
yogur
BATIR (11) Elaborarbatidosymalteadas
TRITURAR HIELO (12) Picarhieloyalimentoscongelados
ALTA/BAJA Seleccioneparacambiardevelocidadentrealtay
baja
Alta(HI)–botónnopulsado
Baja(LOW)–botónpulsado
RECETAS
ADEREZO DE QUESO AZUL
Estecremosoyfrescoaderezoesfantásticoconcualquiertipodeverdura
paraensalada.Pruébelocomounasalsaconalasdepolloocomosalsapara
susvegetalesfavoritos.
• ½tazadecremaagria
• ¼tazademayonesa
• 1cucharadadeperejilfresco,picado
• 1dientedeajo,peladoypicado
• 2cucharaditasdejugodelimón
• 1/8cucharaditacadaunadesalydepimiento
Coloquetodoslosingredientesenelvasolicuadorpersonal.Póngalelatapa,
presioneelbotóndemezclar/revolver(Blend/Stir)por30segundosohasta
quelosingredientesesténmezclados.Colóqueloconlatapaenelrefrigerador
hasta2días.Revuelvalamezclaantesdeusarla.Paraunacantidadgrande,
doblelarecetayprepárelaenlajarraregulardelalicuadora.
SALSA FÁCIL Y RÁPIDA DE PREPARAR
Estarápidayfácilsalsadecalidadderestaurante,esunidealsustitutopara
elPicodeGallocuandolostomatesnoestanentemporada.Sírvalaconsus
papitasfavoritasocontacos.
• 2latas(10onzas)detomatespicadosconchilesverdes
• ½cebollapequeña,picadaencuartos
• 1ajíjalapeño,sinsemillasysinvenas
• 1dientedeajo,peladoyaplastado
• ½tazadehojassueltasdecilantro
• 1cucharadadejugodelima
• 1cucharaditaazúcar
• ½cucharaditadecomino
• ½cucharaditadesal
Coloquetodoslosingredientesenlajarraregulardelalicuadora.Póngale
latapaypresioneelbotóndepulsofor30segundosohastaalcanzarla
consistenciadeseada.Paraunacantidadpequeña,reduzcalarecetaala
mitadymezclelosingredientesenelvasolicuadordetamañodepersonal.
CUIDADO Y LIMPIEZA
Esteproductonocontienepiezasreparablesporelusuario.Soliciteelservicio
apersonaltécnicocualificado.
LIMPIEZA
1.Antesdelimpiar,apagueydesenchufeelaparato.
2.Levantelajarradelalicuadoraporelmangodelabasegirando
ligeramentehacialaizquierda.
3.Retirelabasedelfrascogirandohacialaizquierdahastaquesesuelte.
4.Retireelconjuntodelacuchilla.
Precaución: Las cuchillas son afiladas, manejar con cuidado.
5.Retirelatapayeltapóndelatapa.
6.Lavelaspiezasremoviblesamanooenellavavajillas.Colocarelfrascoen
larejillainferioryelrestodelaspartessóloenlarejillasuperior.
Consejos útiles:
• Paraunalimpiezarápida,combine1tazadeaguacalienteyunagotadejabón
líquidoparaplatosenlajarradelalicuadora.
• Cubraylicuealimpioduranteunos30segundos.
• Desechelíquidoyenjuagarbien.
Importante:
• No coloque las piezas de la jarra en líquidos hirviendo.
• No sumerja la base en ningún líquido. Limpie la base con un paño
húmedo y seque bien.
• Elimine las manchas persistentes frotándola con un paño húmedo y un
limpiador no abrasivo.
Nota:Siderramalíquidossobrelabase,limpieconunpañohúmedoyseque
completamente.Nousealmohadillasnilimpiadoresabrasivosenninguna
parteniacabado.
¿NECESITA AYUDA?
Paraservicio,reparacionesopreguntasrelacionadasalproducto,porfavor
llamealnúmerodelcentrodeservicioqueseindicaparaelpaísdonde
ustedcomprósuproducto.NOdevuélvaelproductoalfabricante.Llameo
lleveelproductoauncentrodeservicioautorizado.
DOS AÑOS DE GARANTÍA LIMITADA
(NoaplicaenMéxico,EstadosUnidosyCanada)
¿Qué cubre la garantía?
•Lagarantíacubrecualquierdefectodematerialesodemanodeobraque
nohayasidogeneradoporelusoincorrectodelproducto.
¿Por cuánto tiempo es válida la garantía?
•Pordosañosapartirdelafechaoriginaldecompramientrasquetenga
unapruebadelacompra.
¿Cómo se obtiene el servicio necesario?
•Conserveelrecibooriginalcomocomprobantedelafechadecompra,
comuníqueseconelcentrodeserviciodesupaísyhagaefectivasu
garantíasicumpleloindicadoenelmanualdeinstrucciones.
¿Cómo se puede obtener servicio?
•Conserveelrecibooriginaldecompra.
•Porfavorllamealnúmerodelcentrodeservicioautorizado.
¿Qué aspectos no cubre esta garantía?
•Losproductosquehansidoutilizadosencondicionesdistintasalas
normales.
•Losdañosocasionadosporelmaluso,elabusoonegligencia.
•Losproductosquehansidoalteradosdealgunamanera.
•Losdañosocasionadosporelusocomercialdelproducto.
•Losproductosutilizadosoreparadosfueradelpaísoriginaldecompra.
•Laspiezasdevidrioydemásaccesoriosempacadosconelaparato.
•Losgastosdetramitaciónyembarqueasociadosalreemplazodel
producto.
•Losdañosyperjuiciosindirectosoincidentales.
¿Qué relación tiene la ley estatal con esta garantía?
•Estagarantíaleotorgaderechoslegalesespecíficosyelconsumidor
podríatenerotrosderechosquevaríandeunaregiónaotra.
Válida sólo para México
Duración
RayovacdeMéxicoSAdeCVgarantizaesteproductopor2añosapartirdela
fechaoriginaldecompra.
¿Qué cubre esta garantía?
EstaGarantíacubrecualquierdefectoquepresentenlaspiezas,componentes
ylamanodeobracontenidasenesteproducto.
Requisitos para hacer válida la garantía
ParareclamarsuGarantíadeberápresentaralCentrodeServicioAutorizado
lapólizaselladaporelestablecimientoendondeadquirióelproducto.Sinola
tiene,podrápresentarelcomprobantedecompraoriginal.
¿Donde hago válida la garantía?
Llamesincostoalteléfono018007142503,paraubicarelCentrodeSer-
vicioAutorizadomáscercanoasudomicilioendondeustedpodráencontrar
partes,componentes,consumiblesyaccesorios.
Procedimiento para hacer válida la garantía
AcudaalCentrodeServicioAutorizadoconelproductoconlapólizade
Garantíaselladaoelcomprobantedecompraoriginal,ahísereemplazará
cualquierpiezaocomponentedefectuososincargoalgunoparaelusuario
final.EstaGarantíaincluyelosgastosdetransportaciónquesederivendesu
cumplimiento.
Excepciones
EstaGarantíanoseráválidacuandoelproducto:
A)Sehubieseutilizadoencondicionesdistintasalasnormales.
B)Nohubiesesidooperadodeacuerdoconelinstructivodeusoquele
acompaña.
C)Cuandoelproductohubiesesidoalteradooreparadoporpersonasno
autorizadasporRayovacdeMéxicoSAdeCV.
Nota: Ustedpodraencontrarpartes,componentes,consumiblesyaccesorios
enloscentrosdeserviciosautorizados.Estagarantíaincluyenlosgastos
detransportaciónquesederivendesuscumplimientodentrodesusredde
servicio.
A
B
D
C
A
B
D
C


Join the conversation about this product
Here you can share what you think about the Black and Decker BL1120 Blender. If you have a question, first carefully read the manual. Requesting a manual can be done by using our contact form.