
IMPORTANT:
During the first few minutes of initial use, you may notice a slight odor. This is normal
and will quickly disappear.
This heater is intended for use on a flat, stable surface, such as a floor, tabletop,
shelf, or desk in a location where the airflow grille openings won’t be obstructed.
Keep all combustible materials such as furniture, pillows, bedding, paper, clothes and
curtains at least 3 feet (0.9 m) away from the heater. Do not use in wet or moist
locations, like bathrooms or laundry areas, or in areas where paint or other
flammable or volatile liquids are used or stored.
CAUTION: Be sure no other appliances are plugged into the same circuit with
this heater/fan. A circuit overload could occur.
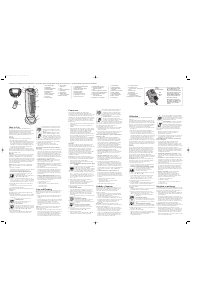
1. Be sure the dial is in the OFF position before plugging the unit in. Plug in to an
AC outlet. For models with Room Select, turn the Room Select Dial to the
appropriate setting for a Small (approx. 10’x10’/3m x3m), Medium (approx.
12’x12’/3.8m x3.8m),or Large Room (approx. 12’x 16’/3.8m x5m) (See Fig. A); for
other models, choose High for large rooms and Low for smaller rooms. The
POWER indicator will light up.
2. Turn the Thermostat Control to HOT to activate the heater/fan. Once the
desired room temperature is achieved, turn the Thermostat Control to a lower
setting until the fan cycles off. The heat will now cycle On/Off to maintain a
comfortable level.
3. To use as a fan without heat, move the dial to FAN ONLY and the Thermostat
Control toward HOT until the fan begins to operate. No heating will occur in
this mode.
4. For models with a built-in Digital Thermometer, consult the thermometer to
see the area temperature. Depending on the model, it will be displayed in
either °F or °C. (See Fig. B) The digital thermometer runs on batteries and is
not affected by whether or not the unit is plugged in. The batteries are already
installed. To activate the thermometer, turn the unit over and pull the plastic
TAB out of the Battery Cover on the under side of the unit.
Batteries have an average life of approximately a year. To change the batteries,
unscrew the Battery Cover on the underside of the unit and pull on the ribbons to
pop the old batteries out. Replace the batteries with new LR44 (or AG13) Cells by
placing them with the flat sides (+) facing in toward each other. Replace the
Battery Cover and snap in place. Do not overtighten the screw. To preserve
battery-life, you may want to remove the batteries from your unit before storing
during the off season.
SPECIAL FEATURES
1. This unit is equipped with a Safety Auto-Off, plus a safety Thermal Fuse and
CAUTION light. If the unit experiences excessive heat, the Safety Auto-Off will
shut the unit off, and the CAUTION light will go on. If this happens, turn the
Dial to Off immediately. Be sure the front and back grilles are not blocked and
HOW TO USE
CARE AND CLEANING
This appliance is permanently lubricated and will not require additional lubrication
for the life of the unit. It contains no user serviceable parts. Refer service to
qualified service personnel.
1. Always turn the unit Off, unplug, disconnect the cord from the outlet, and allow
the heater to cool completely before cleaning.
2. To clean the exterior, use a soft dry cloth or one moistened with a mild
detergent to wipe the outside surfaces. Do not use abrasives or harsh
cleansers. Dry surfaces thoroughly before using the heater. Or, you can use a
vacuum with a dusting brush attachment to clean away dust.
CAUTION: DO NOT immerse the heater in water or allow water to drip into the
interior of the heater, as this could create an electric shock hazard.
3. Store the heater in a dry area. Gather the power cord in loops and secure it
with a twist tie. Don’t let the power cord come in contact with sharp edges or
get compressed by heavy objects. Portable electric heaters are designed for
space heating as a supplementary heat source. They are not intended to be the
main source of heat.
IMPORTANTE:
No se alarme si inicialmente detecta cierto olor durante los primeros minutos de
uso del calentador. Dicho olor desaparece pronto.
Este calentador ha sido diseñado para usarse sobre superficies planas, seguras
tal como pisos, mesas, estantes, o escritorios donde las parrillas de circulación
de aire se mantengan libres de obstrucción. Mantenga todo material combustible
incluyendo muebles, almohadas, ropa de cama, ropa y cortinas, por lo menos a
0.9 m (3 pies) del calentador. No use el calentador en áreas húmedas o mojadas
como el baño o cuarto de lavandería, como tampoco donde almacene o use
pintura u otros líquidos inflamables o volátiles.
PRECAUCION: Asegúrese que no haya ningún otro aparato enchufado a la misma
toma de corriente con este calentador/ventilador. Podría ocurrir una sobrecarga
eléctrica.
1. Antes de enchufar la unidad, asegúrese que la perilla de control esté en la
posición OFF (apagado). Conecte la unidad a una toma de corriente AC. Para
los modelos con selector de cuarto, gire la perilla a la posición apropiada para
un cuarto pequeño (aproximadamente 3m x 3m/10' x 10'), mediano
(aproximadamente 3.8m x 3.8m /12' x 12'), o grande (aproximadamente 3.8m x
5m /12' x 16'); para los demás modelos, ajuste el control a HIGH (alto) para los
cuartos grandes y LOW (bajo) para los cuartos pequeños. La luz indicadora del
interruptor POWER se iluminará.
2. Para activar el calentador/ventilador gire el control del termostato a la
posición HOT (caliente). Una vez que la unidad alcance la temperatura
deseada, gire el control del termostato a una posición de temperatura más
baja hasta que el ventilador se apague. La unidad se enciende y se apaga a
intervalos para mantener un nivel de calor confortable.
3. Si desea usar la unidad como ventilador únicamente, gire la perilla a la
posición FAN ONLY (ventilación únicamente) y el control del termostato hacia
HOT (caliente) hasta que el ventilador comience a funcionar. En esta posición
la unidad no emite calor.
4. Para los modelos con termómetro digital incorporado, consulte el termómetro
para verificar la temperatura ambiental. La temperatura aparece ya sea en °F
o °C según el modelo. Consulte la ilustración (B). El termómetro digital
funciona con baterías y no lo afecta el hecho que la unidad está enchufada
o no. Las baterías ya vienen instaladas. Para activar el termómetro, invierta la
unidad y retire la GUIA plástica de la cubierta de las baterías en la parte
inferior del calentador.
Las baterías tienen vida útil de aproximadamente un año. Para cambiar las
baterías, destornille la cubierta del compartimiento de las baterías en el inferior
de la unidad y tire de las cintas para extraer las baterías gastadas. Reemplace
las baterías con unas LR44 (o AG13) colocándolas con los costados planos (+)
hacia adentro uno frente al otro. No apriete el tornillo demasiado cuando cierre la
cubierta. Si desea preservar la vida útil de las baterías, retírelas antes de
almacenar la unidad por tiempo prolongado.
Este ventilador trae lubricante permanente y no requiere lubricación adicional a
largo de su vida útil. No contiene partes servibles para el usuario. Para cualquier
servicio, acuda a personal de servicio calificado.
1. Siempre apague la unidad, desconéctela, desconecte el cable de la toma de
corriente y permita que el calentador se enfríe por completo antes de
limpiarlo.
2. Limpie el exterior de la unidad con un paño seco suave o uno humedecido con
detergente suave para limpiar las superficies exteriores. No use limpiadores
fuertes abrasivos. Seque bien las superficies antes de usar el calentador.
Puede usar también una aspiradora y el accesorio de cepillo para
desempolvar.
PRECAUCION: A fin de evitar el peligro de un choque eléctrico, NO sumerja el
calentador en agua ni permita que gotee agua adentro de la unidad.
3. Almacene el calentador en un lugar seco. Recoja el cable nítidamente y
asegúrelo con una gasa. No permita que el cable eléctrico entre en contacto
con ningún borde afilado ni que lo comprima ningún objeto pesado. Los
calentadores portátiles son diseñados para brindar calefacción ambiental y
complementar una fuente de calor principal. No son diseñados con el fin de
servir como fuente principal de calor.
COMO USAR
CUIDADO Y LIMPIEZA
OPERATING INSTRUCTIONS/INSTRUCCIONES DE FUNCIONAMIENTO
PRODUCT MAY VARY SLIGHTLY FROM ILLUSTRATIONS/ESTE PRODUCTO PUEDE VARIAR LIGERAMENTE DE LAS ILUSTRACIONES
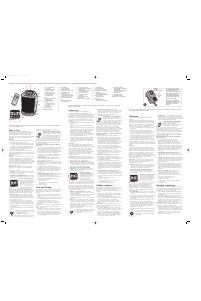
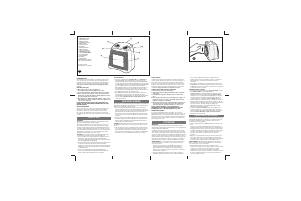
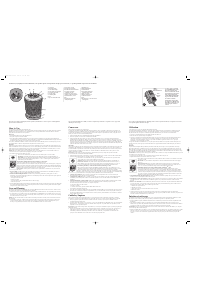
1. Room Select Control (Certain Models Only)
Selector de temperatura ambiental
(En ciertos modelos únicamente)
2. CAUTION Indicator Light/Luz indicadora de precaución
3. Power Indicator Light/Luz indicadora de encendido
4. Thermostat Control/Control del termostato
5. Soft-Grip Handle/Asa suave
6. Stable Base/Base estable
7. Tip-Over Switch (Under unit)
Interruptor de inclinación (Debajo de la unidad)
8. Front/Back Grilles/Parrilla delantera/trasera
9. Fan Only Setting/Posición de ventilador solamente
10. High/Low Selector (Certain Models Only)
Selector de temperatura alta/baja
(En ciertos modelos únicamente)
11. Digital Thermometer (Certain Models Only)
Termómetro digital (En ciertos modelos únicamente)
쐈
쐅
AREA TEMPERATURE
TEMPERATURA AMBIENTAL
B
AREA TEMPERATURE
TEMPERATURA AMBIENTAL
A
CARACTERISTICAS ESPECIALES
1. Esta unidad viene equipada con un dispositivo de seguridad de apagado
automático, fusible térmico y luz de PRECAUCION. Si la unidad se
sobrecalienta, el dispositivo de seguridad apaga la unidad automáticamente, y
la luz de PRECAUCION se enciende. En dado caso, gire de inmediato el control
a la posición OFF (apagado). Asegúrese que no haya nada obstruyendo la
circulación de aire a través de las parrillas delantera y trasera. Si la luz
CAUTION (precaución) permanece encendida, desconecte la unidad, permita
que se enfríe, y espere unos 10 minutos antes de conectarla de nuevo para
hacerla funcionar. Ajuste nuevamente la temperatura o la regulación para
cuartos. Si la unidad no funciona al cabo de 10 minutos, es posible que el
calentador tenga daños internos y que el fusible térmico se haya disparado
impidiendo que la unidad funcione apropiadamente.
2. El sensor de movimiento corta la corriente si la unidad se cae o se mueve de
lugar (a otro cuarto o dentro de la misma área). El sensor de inclinación corta
la corriente si la unidad cae hacia enfrente o hacia atrás (por ejemplo, si una
mascota voltea la unidad inadvertidamente). Ambos sensores están
controlados por el interruptor de caída en el inferior de la unidad. No altere
esta medida de seguridad.
3. La luz del interruptor indica que el calentador está encendido y en
funcionamiento. Esta luz permanece iluminada aunque el termostato haya
completado el ciclo y las resistencias de calor se hayan apagado. Observe
que aunque esta unidad es fresca al tacto, tanto la parrilla delantera como la
trasera se calientan. Tenga cuidado de no tocarlas.
4. Termostato de temperatura baja (FROST WATCH): cuando el calentador está
conectado y la luz indicadora del interruptor está encendida, usted puede
seleccionar cualquier regulación para un cuarto (según su modelo) y ajustar el
control del termostato a MIN WARM (regulación más baja). El
calentador/ventilador permanecerá apagado a no ser que la temperatura baje
a menos de 4°C (40°F). En dado caso, el termostato de temperatura baja
activa automáticamente la unidad para evitar que se congele la tubería o que
haya daño de escarcha.
ENCHUFE POLARIZADO (Sólo en el modelo de 120V)
Esta unidad tiene un enchufe polarizado en el que una clavija (contacto) es más
ancha que la otra. Como medida de seguridad, este enchufe entra en una toma
de corriente polarizada en un solo sentido. Si el enchufe no entra en la toma,
inviértalo e intente de nuevo. Si aún así no logra enchufarlo, busque la ayuda de
un electricista. Por favor no altere esta medida de seguridad haciéndole
modificaciones al enchufe.
MUCHA ATENCION:
No se recomienda el uso de un cable de extensión. Si no tiene otra alternativa,
asegúrese que el cable sea: (1) No.14 AWG como tamaño mínimo, con
calificación no menor de 1875 watts; (2) inscrito por UL; (3) lo más corto posible
(los cables más largos pueden sobrecalentarse, como también pueden disparar
circuitos); (4) no debe usarse para operar más de un aparato a la vez.
POLARIZED PLUG (For 120V Model Only)
This appliance has a polarized plug—one blade is wider than the other. To
reduce the risk of electric shock, this plug will fit into a polarized outlet only one
way. If the plug does not fit fully into the outlet, reverse it. If it still does not fit,
contact an electrician. Do not attempt to defeat this safety feature by modifying
the plug in any way.
SPECIAL ATTENTION:
The use of an extension cord is not recommended. However, if it is absolutely
necessary, be sure that the cord is (1) No. 14 AWG minimum size and rated no
less than 1875 watts; (2) UL listed; (3) as short as possible (long cords can
overheat, as well as trip circuit breakers); (4) not used for
operating more than
one appliance at a time.
nothing is restricting airflow. If the CAUTION light stays on, unplug the unit, let
it cool down, and wait 10 minutes before plugging it back in to operate.
Readjust your temperature or room settings. If the unit fails to operate after
10 minutes, it may mean the heater has internal damage and that the Thermal
Fuse has been tripped so the heater can no longer operate.
2. The Motion Off Detection Feature will cut the power if the unit falls over in any
direction or is lifted (such as if you move it to another part of the room). The
Tip-Over Switch will cut the power if the unit is knocked over forward or
backward (for example, if a pet accidentally tips it over). Both are controlled
by the Tip-Over Switch on the bottom of the unit. Do not attempt to defeat this
safety feature.
3. The Power Indicator Light shows that the heater is switched on and operating.
It continues to glow even if the thermostat has cycled and the heating
elements are off. Note that even though this unit has a Cool-Touch Housing,
both the front and back grilles will get hot. Be careful not to touch them.
4. Frost Watch: when the heater is plugged in and the Power Indicator Light is on,
you can select any setting for room size (depending on your model) and leave
the Thermostat Control on the MIN (WARM) or lowest setting. Your heater/fan
will remain Off unless the temperature drops below (40° F/4°C). If this happens,
Frost Watch will automatically cycle the heater/fan On to protect against
freezing pipes or frost damage.
SOFT-GRIP HANDLE
NOTE: The rubberized grip is free of natural rubber and latex. It is safe for use
by individuals allergic or sensitive to these materials.
ASA SUAVE
NOTA: La asa engomada no contiene látex natural. Es segura para aquellas
personas alérgicas o susceptibles a estos materiales.

Join the conversation about this product
Here you can share what you think about the Black and Decker BDHF70 Heater. If you have a question, first carefully read the manual. Requesting a manual can be done by using our contact form.
reply | This was helpful (0) (Translated by Google)