
Como usar
Este producto es solamente para uso doméstico.
ANTES DE USAR
Retire cualquier etiqueta o calcomanía adherida al cuerpo o a la plancha.
Importante: Para verificación de la garantía, por favor no retire la etiqueta del
cable eléctrico.
Nota: Use agua común de la llave para planchar. No use agua procesada por sistemas domésticos.
Importante: Para óptimo rendimiento, espere que la luz indicadora de funcionamiento se apague (aproximadamente de
60 a 90 minutos) antes de comenzar a planchar.
PARA LLENAR EL TANQUE DE AGUA
1. Incline la plancha y, usando una taza de medir limpia, vierta agua dentro del orificio hasta que ésta llegue a la marca
de nivel max del tanque de agua. No lo llene en exceso.
2. Enchufe la plancha. La luz indicadora de encendido se encenderá.
Consejo: Si no está seguro de la fibra de una prenda, haga una prueba en un área pequeña (en una costura o dobladillo
interno) antes de planchar.
PARA PLANCHADO A VAPOR
1. Mueva el selector al nivel de vapor deseado (A).
2. Gire el selector de tejido al nivel apropiado (entre 4 y 6) para su tejido (B).
Consulte la guía de tejidos en el talón de apoyo (B) y lea la etiqueta de
la prenda para determinar el tipo de tejido. La luz de temperatura adecuada
se mantiene encendida hasta que llega a la temperatura apropiada. Luego
realiza ciclos de encendido y apagado durante el planchado.
3. Al terminar de planchar, ajuste el selector de tejido al nivel más bajo, pase
el selector a la posición de seco (min) y desconecte la plancha.
PARA EL PLANCHADO SECO
1. Asegúrese de que el selector esté en seco (min). Quizá quiera vaciar el agua
(consulte “Vaciar el tanque de agua después del planchado").
2. Gire el selector de tejido al nivel adecuado para su tejido. Consulte la guía de
tejidos en el talón de descanso (B) y lea la etiqueta de la prenda para
determinar el tipo de tejido.
EMISIÓN DE VAPOR
• Horizontal
1. Con el tanque de agua lleno hasta la marca MAX, gire el control
de temperatura hasta al menos el nivel 4, y deje la plancha sobre el talón
de descanso durante aproximadamente 60 minutos.
2. Para quitar las arrugas persistentes, bombee el botón de unas cuantas
veces a intervalos de 5 segundos para formar una ráfaga concentrada
de vapor.
• Vertical
1. Cuelgue la prenda que planchará a vapor en una percha de colgar.
(Las cortinas pueden rociarse una vez colgadas.)
2. Gire el selector al nivel max.
3. Sostenga la plancha cerca pero no en contacto con el tejido.
4. Tire con fuerza del tejido con la otra mano y bombee el botón de
a medida que pasa la plancha por el tejido (C).
ROCÍO
Puede usar el rocío en cualquier nivel. Asegúrese de que el tanque de agua esté
lleno. Presione el botón de . Si el rocío es débil, bombee el botón unas
cuantas veces.
VACIAR EL TANQUE DE AGUA DESPUÉS DEL PLANCHADO
1. Gire el selector de tejido a min. Desenchufe la plancha y déjela enfriar.
2. Vacíe el agua sosteniendo la plancha sobre un lavadero con la punta hacia
abajo. El agua saldrá por el orificio de llenado de agua (D).
Cuidado y limpieza
El aparato no contiene piezas reparables por el consumidor. Para servicio, acuda
a personal de asistencia calificado.
LIMPIEZA DE LAS SUPERFICIES EXTERIORES
1. Asegúrese de que la plancha esté desenchufada y se haya enfriado por
completo. Limpie la plancha y demás superficies exteriores con un paño
suave humedecido con agua y un detergente suave. Nunca utilice abrasivos
limpiadores fuertes, vinagre ni almohadillas de fibras metálicas que puedan
rayar o decolorar la plancha.
2. Después de limpiar la plancha, planche con vapor sobre un paño viejo para
eliminar cualquier residuo de las salidas de vapor.
ALMACENAMIENTO DE LA PLANCHA
1. Desconecte la plancha y permita que se enfríe.
2. Asegúrese de que el selector esté en seco (min).
3. Enrolle el cable alrededor del talón de apoyo y sujete el enchufe con el cable.
4. Guarde la plancha en posición vertical sobre el talón de descanso para evitar que gotee agua de la plancha.
Size: 21.75" x 17"
How to Use
This appliance is for household use only.
GETTING STARTED
Remove any labels, stickers or tags attached to the body or soleplate of the iron.
Important: For warranty verification, do not remove line cord sticker.
Note: Use ordinary tap water for ironing. Do not use water processed through a home softening system.
Important: For optimum performance, let the iron stand until the indicator light goes out (approximately 60 to 90
seconds) before beginning to iron.
TO FILL WATER TANK
1. Tilt the iron and using a clean measuring cup, pour water into opening until water reaches the max level mark on the
water tank. Do not overfill.
2. Plug in the iron. The power indicator light comes on.
Tip: If unsure of a garment’s fiber, test a small area (on an inside seam or hem) before ironing.
FOR STEAM IRONING
1. Move the selector to the desired steam level (A).
2. Turn the fabric-select dial to appropriate setting (between 4 and 6) for your
fabric (B). See fabric guide on the heel rest and read garment’s label to help
you determine fabric type. The temperature ready light glows until it reaches
the appropriate temperature. It then cycles on and off during ironing.
3. When finished ironing, turn the fabric-select dial to lowest heat setting,
move the selector to min and unplug the iron.
FOR DRY IRONING
1. Make sure selector is set to min. You may want to empty the water (see
“Emptying Water Tank After Ironing”).
2. Turn the fabric-select dial to the appropriate setting for your fabric (B). See
fabric guide on the heel rest and read garment’s label to help you determine
fabric type.
SURGE OF STEAM
• Horizontal
1. With the water tank filled to the max mark, turn the fabric-select dial
to at least setting 4 and let iron stand on its heel rest about 60 minutes.
2. To remove tough wrinkles, pump the button a few times at 5-second
intervals for a concentrated blast of steam.
• Vertical
1. Hang the garment to be steamed on a clothes hanger. (Curtains or
drapes can be steamed once they are hung.)
2. Move the selector to max.
3. Hold the iron close to, but not touching, the fabric.
4. Pull the fabric tight in your free hand and pump the button as you
move the iron over the fabric (C).
SPRAY
You can use spray at any setting. Check that the water tank is filled with water.
Press the button. If spray is weak, pump the button a few times.
EMPTYING WATER TANK AFTER IRONING
1. Turn the fabric-select dial to min. Unplug the iron and allow it to cool.
2. Empty the water by holding the iron over a sink with the tip pointing down.
Water will empty out of water-fill opening (D).
Care and Cleaning
This product contains no user serviceable parts. Refer service to qualified
service personnel.
CLEANING OUTSIDE SURFACES
1. Make sure iron is unplugged and has cooled completely. Wipe the soleplate
and outer surfaces with a soft cloth dampened with water and a mild
household detergent. Never use abrasives, heavy-duty cleansers, vinegar or
scouring pads that may scratch or discolor the iron.
2. After cleaning, iron with steam over an old cloth to remove any residue
from the steam vents.
STORING YOUR IRON
1. Unplug the iron and allow it to cool.
2. Check that the selector is set to min.
3. Wrap the cord loosely around the heel rest and tuck in the plug to secure it.
4. Store vertically on its heel rest to prevent water leaking from the soleplate.
Utilisation
L’appareil peut seulement servir pour une utilisation domestique.
PRÉPARATIFS
Enlever tout collant ou étiquette du corps ou de la semelle du fer.
Important : Afin de pouvoir en vérifier la garantie, ne pas retirer l’étiquette du cordon d’alimentation.
Note : On peut utiliser de l’eau du robinet pour repasser. Ne pas se servir d’eau traitée dans un système
d’adoucissement d’eau domestique.
Important : Afin d’optimiser le rendement, laisser le fer reposer jusqu’à ce que le témoin s’éteigne (environ de 60 à 90
secondes) avant de commencer à repasser.
REMPLISSAGE DU RÉSERVOIR
1. Pencher le fer et à l’aide d’une tasse à mesurer propre, verser de l’eau dans l’orifice de remplissage jusqu’à la
marque max de l’indicateur de niveau d’eau. Ne pas trop remplir.
2. Brancher le fer. Le voyant indicateur de courant s’allume.
Conseil : Lorsqu’on ne connaît pas le type de fibre d’un vêtement, faire un essai sur un petit bout de tissu (un bord
ou une couture à l’intérieur) avant de repasser le vêtement.
POUR REPASSER À LA VAPEUR
1. Glisser le sélecteur au niveau de vapeur voulu (A).
2. Régler le sélecteur de tissu à la température appropriée au tissu (entre
4 et 6) (B). Consulter le guide de tissu sur le talon d’appui (B) et lire
l’étiquette du vêtement pour vous aider à déterminer le type de tissu.
L’indicateur lumineux de température s’allume lorsqu’il atteint la
température appropriée. Il s’allume et s’éteint pendant le repassage.
3. À la fin du repassage, tourner le sélecteur de tissu au réglage minimal,
remettre le sélecteur a sec (min), et débrancher le fer.
POUR REPASSER À SEC
1. S’assurer de régler le sélecteur à sec (min). On peut vider le fer (voir "Vider
le réservoir d’eau après le repassage").
2. Régler le sélecteur de tissu au réglage approprié pour votre tissu. Consulter
le guide de tissu sur le talon d’appui (B) et lire l’étiquette du vêtement pour
vous aider à déterminer le type de tissu.
JET DE VAPEUR
• Horizontal
1. Lorsque le réservoir d’eau est rempli jusqu’à la marque max, mettre
le sélecteur de température au réglage d’au moins 4 et laisser le fer sur
le talon d’appui pendant environ 60 minutes.
2. Pour enlever les plis tenaces, pomper le bouton à quelques reprises
pendant des intervalles de 5 secondes pour obtenir un puissant jet de
vapeur concentré.
• Vertical
1. Suspendre le vêtement sur un cintre. (Les rideaux ou les draperies
peuvent être vaporisés lorsqu’ils sont suspendus.)
2. Glisser le sélecteur au niveau max.
3. Tenir le fer près du tissu sans y toucher.
4. Tirer fermement sur le tissu de la main libre et pomper le bouton
en déplaçant le fer sur le tissu (C)
PULVÉRISATION
On peut vaporiser à tout réglage. Vérifier que l’indicateur de niveau d’eau est
rempli d’eau. Appuyer sur le bouton . Lorsque celle-ci est faible, pomper le
bouton à quelques reprises.
VIDER LE RÉSERVOIR D’EAU APRÈS LE REPASSAGE
1. Régler le sélecteur de tissu à Min. Débrancher le fer et le laisser refroidir.
2. Vider le fer en tenant le fer au-dessus d’un évier avec le bout vers le bas.
L’eau s’écoule par l’orifice de remplissage (D).
Entretien et nettoyage
L’utilisateur ne peut entretenir aucune composante du produit. En confier
l’entretien à du personnel qualifié.
NETTOYAGE DES SURFACES EXTÉRIEURES
1. S’assurer que le fer est débranché et bien refroidi. En essuyer la semelle
et les surfaces externes à l’aide d’un chiffon doux trempé dans de l’eau et un
détergent doux domestique. Ne jamais utiliser des produits nettoyants abrasifs,
de service intensif, du vinaigre ni des tampons à récurer qui peuvent
égratigner ou décolorer le fer.
2. Après le nettoyage, repasser à la vapeur un vieux chiffon afin d’enlever toute
trace de résidu des évents.
RANGEMENT DE VOTRE FER
1. Débrancher le fer et le laisser refroidir.
2. S’assurer de régler le sélecteur à sec (min).
3. Enrouler le cordon lâchement autour du talon d’appui et en fixer la fiche.
4. Ranger le fer sur son talon d’appui afin d’empêcher les fuites d’eau sur la semelle.
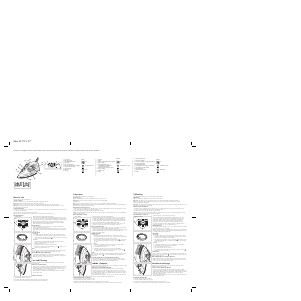
Product may vary slightly from what is illustrated./Este producto puede variar ligeramente del que aparece ilustrado./Le produit peut différer légèrement de celui illustré.
1. Variable Steam
2. Dry
A
B
D
C
1. Vapor variable
2. Seco
A
B
D
C
6
5
4
3
2
1
1. Réglage de vapeur
2. Sec
A
B
6
5
4
3
2
1
D
C
쐂
쐆
쐊
쐎
쐅
AS75/AS85
AS70
1. Ajutage de pulvérisation
2. Orifice de remplissage
3. Selecteur de repassage à sec/repassage à vapeur
4. Bouton de pulvérisation
5. Bouton de jet de vapeur
6. Voyant indicateur de courant et de temperature
7. Talon d’appui avec guide de tissue
8. Sélecteur de tissue
9. Indicateur de niveau d’eau
10. Semelle
Dry
Steam/Blast of Steam
Spray
1. Spray nozzle
2. Water-fill opening
3. Dry/variable steam selector
4. Spray button
5. Surge-of-steam button
6. Power on and temperature-ready light
7. Heel rest with fabric guide
8. Fabric-select dial
9. Water tank
10. Soleplate
1. Rociador
2. Orificio
3. Selector de planchado seco/vapor variable
4. Botón de rociar
5. Botón de emisión de vapor
6. Luz indicadora de funcionamiento
y de temperatura adecuada
7. Talón de descanso con guía de tejidos
8. Selector de tejido
9. Tanque de agua
10. Suela
Symbols
Seco
Vapor/impacto de vapor
Rocío
Símbolos
Sec
Vapeur/Jet de vapeur
Pulvérisation
Symboles

Join the conversation about this product
Here you can share what you think about the Black and Decker AS70 Iron. If you have a question, first carefully read the manual. Requesting a manual can be done by using our contact form.