AFTER SALES SUPPORT
91064, 04/2014
USA
1-855 754 8297
USA
Ventil Ventil
C
5. INITIAL USE
We recommend reading the user manual thoroughly before using the
bicycle computer for the first time.
5.1 Initial Activation of the Bicycle computer
Before using the bicycle computer for the first time, several settings
must be made. Remove the protective foil from the display screen and
press the LEFT or RIGHT button to turn on the bicycle computer. The
first display shows the setting for the wheel size “2124”.
5.2 Setting the Wheel Size
(Required after replacing the battery or restarting)
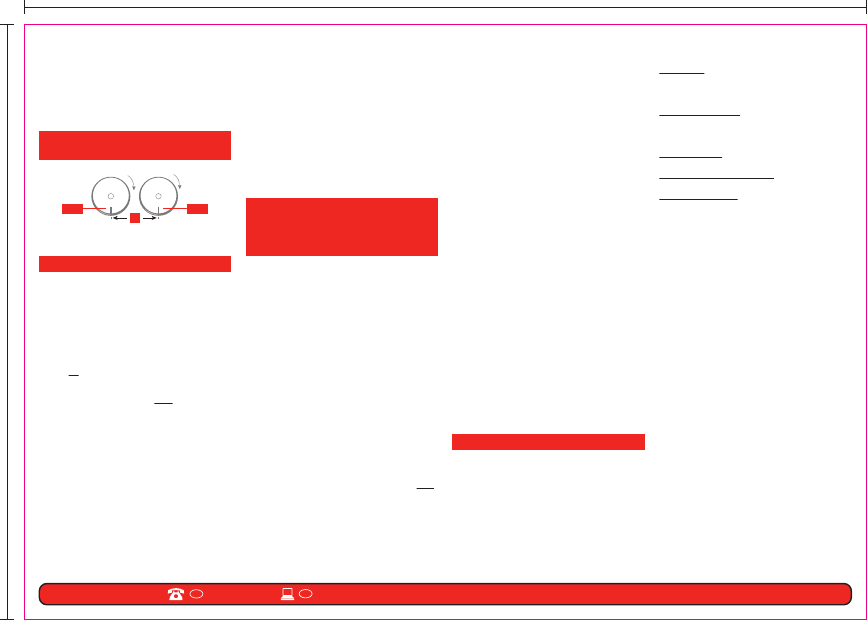
Determining the wheel size: Mark the front wheel and the ground at the
same point or use the valve for orientation. Move the bicycle forward for
one full rotation of the wheel and measure the distance travelled in mm.
This is your input value.
Basic settings display: 2124 (=mm),the digit in the ones column (4)
blinks. Press the RIGHT button: the first digit is then increased by one.
With all settings: Press and hold the RIGHT button – each digit will
continue to increment faster.
Confirm your selection by pressing the LEFT button. The digit in the tens
column now begins to blink. Press the RIGHT button: The digit in the tens
column is then increased by one. The following digits are set using the
same method. The digit in the thousands column can be set from 0 to 5.
To complete the setting, press the LEFT button again to confirm the input.
5.3 Selecting Kilometres/Miles
The units of measurement are selected immediately after entering the
wheel size. Press the RIGHT button to choose between KILOMETRES
(KM) and MILES (M) then confirm the selection with the LEFT button.
Here, the system changes to the mode for setting age and weight.
5.4 Setting Age and Weight
The preset Age is shown (23). The digit in the ones column of the age
blinks. Press the RIGHT button: the digit in the ones column can then be
set. Press the LEFT button: The digit in the tens column of the age
begins to blink. Press the RIGHT button to set the digit in the tens
column. Press the LEFT button: The preset Weight is shown.
If you previously selected kilometers, 80 kilogram’s will appear.
If you previously selected miles, 160 pounds will appear.
The digit in the ones column of the weight blinks. Press the RIGHT
button to set the digit in the tens column. Press the LEFT button: The
digit in the tens column of the weight begins to blink. Press the RIGHT
button to set the digit in the tens column. Press the LEFT button. The
digit in the hundreds column begins to blink. Press the RIGHT button to
set the digit in the hundreds column. Press the LEFT button to confirm
the setting.
5.5 Setting the CO
2 saving in comparison with a car
This function is used to calculate the CO
2 saving in comparison with a
car. It allows you to see how much CO
2 you would have produced if you
had travelled the same route by car rather than by bicycle.
To use this function you will need to enter the CO
2 emissions produced
by your car in g/km. This information can be obtained from your car’s
technical documentation (e.g. approval certificate, manufacturer’s
website, etc.) If you do not have a car, we recommend leaving the initial
setting of 159 g/km unchanged.
The preset value 159 is displayed.
To enter your own value adjust the units, tens and hundreds digits by
using the RIGHT button and confirm your entry by pressing the LEFT
button. You will then be transferred to the normal function mode and the
time is displayed.
5.6 Setting the 12/24h Display
After setting the CO
2 VALUE press and hold the LEFT button; 24 Hr
begins to blink. With the RIGHT button, choose between the 12 Hr and
24 Hr clock display and confirm your selection with the LEFT button.
5.7 Setting the Clock
Immediately after selecting the 12/24 hour display, the time can be set.
The hour display begins to blink. Press the RIGHT button: The hour
display is then increased by one. Press the LEFT button: the minute
display begins to blink. Press the RIGHT button: The minute display is
then increased by one. Press the LEFT button to confirm the time setting.
The settings are now complete and the bicycle computer is ready for use.
5.8 Testing the Bicycle computer
To test the correct installation of the bicycle computer and sensor,
press the LEFT button to activate the display. Rotate the front wheel of
the bicycle and the speed is shown.
5.9 Restart/Reset
To reset entered and saved data, press the LEFT and RIGHT button for
approximately 5 seconds. After restarting/resetting, all setting must be
re-entered (see point 5.2 Setting the Wheel Size).
Automatic On/Off: When the bicycle is not moving, the bicycle computer
shuts off automatically after 4 minutes. When continuing, the bicycle
computer turns on automatically. This reduces battery drain; no data is
lost.
Automatic start/stop: all functions (except the time) have an automatic
start/stop switch. Measuring starts when the wheel magnet passes the
sensor for the first time. When the bicycle is stopped, the electronics
wait 2-4 seconds for a possible signal before stopping measurement.
6. MODES/FUNCTIONS
After starting the bicycle computer, the speed and time are shown in the
display screen.
• Speed: Continuously calculated and updated, and ALWAYS shown in
the upper right corner of the display screen.
Maximum range of measurement: 99.9 km/h
Press the RIGHT button to change between the following modes:
• ODO (total kilometres): Total kilometers (miles) ridden are saved.
Maximum range of memory: 9999.9 km
• DST (daily kilometres): Begins automatically at the start of the tour.
Maximum range of measurement: 999.99 km
• MXS (maximum speed): The maximum speed reached is saved.
Maximum range of measurement 99.9 km/h.
• AVS (average speed): Maximum range of measurement: 99.9km/h
• TM (duration/tour timer): Begins automatically at the start of the
tour. Maximum range of measurement: 9 hrs. 59 min. 59 sec.
• Actual temperature display: The temperature is measured
approximately once per minute and the display is updated.
Choose between °C and °F:
In the temperature display, press and hold the LEFT button for
approximately 3 seconds until °C starts to blink. Press the RIGHT
button to choose between °C and °F. Confirm your selection with the
LEFT button.
• Calories burned CAL:
The energy consumption in calories (Kcal) is measured automatically
at start of the tour. Maximum range of measurement: 99999 kcal
Energy consumption is calculated based on speed, age and weight
parameters (see point 5.4 “Setting Age and Weight”).
• CO
2 saving in comparison with a car:
The amount of CO
2 saved from all previous journeys in comparison
with a car is determined here. The CO
2 saving is displayed in kg/km.
Maximum measuring range: 99999 kg
• SCAN (scan function): Rolling display of the functions: SCAN appears
in the display screen. In this mode the DST, MXS, AVS and TM
functions are automatically displayed after one another in approx.
4 second intervals.
• Time
Quick scan function: pressing and holding the RIGHT button for approx.
2 seconds initiates a quick scan of the functions (DST, MXS, AVS, TM).
Speed trend and comparison are always shown while riding:
• Speed trend:
Actual speed display: The wheel symbol in the upper left corner of
the display screen rotates faster or slower.
• Speed comparison:
To the right of the speed display “+” or “-” appears. This indicates
that you are faster “+” or slower “-” than the average speed up to
that point.
6.1 Resetting the Route Data (DST, TM, AVS) to Zero
Press the right button until DST is displayed. Press and hold the LEFT
button for approximately 3 seconds and the 3 route data values (daily
kilometer counter-DST, riding time-TM, average speed-AVS) are all
reset to zero.
6.2 Resetting the Maximum Speed (MXS) or the Calories (CAL) to Zero
Press the RIGHT button until the maximum speed (MXS) or the calories
(CAL) are displayed then press and hold the LEFT button for
approximately 3 seconds. The maximum speed (MXS) or the calories
(CAL) are then reset to zero.
6.3 Manual Input of the Total Kilometres
To input the total kilometers (ODO) after changing the battery or
resetting the bicycle computer, all settings in point 5.2 “Setting the
Wheel Size” to point 5.5 “Setting the CO
2 saving in comparison with a
car” must be re-entered.
Next, press the RIGHT button until the ODO mode is reached. Press and
hold the LEFT button for approximately 3 seconds, the last place in the
total kilometers then begins to blink. Press the RIGHT button to set the
digits and confirm the setting by pressing the LEFT button. Select the
next place for the setting. Repeat this process until the desired value for
the total kilometers is set. Press the LEFT button again to return to the
normal ODO mode.
6.4 Manually entering the previous CO
2 saving in comparison with a car
In order to enter the value for your ‘previous CO
2 saving in comparison
with a car’ after changing the battery or restarting/resetting the device,
you will initially need to re-enter all of the settings from point 5.2
“Setting the Wheel Size” to point 5.5 “Setting the CO
2 saving in
comparison with a car”.
Then press the RIGHT button until the CO2/kg mode is displayed. Now
press and hold the LEFT button for approx. 3 seconds until the last digit
starts to flash. Press the RIGHT button to alter the digit and confirm
your entry by pressing the LEFT button. Then select the next digit to be
entered. Repeat this process until your desired value has been set.
Press the LEFT button again to confirm the setting.
7. CHANGE THE BATTERY
If the display screen is weak or the bicycle computer can no longer be
turned on, the battery must be changed. Using a coin, turn the battery
cover on the underside of the bicycle computer counter clockwise and
remove it. Place a 3V battery (CR2032) in the battery compartment so
that the plus pole is visible. Replace the battery cover and turn it
clockwise to tighten.
Caution! Improperly changing the battery can lead to danger or
explosion. Replace the battery with the equivalent battery type only.
After replacing the battery, all settings must be re-entered (see point
5.2 Setting the Wheel Size).
8. DECLARATION OF CONFORMITY
EMV directive 2004/108/EG: Krippl-Watches herewith declares that the
bicycle computer (article number 91064) conforms to the basic
requirements and the essential specifications of the 2004/108/EG
directive.
This device complies with Part 15 of the FCC Rules. Operation is subject
to the following two conditions: (1) this device may not cause harmful
interference, and (2) this device must accept any interference received,
including interference that may cause undesired operation.
9. FAQ / TROUBLESHOOTING
Should malfunction occur, first check the battery as well as the
following points before sending bicycle computer for repair.
No speed display
• Check for correct magnet/sensor alignment
• Check the battery (bicycle computer)
• If the battery is too weak, no transmission is sent.
Incorrect speed measurement
• Check whether the wheel size is set correctly.
• Check whether the KM/Mile selection is correct.
• Check whether the magnet and sensor are positioned correctly
Display screen is black: Temperature too high or the display screen was
exposed to direct sunlight; normalize after cooling.
Display screen shows numbers irregularly: Remove the bicycle
computer battery and place it back into the battery compartment.
No display or display is weak:
• Check the battery
• Is the batter placed correctly? Check +/1 polarity.
297 mm
210 mm



Join the conversation about this product
Here you can share what you think about the Bikemate T52432 Cycling Computer. If you have a question, first carefully read the manual. Requesting a manual can be done by using our contact form.
reply | This was helpful (1) Read more (Translated by Google)
This was helpful (0) (Translated by Google)
reply | This was helpful (0)
reply | This was helpful (0)
reply | This was helpful (0) (Translated by Google)