ENGLISH
ELECTRIC WINE OPENER
We recommend that you charge your corkscrew for at least eight hours before
using it for the rst time. Please follow the instructions for recharging below.
RECHARGING YOUR CORKSCREW
Plug one end of the adaptor cord into the base of the recharging unit and the
other end into a socket. Place the corkscrew in the recharging unit, ensuring that
it is rmly in position and is fully engaged with the recharging connectors. It will
take approximately 6 to 8 hours to recharge your corkscrew. When the corkscrew
is fully recharged, it can be used to open approximately 30 bottles.
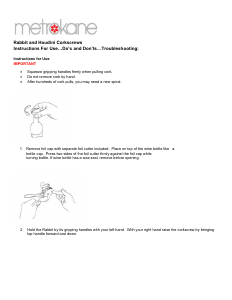
HOW TO OPERATE THE CORKSCREW
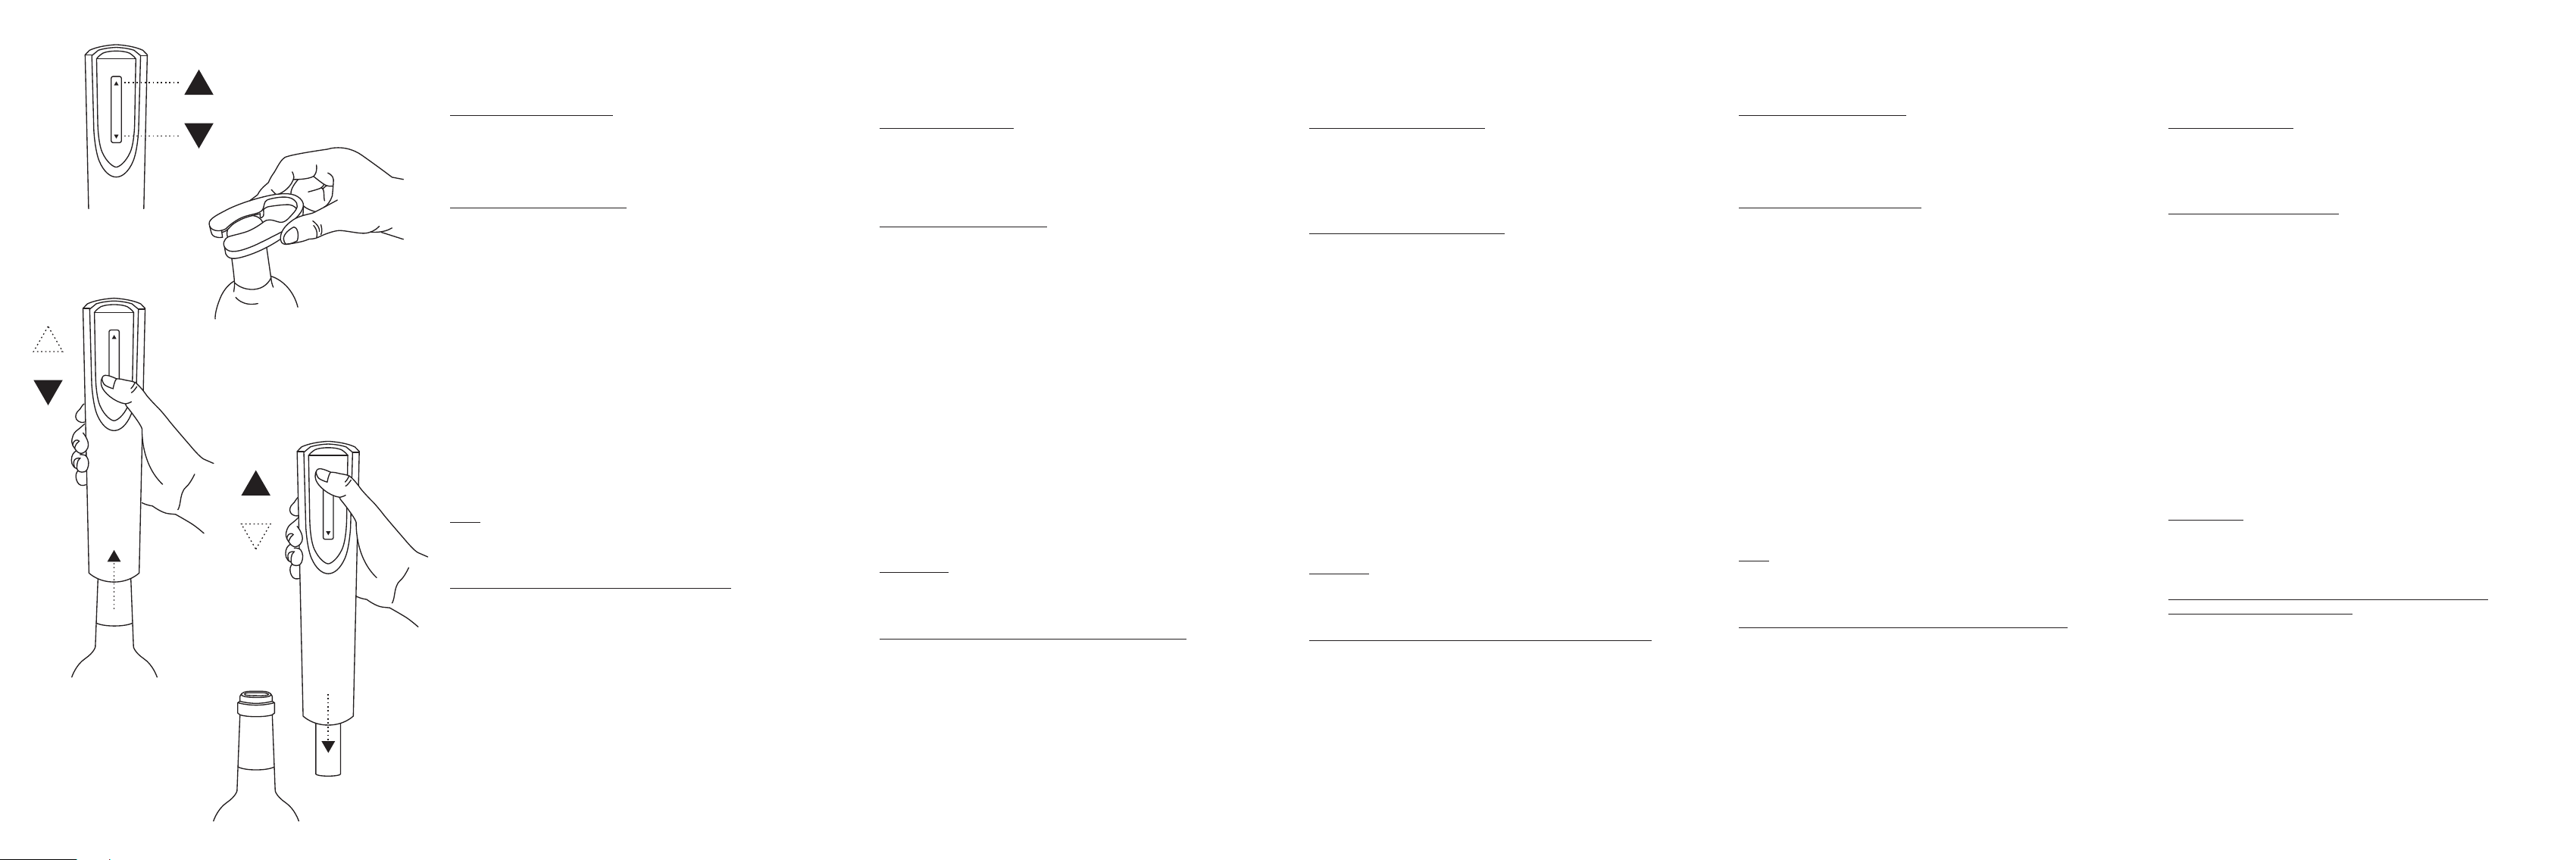
The corkscrew is operated by one simple switch. The switch has two functions.
Press the lower part of the switch to remove a cork from a bottle. Press the upper
part of the switch to release the cork from the mechanism after you have removed
it from the bottle (1).
Before using the corkscrew, you must remove any foil from the top of the
bottle using the foil cutter provided (2).
• Place the corkscrew on the top of the wine bottle. Ensure that it remains as
upright as possible at all times. If you hold the corkscrew at an angle to the
bottle, it will not remove the cork properly (3).
• Hold the corkscrew rmly and press the lower part of the switch. The corkscrew
spiral will turn clockwise, enter the cork and then gradually remove it from the
bottle. When the corkscrew mechanism stops, the cork has been completely
removed from the bottle.
• Lift the corkscrew from the bottle. To remove the cork, simply press the upper
part of the switch. The spiral will turn counterclockwise and release the cork (4)
• Always return the corkscrew to the recharging unit when you have nished with
it. This will protect the mechanism while it is not in use.
NOTE:
It has been noted that the electric corkscrew may experience problems with a
small percentage of plastic/synthetic corks and undersized corks. In this case the
cork should be removed manually.
PLEASE READ THESE IMPORTANT SAFETY WARNINGS.
When using this electric appliance the following safety precautions should
be taken into account in order to reduce the risk of re, electric shock and
personal injury.
• Read all the instructions before the rst use and save them for future reference.
• When using or recharging the corkscrew, keep your work surface clean and free
from potential hazards.
• Never use the corkscrew in damp areas or near water, sinks or taps.
• Never submerge the corkscrew or charger in water.
• The corkscrew is intended for indoor use only. Do not expose the corkscrew or
the charging unit to rain or other extreme conditions.
DEUTSCH
ELEKTRISCHER WEINÖFFNER
Wir empfehlen Ihnen, den Korkenzieher mindestens acht Stunden lang
auf zu laden, bevor Sie ihn zum ersten Mal verwenden. Bitte folgen Sie die
untenstehenden Anweisungen zum Auaden.
KORKENZIEHER AUFLADEN
Stecken Sie das eine Ende des Adapterkabels in der Ladeeinheit und das
andere Ende in eine Steckdose. Setzen Sie den Korkenzieher in die Ladeeinheit
und achten Sie darauf, dass er fest sitzt und mit den Ladestecker vollständig
verbunden ist. Das auaden des Korkenziehers dauert ca. 6 bis 8 Stunden. Wenn
der Korkenzieher vollständig aufgeladen ist, kann er zum Önen von ca. 30
Flaschen verwendet werden.
BEDIENUNG DES KORKENZIEHERS
Der Korkenzieher wird mit einem einfachen Schalter bedient. Der Schalter hat
zwei Funktionen. Drücken Sie den unteren Teil des Schalters, um den Korken
aus der Flasche zu entfernen. Drücken Sie den oberen Teil des Schalters, um
den Korken aus dem Mechanismus zu lösen, nachdem Sie ihn aus der Flasche
genommen haben (1).
Bevor Sie den Korkenzieher verwenden, müssen Sie die Folie mit dem
mitgelieferten Folienschneider von der Oberseite der Flasche entfernen (2).
• Setzen Sie den Korkenzieher auf den Kopf der Weinasche. Achten Sie darauf,
dass er immer so aufrecht wie möglich steht. Wenn Sie den Korkenzieher schräg
zur Flasche halten, wird der Korken nicht richtig entfernt (3).
• Halten Sie den Korkenzieher fest und drücken Sie auf den unteren Teil des
Schalters. Die Korkenzieherspirale wird sich im Uhrzeigersinn drehen, in den
Korken eindringen und ihn dann allmählich aus der Flasche nehmen. Wenn der
Korkenziehermechanismus stoppt, ist der Korken vollständig aus der Flasche
entfernt worden.
• Heben Sie den Korkenzieher aus der Flasche. Um den Korken zu entfernen,
drücken Sie einfach den oberen Teil des Schalters. Die Spirale dreht sich gegen
den Uhrzeigersinn und gibt den Korken frei (4).
• Stellen Sie den Korkenzieher immer wieder in die Ladeeinheit zurück, wenn Sie
damit fertig sind. Dadurch wird der Mechanismus geschützt, während er nicht
in Gebrauch ist.
ANMERKUNG:
Es wurde festgestellt, dass der elektrische Korkenzieher Probleme mit einem
kleinen Prozentsatz von Kunststo-/Synthetikkorken und unterdimensionierten
Korken haben kann. In diesem Fall sollte der Korken manuell entfernt werden.
LESEN SIE BITTE DIESE WICHTIGEN SICHERHEITSHINWEISE
Bei der Verwendung dieses elektrischen Geräts sind folgende
Sicherheitsvorkehrungen zu beachten, um die Gefahr von Feuer, Stromschlag
und Verletzungen zu verringern.
• Lesen Sie alle Anweisungen vor dem ersten Gebrauch durch und bewahren Sie
sie zum späteren Nachschlagen auf.
• Halten Sie Ihre Arbeitsäche sauber und frei von möglichen Gefahren, wenn Sie
den Korkenzieher verwenden oder wieder auaden.
• Verwenden Sie den Korkenzieher niemals in Feuchträumen oder in der Nähe
von Wasser, Spülen oder Wasserhähnen.
• Tauchen Sie den Korkenzieher oder das Ladegerät niemals in Wasser ein.
• Der Korkenzieher ist nur für den Innenbereich bestimmt. Setzen Sie den
Korkenzieher oder das Ladegerät nicht Regen oder anderen extremen
Bedingungen aus.
FRANÇAIS
TIREBOUCHON ELECTRIQUE
Nous vous recommandons de charger votre tire-bouchon pendant au moins huit
heures avant de l’utiliser pour la première fois. Veuillez suivre les instructions pour
le recharger ci-dessous.
RECHARGER VOTRE TIREBOUCHON
Branchez une extrémité du cordon de l’adaptateur dans la base du chargeur
et l’autre extrémité dans une prise. Placez le tire-bouchon dans le chargeur, en
veillant à ce qu’il soit bien en place et complètement engagé dans les connecteurs
de recharge. Il faudra environ 6 à 8 heures pour recharger votre tire-bouchon.
Lorsque le tire-bouchon est complètement rechargé, il peut être utilisé pour
ouvrir environ 30 bouteilles.
COMMENT UTILISER LE TIREBOUCHON
Le tire-bouchon est actionné par un simple bouton. Le bouton a deux fonctions.
Appuyez sur la partie inférieure du bouton pour retirer le bouchon d’une bouteille.
Appuyez sur la partie supérieure de l’interrupteur pour libérer le bouchon du
mécanisme après l’avoir retiré de la bouteille (1).
Avant d’utiliser le tire-bouchon, vous devez retirer toute pellicule du haut de
la bouteille à l’aide du coupe-capsule fourni (2).
• Placez le tire-bouchon sur le dessus de la bouteille de vin. Assurez-vous qu’il
reste aussi droit que possible en tout temps. Si vous tenez le tire-bouchon de
biais par rapport à la bouteille, le bouchon ne sera pas retiré correctement (3).
• Tenez fermement le tire-bouchon et appuyez sur la partie inférieure du bouton.
La mèche du tire-bouchon tourne dans le sens des aiguilles d’une montre, entre
dans le bouchon et l’enlève ensuite graduellement de la bouteille. Lorsque le
mécanisme du tire-bouchon s’arrête, le bouchon a été complètement retiré de
la bouteille.
• Soulevez le tire-bouchon de la bouteille. Pour retirer le bouchon, appuyez
simplement sur la partie supérieure de l’interrupteur. La spirale tourne dans le
sens antihoraire et libère le bouchon (4).
• Renvoyez toujours le tire-bouchon à l’unité de recharge lorsque vous en avez
ni. Cela protégera le mécanisme lorsqu’il n’est pas utilisé.
REMARQUE:
Il a été noté que le tire-bouchon électrique peut rencontrer des problèmes
avec un petit pourcentage de bouchons synthétiques et de bouchons sous-
dimensionnés. Dans ce cas, le bouchon doit être retiré manuellement.
VEUILLEZ LIRE CES AVERTISSEMENTS IMPORTANTS DE SÉCURITÉ.
Lors de l’utilisation de cet appareil électrique, les précautions de sécurité
suivantes doivent être prises en compte an de réduire les risques d’incendie,
d’électrocution et de blessures corporelles.
• Lisez toutes les instructions avant la première utilisation et gardez-les pour
référence ultérieure.
• Lorsque vous utilisez ou rechargez le tire-bouchon, gardez votre surface de
travail propre et exempte de dangers potentiels.
• N’utilisez jamais le tire-bouchon dans des endroits humides ou à proximité
d’eau, d’éviers ou de robinets.
• Ne plongez jamais le tire-bouchon ou le chargeur dans l’eau.
• Le tire-bouchon est conçu pour une utilisation en intérieur uniquement.
N’exposez pas le tire-bouchon ou le chargeur à la pluie ou à d’autres conditions
extrêmes.
ESPAÑOL
ABRIDOR DE VINOS ELÉCTRICO
Recomendamos que cargue su abridor al menos durante ocho horas antes de
usarlo por primera vez. Por favor, siga las instrucciones de recarga más abajo.
RECARGANDO SU SACACORCHOS
Coloque el extremo del cable adaptador a la bse de unidad de recarga y el otro en
el enchufe. Ponga el abridor en la unidad de recarga asegurándose de que está
rmemente en su posición y totalmente enganchado a los conectores de recarga.
llevará aproximadamente de 6 a 8 horas recargar su sacacorchos. Cuando esté
totalmente recargado, puede usarse para abrir aproximadamente 30 botellas.
CÓMO FUNCIONA EL SACACORCHOS
El sacacorchos funciona con un sencillo interruptor. El interruptor tiene dos
funciones. Presione la parte inferior para extraer el corcho de la botella. Presione
la parte superior del interruptor para liberar el corcho del mecanismo tras sacarlo
de la botella (1).
Antes de usar el sacacorchos debe quitar el recubrimiento de aluminio de la
parte superior de la botella usando el descapsulador que proporcionamos
(2).
• Coloque el abridor en la parte superior de la botella de vino. Asegúrese de que
quede lo más recto posible siempre. Si sostiene el abridor en ángulo a la botella,
no extraerá el corcho correctamente (3).
• Coloque el sacacorchos rmemente y presione la parte inferior del interruptor.
La espiral del abridor girará en dirección de las agujas del reloj, entra en el
corcho y gradualmente lo extrae de la botella. Cuando el mecanismo del abridor
se para, el corcho ha salido totalmente de la botella.
• Levante el abridor de la botellas. Para quitar el corcho, simplemente presione las
parte superior del interruptor. La espiral girará en sentido contrario a las agujas
del reloj y liberará el corcho (4).
• Vuelva a colocar el abridor en la unidad de recarga cuando haya terminado. Ésto
protegerá el mecanismo mientras no se use.
NOTA:
Se ha observado que el sacacorchos eléctrico puede sufrir problemas con un
pequeño porcentaje de corchos de plástico/sintéticos y de tamaño pequeño. En
este caso, deberían quitarse manualmente.
POR FAVOR, LEA ESTOS IMPORTANTES AVISOS DE SEGURIDAD.
Al usar este aparato eléctrico, deberían tenerse en cuenta las siguientes
medidas de seguridad para reducer el riesgo de fuego, shock eléctrico y
daño personal.
• Lea todas las instrucciones antes del primer uso y guárdelas para future
referencia.
• Al usar o recargar el abridor, mantenga la supercie de trabajo limpia y libre de
riesgos potenciales.
• Nunca use el sacacorchos en zonas húmedas o cerca de agua, fregaderos o
grifos.
• Nunca sumerja el abridor o cargador en agua.
• El sacacorchos es solo para uso en el interior. No exponga el sacacorchos o la
unidad de recarga a la lluvia u otras condicione extremas.
P
.
.
,
— . ,
, .
6 8 .
, 30 .
.
.
.
(1).
, (2).
• .
, .
, (3).
• , .
,
. ,
.
• .
.
(4).
• .
.
:
,
/ ,
.
.
.
,
.
•
.
• ,
.
•
, .
• .
• .
.
1
2
3
4


Join the conversation about this product
Here you can share what you think about the BergHOFF 1100197 Corkscrew. If you have a question, first carefully read the manual. Requesting a manual can be done by using our contact form.