1. Is the battery dead?
2. Is there incorrect battery
installation?
1. Is it at the MAIN UNIT SETUP or
another setting screen?
2. Are the relative positions and gap
between sensor and magnet correct?
3. Is the circumference correct?
4. Is the sensing distance too long or
the installation angle of the sensor
incorrect?
5. Is the sensor battery nearly
exhausted?
6. Is any strong interference source
nearby?
Did you leave main unit under direct
sunlight when not riding the bike for a
long period of time?
Is the temperature below 0°C (32°F)?
1. Replace the battery.
2. Be sure that the positive pole of the
battery is facing the battery cap.
1. Refer to the setting procedure and
complete the adjustment.
2. Refer to Installation(Fig.C-1.)and
re-adjust position and gap correctly.
3. Refer to "Circumference Setting"
and enter correct value.
4. Refer to
Installation(Fig.C-2.)
adjust
distance or angle between the main
unit and the sensor.
5. Replace with a new battery.
6. Move away from the source of
interference.
Refer to the "Main Unit Setup" and
initiate the computer again.
Place main unit in the shade to return
to normal state.
No adverse effect on data.
Unit will return to normal state when
the temperature rises.
Main unit No
display
No current speed
or
Incorrect data
Irregular display
LCD is black
Display is slow
PROBLEM CHECK ITEMS REMEDY
Sensor with Transmitter: No Contact Magnet sensor with Wireless Transmitter.
Wireless Sensing Distance: 70cm between the transmitter and the main unit.
Cross-Talking Interference: Within 40 cm (15.8"), no interference by 2 bicycles carrying similar
cycle computers, even when ridden side by side.
Wheel Circumference Setting: 1mm - 3999mm (1mm increment)
Operation Temperature: 0°C ~ 50°C (32°F ~ 122°F)
Storage Temperature: - 10°C ~ 60°C (14°F ~ 140°F)
Main Unit Battery Power: 3V battery x 1 (CR2032), battery operating life is about 2 years.
(Based on an average of 1.5 hours use per day)
Dimensions and Weight Main Unit: 46 x 54 x 16.5 mm / 31.5g
* The specifications and designs may be changed without notice.
TROUBLE SHOOTING
EN
N
N
2s
I NDEX:
Means press button N more than 2 seconds.
Means press button N Quickly {N=Keynumber:
o
Mode button.
f
SET button.}
MAIN UNIT SETUP
(Fig. 1)
FUNCTIONS
:
CURRENT SPEED
0.0 – 199.9 Km/h or 120.0 Mile/h +/- 1% (Typical)
1. The current speed is always displayed on the upper display when riding. It displays
current speed up to 199.9 KM/h or 120.0 M/h (for wheel diameters of over 24
inches).
2. When riding is stopped, the speed will continue to count 4 seconds to confirm that
no more wheel signals have been sent.
ODO: ODOMETER
0.0 – 99999.9 Km or Miles +/- 0.1%
1. The odometer cumulates the total distance as long as the bike is running.
2. The ODO data can not be cleared to zero by RESET operation.
RT:
RIDING TIME
0M00.0S-59M59.9S, 1H00M00S-99H59M59S +/- 0.003%
T-RT:
TOTAL RIDING TIME
0H00M – 9999H59M +/- 0.003%
The RT totals the riding time from the last RESET operation. The T-RT accumulates
total riding time from the beginning of computer use and can not be cleared by the
RESET operation.
:
12HR AM/PM OR 24HR CLOCK
1:00:00 – 12:59:59 AM/PM or 0:00:00 – 23:59:59 +/- 0.003%
It can display the current time in 12HR AM/PM or 24HR clock.
AS:
AVERAGE SPEED
0.0 – 199.9 Km/h / 0.0 – 120.0Mile/h +/- 0.1%
1. It is calculated from the DS divided by the RT. The average data counted is from the
last RESET to current point.
2. It displays "0.0" when RT is less than 4 sec., and is updated by about one second
when RT is over 4 seconds.
3. It displays an "Err" symbol when either the RT is over 100 hours or the DS is over
1,000km (or miles). Reset the unit in order to restart.
DS:
TRIP DISTANCE
0.00 – 999.99 Km or Miles +/- 0.1%
The DS function accumulates the distance data from the last RESET operation as long
as the bike is being ridden.
MS:
MAXIMUM SPEED
0.0 – 199.9 Km/h or 120.0 Mile/h +/- 1%
It shows the highest speed from the last RESET operation.
/ :
SPEED PACER
It flashes the " " speed pacer arrow while the current speed is higher than the
average speed and the down arrow " " flickers conversely.
* Remarks: All functions’ data are updated about one second.
INITIATE THE COMPUTER (ALL CLEAR)
1. Hold down the MODE button o and SET button f simultaneously for more than 3
seconds to initiate the computer and clear all data. IMPORTANT: Be sure to initiate
the computer before it is be used, otherwise the computer may run errors.
2. The LCD segments will be tested automatically after the unit is initiated.
3. Press the MODE button
o to stop LCD test, then the flickering "KM/h" appears.
UNIT SELECTION
Press MODE buttono to choose KM/h or M/h (Mile/h). Press the SET button f to
recognize either as desired.
ODO and T-RT DATA SETTING
1. The function is designed to re-key in former data of ODO and T-RT when battery is
replaced. A new user does not need to set this data. Each press of the SET button
f
skips one setting data process.
2. Data Setting Processes (621 741): (Fig. b)
a). The data is adjusted per each digit separately. The digit to be set flickers.
b). Press the MODE button
o to increase the digital value by 1.
c). To change the setting digit by hold down the MODE button
o
for more than 2 seconds.
d). Press the SET button
f
to store the data and change to the next setting.
CIRCUMFERENCE DATA SETTING
1. It displays the “c2155”of the default value 2155mm. Measure the value for your
wheel or refer to the quick table provided in the manual for your bicycle.
2. Adjust the circumference data as described in the Data Setting Processes.(Fig. b)
WHEEL CIRCUMFERENCE
a).Precise Measurement (Fig. a-1)
Roll the wheel until the valve stem is at its lowest point close to the ground, then
mark this first point on the ground. Get on the bicycle and have a helper push you
until the valve stem returns to its lowest point. Mark the second point on the
ground. Measure the distance between the marks. Enter this value to set the
wheel circumference.
b).Quick Table (Fig.a-2): Get a suitable circumference value from the table.
CLOCK SETTING
1. It displays the " " symbol at this clock setting.
2. 12H/AM, 12H/PM or 24H selection.
A quick press of the MODE button
o to select 12H/AM, 12H/PM or 24H. Hold down
the MODE button
o for more than 2 second to change to the clock setting screen.
3 Adjust the clock data according to the Data Setting Processes.(Fig. b)
BUTTON and NORMAL OPERATIONS
MODE BUTTON
o
(Fig. 2)
1. Quickly press this button to move in a loop sequence from one function screen to another.
2. It skips the T-RT, ODO function data while it
riding.
SET BUTTON
f
Press this button to get in or out the setting screens when you want to re-set to bike
circumference or the current time of the " ".
RESET OPERATION (Fig.3)
1. Hold down the MODE button
o
till the LCD digit is blanked, then release it. The computer will
reset AS, DS, RT and MS data from stored values to zero.
2. It cannot reset ODO, T-RT, .
MAIN UNIT SLIDE ON/OFF DETECTION
The computer has a slide on detecting switch (patents pending) to avoid noise interference
when the main unit is removed from the bracket. The main unit can receive the wheel signal
only when it is slid onto the bracket only.
AUTOMATIC STOP & POWER AUTO ON/OFF
The computer will automatically begin counting data upon riding and stop counting data when
riding is stopped. The flickering symbol " " indicates that the computer is at start status.
To preserve battery, this computer will automatically switch off and just displays the " " data
when it has not been used for about 30 minutes. The power will be turned on by pressing the
MODE button
o
.
CIRCUMFERENCE, CLOCK RE-SETTING
1. Press the MODE button
o
to change to one of the following mode displays:
a). Change to ODO screen to set Circumference.
b). Change to screen to set Clock.
2. Press the SET button
f
to enter to the relative setting screen.
3. Adjust the desired value according to the Data Setting Processes.(Fig. b)
4. Press the SET button
f
to store the desired data and complete the current setting.
MAIN UNIT BATTERY CHANGE
a). The symbol " " will appear to indicate the battery is nearly exhausted.
b). Replace the battery with a new battery within a few days after the symbol was appeared.
c). All data will be cleared when battery is replaced, but this computer allows you to re-key in
ODO and T-RT which you had rode after replacing battery, keeping record these data before
you remove the old battery.
d). Replace with a new CR2032 battery and initiate the main unit. (Fig. 1)
PRECAUTIONS
1. Don’t leave the main unit exposed to direct sunlight when not riding the bike.
2. Don’t disassemble the main unit or its accessories.
3. Check relative position and gap of sensor, magnet and main unit periodically.
4. Don’t use thinner, alcohol or benzine to clean the main unit or its accessories when they
become dirty.
5. Remember to pay attention to the road while riding.
English
SET
MODE
3s
ODO Setting
Circumference
Setting
T-RT Setting
CLOCK SETTING
Unit Selection
All Clear
BATTERY CHANGE
SET
MODE
Lock leverLock lever
PRESS
PULLPULL
CLICKCLICK
3V CR2032
S
2s
2s
1
OK !
2s
CLK
AS
DS
RT
MS
ODO
T
-
RT
RIDING STATUS.
STOP STATUS
ONLY.
RESET OPERATION (AS =0, DS =0, RT =0, MS =0)
2s
2s 2s
DATA SETTING PROCESSES (621 741)
+1
+1
+1
WHEEL CIRCUMFERENCE MEASUREMENT
a-1.
b.
2s
2s
2s
Coin
0681
WIRELESS COMPUTER
-12W
Tire Size
Circumference
Number
Circumference
Number
Tire Size
POPULAR TIRES CIRCUMFERENCE REFERENCE TABLE
1st
2nd
2.
3.
a-2.
1. Ist die Batterie leer?
2. Ist die Batterie falsch eingelegt?
1.Befinden Sie sich im
Einstellungsmenü des Hauptteil
oder einem anderen
Einstellungsmenü ?
2. Ist die Position des Sensor und der
Abstand zwischen dem Magneten
und dem Sensor ordnungsgemäß?
3. Ist der Radumfang korrekt
eingestellt?
4. Ist die Übertragungsdistanz zu
groß oder der eingestellte Winkel
des Sensors falsch?
5. Ist die Sensorbatterie fast verbraucht?
6. Gibt es eine starke,
konfliktträchtige Störquelle in der
Nähe?
Hatten Sie das Hauptteil in der
prallen
Sonne gelassen, während Sie nicht
gefahren sind?
Is die Temperatur unter 0°C (32°F)?
Hauptein-heit
hat keine
Anzeige
Keine aktuelle
Geschwindig-
keitsanzeige
oder falsche
Daten
Irreguläre
Anzeige
Schwarze
LCD-Anzeige
Die Anzeige
ist langsam
PROBLEM ZU ÜBERPRÜFENDE TEILE LÖSUNG
FEHLERBESEITIGUNG
1. Ersetzen Sie die Batterie.
2. Versichern Sie sich, daß der Pluspol der
Batterie zum Verschlußdeckel zeigt.
1.
Lesen Sie in der Einstellungsanleitung die
zu
vervollständigen Schritte nach.
2. Sehen Sie in der
ANBAU(Abb. C-1. )
nach
und machen Sie die entsprechenden
Korrekturen.
3.Sehen Sie unter der Radumfang -Einstellung
nach und geben Sie die korrekten Daten ein.
4.
Sehen Sie in ANBAU(Abb. C-2. )
nach und
machen
Sie die entsprechenden Längen-
oder
Winkelanpassungen
zwischen dem
Hauptteil und dem Sensor.
5. Ersetzen Sie die alte durch eine neue
Batterie.
6. Bewegen Sie sich von der Störquelle fort.
Sehen Sie in den Einstellungen für das
Hauptteil nach und starten Sie den Computer
entsprechend neu.
Legen Sie das Hauptteil in den Schatten, bis
die normale Anzeige wieder erscheint. Die
Daten werden hiervon nicht beeinflußt.
Die Haupteinheit kehrt in den normalen
Betrieb zurück, sobald die Temperatur steigt.
FUNKTIONEN
:
AKTUELLE GESCHWINDIGKEIT
0.0 – 199.9 km/h oder 120.0 meilen/h +/- 1% ( Typ)
1. Die aktuelle Geschwindigkeit wird während der Fahrt immer auf dem oberen
Bereich der Anzeige angezeigt. Es zeigt die aktuelle Geschwindigkeit bis zu 199.9
km/h oder 120.0 Meilen/h (bei Raddurchmessern von über 24 Inches) an.
2. Wenn Sie die Fahrt beenden, wird die Geschwindigkeit noch weitere 4 Sekunden
gemessen um sicherzustellen, daß keine weiteren Radsignale mehr gesendet
werden.
ODO:
KILOMETERZÄHLER
0.0 – 99999.9 km oder meilen +/- 0.1%
1. Der Kilometerzähler akkumuliert die Gesamtstrecke solange Sie Fahrrad fahren.
2. Die ODO-Werte können nicht mit den Reset-Vorgang auf Null gesetzt werden.
RT:
FAHRZEIT
0M00.0S-59M59.9S, 1H00M00S-99H59M59S +/- 0.003%
T-RT:
GESAMTFAHRZEIT
0H00M – 9999H59M +/- 0.003%
Die RT gibt die Fahrzeit vom letzen Reset-Vorgang an. Die T-RT akkumuliert die
Gesamtfahrzeit von Beginn der Benutzung des Computers und kann nicht durch
den Reset-Vorgang gelöscht werden.
: 12 HR AM/PM oder 24 HR Uhr
1:00:00 – 12:59:59 AM/PM oder 0:00:00 – 23:59:59 +/- 0.003%
Die aktuelle Uhrzeit kann entweder im 12-Stunden AM/PM oder 24-Stunden Modus
angezeigt werden.
AS:
DURCHSCHNITTSGESCHWINDIGKEIT
0.0 – 199.9 km/h / 0.0 – 120.0 meilen/h +/- 0.1%
1. Die Durchschnittsgeschwindigkeit wird aus der DS geteilt durch die RT berechnet.
Der Durchschnittswert wird vom letzten Reset-Vorgang bis zum aktuellen Standort
berechnet.
2. Die Anzeige "0.0" erscheint, wenn RT weniger als 4 Sekunden beträgt. Die Daten
werden, sobald RT über 4 Sekunden ist, in etwa jede Sekunde aktualisiert.
3. Das Symbol "ERR" erscheint entweder, wenn RT größer als 100 Stunden ist oder
DS mehr als 1 000 km (oder Meilen) beträgt. Betätigen Sie dann den
Reset-Vorgang, um den Fahrradcomputer neu zu starten.
DS:
FAHRSTRECKE
0.00 – 999.99 km oder meilen +/- 0.1%
Die DS-Funktion akkumuliert die Daten der Fahrstrecke, die mit dem Fahrrad seit
dem letzten Reset-Vorgang gefahren wurden.
MS:
HÖCHSTGESCHWINDIGKEIT
0.0 – 199.9 km/h oder 120.0 meilen/h +/- 1%
Zeigt die höchste Geschwindigkeit an, welche seit dem letzten Reset-Vorgang
gefahren wurde.
/ :
GESCHWINDIGKEITSANZEIGER
Es blinkt der " " -Geschwindigkeitsanzeiger auf, wenn die aktuelle Geschwindigkeit
schneller als die Durchschnittsgeschwindigkeit ist und der Pfeil " " blinkt im
entgegengesetzten Fall auf.
EINSTELLUNG DES HAUPTTEILES (Abb.1)
INDEX:
BEDEUTET DAS MAN DEN KNOPF N LÄNGER ALS 2 SEKUNDEN DRÜCKEN MUß.
BEDEUTET DAS MAN DEN KNOPF N SCHNELL DRÜCKEN MUß.
{
N= SCHLÜSSELNUMMER:
o
MODE-KNOPF.
f
SET-KNOPF. }
STARTEN DES COMPUTERS (ALLES LÖSEN)
1.
Drücken Sie den Mode-Knopf
o
und den Set-Knopf
f
gleichzeitig mindestens 3 Sekunden
lang, um den Computer zu starten und um alle Daten zu löschen.
Wichtig: Starten Sie den Computer auf diese Weise, bevor Sie ihn das erste Mal benutzen.
Andernfalls können Fehler auftreten.
2. Die LCD-Segmente werden automatisch nach dem Start getestet.
3. Drücken Sie den Mode-Knopf
o
um den LCD-Test zu stoppen. Anschließend erscheint das
flackernde "KM/h".
EINHEITSAUSWAHL
Drücken Sie den Mode-Knopf
o
um zwischen km/h und M/h (Meilen/h) zu wählen. Um Ihre
gewünschte Einheit kenntlich zu machen und diese zu Speichern, drücken Sie den
Set-Knopf
f
.
EINSTELLUNG VON ODO UND T-RT-DATEN
1.Diese Funktion ist dafür entwickelt, um ODO und T-RT-Daten nach einem Batteriewechsel
wieder eingeben zu können. Der Erstbenutzer braucht diese Daten nicht eingeben. Jedes
drücken des Set-Knopfes
f
überspringt eine der Dateneingabe.
2.Einstellverfahren der Werte (621 741): (Abb. b)
a). Jede Ziffer wird separat eingegeben. Die einzustellende Ziffer leuchtet auf.
b). Drücken Sie den Mode-knopf
o
um den Wert der Zahl um eine Einheit zu erhöhen.
c). Um die Ziffer zu wechseln, müssen Sie den Mode-knopf
o
länger als 2 Sekunden drücken.
d). Drücken Sie den Set-Knopf
f
um die Daten zu speichern und so in den nächsten
Einstellungsbereich zu wechseln.
EINSTELLUNG DER UMFANGSDATEN
1. Es wird "c2155" angezeigt für den eingestellten Standardwert von 2155 mm. Messen Sie
den Umfang Ihres Reifens oder entnehmen Sie ihn aus der Referenztabelle, welche den
Unterlagen Ihres Fahrrades beigefügt war.
2. Passen Sie die Umfangsdaten entsprechend der Beschreibung im Abschnitt
Einstellungsverfahren der Werte an.(Abb. b)
EINSTELLUNG DES RADUMFANGES
a).genaue Messung (Abb.a-1)
Drehen Sie das Rad so, daß sich das Ventil am untersten Punkt zum Boden befindet.
Markieren Sie am Boden diesen Punkt. Setzen Sie sich auf das Fahrrad und lassen Sie
sich von einem Helfer soweit nach vorne schieben bis das Ventil sich wieder am untersten
Punkt am Boden befindet. Markieren sie diesen zweiten Punkt ebenfalls. Messen Sie die
Entfernung zwischen den beiden Punkten und geben Sie diesen Wert ein, um den
Radumfang zu bestimmen.
b).Referenztabelle (Abb.a-2)
Wählen Sie einen passenden Wert für Ihren Radumfang aus der Refernztabelle.
EINSTELLEN DER UHRZEIT
1. Das “ ” Symbol zeigt den Einstellungsbereich der Uhrzeit an.
2. Auswahl des Anzeigemodus 12 Stunden/AM, 12 Stunden/PM oder 24 Stunden:
Schnelles drücken des Mode-Knopfes
o
läßt Sie zwischen der 12 Stunden/AM, 12
Stunden/PM oder der 24 Stunden Anzeige wählen. Halten Sie den Mode-Knopf
o
länger als
2 Sekunden gedrückt um zu den Uhrzeiteinstellungsbereich zu wechseln.
3. Geben Sie entsprechend des Einstellungsverfahren der Werte (Abb. b)die Uhrzeit ein.
BEDIENKNÖPFE UND NORMALE OPERATIONEN
MODE-KNOPF
o
(Abb. 2)
1. Schnelles drücken dieses Knopfes bringt Sie in einem Kreislauf in dem Sie alle Sequenzen
der Funktionsbildschirme nacheinander durchlaufen.
2. DieFunktionsdaten von T-RT, ODO.
SET-KNOPF
f
Um in die Einstellungsmenüs zu gelangen oder diese zu verlassen drücken Sie diesen Knopf,
wenn Sie den Radumfang, den Erinnerungswert zum Ölen, den Erinnerungswert zum
Schrauben nachziehen oder die aktuelle Zeit des " " ändern oder erneut eingeben wollen.
RESET-OPTIONEN
(Abb. 3)
1. Halten Sie den Mode -Knopf
o
solange gedrückt, bis die LCD-Anzeige leer ist und lassen
Sie ihn dann los. Der Computer wird nun die bisher gespeicherten Werte von AS, DS, RT und
MS mit Null ersetzen
2. Es können nicht die Werte von ODO, T-RT, .
EIN/AUS- SCHIEBESCHALTER DETEKTION DER HAUPTEINHEIT
Der Computer hat einen patentierten Schiebeschalter, der feststellt ob das Hauptteil
auf die
Halterung geschoben ist oder nicht. Diese Funktion ist um zu verhindern das es zu
Signalkonflikten kommt, wenn das Hauptteil von der Halterung entfernt wird. Die Haupteinheit
kann nur Signale vom Rad empfangen, wenn es auf die Halterung geschoben ist.
START/STOP AUTOMATIK & AUTOMATISCHES EIN-/AUSSCHALTEN DER STROMZUFUHR
Der Computer beginnt automatisch zu zählen, sobald Sie Ihre Fahrt starten und hört zu zählen auf,
wenn Sie ihre Fahrt beenden. Das flackernde " " Symbol zeigt an, daß der Computer im
Startmodus ist. Um die Batterie zu schonen, schaltet sich der Computer automatisch aus und zeigt
lediglich " " an, wenn er für länger als 30 Minuten nicht benutzt wurde. Die Stromzufuhr wird
durch drücken das Mode-Knopfes
o
wieder eingeschaltet.
NEUEINSTELLUNG DER UMFANGSDATEN, DER UHRZEIT
1.Drücken Sie den Mode-Knopf
o
um zu einer der folgenden Anzeigen zu wechseln:
a). Wechseln Sie zur ODO-Anzeige um die Umfangsdaten einzugeben.
b). Wechseln Sie zur -Anzeige um die Uhrzeit einzustellen
2.Drücken Sie den Set-Knopf
f
um die gewünschte Anzeige auszuwählen.
3. Es wird der vorherige eingegebene Wert angezeigt. Passen Sie diesen auf den gewünschten
Wert an, indem Sie den Einstellungsverfahren der Werte (Abb. b) folgen.
4. Drücken Sie den Set-Knopf
f
um die gewünschten Daten zu speichern und die aktuellen
Eingaben zu
beenden.
MAIN UNIT BATTERY CHANGE
a). Das Symbol " " erscheint, um anzuzeigen, daß die Batterie fast verbraucht ist.
b). Ersetzen Sie die alte Batterie innerhalb weniger Tage, nachdem das Symbol erschienen ist.
c). Durch das Wechseln der Batterie werden die ganzen Daten gelöst. Dieser Computer
ermöglicht Ihnen jedoch, in “ODO und “T-RT“, die Wiedereingabe der Werte, die Sie
gefahren sind. Notieren Sie sich diese Daten, bevor Sie die alte Batterie ersetzen.
d). Ersetzen Sie die Batterie mit einer neuen CR2032 Batterie und starten Sie nun das
Hauptteil erneut.
VORSICHTSMAßNAHMEN
1. Lassen Sie, wenn Sie nicht am fahren sind, das Hauptteil nicht in der prallen Sonne liegen.
2. Bauen Sie nicht das Hauptteil oder anderes Zubehör auseinander.
3. Überprüfen Sie in regelmäßigen Zeitabständen die Befestigung und Größe der Lücke
zwischen Magnet, Haupteinheit und Sensor.
4. Benutzen Sie keine Lösungsmittel, Alkohol oder Benzin zum reinigen des Hauptteiles, falls
es verschmutzt ist.
5. Denken Sie daran, auf den Straßenverkehr zu achten, während Sie Fahrrad fahren!
DE
Sensor mit Übertragungseinheit: kontaktloser Magnetsensor mit kabelloser Übertragungseinheit.
passende Fahrradgabelgröße: 12 mm bis 50 mm& (0.5” bis 2.0”&) Fahrradgabel.
kabellose Übertragungsstrecke:
70 cm zwischen der Übertragungseinheit und dem Hauptteil.
Signalkonflikte: Bei einem Abstand von 40cm (15.8”) treten, sogar wenn Sie
nebeneinander fahren, keine Signalkonflikte zwischen zwei
Fahrrädern mit ähnlichen Fahrradcomputern auf.
Einstellungsdaten des Reifendurchmessers:
1 mm – 3999 mm (Zunahme um 1 mm).
Betriebstemperatur: 0°C ~ 50°C (32°F ~ 122°F).
Lagertemperatur: - 10°C ~ 60°C (14°F ~ 140°F).
Batterie der Haupteinheit: Eine 3V Batterie. Die Lebensdauer beträgt in etwa 2 Jahre
(basierend auf einem durchschnittlichen Gebrauch von 1.5 Stunden
pro Tag).
Abmessung und Gewicht:
46 x 54 x 16.5 mm / 31.5g
* Die Spezifikation und das Design können jederzeit ohne Benachrichtigung geändert werden.
N
N
2s
Deutsch
1. La pile est-elle à plat?
2. La pile est-elle installée
correctement?
1.Êtes-vous à l’écran de
PROGRAMMATION DE L’UNITÉ
PRINCIPALE ou à un autre écran?
2.La position relative du détecteur et de
l’aimant, ainsi que l’écart entre les
deux, sont-ils appropriés?
3.La circonférence est-elle exacte?
4.La distance de détection est-elle trop
grande ou l’angle d’installation du
détecteur est-il incorrect?
5.La pile du détecteur est-elle presque
épuisée?
6.
Y a-t-il une source d’interférence
puissante à proximité?
Avez-vous laissé l’unité principale au
soleil pendant une longue période de
temps lorsque la bicyclette n’était pas
en marche?
La température est-elle sous 0 °C (32
°F)?
Rien ne
s’affiche sur
l’unité
principale
La vitesse
courante ne
s’affiche pas
ou les
données sont
incorrectes
Affichage
intermittent
L’afficheur est
noir
Affichage lent
PROBLÈME VÉRIFICATION MESURE CORRECTIVE
1.Changez la pile.
2.Assurez-vous que la borne positive de la pile
soit dirigée vers l’extérieur du compartiment.
1.
Reportez-vous à la procédure de
programmation et terminez le paramétrage.
2.Reportez-vous aux Montages(Fig C-1.), et
rajustez les positions et l’écart.
3.Reportez-vous à la section « Programmation
des données de la circonférence», et entrez
les bonnes valeurs.
4.Reportez-vous à la Montages(Fig C-2.) pour
ajuster la distance ou l’angle entre l’unité
principale et le détecteur.
5.Installez une nouvelle pile.
6.Écartez-vous de la source d’interférence.
Reportez-vous à la section
«PROGRAMMATION DE L’UNITÉ
PRINCIPALE» et réinitialisez le compteur.
Placez l’unité à l’ombre, pour qu’elle revienne
à l’état normal.Les données restent intactes.
L’unité reviendra à l’état normal lorsque la
température sera plus élevée.
FR
Détecteur avec transmetteur: Détecteur à aimant, sans contact, avec transmetteur sans fil.
Distance de détection sans fil: 70cm entre le transmetteur et l’unité principale.
Perturbation par diaphonie: en deçà de 40 cm (15.8 po), aucune interférence pour 2
bicyclettes munies de vélo-compteurs similaires, même si elles
roulent côte à côte.
Définition de la circonférence de la roue: 1 mm – 3999 mm (incrément: 1 mm)
Température d’exploitation: 0°C ~ 50°C (32°F ~ 122°F)
Température d’entreposage: - 10°C ~ 60°C (14°F ~ 140°F)
Pile de l’unité principale: 3V x 1 (CR2032). Durée de vie : environ 2 ans (selon une
moyenne d’utilisation de 1.5 heure par jour).
Dimensions et poids: Unité principale : 46 x 54 x 16.5 mm / 31.5 g
* Les spécifications et la conception peuvent changer sans préavis.
N
N
2s
DÉPANNAGE
FONCTIONS ET SPÉCIFICATIONS
: VITESSE COURANTE 0.0 – 199.9 km/h ou 120.0 mi/h +/- 1% (habituellement)
1. Lorsque vous roulez, la vitesse courante apparaît toujours dans la partie
supérieure du cadran. Cette zone cadran vitesse courante, jusqu’à 199,9 km/h
ou 120,0 mi/h (pour les roues d’un diamètre supérieur à 24 po).
2. Lorsque la bicyclette ne roule plus, le compteur continue de compter pendant 4
secondes pour ce qui est , afin de confirmer qu’il n’y a plus de signaux de
déplacement de la roue.
ODO:
Odomètre 0.0 – 99999.9 km ou miles +/- 0.1%
1. L’odomètre recueille les données sur la distance totale parcourue, tant et aussi
longtemps que la bicyclette roule.
2. La fonction RESET ne peut remettre à zéro les données ODO.
RT :
TEMPS DE PARCOURS 0M00.0S-59M59.9S, 1H00M00S-99H59M59S +/- 0.003%
T-RT:
TEMPS DE PARCOURS TOTAL 0H00M – 9999H59M +/- 0.003%
RT calcule le temps écoulé à rouler depuis la dernière opération RESET. La
fonction T-RT calcule le temps de parcours total, depuis le début de l’utilisation du
vélo-compteur. La fonction RESET ne peut remettre ces données à zéro.
: Horloge 12HR AM/PM ou 24HR
1:00:00 – 12:59:59 AM/PM ou 0:00:00 – 23:59:59 +/- 0.003%
Le cadran affiche indique l’heure courante selon le système de 12 heures a.m.
et 12 heures p.m. ou le système de 24 heures.
AS:
VITESSE MOYENNE 0.0 – 199.9 km/h / 0.0 – 120.0mi/h +/- 0.1%
1. On la calcule en divisant la distance parcourue (DS) par le temps de parcours
(RT). Les valeurs moyennes sont calculées depuis la dernière opération
RESET jusqu’au moment présent.
2. Le cadran affiche indique "0.0" lorsque RT est inférieur à 4 secondes. Cette
valeur est mise à jour d’une seconde environ, lorsque RT est supérieur à 4
secondes.
3. Le cadran affiche indique le symbole "Err" lorsque RT dépasse 100 heures ou
que DS dépasse 1000 km (ou miles). Réinitialisez le compteur pour remettre le
compteur à zéro.
DS: DISTANCE PARCOURUE 0.00 – 999.99 km ou miles +/- 0.1%
La fonction DS recueille les données sur la distance parcourue depuis la dernière
opération RESET, tant et aussi longtemps que la bicyclette roule.
MS: VITESSE MAXIMALE 0.0 – 199.9 km/h ou 120.0 mi/h +/- 1%
Cette fonction indique la vitesse la plus élevée, atteinte depuis la dernière opération
RESET.
/ : INDICATEUR DE VITESSE
La flèche vers le haut " " clignote sur l’afficheur lorsque la vitesse courante est plus
élevée que la vitesse moyenne; la flèche vers le bas " " clignote pour indiquer le contraire.
*Notas: Todos los datos y funciones se actualizan a cada segundo.
INITIALISER LE COMPTEUR
1. Maintenez les boutons MODEo et SET
f
enfoncés simultanément pendant plus de 3 secondes
pour initialiser le compteur et effacer toutes les données. IMPORTANT. - Assurez-vous
d’initialiser le compteur avant de l’utiliser, sinon il pourrait afficher des résultats erronés.
2. Les données des divers segments sont testées automatiquement après l’initialisation de l’unité.
3. Appuyez sur le bouton MODE
o pour arrêter le test, puis le clignotement de «KM/h».
SÉLECTION D’UNE UNITÉ DE MESURE
Appuyez sur le bouton MODEo pour choisir KM/h ou M/h (mile/h). Appuyez ensuite sur le bouton
SET
f
pour enregistrer votre choix.
PROGRAMMATION DE ODO ET T-RT
1. Cette fonction est conçue de façon à vous permettre de réintroduire les données de ODO et T-RT
mémorisées avant le changement de la pile. Un nouvel utilisateur n’a pas à programmer ces
données. À chaque fois que vous appuyez sur le bouton SET
f
le système saute une étape de
programmation des données.
2. Étapes de programmation des données (621 741): (Fig b)
a). Chaque chiffre des données est réglé séparément. Le chiffre qui doit être modifié clignote.
b). Appuyez sur le bouton MODE
o pour faire avancer d’un (1) incrément la valeur numérique.
c). Pour changer le chiffre clignotant, maintenez le bouton MODE
o enfoncé pendant plus de 2
secondes.
d). Appuyez sur le bouton SET
f
pour mémoriser les données entrées et passer au prochain
paramètre.
PROGRAMMATION DES DONNÉES DE LA CIRCONFÉRENCE
1. La valeur par défaut est 2155 mm, représentée par “c2155”. Mesurez la valeur correspondant à
votre roue ou reportez-vous au tableau sommaire fourni dans le guide d’utilisation de votre
bicyclette.
2. Réglez les données relatives à la circonférence en suivant les instructions données dans la
section Étapes de programmation des données.(Fig b)
CIRCONFÉRENCE DE LA ROUE
a).Mesure précise (Fig. a-1)
Faites tourner la roue jusqu’à ce que la tvalve soit à son point le plus bas, près du sol, puis
marquez ce premier point sur le sol. Montez sur la bicyclette et demandez à quelqu’un de vous
pousser jusqu’à ce que la tubulure de valve revienne à son point le plus bas. Marquez le
deuxième point sur le sol. Mesurez la distance entre les deux marques. Entrez cette valeur
pour programmer la circonférence de la roue.
b).Calcul rapide (Fig. a-2) - Choisissez la valeur de circonférence appropriée dans le
tableau.
PROGRAMMATION DE L’HORLOGE
1. Le système affiche le symbole " " pour indiquer le réglage de l’horloge.
2. Choix offert : système de 12 heures a.m./12 heures p.m. ou de 24 heures.
Appuyez rapidement sur le bouton MODE
o pour choisir 12H/AM, 12H/PM ou 24H. Maintenez
le bouton MODE
o enfoncé pendant plus de 2 secondes pour obtenir l’écran de programmation
de l’horloge.
3. Entrez les données d’horloge voulues, en suivant les points décrits à la section Étapes de
programmation des données.(Fig b)
BOUTONS ET EXPLOITATION NORMALE
BOUTON MODE
o
(Fig. 2)
1. Appuyez rapidement sur ce bouton pour passer d’une fonction à une autre.
2. Ce bouton vous permet de voyager entre les fonctions T-RT, ODO, tout en roulant.
BOUTON SET
f
Appuyez sur ce bouton pour afficher les divers écrans de programmation (ou en sortir), afin de
changer la circonférence de la roue, la distance pour et l’heure courante " ".
FONCTION RESET
(Fig. 3)
1. Maintenez le bouton MODEo enfoncé jusqu’à ce que l’afficheur soit complètement vide. le
compteur réinitialise alors à zéro les données relatives AS, DS, RT et MS.
2. Cette fonction ne permet pas de réinitialiser les données relatives à ODO, T-RT, .
DÉTECTION DE MISE EN PLACE DE L’UNITÉ PRINCIPALE SUR LE SUPPORT
le compteur est muni d’un bouton de détection de mise en place (brevet en instance), qui permet
d’éviter l’interférence des bruits lorsque l’unité ne repose plus sur le support. L’unité ne peut
recevoir le signal de la roue que si elle est en place sur le support.
MARCHE/ARRÊT AUTOMATIQUE ET MISE SOUS/HORS TENSION AUTOMATIQUE
le compteur commence à calculer les données dès que la bicyclette roule, et arrête de compter à
l’arrêt de la bicyclette. Le symbole " " clignotant indique que le compteur est à l’état de départ.
Afin de prolonger la vie de la pile, le compteur se ferme automatiquement et affiche simplement les
données " " après une période d’inactivité d’environ 30 minutes. Pour remettre le compteur en
marche, appuyez sur le bouton MODEo.
REPROGRAMMATION DES FONCTIONS CIRCONFÉRENCE ET HORLOGE
1. Appuyez sur le bouton MODEo pour passer à l’un des modes d’affichage suivants :
a). Passez à l’écran ODO pour programmer la circonférence.
b). Passez à l’écran " " pour programmer l’horloge.
2. Appuyez sur le bouton SET
f
pour obtenir l’écran de programmation approprié.
3.Programmez la valeur désirée en suivant les points décrits à la section Étapes de programmation
des données.(Fig b)
4.Appuyez sur le bouton SET
f
pour mémoriser les données entrées et terminer votre
programmation.
CHANGEMENT DE LA PILE DE L’UNITÉ PRINCIPALE
a). Le symbole " " s’affiche pour indiquer que la pile est presque épuisée.
b). Changez la pile dans les jours qui suivent l’affichage du symbole.
c). Lors d’un changement de pile, toutes les données sont effacées, mais cet ordinateur vous
permet de réintroduire les données ODO et T-RT pertinentes au parcours effectué avant le
remplacement de la pile. Vous devez donc prendre ces données en note avant de retirer la pile
usagée.
d). Installez une nouvelle pile CR2032 et réinitialisez le compteur. (Fig. 1)
PRÉCAUTIONS
1. Ne laissez pas l’unité principale au soleil si la bicyclette ne roule pas.
2. Ne démontez pas l’unité principale ou ses accessoires.
3. Vérifiez, de façon périodique, la position relative du détecteur, de l’aimant et de l’unité principale,
ainsi que l’écart entre les deux.
4. N’utilisez ni diluants, ni alcool, ni benzène pour nettoyer l’unité ou ses accessoires lorsque la
saleté s’est incrustée.
5. N’oubliez pas de surveiller la route lorsque vous roulez.
PROGRAMMATION DE L’UNITÉ PRINCIPALE (Fig.1 )
SIGNIFIE : APPUYEZ SUR LE BOUTON N PENDANT PLUS DE 2 SECONDES.
SIGNIFIE : APPUYEZ RAPIDEMENT SUR LE BOUTON N
{ N=NUMÉRO DE BOUTON :
o
Bouton MODE,
f
Bouton SET }
I NDEX :
Français
FUNCTIES en SPECIFICATIES
: HUIDIGE SNELHEID
0.0 – 199.9 Km/u of 120.0 Mijl/u +/- 1% (Meestal)
1. De huidige snelheid wordt tijdens het rijden altijd op het bovenste scherm
aangegeven. Met een wielomtrek groter dan 24 inch kan de huidige snelheid
worden aangegeven tot 199.9 Km/u of 120.0 Mijl/u.
2. Als u bent gestopt, zal er voor de snelheid nog 4 seconden worden doorgeteld om
na te gaan of het wiel geen signalen meer afgeeft.
ODO: ODOMETER
0.0 – 99999.9 Km of Mijl +/- 0.1%
1. De odometer houdt de totale afstand bij die de fiets heeft afgelegd.
2. De ODO-gegevens kunnen niet door een RESET worden gewist.
RT: RIJTIJD
0M00.0S-59M59.9S, 1H00M00S-99H59M59S +/- 0.003%
T-RT: RIJTIJD EN TOTALE RIJTIJD
0H00M – 9999H59M +/- 0.003%
De RT is de totale rijtijd berekend vanaf de laatste RESET. De T-RT is de totale rijtijd
vanaf het eerste gebruik van de computer en kan niet worden gewist met een
RESET.
: 12-UURS AM/PM OF 24-UURS KLOK
1:00:00 – 12:59:59 AM/PM of 0:00:00 – 23:59:59 +/- 0.003%
De huidige tijd kan volgens het 12- of 24-uren systeem worden weergegeven.
AS: GEMIDDELDE SNELHEID
0.0 – 199.9 Km/u / 0.0 – 120.0 Mijl/u +/- 0.1%
1. Deze wordt berekend door DS door RT te delen. Hiervoor worden de gegevens
vanaf de laatste RESET gebruikt.
2. De display zal "0.0" aangeven als RT minder is dan 4 seconden. Zodra RT langer
is dan 4 seconden, worden de gegevens bijgewerkt.
3. Als RT groter is dan 100 uur, of als DS groter is dan 1.000 km (of mijl), zal het
scherm een "Err"-symbool weergeven. Reset het apparaat om opnieuw te
beginnen.
DS: RITAFSTAND
0.00 – 999.99 Km of Mijl +/- 0.1%
Zolang de fiets wordt bereden zal de DS-functie de afstandsgegevens optellen.
MS: Maximum Snelheid
0.0 – 199.9 Km/u of 120.0 Mijl/u +/- 1Km/Mijl of 1%
Laat de hoogste snelheid sinds de laatste RESET zien.
/ : SNELHEIDSPACER
Als de huidige snelheid hoger dan de gemiddelde snelheid ligt zal de " " -pijl van
de snelheidspacer knipperen. Ligt de snelheid lager, dan knippert de " " .
* Opmerkingen: De gegevens van alle functies worden elke seconde bijgewerkt.
DE COMPUTER INSTALLEREN (ALLES WISSEN)
1. Om de computer te installeren en alle gegevens te wissen, dient u langer dan 3 seconden
tegelijkertijd op de MODE-knop
o
en de SET-knop
f
te drukken. BELANGRIJK: Als u de
computer voor gebruik niet installeert, kan de computer foutmeldingen gaan geven.
2. Nadat de eenheid is geïnstalleerd zullen automatisch de LCD-segmenten worden getest.
3. Druk op de MODE knop
o
om de LCD-test te stoppen. "KM/h" zal gaan knipperen.
EENHEIDSKEUZE
Druk op de MODE-knop
o
om te kiezen uit KM/h (Km per uur) of M/h (Mijl per uur). Druk op de
SET-knop
f
om uw keuze vast te leggen.
INSTELLING ODO en T-RT-GEGEVENS
1. U kunt met deze functie na het vervangen van de batterij de gereden ODO en T_RT opnieuw
invoeren. Nieuwe gebruikers hoeven deze gegevens niet in te stellen. Met elke druk op de
SET-knop
f
slaat u één stap in het proces van gegevensinstellingen over.
2. Procedures voor Gegevensinstellingen (621 741): (Fig b)
a). De gegevens worden getal voor getal aangepast. De positie in het getal die wordt
ingesteld, knippert.
b). Druk op de MODE-knop
o
om de digitale waarde met 1 te verhogen.
c). Om de in te stellen positie te wijzigen, dient u langer dan 2 seconden op de MODE-knop
o
te drukken.
d). Druk op de SET-knop
f
om de gegevens op te slaan en naar de volgende instelling te gaan.
INSTELLING GEGEVENS OMTREK
1. Het scherm zal "c2155" aangeven voor de standaardwaarde van 2155mm. Meet de omtrek van
uw wiel of maak gebruik van de tabel in de gebruiksaanwijzing van uw fiets.
2. Pas de gegevens voor de omtrek aan zoals wordt beschreven in de Procedures voor
Gegevensinstellingen. (Fig b)
WIELOMTREK
a).
Nauwkeurige meeting (Fig. a-1)
Draai het wiel totdat het ventiel op zijn laagste punt staat en markeer dit punt op de grond.
Stap op de fiets en laat u duwen totdat het ventiel weer op zijn laagste punt staat. Markeer het
tweede punt op de grond. Meet de afstand tussen de markeringen. Voer deze waarde in.
b).
Tabel (Fig. a-2): Neem de wielomtrek uit de tabel over.
INSTELLING KLOK
1. Voor de klokinstellingen wordt het symbool " " weergegeven.
2. Selectie 12H/AM, 12H/PM en 24H.
Met een snelle druk op de MODE-knop
o
selecteert u 12H/AM, 12H/PM of 24H. Als u de
MODE-knop
o
langer dan 2 seconden indrukt, gaat u naar het scherm voor klokinstellingen.
3. Pas de gegevens voor de klok aan volgens de Procedures voor Gegevensinstellingen.(Fig b)
KNOPPEN en NORMALE FUNCTIES
MODE-KNOP
o
1. Druk kort op deze knop om door de functies heen te lopen.
2. Tijdens het rijden kunnen met de knop de gegevens voor T-RT, ODO, worden overgeslagen.
SET-KNOP
f
Druk op deze knop om de instellingsschermen te verlaten en de wielomtrek, de herinneringen
voor of de huidige tijd weer te geven " ".
RESET
(Fig. 3)
1. Druk op de MODE-knop
o
totdat de LCD-positie wordt gewist en laat vervolgens de knop
los. De computer zal de waarden van AS, DS, RT en MS terugzetten op nul.
2. ODO en T-RT, worden overgeslagen.
SCHUIFDETECTIE COMPUTER
De computer heeft een schuifdetectie-schakelaar (patent aanvraagd). Hiermee kan, als de
computer van de bracket is verwijderd, interferentie worden voorkomen. Het signaal van het
wiel kan alleen worden ontvangen als de computer op de bracket geschoven is.
AUTO START/STOP & AUTO POWER AAN/UIT
De computer zal automatisch gegevens gaan verzamelen zodra u begint te rijden. Als u stopt
met rijden, stopt de computer ook. Het knipperende symbool " " geeft aan dat de computer
klaar is om te starten.
Als de eenheid meer dan 30 minuten niet gebruikt is, zal de eenheid zichzelf automatisch
uitschakelen (dit om de batterij te sparen). Hierna zullen de " " -gegevens worden
weergegeven. De eenheid kan weer aangezet worden door op de MODE-knop
o
te drukken‚.
OPNIEUW INSTELLEN VAN OMTREK, KLOK
1. Druk op de MODE-knop
o
om naar één van de volgende modi te gaan.
a). Ga naar het ODO-scherm om de Omtrek in te stellen.
b). Ga naar het -scherm om de Klok in te stellen.
2. Druk op de SET-knop
f
om het scherm voor relatieve instellingen in te gaan.
3. Het scherm zal de vorige ingestelde waarde weergeven; pas de waarde naar wens aan
volgens de Procedures voor Gegevensinstellingen.
4. Druk op de SET-knop
f
om de gewenste gegevens op te slaan en de huidige instelling af te ronden.
VERVANGING BATTERIJ COMPUTER
a). Als de batterij bijna op is zal het symbool " " verschijnen.
b). Vervang de batterij binnen een paar dagen nadat dit symbool is verschenen.
c). Als de batterij vervangen wordt zullen alle gegevens worden gewist. U kunt met deze computer
echter de ODO en T-RT die u gereden heeft na het vervangen van de batterij opnieuw
invoeren.
Het is daarom van belang deze gegevens te noteren voordat de oude batterij wordt verwijderd.
d). Plaats een nieuwe batterij CR2032 in het compartiment aan de achterkant van de computer, met
de positieve (+) kant naar de batterijdeksel. Installeer de computer. (Fig. 1)
VOORZORGSMAATREGELEN
1. De computer niet blootstellen aan direct zonlicht als u de fiets niet gebruikt.
2. Haal de computer of de accessoires niet uit elkaar.
3. Controleer regelmatig de relatieve posities van en de afstanden tussen de sensor, de magneet
en de computer.
4. Gebruik bij het schoonmaken van de computer of accessories geen verdunner, alcohol of
benzine.
5. Blijf tijdens het rijden op de weg letten.
1.Is de batterij leeg?
2.Is de batterij fout geinstalleerd?
1.Zit u in het scherm installatie computer
of een ander installatiescherm?
2.Zijn de relatieve posities van en de
grootte tussen de sensor en de
magneet juist?
3.Is de wielomtrek juist?
4.Is de afstand tussen de zender en de
computer te groot of is de sensor
onder een verkeerde hoek
geïnstalleerd?
5.Is de batterij van de sensor bijna op?
6.Bent u in de buurt van een sterk
interfererend apparaat?
Heeft u de computer lange tijd in direct
zonlicht laten staan?
Is de temperatuur lager dan 0°C (32°F)?
Geen beeld
Geen Huidige
Snelheid of
Onjuiste
gegevens
Onregelmatig-
h
eden op scherm
Zwart LCD
Display is
traag
PROBLEEM TE CONTROLEREN ONDERDELEN OPLOSSING
1.Vervang de batterij.
2.Zorg dat de positieve kant van de batterij
is gericht naar de batterijdeksel.
1.Lees de installatieprocedure en
voer de
benodigde aanpassingen uit.
2.Zie
Installatie
(
Fig.C-1.)
pas de posities en
de afstanden opnieuw aan.
3.Lees "Instelling Wielomtrek" en voer de
juiste waarde in.
4.Zie Installatie (Fig.C-2.) en pas de
afstand en de hoek tussen de computer
en de sensor aan.
5.Vervang de batterij.
6.Verwijder u van de bron van interferentie.
Lees "Installatie computer" en installeer de
computer opnieuw.
Plaats computer in de shaduw om het
probleem te verhelpen.
De gegevens zullen niet worden aangetast.
Het apparaat zal weer normaal
functioneren als de temperatuur stijgt.
Sensor met zender: Contactloze magneetsensor met draadloze zender.
Bereik draadloos signaal: 70cm tussen de zender en de computer.
Overspraak: Zolang afstand groter is dan 40 cm (15.8"): geen interferentie tussen
twee fietsen met gelijksoortige fietscomputers, zelfs niet als deze
gelijk op rijden.
Instelling wielomtrek: 1mm - 3999mm (in stappen van 1mm)
Operationele temperatuur: 0°C ~ 50°C (32°F ~ 122°F)
Bewaartemperatuur: - 10°C ~ 60°C (14°F ~ 140°F)
Batterij computer: 3V batterij x 1 (CR2032). Levensduur ongeveer 2 jaar. (Ervan
uitgaande dat de batterij gemiddeld 1.5 uur per dag gebruikt wordt)
Afmetingen en Gewicht : 46 x 54 x 16.5 mm / 31,5g
*
De specificaties en het ontwerp kunnen zonder voorafgaande kennisgeving
worden gewijzigd.
Nederlands
BETEKENT DAT DE KNOP N LANGER DAN 2 SECONDEN INGEDRUKT MOET WORDEN.
BETEKENT DAT DE KNOP N KORT INGEDRUKT MOET WORDEN
{N=TOETSNUMMER:
o
MODE-Knop.
f
SET-Knop. }
I NDEX:
N
N
2s
INSTALLATIE COMPUTER (Fig. 1)
PROBLEMEN
Controleer het volgende voordat u het apparaat ter reparatie aanbiedt.
NL
FUNCIONES Y ESPECIFICACIONES
: VELOCIDAD ACTUAL 0.0 – 199.9 Km./h o 120.0 Milla/h +/- 1% (Tipico)
1. La velocidad actual aparece siempre en el visor superior cuando se está montando
la bicicleta. Muestra la velocidad actual hasta 199.9 KM./h o 120.0 M/h (para ruedas
de diámetros de más de 24 pulgadas).
2. Cuando para de montar, la velocidad se mantendrá durante 4 segundos para
confirmar que no se han enviado más señales desde las ruedas.
ODO:
CUENTAKILÓMETROS 0.0 – 99999.9 Km. O Millas +/- 0.1%
1. El cuentakilómetros acumula la distancia total en tanto en cuanto la bicicleta está
en movimiento.
2. Los datos del ODO no se pueden borrar mediante el reseteo.
RT:
TIEMPO EN LA BICICLETA 0M00.0S-59M59.9S, 1H00M00S-99H59M59S +/- 0.003%
T-RT:
TIEMPO TOTAL EN LA BICICLETA 0H00M – 9999H59M +/- 0.003%
El RT totaliza el tiempo en la bicicleta desde la ultima operación de reseteo. El T-RT
acumula tiempos totales en la bicicleta desde el principio del uso del ordenador y no
se puede borrar mediante el reseteo.
: RELOJ DE 12HR AM/PM O 24HR
1:00:00 – 12:59:59 AM/PM o 0:00:00 – 23:59:59 +/- 0.003%
Puede mostrar la hora actual en formato de 12HR AM/PM o 24HR.
AS:
VELOCIDAD MEDIA 0.0 – 199.9 Km./h / 0.0 – 120.0 Milla/h +/- 0.1%
1. Se calcula dividiendo el DS por el RT. Los datos medios se cuentas desde el ultimo
reseteo hasta el punto actual.
2. Muestra "0.0" cuando el RT es menor de 4 sec., y se actualiza por cada segundo
cuando el RT es mayor de 4 segundos.
3. Muestra el símbolo "Err" bien porque el RT ha pasado las 100 horas o el DS ha
pasado los 1,000 km. (o millas). Resetee la unidad para volver a empezar.
DS:
DISTANCIA DEL VIAJE 0.00 – 999.99 Km. o Millas +/- 0.1%
La función DS acumula los datos de la distancia desde el ultimo reseteo mientras
que se está montando en bici.
MS:
VELOCIDAD MÁXIMA 0.0 – 199.9 Km./h o 120.0 Milla/h +/- 1%
Muestra la velocidad máxima desde el ultimo reseteo.
/ :
REGULADOR DEL PASO DE LA VELOCIDAD
Muestra la flecha de " " regulación del paso cuando la velocidad actual es
superior a la media y la flecha para abajo " " muestra lo contrario.
* Notas: Todos los datos y funciones se actualizan a cada segundo.
INSTALACION DE LA UNIDAD PRINCIPAL (Fig. 1)
SIGNIFICA APRETAR EL BÓTON N MÁS DE 2 SEGUNDOS.
SIGNIFICA APRETAR EL BÓTON N RÁPIDAMENTE.
{N = NÚMERO DE ILAVE:
o
Botón MODO.
f
Botón SET.}
INICIE EL ORDENADOR (TODO LIMPIO)
1. Mantenga apretado el botón MODO
o
y el botón INSTALAR (SET)
f
al mismo tiempo
durante más de 3 segundos para inicializar el ordenador y borrar los datos. IMPORTANTE:
Asegúrese de iniciar el ordenador antes de que sea usado, sino puede dar mensajes
de error.
2. Los segmentos LCD serán comprobados automáticamente después de que la unidad sea iniciada.
3. Apriete el botón MODO
o
para parar el la prueba LCD, después los "KM./h" parpadeantes.
SELECCIÓN DE UNIDAD
Apriete el Botón MODO
o
para escoger entre KM./h o M/h (Millas/h). Apriete el botón INSTALAR
f
para dar el visto bueno a la selección.
ODO y T-RT INSTALACION DE DATOS
1. La función esta diseñada para reteclear datos de ODO y T-RT cuando se substituye la pila.
Un nuevo usuario no necesita instalar estos datos. Cada vez que se aprieta el botón
INSTALAR
f
se pasa un paso del proceso de instalación.
2. Procesos de instalación de datos (621 741): (Fig. b)
a). Los datos se ajustan para cada dígito de forma separada. El dígito que se está instalando
parpadea.
b). Apriete el botón MODO
o
para aumentar el valor del dígito de uno en uno.
c). Para modificar el dígito de instalación mantenga apretado el botón MODO
o
durante más
de 2 segundos.
d). Apriete el botón INSTALAR
f
para almacenar los datos y pasar a la siguiente instalación.
INSTALACION DE LOS DATOS DE LA CIRCUNFERENCIA
1. aparece el valor por defecto de "c2155" 2155 mm. Mida la distancia de su rueda o mírelo en
la tabla de referencia rápida que se entrega con el manual de su bicicleta.
2. Ajusto los datos de la circunferencia como se describe en los Procedimientos de Instalación de datos.
CIRCUNFERENCIA DE LA RUEDA
a).Medición Precisa (Fig. a-1)
Ruede la rueda hasta que el sistema de válvulas esté en su punto más bajo más cerca del
suelo, marque este primer punto en el suelo. Subase en la bicicleta y haga que alguien le
empuje hasta que la válvula de roda vuelva a su punto más bajo. Marque este segundo
punto en e l suelo. Mida la distancia entre las marcas. Introduzca este valor para marcar la
circunferencia de la rueda.
a).Tabla Rápida (Fig. a-2): Obtenga un valor adecuado de circunferencia para la tabla.
INSTALACION DEL RELOJ
1. El símbolo que aparece en la instalación del reloj es el siguiente " ".
2. Selección de 12H/AM, 12H/PM o 24H.
Apriete rápidamente el botón MODO
o
para seleccionar 12H/AM, 12H/PM o 24H. Mantenga
apretado el botón MODO
o
durante más de 2 segundos para modificar la instalación del reloj.
3. Ajuste los datos del reloj según los
Procedimientos de instalación de datos.
(Fig b)
BOTON Y OPERACIONES NORMALES
BOTÓN MODO
o
(Fig. 2)
1. Apriete rápidamente este botón para moverse en ciclos de una función de la pantalla a la siguiente.
2. Omite las funciones de datos de T-RT, ODO, mientras se monta.
BOTÓN INSTALAR
f
Apriete este botón para entrar o salir de las pantallas de instalación cuando quiera resetear
la circunferencia de la bici u hora actual del " ".
OPERACION DE RESETEO
(Fig. 3)
1. Mantenga apretado el botón MODO
o
hasta que el dígito LCD quede en blanco, después
suéltelo. El ordenador reseteará los datos almacenados en AS, DS, RT y MS a cero.
2. No puede resetear ODO, T-RT, .
DETECCION DE CHASIS ON/OFF EN LA UNIDAD PRINCIPAL
El ordenador tiene un conmutador de detección (pendiente de patente) para evitar
interferencias sonoras cuando se retira la unidad principal del soporte. La unidad principal
solo puede recibir señal de la rueda cuando esta en el soporte.
INICIO/PARADA AUTOMATICA Y AUTO ENCENDIDO/APAGADO
El ordenador empezará a contar datos en cuanto se monte y parará de contar en cuanto
pare. El símbolo parpadeante " " indica que el ordenador está en modo empezar.
Para ahorrar energía, este ordenador se apagará automáticamente mostrando el símbolo
" " cuando el ordenador no se utilice durante 30 minutos. Se volverá a encender
apretando el botón MODO
o
.
REINSTALACIÓN DE LA CIRCUNFERENCIA, EL RELOJ
1. Apriete el botón MODO
o
para cambiar una de las siguientes pantallas.
a). Cambiar a la pantalla ODO para instalar la Circunferencia.
b). Cambiar a la pantalla para instalar el Reloj.
2. Apriete el Botón INSTALAR
f
para entrar en la respectiva pantalla de instalación.
3. Ajuste el valor deseado según los Procedimientos de Instalación de datos.(Fig. b)
4. Apriete el Botón INSTALAR
f
para almacenar los datos deseados y completar la instalación actual.
CAMBIO DE PILA DE LA UNIDAD PRINCIPAL
a). El símbolo " " aparecerá para indicar que casi no queda pila.
b). Cambie la pila por una nueva a los pocos días de que aparezca el símbolo.
c). Todos los datos se eliminaran al cambiar la pila. Pero este ordenador permite reintroducir
en ODO y T-RT que ha marcado después de cambiar la pila, manteniendo la información
de estos datos mientras se cambia.
d). Cámbiela por una nueva CR2032 e inicie la unidad principal. (Fig. 1)
PRECAUCIONES
1. No deje la unidad principal expuesta al sol cuando no esté montando la bici.
2. No desmonte la unidad principal o sus accesorios.
3. Compruebe la posición relativa del sensor, imán y unidad principal periódicamente.
4. No utilice alcohol o bencina pata limpiar la unidad principal o sus accesorios cuando se ensucien.
5. Recuerde prestar atención a la carretera mientras monte.
PROBLEMA COMPROBAR SOLUCION
No se muestra
la unidad
principal
No muestra
la velocidad
actual o
datos
erróneos
Presentación
Irregular
El LCD está
negro
Muestra muy
despacio
1. Se ha acabado la pila?
2. Ha instalado la pila mal?
1. Está en la instalacion de la unidad
principal o en otra pantalla de
instalación?
2. Son correctas las posiciones y espacios
relativos entre el sensor y el imán?
3. Es correcta la circunferencia?
4. Es la distancia demasiada o el ángulo de
instalación del sensor incorrecto?
5. Esta la pila del sensor casi agotada?
6. Hay alguna fuente de interferencias
cerca?
Dejo la unidad principal expuesta
directamente a la luz del sol cuando no
estaba
montando la bicicleta y durante
un
periodo prolongado de tiempo?
Es la temperatura inferior a 0°C (32°F)?
1. Cambie la pila.
2. Asegúrese de que el polo positivo esta
de cara a la tapa de la pila.
1.Vea el procedimiento de instalación y
complete el ajuste.
2.Vea la Instalación(Fig.C-1) reajuste la
posición y el espacio correctamente.
3.Ve la "Instalación de a
Circunferencia " e
introduzca el valor adecuado.
4.
Vea la
Instalación(Fig.
C-2)
para ajustar la
distancia o el ángulo entre la unidad principal
y el sensor.
5.
Cámbiela por una pila nueva
6.Retirarlo de la fuente de interferencia.
Vea la "Instalación de la Unidad Principal
" e inicie el ordenador otra vez.
Ponga la unidad principal a la sombra para
que vuelva a su estado normal.
Los datos no se pierden.
La unidad volverá a su estado normal
cuando suba la temperatura.
Sensor con Transmisor:
No hay Contacto con el sensor del Imán y con el
Transmisor inalámbrico.
D
istanci
a
con sensor inalámbrico:
70 cm entre el transmisor y la unidad principal.
Dentro de 40 cm (15.8"), no hay interferencias por el hecho de
que 2 bicicletas lleven ordenadores similares, aunque vayan
pegadas.
I
nstalación de la Circunferencia de la
R
ueda
:
1 mm - 3999 mm (1 mm incremento)
Operación Temperatura:
0°C ~ 50°C (32°F ~ 122°F)
Almacenaje Temperatura:
- 10°C ~ 60°C (14°F ~ 140°F)
Ma Energía de la Pila de la Unidad Principal:
3V pilas x 1 (CR2032), la vida operativa de la pila es de
unos 2 años. (Basado en una media de uso de 1.5 horas por día)
Dimensiones y peso de la Unidad Principal:
46 x 54 x 16.5 mm / 31.5g
*
Las especificaciones y los diseños pueden cambiar sin aviso previo.
N
N
2s
Espanól
SOLUCION DE PROBLEMAS
Antes de acudir al servicio de reparaciones conviene hacer las siguientes
comprobaciones.
ÍNDICE:
ES
N
N
CONFIGURAÇÃO DA UNIDADE PRINCIPAL
2s
INICIAR O COMPUTADOR (TUDO LIMPO)
1. Mantenha os botões MODE o e SET f pressionados simultaneamente durante mais de 3
segundos para iniciar o computador e limpar todos os dados. IMPORTANTE: Certifique-se
de que inicia o computador antes de o utilizar, caso contrário podem surgir erros.
2. Os segmentos do LCD serão testados automaticamente após a unidade ter sido iniciada.
3. Pressione o botão MODE o para interromper o teste ao LCD e, em seguida, é apresentada
a indicação intermitente "KM/h".
SELECÇÃO DA UNIDADE
Pressione o botão MODE o para escolher KM/h ou M/h (Milhas/h). Pressione o botão SET
f para reconhecer uma das unidades.
DEFINIÇÃO DE DADOS ODO e T-RT
1. A função foi concebida para recuperar os dados existentes de ODO e T-RT sempre que a
bateria for substituída. Um novo utilizador não precisa de definir estes dados. De cada vez
que pressiona o botão SET f salta um dos procedimentos para definição de dados.
2. Procedimentos para definição de dados (621 741): (fig. b)
a). Os dados são ajustados separadamente, para cada dígito. O dígito a ser ajustado, pisca.
b). Pressione o botão MODE o para aumentar o valor em 1.
c). Para alterar a definição do dígito, mantenha o botão MODE o pressionado por mais de 2
segundos.
d). Pressione o botão SET f para guardar os dados e alterar a definição seguinte.
DEFINIÇÃO DE DADOS DA CIRCUNFERÊNCIA
1. É apresentada a indicação “c2155”a propósito do valor predefinido 2155mm. Meça o valor
da roda ou verifique o quadro de consulta rápida existente no manual da bicicleta.
2. Ajuste os dados da circunferência da forma descrita em Procedimentos para definição de
dados. (Fig. b)
CIRCUNFERÊNCIA DA RODA
a). Medição precisa (fig. a-1)
Faça girar a roda até que a válvula se encontre na posição mais próxima do solo e
marque este primeiro ponto no pavimento. Suba para a bicicleta e peça que o
empurrem até que a válvula regresse ao ponto mais próximo do solo. Marque o
segundo ponto no pavimento. Meça a distância existente entre as marcas. Introduza
este valor para definir a circunferência da roda.
b). Quadro de consulta rápida (fig.a-2): Verifique no quadro qual o valor de circunferência
adequado.
DEFINIÇÃO DO RELÓGIO
1. É apresentado o símbolo " " para definição do relógio.
2. Selecção de 12H/AM, 12H/PM ou 24H.
Pressione brevemente o botão MODE o para seleccionar 12H/AM, 12H/PM ou 24H.
Mantenha o botão MODE o pressionado por mais de 2 segundos para alterar o ecrã de
definição do relógio.
3. Ajuste os dados do relógio da forma descrita em Procedimentos para definição de dados.
(Fig. b)
FUNÇÕES e ESPECIFICAÇÕES
:
VELOCIDADE ACTUAL 0.0 – 199,9 Km/h ou 120.0 Milhas/h +/- 1% (normal)
1. A velocidade actual é sempre indicada no ecrã superior durante a condução. É
apresentada a velocidade actual até 199,9 KM/h ou 120.0 M/h (para diâmetros de
roda superiores a 24 polegadas).
2. Quando o percurso é interrompido, a velocidade continua a ser contabilizada
durante mais 4 segundos no caso, para confirmação de que não foram enviados
mais sinais.
ODO:
CONTA-QUILÓMETROS TOTAL
1. O conta-quilómetros indica a distância total.
2. Os dados de ODO não podem ser colocados a zero através da operação
REINICIAR.
RT:
TEMPO DE PERCURSO 0M00.0S-59M59.9S, 1H00M00S-99H59M59S +/- 0.003%
T-RT:
TEMPO DE PERCURSO TOTAL 0H00M – 9999H59M +/- 0.003%
1. O indicador RT apresenta o tempo de percurso desde a última operação
REINICIAR. O indicador T-RT apresenta o tempo de percurso total, desde a ligação
do computador, e não pode ser eliminado através da operação REINICIAR.
:
12HR AM/PM OU 24HR CLOCK 1:00:00 – 12:59:59 AM/PM ou 0:00:00 – 23:59:59 +/- 0.003%
A hora actual pode ser apresentada em unidades de 12HR AM/PM ou 24HR.
AS:
VELOCIDADE MÉDIA 0.0 – 199,9 Km/h / 0,0 – 120,0Milhas/h +/- 0,1%
1. É calculado a partir de DS dividido por RT. O valor médio é calculado a partir da
última operação REINICIAR até ao ponto actual.
2. É apresentado "0.0" quando RT é inferior a 4 s, sendo actualizado de segundo a
segundo quando RT é superior a 4 segundos.
3. É apresentado um símbolo "Err" quando o valor de RT é superior a 100 horas ou o
valor de DS é superior a 1.000 km (ou milhas). Reinicie a unidade para recomeçar.
DS:
DISTÂNCIA DO PERCURSO 0,00 – 999,99 Km ou Milhas +/- 0,1%
A função DS apresenta a distância percorrida desde a última operação REINICIAR,
desde que a bicicleta esteja a ser conduzida.
MS:
VELOCIDADE MÁXIMA 0,0 – 199,9 Km/h ou 120,0 Milhas/h +/- 1%
Indica a velocidade mais elevada desde a última operação REINICIAR.
/ :
INDICADOR DE VELOCIDADE
O cursor do indicador de velocidade pisca " " enquanto a velocidade actual for
superior à velocidade média, ao passo que a seta para baixo " " pisca inversamente.
* Observações: Todos os dados das funções são actualizados segundo a segundo.
BOTÕES E OPERAÇÕES NORMAIS
BOTÃO MODE o (Fig. 2)
1. Pressione brevemente este botão para se deslocar sequencialmente de uma função para outra.
2. Durante a condução, pode aceder aos dados das funções T-RT, ODO.
BOTÃO SETf
Pressione este botão para aceder e sair dos ecrãs de configuração, sempre que quiser
alterar o valor da circunferência da bicicleta, o lembrete de lubrificação e manutenção ou
a hora actual de " ".
OPERAÇÃO REINICIAR (Fig. 3)
1. Mantenha o botão MODE o pressionado até que o LCD deixe de apresentar qualquer
valor e, em seguida, solte o botão. O computador reiniciará todos os valores de AS,
DS, RT e MS a zero.
2. Não é possível reiniciar os valores de ODO, T-RT, .
LIGAR/DESLIGAR O SENSOR DE MOVIMENTO DA UNIDADE PRINCIPAL
O computador inclui um sensor (patenteado) para evitar qualquer interferência sempre
que a unidade principal for retirada do apoio. A unidade principal só recebe os sinais das
rodas quando se encontra encaixada no apoio.
ACTIVAÇÃO/DESACTIVAÇÃO E LIGAÇÃO/PARAGEM AUTOMÁTICAS
O computador inicia automaticamente a contagem assim que o percurso é iniciado e
interrompe quando o percurso termina. O símbolo intermitente " " indica que o computador
está a ser ligado.
Para economizar bateria, este computador desliga automaticamente após um período de
inactividade de 30 minutos, apresentando apenas a indicação " ". A alimentação é
restaurada assim que pressionar o botão MODE o.
REDEFINIÇÃO DOS VALORES DA CIRCUNFERÊNCIA, RELÓGIO, LEMBRETE DA LUBRIFICAÇÃO
E MANUTENÇÃO
1. Pressione o botão MODE o para aceder a um dos seguintes modos de visualização:
a). Utilize o ecrã ODO para definir o valor da circunferência.
b). Utilize o ecrã para acertar o relógio.
2. Pressione o botão SET f para aceder ao ecrã de definições relativas.
3. Ajuste os dados da forma descrita em Procedimentos para definição de dados. (Fig. b)
4. Pressione o botão SET f para guardar os dados e concluir a definição em curso.
SUBSTITUIÇÃO DA BATERIA DA UNIDADE PRINCIPAL
a). O símbolo " " surge para indicar que a bateria está quase sem carga.
b). Substitua a bateria por uma nova no prazo de alguns dias após o símbolo ter surgido.
c). Todos os dados serão eliminados aquando da substituição da bateria, mas o
computador permite que o condutor introduza os dados relativos a ODO1 e T-RT após
a operação de substituição, pelo que deve registar estes valores antes de retirar a
bateria antiga.
d). Utilize uma bateria CR2032 nova e ligue a unidade principal. (Fig. 1)
PRECAUÇÕES
1. Este computador pode ser utilizado à chuva, mas não pode ser utilizado debaixo de água.
2. Não desmonte a unidade principal ou os respectivos acessórios.
3. Verifique regularmente a posição relativa e o intervalo do sensor, do íman e da unidade
principal.
4. Não utilize diluente, álcool ou gasolina para limpar a unidade principal ou os respectivos
acessórios quando estes estiverem sujos.
5. Lembre-se de prestar atenção à estrada durante a condução.
Português
PT
ÍNDICE: SIGNIFICA: PREMIR O BOTÃO N POR MAIS 2 SEGUNDOS
SIGNIFICA: PREMIR O BOTÃO N RÁPIDAMENTE
{N=NÚMERO CHAVE:
o MODE Botão. f SET Botão. }
Sensor com transmissor: sensor de íman sem contacto com transmissor
sem fios.
Distância de funcionamento do sensor sem fios: 70 cm entre o transmissor e a unidade principal.
Interferência cruzada: até uma distância de 40 cm (15.8"), sem interferência
entre 2 bicicletas que estejam equipadas com
computadores semelhantes, mesmo que se encontrem
lado a lado.
Definição da circunferência da roda: 1mm - 3999mm (intervalos de 1 mm)
Temperatura de funcionamento: 0°C ~ 50°C (32°F ~ 122°F)
Temperatura de armazenamento: - 10°C ~ 60°C (14°F ~ 140°F)
Alimentação da unidade principal: Bateria de 3V x 1 (CR2032), a vida útil da bateria é de
aproximadamente 2 anos. (com base numa utilização
diária média de 1,5 horas)
Dimensões e peso da unidade principal: 46 x 54 x 16,5mm/31,5g
* As especificações e design podem sofrer alterações sem aviso prévio.
1. A bateria tem carga?
2. A bateria foi instalada correctamente?
1. Está na tela inicial ou em outra tela de
configuração / ajuste?
2. A distância entre o sensor e o imã está
correta?
3. A circunferência está correta?
4. A distância ou ângulo entre o sensor e o
ciclo-computador estão corretos e dentro
dos limites?
5. A pilha do sensor não estará quase
descarregada?
6. Haverá qualquer interferência de algum
aparelho eletrônico por perto?
Deixou a unidade principal sob a luz directa
do sol durante um longo período de tempo?
A temperatura é inferior a 0ºC (32ºF)?
Nenhuma
informação no
ecrã
Nenhum valor
relativo à
Velocidade ou
dados incorrectos
Imagens
irregulares
O LCD não
apresenta
qualquer imagem
As imagens
demoram muito
tempo a serem
a presentadas
PROBLEMA ITENS A VERIFICAR SOLUÇÃO
1. Substitua a bateria.
2. Certifique-se de que o pólo positivo da bateria se
encontra orientado na direcção da tampa da
bateria.
1. Verificar os procedimentos de ajustes e
conclua a operação.
2. Verifique (Fig. F) e (Fig. G) para re-ajustar a
posição e distância corretamente.
3. Verifique as “Configurações de
Circunferência” e insira os dados corretos.
4. Verifique (Fig. E) e ajuste a distância e ângulo
entre o ciclo-computador e o sensor.
5. Substitua a pilha do sensor.
6. Identifique e afaste-se do local de
interferência.
Consulte a secção "CONFIGURAÇÃO DA
UNIDADE PRINCIPAL" e volte a ligar o computador.
Coloque a unidade principal na sombra para
que esta regresse ao seu estado normal. Os
dados não são afectados negativamente.
A unidade regressa ao estado normal quando a
temperatura aumentar.
RESOLUÇÃO DE PROBLEMAS
1. La batteria è scarica?
2. La batteria è stata installata in modo
corretto?
1. Si è allo schermo di regolazione
dell’unità principale o dell’orologio?
2. Le posizioni relative e la distanza tra
sensore e magnete sono corrette?
3. La circonferenza impostata è
corretta?
4. La distanza di percezione è troppa o
l’angolo di installazione non è
corretto?
5. La batteria del sensore è quasi
esaurita?
6. C’è una fonte di interferenza nelle
vicinanze?
L’unità principale è stata esposta ai
raggi diretti del sole per un periodo in
cui la bicicletta non era in movimento?
La temperatura è inferiore a 0°C
(32°F)?
Nessuna
indicazione sul
display
Non compare la
velocità di corsa
o i dati non sono
corretti
Visualizza-zione
irregolare
Il display è scuro
Il display è
lento
PROBLEMA COSA CONTROLLARE RIMEDIO
1. Sostituire la batteria.
2. Assicurarsi che il polo positivo della
batteria sia rivolto verso il coperchio
della batteria.
1.Fare riferimento alle istruzioni di effettuare
le
operazioni in modo corretto.
2.
Fare riferimento alle Installazioni(Fig.C-1)
correggere posizione e distanza.
3. Fare riferimento al paragrafo
“Circonferenza” ed inserire il dato
corretto.
4.Fare riferimento alla Installazioni(Fig.C-2)
per regolare distanza o angolo tra unità
principale e sensore.
5. Sostituire la batteria.
6. Allontanarsi dalla fonte.
Fare riferimento al paragrafo
“Preparazione dell’unità principale” e
riavviare il computer
Riporre l’unità principale all’ombra per
riportarla allo stato di normalità.
Questo fenomeno non compromette in
alcun modo i dati.
Ritornerà allo stato normale appena la
temperatura aumenta.
Sensore con trasmettitore: Sensore magnetico senza contatti con trasmettitore senza fili.
Dimensione della forcella: orcelle da 12 a 50 mm (da 0.5" a 2.0").
Distanza di percezione senza filo: 70 cm tra il trasmettitore e l’unità principale
Interferenze: Fentro 40 cm (15.8"). Nessuna interferenza tra due biciclette
equipaggiate con ciclo-computer simili, quand’anche
corressero l’una affianco all’altra.
Regolazione circonferenza ruota: da 1 mm a 3999 mm (incrementi di 1 mm)
Temperatura operativa: da 0°C a 50° C (da 32°F a 122°F)
Temperatura di stoccaggio: da -10°C a 60°C (da 14°F a 140°F)
Batteria dell’unità principale: 1 batteria da 3 V (tipo CR2032). La durata media della batteria
è circa 2 anni, considerato un uso di 1,5 ore al giorno.
Dimensioni e Peso: Unità principale: 46 x 54 x 16.5 mm / 31.5g
* Caratteristiche e modelli possono essere cambiati senza preavviso.
N
N
IDENTIFICAZIONE DEI GUASTI
SIGNIFICA: PREMERE IL PULSANTE N PER OLTRE 2 SECONDI
SIGNIFICA: PREMERE IL PULSANTE N RAPIDAMENTE
{
N=NUMERO CHLIAVE:
o
Pulsante MODE.
f
Pulsante SET. }
PREPARAZIONE DELL’ UNITA’ PRINCIPALE
(Fig. 1)
INDCE:
2s
FUNZIONI E SPECIFICHE
:
VELOCITÀ DI CORSA
0.0 - 199.9 KM/H O 120.0 miglia/h +/- 1% (Tipo)
1. La velocità di corsa viene sempre visualizzata nella parte alta del display. Esso
indica la velocità di corsa fino ad un massimo di 199,9 km/h o 120 miglia/h (per ruote
con un diametro superiore a 24 pollici).
2. Quando la corsa viene interrotta, il calcolo della velocità prosegue per 4 secondi in
attesa della conferma che non sono stati inviati altri segnali dalla ruota.
ODO: ODOMETRO 0.0 - 99999.9 km o miglia +/- 0.1%
1. L’odometro misura la distanza totale percorsa dalla bicicletta.
2. Il dato ODO non può essere azzerato mediante l’operazione di RESET.
RT:
TEMPO DI CORSA
0M00.0S-59M59.9S,1H00M00S-99H59M59S +/- 0.003%
T-RT:
TEMPO TOTALE DI CORSA
0H00M – 9999H59M +/- 0.003%
RT misura il tempo di corsa dall’ultima operazione di RESET. T-RT calcola il tempo
totale dall’inizio dell’uso del computer e non può essere azzerato mediante
l’operazione di RESET.
:
OROLOGIO A 12 ORE O 24 ORE
1:00:00 – 12:59:59 AM/PM or 1:00:00 – 23:59:59 +/- 0.003%
Visualizza l’ora esatta. Può essere impostato a 12 o 24 ore.
AS:
VELOCITÀ MEDIA
0.0-199.9 km/h - 00-120.0 miglia/h +/-0.1%
1. La velocità media viene calcolata dividendo la DS (distanza del percorso) per RT. La
media viene quindi calcolata dall’ultima operazione di RESET (azzeramento) fino al
punto attuale.
2. Quando RT è inferiore a 4 secondi, verrà visualizzato "0.0". Quando RT è superiore
a 4 secondi, la funzione viene aggiornata ogni secondo.
3. Quando RT è superiore alle 100 ore oppure DS è superiore a 1.000 km (o miglia),
sul display compare il simbolo "Err" (che significa Errore). Azzerare l’unità per
ricominciare il conteggio.
DS:
DISTANZA DEL PERCORSO
0.00 – 999.99 km o miglia +/- 0.1%
La funzione DS calcola la distanza dall’ultima operazione di RESET (azzeramento) fino
a quando la bicicletta non si ferma.
MS:
VELOCITÀ MASSIMA
0.0 – 199.9 Km/h o 120.0 miglia/h +/- 1%
La funzione MS visualizza la velocità più elevata raggiunta dopo l’ultima operazione di
RESET (azzeramento).
/ :
Indicatore di velocità
Mentre la bicicletta è in movimento, il simbolo " " lampeggia se la velocità
del momento è superiore alla velocità media mentre, al contrario, lampeggia il
simbolo " " se la velocità del momento è inferiore a quella media.
*
NOTA: Tutti i dati relativi alle funzioni vengono aggiornati ogni secondo.
AVVIO DEL COMPUTER (AZZERAMENTO)
1.Premere contemporaneamente il pulsante MODEo e il pulsante SET
f
per oltre tre
secondi per avviare il computer e cancellare tutti i dati.
IMPORTANTE: Accertarsi di eseguire le operazioni di avviamento del computer
prima di utilizzarlo, altrimenti potrà fornire risultati errati.
2. Quando si avvia l’unità, viene effettuato un test automatico dei segmenti del display
a cristalli liquidi (LCD).
3.
Premere il pulsante MODEo per interrompere il test LCD. L’indicazione “kM/h” lampeggia.
SCELTA DELL’UNITA’ DI MISURA
Premere il pulsante MODE
o
per selezionare km/h (chilometri all’ora) o Mile/h (miglia all’ora).
Premere quindi il pulsante SET
f
per confermare la scelta.
IMPOSTAZIONE DEI DATI ODO E T-RT
1. La funzione è stata studiata per conservare i dati di ODO e T-RT quando la batteria
viene sostituita. Un nuovo utilizzatore non ha bisogno di inserire questi dati. Ogni
pressione del pulsante SET „ avvia un processo di impostazione dati.
2. Procedura di impostazione Dati (621 741): (Fig b)
a). Ogni elemento (cifra) dei dati viene regolato separatamente. L’elemento da
modificare lampeggia.
b). Premendo rapidamente il pulsante MODE
o
la cifra da regolare avanza di un’unità.
c). Per passare alla regolazione della cifra successiva, premere il pulsante MODEo
per più di due secondi.
d). Premere il pulsante SET
f
per memorizzare i dati e passare alla regolazione
successiva o al normale utilizzo.
IMPOSTAZIONE DELLA CIRCONFERENZA
1. Il display visualizza "c2155" che sta per il valore 2155 mm. Misurare il valore della propria
ruota o fare riferimento alla tabella riportata nel manuale della bicicletta.
2. Regolare la misura della circonferenza in base alle Procedura di impostazione Dati.(Fig b)
CIRCONFERENZA DELLA RUOTA
a).Misurazione precisa (Fig. a-1)
Posizionare la ruota di modo che la valvola si trovi nel punto più basso
perpendicolare al terreno e segnare per terra questo primo punto di contatto. Salire
sulla bicicletta e farsi spingere leggermente in avanti finché la ruota non compie un
giro completo e la valvola non torna nel punto di partenza. Segnare questo
secondo punto di contatto sul terreno. Misurare la distanza tra i due punti in
millimetri. Inserire questo valore come circonferenza della ruota.
b).Tabella rapida (Fig. a-2): Rilevare la circonferenza adeguata dalla tabella di
riferimento.
IMPOSTAZIONE DELL’OROLOGIO
1. Viene visualizzato il simbolo " " sul display LCD.
2. Scelta delle opzioni 12H/AM, 12H/PM oppure 24H.
Premere velocemente il pulsante MODE
o
per visualizzare l’orologio a 12 ore oppure 24 ore
in sequenza. Tenere premuto per oltre due secondi il pulsante MODE
o
per passare alla
procedura di regolazione dell’orario.
3.Regolare l’orologio seguendo le Procedura di impostazione Dati.(Fig b)
PULSANTI e OPERAZIONI NORMALI
PULSANTI MODE
o
(FIG. 2)
1. Premere rapidamente questo pulsante per spostarsi in sequenza dal display di una funzione all’altro.
2. Le funzioni che vengono visualizzate in sequenza durante la corsa sono: T-RT, ODO.
PULSANTE SET
f
Premere questo pulsante per entrare o uscire dagli schermi di regolazione quando si vuole
reinserire la circonferenza della ruota della bicicletta,oppure si desidera regolare l’orologio " " per
sincronizzarlo con l’ora esatta.
OPERAZIONE RESET
(FIG. 3)
1.Tenere premuto il pulsante MODE
o
finché sullo schermo a cristalli liquidi non sarà
visualizzato alcun dato, quindi lasciare il pulsante. Il computer azzererà i dati memorizzati di
AS, DS, RT e MS.
2. Il pulsante RESET non può azzerare i dati ODO, T-RT, .
DISPOSITIVO DI ALLOGGIAMENTO ON/OFF DELL’UNITÀ PRINCIPALE
Questo computer è dotato di un dispositivo a scatto (brevettato) che accerta se l’unità principale è
alloggiata correttamente o meno nel supporto. Quando questa si trova fuori dal supporto, qualsiasi
segnale di interferenza senza fili viene disattivato. L’unità principale può ricevere il segnale (dalla
ruota) solo quando è correttamente alloggiata nel supporto.
START / STOP AUTOMATICO E ACCENSIONE/SPEGNIMENTO AUTOMATICO (ON/OFF)
Il computer comincerà automaticamente il suo conteggio nel momento in cui si inizia la corsa,
mentre smetterà di conteggiare appena ci si ferma. Il simbolo " " lampeggiante significa che il
computer si trova nello stato di START (avvio).
Per non consumare la batteria, il computer si spegne automaticamente e visualizza solo l’orologio
" " quando non viene utilizzato per circa 30 minuti. Si riaccenderà automaticamente premendo il
pulsante MODEo
.
REIMPOSTAZIONE DI CIRCONFERENZA, OROLOGIO
1. Premere il pulsante MODE
o
per passare a una delle seguenti videate:
a). Passa alla videata ODO per inserire la circonferenza.
b). Passa aper regola per l’orologio.
2. Premere il pulsante SET
f
per accedere alla videata impostazioni.
3. Lo schermo visualizza il valore precedentemente impostato. Impostare il valore desiderato
secondo le Procedura di impostazione Dati.(Fig b)
4. Premere il pulsante SET
f
per salvare i valori desiderati e completare l’impostazione.
SOSTITUZIONE DELLA BATTERIA DELL’UNITA’ PRINCIPALE
a). Il simbolo " " apparirà per indicare che la batteria è quasi esaurita.
b). Sostituire la batteria vecchia con una nuova entro pochi giorni da quando è comparso il
suddetto simbolo.
c). Sostituzione della batteria Questo computer consente di richiamare i dati ODO che sono
stati precedentemente registrati, dopo che la batteria è stata sostituita. Registrare
comunque per sicurezza i dati ODO prima di rimuovere la batteria vecchia.
d). Sostituire la batteria vecchia con una nuova batteria CR2032 . Avviare di nuovo l’unità
principale. (Fig. 1)
PRECAUZIONI
1. Non lasciare l’unità principale sotto l’esposizione diretta dei raggi solari a meno che non si stia
utilizzando la bicicletta.
2. Non smontare l’unità principale o i suoi accessori.
3. Controllare periodicamente la posizione e la distanza tra sensore, magnete e unità principale.
4. Non utilizzare diluenti, alcool o benzina per pulire l’unità principale o i suoi accessori quando sono
sporchi.
5. Ricordarsi di prestare attenzione alla strada durante la corsa.
Italiano
IT
(OOHQĘUL]]HD]HOHPW|OW|WWVpJpW
(OOHQĘUL]]HKRJ\PHJIHOHOĘHQ
tette-e be az elemet a komputerbe.
$NLMHO]ĘDNRPSXWHUYDJ\HJ\pE
funkció beállítását mutatja?
0HJIHOHOĘDV]HQ]RUpVDPiJQHV
pozíciója és távolsága.
0HJIHOHOĘDEHiOOtWRWWNHUpNPpUHW"
0HJIHOHOĘDV]HQ]RUpVDNRPSXWHU
távolsága és pozíciója?
0HJIHOHOĘDV]HQ]RUEDQOpYĘHOHP
töltöttsége?
(OOHQĘUL]]HKRJ\YDQHDN|]HOEHQ
interferenciát okozó készülék.
Hosszabb ideig közvetlen
napsütésnek tette
NLDKDV]QiODWRQNtYOOpYĘNRPSXWHUW"
$KĘPpUVpNOHW&)DODWWYDQ"
hUHVNLMHO]Ę
Nincs pillanatnyi
sebesség vagy
rossz
az adat
Rendellenes
NLMHO]Ę
$]/&'NLMHO]Ę
fekete
/DVV~DNLMHO]Ę
352%/e0$(//(1ĝ5,==($=(*<6e*(70(*2/'É6
1. Cserélje ki az elemet.
2. Bizonyosodjon meg róla, hogy az elem
pozitív oldalával felfelé van.
1. A beállítási folyamat befejezése
szükséges.
2. Állítsa be újra a pozíciót és a
távolságot.
ÈOOtWVDEH~MUDDPHJIHOHOĘ
kerékméretet.
4. Állítsa be újra a szenzor pozícióját és
távolságát.
5. Cserélje ki az elemet.
6. Távolodjon el az interferenciát okozó
NpV]OpNWĘO
Nézze meg a komputer beállítása
menüt és indítsa újra a komputert.
Helyezze árnyékban a komputert, és a
normál állapot visszaáll. Adatvesztés
nincs.
A komputer visszatér a normál állapotba,
DPLQWDKĘPpUVpNOHWHPHONHGLN
Jeladó: Közvetlen kapcsolat nélküli mágnes szenzor vezeték nélküli
jeladóval.
Alkalmas villaméretek: 12mm – 50mm (0.5” – 2.0”)
Hatótávolság: 70cm (1.8 láb) a jeladó és a komputer között
Kereszt irányú interferencia: Két hasonló komputerrel szerelt kerékpár esetén a
komputerek minimális távolsága 40cm kell legyen.
Kerékméret határai: 1mm -3999mm
0ĦN|GpVLKĘPpUVpNOHW &&))
7iUROiVLKĘPpUVpNOHW &&)&
A komputer elemszükséglete: 1db 3V-os elem (CR2032), élettartama kb. 2év
(Napi átlagosan 1.5 óra használattal számolva.)
Méret és súly: 46x54x16.5mm / 31,5g.
* A termék tulajdonságainak változtatási jogát fenntartjuk.
HIBAELHÁRÍTÁS
INDEX: N 2s Tartsa nyomva az N gombot legalább 2 másodpercig.
N Nyomja meg röviden az N gombot.
{N=
o
Mode gomb vagy
f
SET gomb}
A KOMPUTER ALAPBEÁLLÍTÁSAI (1. Ábra)
FUNKCIÓK
:
PILLANATNYI SEBESSÉG 0.0 – 199.9 Km/h vagy 120.0 Mile/h +/- 1%
$SLOODQDWQ\LVHEHVVpJPLQGLJDNLMHO]ĘIHOVĘUpV]pQMHOHQLNPHJ$SLOODQDWQ\L
VHEHVVpJIHOVĘKDWiUpUWpNH.0KYDJ\0K´NHUpNPpUHWIHOHWW
2. Megálláskor a pillanatnyi sebesség kijelzése még 4 másodpercig folytatódik,
H]DODWWDNRPSXWHUHOOHQĘU]LKRJ\QHPpUNH]LNHW|EEMHODMHODGyIHOĘO
ODO:
ÖSSZES MEGTETT ÚT 0.0 – 99999.9 Km vagy Miles +/- 0.1%
1. Az összes megtett út funkció a kerékpár haladása közben megtett távolságot
méri.
$]2'2DGDWQHPW|U|OKHWĘDW|UOpVPĦYHOHWWHO
RT:
(/7(/7,'ė 0M00.0S-59M59.9S, 1H00M00S-99H59M59S +/- 0.003%
$]57IXQNFLyPXWDWMDD]XWROVyW|UOpVyWDHOWHOWLGĘW
T-RT:
g66=(6(/7(/7,'ė 0H00M – 9999H59M +/- 0.003%
$757IXQNFLyPXWDWMDDNRPSXWHUHOLQGtWiVDyWDNHUpNSiUR]iVVDOHOW|OW|WWLGĘW$]
DGDWQHPW|U|OKHWĘDW|UOpVIXQNFLyYDO
..
:
12HR AM/PM VAGY 24HR ÓRA
1:00:00 – 12:59:59 AM/PM vagy 0:00:00 – 23:59:59 +/- 0.003%
$]LGĘWPXWDWMDyUiV$030GpOHOĘWWGpOXWiQYDJ\yUiVIRUPiWXPEDQ
AS:
ÁTLAGSEBESSÉG 0.0 – 199.9 Km/h / 0.0 – 120.0Mile/h +/- 0.1%
1. Ezt a DS és az RT adatok hányadosából számítja a komputer. Az átlagsebesség az
XWROVyW|UOpVpVD]DGRWWSLOODQDWLJWHUMHGĘLGĘV]DNRWYHV]LILJ\HOHPEH
2. Az értéke ”0.0”, ha az RT kevesebb, mint 4 másodperc és másodpercenként frissíti
az adatot, ha az RT több mint 4 másodperc.
3. ”Err” felirat jelenik meg, ha az RT 100 óra felett van vagy ha a DS 1000 km (mérföld)
felett van. Ekkor törlésre van szükség.
DS:
NAPI KILOMÉTER 0.00 – 999.99 Km vagy Miles +/- 0.1%
$'6IXQNFLyU|J]tWLDPHJWHWWWiYROViJRWD]XWROVyW|UOpVWĘOV]iPtWYDHJpV]HQDGGLJ
amíg a kerékpár mozgásban van.
MS:
LEGNAGYOBB SEBESSÉG 0.0 – 199.9 Km/h vagy 120.0 Mile/h +/- 1%
Az utolsó törlés óta mért legnagyobb sebességet mutatja.
/ :
SPEED PACER
A felfelé nyíl villog amennyiben a pillanatnyi sebesség az átlagsebesség felett van
és a lefelé mutató nyíl villog, ha alatta van.
*Megjegyzés: A komputer minden adatot másodpercenként frissít.
A KOMPUTER ELINDÍTÁSA (TELJES TÖRLÉS)
1. Tartsa nyomva a MODE o és a SET gombot
f
HJ\LGHMĦOHJOHJDOiEEiVRGSHUFLJ
tJ\W|UOĘGLNPLQGHQDGDW)21726$NRPSXWHUHOVĘKDV]QiODWDHOĘWW
PLQGHQNpSSHQYpJH]]HHODPĦYHOHWHWHOOHQNH]ĘHVHWEHQOHKHWVpJHVKRJ\D
NRPSXWHUQHPIRJPHJIHOHOĘHQPĦN|GQL
$NRPSXWHUDXWRPDWLNXVDQHOLQGtWMDD]/&'NLMHO]ĘWHV]WMpW
3. Nyomja meg a MODE gombot
o a teszt leállításához, majd a ”KM/h” felirat jelenik
meg.
MÉRTÉKEGYSÉG KIVÁLASZTÁSA
A MODE gomb o megnyomásával válassza ki a mértékegysége, KM/h vagy M/h. A
SET gomb
f
megnyomásával állítsa be a kiválasztott mértékegységet.
ODO ÉS
T-RT ADATOK BEÁLLÍTÁSA
$]2'2pV757DGDWRNDWDNRPSXWHUD]HOHPFVHUHDONDOPiYDOLVPHJĘU]LtJ\QHP
V]NVpJHV~MUDEHiOOtWDQLĘNHW$6(7JRPE
f
megnyomásával léphet tovább a
N|YHWNH]ĘDGDWEHiOOtWiViKR]
2. Adatok Beállításának Folyamata (621 741): (b ábra)
a, Az adat számjegyei egyenként állíthatók be. Mindig a villogó számjegy értéke
változtatható.
b, A MODE gomb
o rövid megnyomásával 1 egységgel változtathatja az értéket.
c, A MODE gomb
oQ\RPYDWDUWiViYDOOpSKHWDN|YHWNH]ĘV]iPMHJ\UH
d, Nyomja meg a SET gombot
f
D]DGDWWiUROiViKR]pVDN|YHWNH]ĘIXQNFLy
beállításához.
KERÉKMÉRET BEÁLLÍTÁSA
1. Alapbeállításként a ”c2155” felirat jelenik meg. Határozza meg a kerék kerületét a
mellékelt rajz, vagy táblázat segítségével.
2. Állítsa be a kívánt adatot az Adatok Beállításának Folyamata pontban leírtak
szerint. (b ábra)
A KERÉK KERÜLETE
a, Pontos Mérés (a-1 ábra)
Állítsa be a kereket úgy, hogy a szelep a földhöz legközelebbi pontban legyen.
Jelölje meg ezt a pontot a földön. Tolja a kerékpár addig, amíg a szelep ismét a
földhöz legközelebbi pontba kerül. Jelölje meg ezt a pontot is és mérje le a
távolságot a két pont között. A kapott értéket táplálja be a komputerbe.
b, A mellékelt táblázat segítségével határozza meg a kerék kerületét. (a-2 ábra)
ÓRA BEÁLLÍTÁS
1. Órabeállítás menüben a ” ” szimbólum jelenik meg.
2. 12H/AM, 12H/PM vagy 24H kiválasztása.
A MODE gomb
o rövid megnyomásával választhat a 12H/AM, 12H/PM vagy 24H
közül. A MODE gomb
o nyomva tartásával léphet tovább az órabeállítás menüben.
ÈOOtWVDEHD]LGĘWD]$GDWRN%HiOOtWiViQDN)RO\DPDWDSRQWEDQOHtUWDNV]HULQWEiEUD
*20%2.e61250É/0Ť.g'e6
MODE GOMB
o
(2. ábra)
1. A MODE gomb o rövid megnyomásával válthatunk egyik funkcióról a másikra.
2. Kerékpározás közben az ODO és T-RT funkciókat átugorja.
SET GOMB f
A SET gomb
f
PHJQ\RPiViYDOOpSKHWEHLOOHWYHNLDEHiOOtWiVLPHQEĘODPHQQ\LEHQ
módosítani akarja a kerékméret vagy az óra beállításait.
7g5/e60Ť9(/(7iEUD
1. Tartsa nyomva a MODE gombot oDGGLJDPtJD]/&'NLMHO]ĘUHVQHPOHV]$
komputer ekkor törli az AS, DS, RT és MS funkció adatait.
2. Nem nullázza az ODO és az óra adatait.
$8720$7,.86.,%(.$3&62/É6e5=e.(/Ŋ5(1'6=(5
$NRPSXWHUHJ\DXWRPDWLNXVNLEHNDSFVROiVpU]pNHOĘUHQGV]HUUHOUHQGHONH]LN
mely megóvja az egységeket az interferenciától, amennyiben a komputert
eltávolítja a tartóról. A komputer csak akkor tudja az adatokat fogadni, ha rajta van
a tartón.
AUTOMATIKUS LEÁLLÍTÁS ÉS KI/BEKAPCSOLÁS
A komputer automatikusan elkezdi az adatok mérését a kerékpár elindulásakor
és leállítja a mérést, ha megáll a kerékpár. A villogó ” ” felirat jelzi, hogy a
komputer fogadja az adatokat. Az elemek védelmében a komputer automatikusan
kikapcsol és csak az óra látható, ha legalább 30 percig használaton kívül van. A
MODE gomb
o megnyomásával a komputer ismét bekapcsol.
KERÉKMÉRET, ÓRA ÚJRABEÁLLÍTÁSA
1. Nyomja meg a MODE gombot oDN|YHWNH]ĘIXQNFLyNYDODPHO\LNpKH]
a, A kerékméret változtatásához lépjen az ODO funkcióra.
b, Az órabeállítás módosításához lépjen az óra funkcióhoz.
2. Nyomja meg a SET gombot
f
DEHiOOtWiVLNpSHUQ\ĘPHJMHOHQtWpVpKH]
3. Állítsa be a kívánt értéket az Adatok Beállításának Folyamata pontban leírtak szerint.
(b ábra)
4. Nyomja meg a SET gombot
f
az adatok tárolásához és a beállítás befejezéséhez.
A KOMPUTER ELEMCSERÉJE
a, A villogó ” ” felirat jelzi, ha elemcserére van szükség.
E$IHOLUDWPHJMHOHQpVHXWiQOHJNpVĘEEQpKiQ\QDSSDOFVHUpOMHNLD]HOHPHW
F(OHPFVHUHDONDOPiYDOPLQGHQDGDWW|UOĘGLNDNRPSXWHUEĘO/HKHWĘVpJHYDQD]RQEDQ
az ODO és T-RT adatok újra betáplálására az elemcsere után, ezért rögzítse a
PHJĘUL]QLNtYiQWDGDWRNDWPLHOĘWWHOWiYROtWMDDUpJLHOHPHW
d, Cserélje ki az elemet (CR2032 típusú) és indítsa el a komputert. (1. ábra)
FIGYELMEZTETÉS
1. Ne tegye ki közvetlen napsütésnek a használaton kívüli komputert.
2. Ne szerelje szét a komputert és alkatrészeit.
5HQGV]HUHVHQHOOHQĘUL]]HDV]HQ]RUDPiJQHVpVDNRPSXWHUSR]tFLyMiWpV
távolságát.
4. Ne használjon hígítót, alkoholt vagy benzint a komputer tisztításához.
.HUpNSiUR]iVN|]EHQPLQGLJIRUGtWVRQNHOOĘILJ\HOPHWD]~WWHVWUH
Magyar
HU
N
N
2s
18 Inch 1436 700C tubular 2117
20 Inch 1596 700 x 20C 2092
22 Inch 1759 700 x 23C 2112
24 Inch 1916 700 x 25C 2124
24 x 1.75 1888 700 x 28C 2136
24 x 1 3/8 1942 700 x 32C 2155
26 x 1.40 1995 700 x 35C 2164
26 x 1.50 2030 700 x 38C 2174
26 x 1.75 2045 27.5 Inch 2193
26 x 1.95 2099 28 Inch 2234
26 x 2.1 2133 28.6 Inch 2281


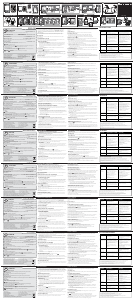
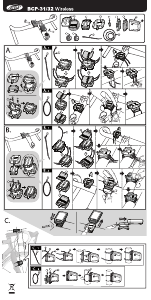
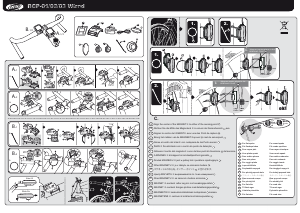

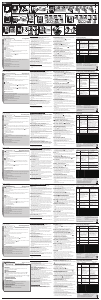
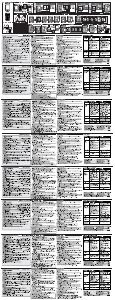
Join the conversation about this product
Here you can share what you think about the BBB BCP-12W Cycling Computer. If you have a question, first carefully read the manual. Requesting a manual can be done by using our contact form.
reply | This was helpful (0) Read more (Translated by Google)
This was helpful (6) (Translated by Google)
reply | This was helpful (0) (Translated by Google)