
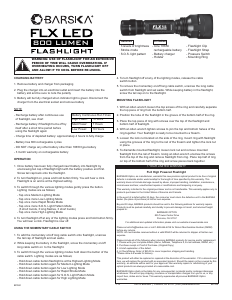
· 3 levels of brightness
· Strobe mode
· S.O.S. light pattern
- One 18650
rechargeable battery
- Battery charger
- Holster
Features
Includes
800 LUMEN
Battery Continuous Run Times
High Power: 3 Hours
Med Power: 7 Hours
Low Power: 10 Hours
BC360
WARNING: USE OF FLASHLIGHT FOR AN EXTENSIVE
PERIOD OF TIME WILL CAUSE OVERHEATING. IF
OVERHEATING OCCURS, TURN FLASHLIGHT OFF
AND ALLOW IT TO COOL BEFORE RE-USING.
- Flashlight Clip
- Flashlight Strap
- Pressure Switch
- Mounting Ring
CHARGING BATTERY
1. Remove battery and charger from packaging
2. Plug the charger into an electrical outlet and insert the battery into the
battery slot and be sure to note the polarity
3. Battery will be fully charged when indicator light is green. Disconnect the
charger from the electrical socket and remove battery
NOTE
- Recharge battery after continuous use
of flashlight, see chart
- Recharge battery if flashlight turns off by
itself after a short time period before
using the flashlight again
- Charge time of depleted battery: approximately 4 hours to fully charge
- Battery has 800 rechargeable cycles
- DO NOT charge any other battery other than 18650 type battery
- 3 month warranty on rechargeable battery
OPERATION
1. Once battery has been fully charged insert battery into flashlight by
unscrewing tail cap of flashlight light with the battery positive end first.
Screw tail cap back onto the flashlight.
2. To turn flashlight on, press and hold button firmly. You will hear a click.
Flashlight is on and is at the Highest setting.
3. To switch through the various lighting modes gently press the button.
Lighting modes are as follows;
- Tap once Medium Lighting Mode
- Tap once more Low Lighting Mode
- Tap once more Rapid Strobe Mode
- Tap once more S.O.S. Light Pattern Mode
(3 short bursts, 3 long flashes, 3 short bursts)
- Tap once more High Lighting Mode
4. To turn flashlight off at any of the lighting modes press and hold button firmly.
You will hear a click. Flashlight is now off.
USING THE MOMENTARY CABLE SWITCH
1. To add the momentary on/off long cable switch onto flashlight, unscrew
the tail cap of flashlight and set aside.
2. While keeping the battery in the flashlight, screw the momentary on/off
long cable switch on to the flashlight.
3. To switch through the various lighting modes hold down the button of the
cable switch. Lighting modes are as follows;
- Hold down cable button flashlight is at the Highest Lighting Mode
- Hold down cable button again for Medium Lighting Mode
- Hold down cable button again for Low Lighting Mode
- Hold down cable button again for Rapid Strobe Mode
- Hold down cable button again for S.O.S. Light Pattern Mode
- Hold down cable button again for High Lighting Mode
4. To turn flashlight off at any of the lighting modes, release the cable
switch button.
5. To remove the momentary on/off long cable switch, unscrew the long cable
switch from flashlight and set aside. While keeping battery in the flashlight,
screw the tail cap on to the flashlight.
MOUNTING FLASHLIGHT
1. With an Allen wrench loosen the top screws of the ring and carefully separate
the top piece of ring from the bottom half.
2. Position the tube of the flashlight in the groove of the bottom half of the ring.
3. Place the top piece of ring with screws over the top of the flashlight and
bottom half of flashlight.
4. With an Allen wrench tighten screws to join the top and bottom halves of the
ring together. Your flashlight is ready to be mounted to a firearm.
5. Loosen the lock nut located on the side of the ring, mount ring with flashlight
using the grooves of the ring to the rail of the firearm and tighten the lock nut
in place.
6. To dismantle mounted flashlight, loosen lock nut and remove mounted
flashlight from the rail of firearm. Using an Allen wrench unscrew the screws
from the top of the ring and remove flashlight from ring. Place top half of ring
on top of the bottom half of the ring and screw pieces back together.
©2013 BARSKA
®
| Pomona, CA 91767 | USA | www.barska.com
BC3587/13
1 YEAR LIMITED WARRANTY
BARSKA® Optics, as manufacturer, warrants this new precision optical product to be free of original
defects in materials and/or workmanship for the length of time specified by this warranty. This
warranty does not include damage caused by abuse, improper handling, installation, maintenance,
normal wear-and-tear, unauthorized repairs or modifications and tampering in anyway.
This warranty is limited to the original purchaser and is not transferable. This warranty applies only to
products purchased in the United States of America and Canada.
In the event of a defect within 30 days, the consumer must return the defective unit to the BARSKA
dealer (the place of purchase) at his/her own expense.
Beyond 30 days, BARSKA products should be sent to the following address for warranty repairs.
Products must be packed carefully and sturdily to prevent damage in transit, and returned freight
prepaid to:
BARSKA® OPTICS
855 Towne Center Drive
Pomona, CA 91767
For additional and updated information please visit our website at www.barska.com
Please email
[email protected] or call 1-888-666-6769 for Return Merchandise Number (RMA#)
before any returns.
NOTE: All merchandise received without a valid RMA # will be returned to shipper at his/her own
expense.
Please include all of the following when returning BARSKA products for service and/or replacement:
1. Please write your complete details (Name, Address, Telephone #, E-mail address, RMA#, etc.)
2. Purchase receipt or Proof of Purchase. (Original/Copy)
3. A brief explanation of the defect.
4. A Check/Money Order of $25.00 to cover inspection, shipping and handling.
*Please allow 6-8 weeks for delivery.
This product will either be replaced or repaired at the discretion of the warrantor. If it's a discontinued
item, we will replace the product with an equivalent product. Should the repair not be covered by this
warranty, an estimate will be sent for your approval. Non-warranty repairs or refurbishing of your
optical products are always provided at a reasonable cost.
BARSKA® Optics shall not be liable for any consequential, incidental and/or contingent damages
whatsoever. We will not pay shipping, insurance or transportation charges from you to us, or any
import fees, duties and or taxes. This warranty supersedes all previous BARSKA® Optics
warranties.
FLX High Powered Flashlight

Join the conversation about this product
Here you can share what you think about the Barska BA12196 Flashlight. If you have a question, first carefully read the manual. Requesting a manual can be done by using our contact form.