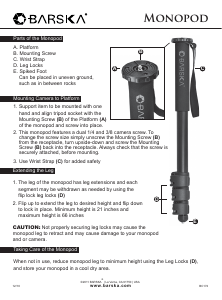
©2011 BARSKA
®
| La Verne, CA 91750 | USA
www.barska.com
BC173
12/10
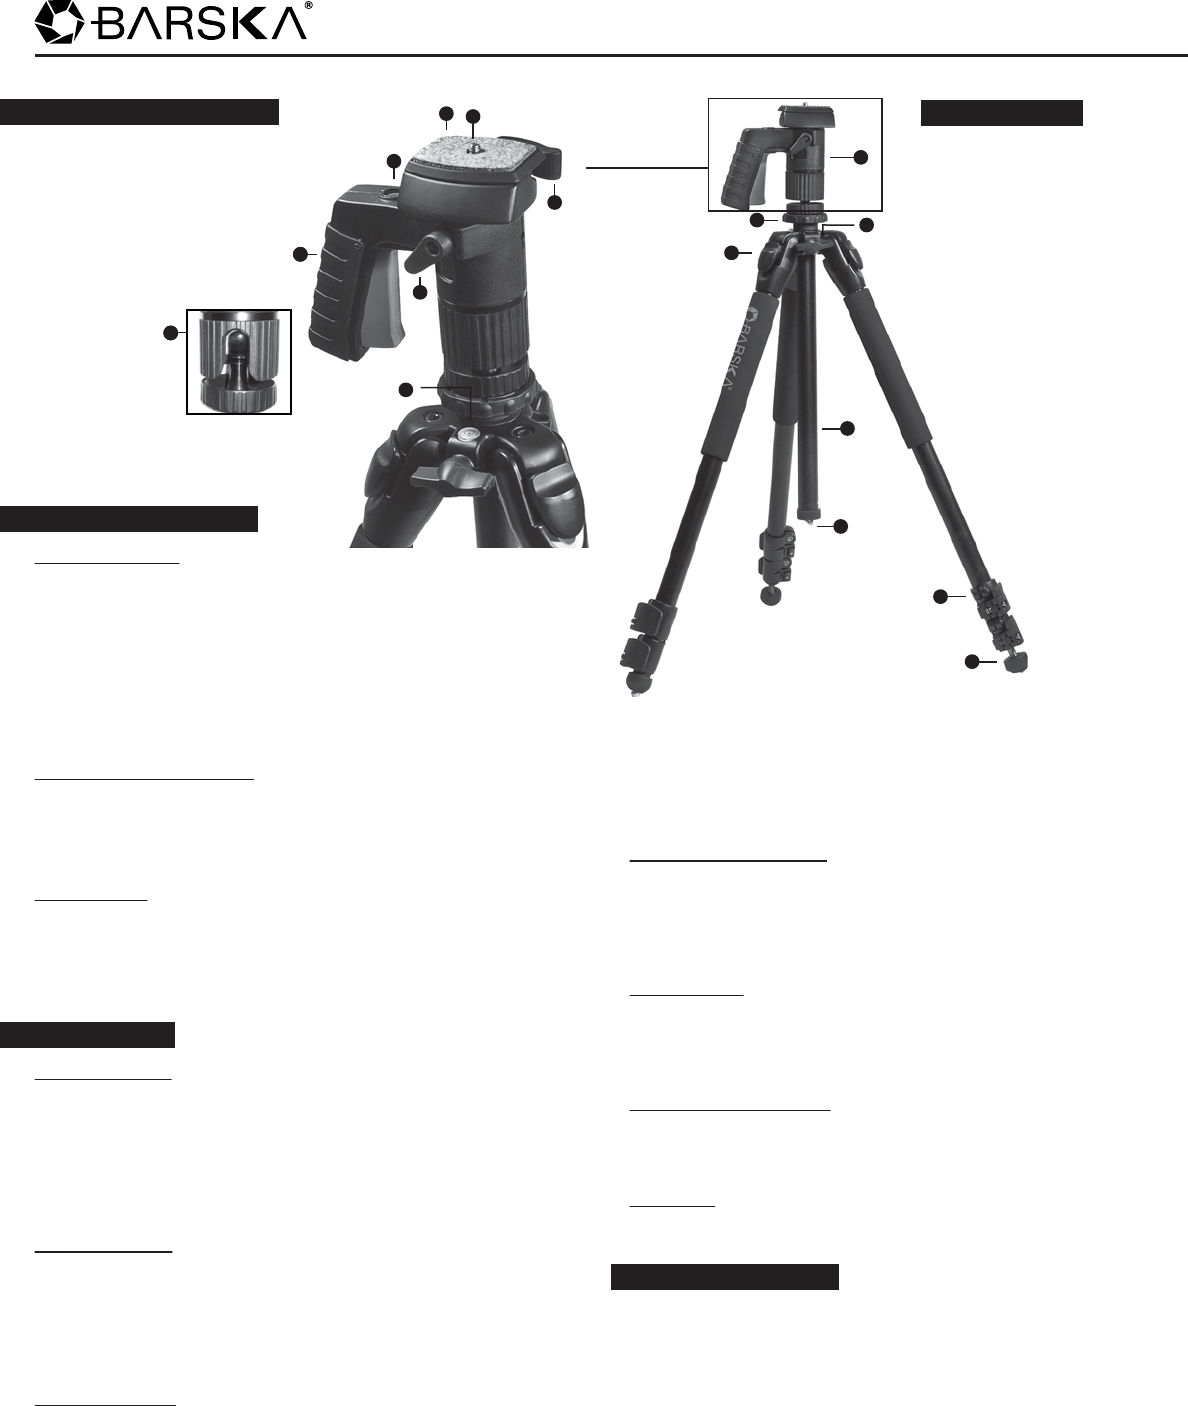
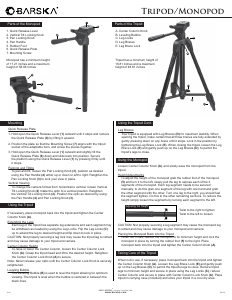
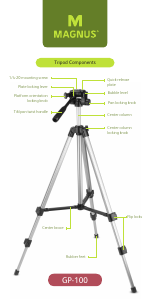
Quick Release Plate
1. Hold open the Quick Release Leg Lock Lever (A) outward until
it stops and remove the Quick Release Plate (B) by lifting upward.
2. Position the plate so that the Mounting Screw (C) aligns with the tripod
socket on the camera or camcorder and screw into place.
3. Hold open the Quick Release Lock Lever (A) outward and with the camera
tilted slightly down, slide the Quick Release Plate (B) back into position.
Secure the platform using the Quick Release Locking Lever (F) by pressing
firmly until it stops.
Using the Pistol Grip Ball Head
For movement in any direction, simply loosen the Pistol Grip Ball Head, by
squeezing the Trigger Control Lock (E). When you have reached your
desired position, simply release the trigger lock and the Pistol Grip Ball
Head will lock into place.
Vertical Cut-Out
The Pistol Grip Ball Head also comes with a Vertical Cut-Out (G) for 360
degree photography. To use this feature, simply squeeze the trigger and
rotate the Pistol Grip Ball Head until you feel the ball head begin to move
downward. You may now use the Pistol Grip Ball Head at any angle. You
can even shoot straight down.
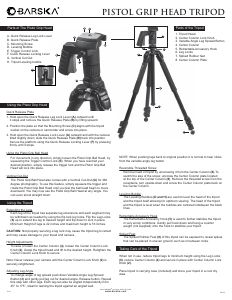
Extending the Legs
Each leg of the tripod has separate leg extensions and each segment may
be withdrawn as needed by using the flip lock leg locks. Flip the Leg Locks
(6) up to extend the leg to desired height and flip down to lock in place.
Minimum Height of legs is 22 inches and maximum height is 53 inches.
CAUTION: Not properly securing a leg lock may cause the tripod leg to retract
and may cause damage to your tripod and camera.
Height Adjustments
To raise or lower the Center Column (4), loosen the Center Column Lock
Knob (2). Grasp the tripod head and lift to the desired height. Retighten the
Center Column Lock Knob to secure.
Note: Never release your camera until the Center Column Lock Knob (2) is
securely retightened.
Adjusting Leg Angle
To change angle of leg spread push down Variable Angle Leg Spread
Button (3) and gently pull leg out for desired angle. Release button. Repeat
this step with other legs. Each leg can also be angled independently from
45° to 175°, ideal for leaning the tripod against an angled wall.
A. Quick Release Leg Lock Lever
B. Quick Release Plate
C. Mounting Screw
D. Leveling Bubble
E. Trigger Control Lock
F. Quick Release Locking Lever
G. Vertical Cut Out
H. Tripod Leveling bubble
Using the Pistol Grip Head
EG
A
1
2
B
C
D
EE
F
PISTOL GRIP HEAD TRIPOD
NOTE: When pushing legs back to original position it is normal to hear clicks
from the variable angle leg button.
Reversible Threaded Screw
Remove head of tripod by unscrewing it from the Center Column (8).To
switch the size of the screw, unscrew the Center Column plate located
at the top of the Center Column (8). Remove the threaded screw from the
receptacle, turn upside-down and screw the Center Column plate back on
the Center Column.
Leveling Bubble
The Leveling Bubbles (D and H) are used to level the head of the tripod
and the tripod itself allowing for optimum viewing. The head of the tripod
and the tripod is level when the bubbles are centered inbetween the black
lines.
Retractable Accessory Hook
The Retractable Accessory Hook (5) is used to further stabilize the tripod
in very windy conditions. Gently pull hook down and hang a counter
weight (not supplied) onto the hook to stabilize your tripod.
Spiked Feet
The Spiked Rubber Feet (8) of this tripod can be exposed to reveal spikes
that can be placed in uneven ground, such as in between rocks.
Taking Care of the Tripod
When not in use, reduce tripod legs to minimum height using the Leg Locks
(6), reduce Center Column (4) and secure in place with Center Column Lock
Knob (2).
Place tripod in carrying case (included) and store your tripod in a cool dry
area.
Parts of The Pistol Grip Head
1. Tripod Head
2. Center Column Lock Knob
3. Variable Angle Leg Spread Button
4. Center Column
5. Retractable Accessory Hook
6. Leg Locks
7. Spiked Rubber feet
8. Center Column Plate
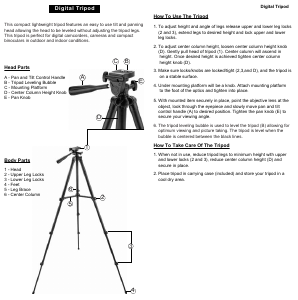
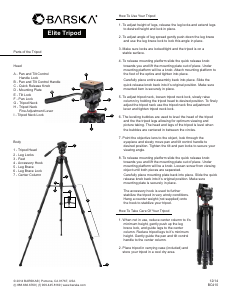
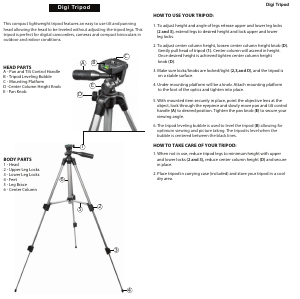
Parts of the Tripod
Using the Tripod
3
4
5
6
7
8
H

Join the conversation about this product
Here you can share what you think about the Barska AF11600 Tripod. If you have a question, first carefully read the manual. Requesting a manual can be done by using our contact form.