FRANÇAIS ITALIANODEUTSCH PORTUGUÈSENGLISH ESPAÑOLNEDERLANDS DANSK
TONDEUSE NEZ/OREILLES
Veuillez lire attentivement les consignes de sécurité
avant toute utilisation de l’appareil.
Cette tondeuse BaByliss permet d’enlever rapidement
et en toute sécurité les poils du nez et des oreilles. Son
design profilé assure une bonne prise en main, et le
système de coupe circulaire rend la tondeuse pratique
et sûre. Pour un nettoyage facile, la tête de l’appareil se
rince sous l’eau.
MISE EN MARCHE DE L’APPAREIL
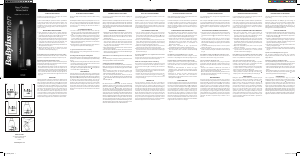
1. Pour introduire une pile, retirer la partie inférieure
de l’appareil en la tournant vers la gauche pour faire
coïncider le repère (I) avec le repère ( ). Tirer ensuite la
partie inférieure de l’appareil vers le bas (Fig. 1).
2. Insérer une pile alcaline AA, borne positive vers le haut.
(Si l’appareil reste inutilisé pour de longues périodes
ou si la pile est en n de vie, la retirer de l’appareil. Cela
contribuera à accroître la durée de vie de celui-ci.)
3. Après avoir introduit la pile, remettre la partie inférieure
de l’appareil bien en place.
4. Mettre l’appareil en marche en tournant la partie
inférieure de l’appareil vers la droite pour faire
coïncider les deux repères (I) (Fig. 2).
Pour éliminer les poils superflus du nez et des oreilles
Introduire délicatement la tête de coupe circulaire dans
la narine ou le pavillon de l’oreille pour couper les poils.
Placement et retrait de la tête de coupe
Mettre l’appareil en position «arrêt» en tournant la partie
inférieure de l’appareil vers la gauche pour faire coïncider
le repère (I) avec le repère (0) (Fig. 3)
- Placer délicatement la tête de coupe sur l’appareil, puis
verrouiller en faisant pivoter la tête de coupe vers la
gauche an de faire coïncider les deux repères (I) (Fig. 4).
- Retirer la tête de coupe de l’appareil en la faisant pivoter
vers la droite an de faire coïncider le repère (I) avec le
repère ( ). Tirer ensuite la tête de l’appareil vers le haut
(Fig. 5).
ENTRETIEN
Mettre l’appareil en position «arrêt» (Fig. 3). Retirer la tête
de l’appareil en la faisant pivoter vers la droite an de
faire coïncider le repère (I) avec le repère ( ). Tirer ensuite
la tête de l’appareil vers le haut (Fig. 5). Eliminer les poils
accumulés sur la tête en souant dessus ou en utilisant
une petite brosse de nettoyage. Il est également possible
de rincer la tête de l’appareil sous l’eau courante (Fig. 6).
Par contre, le manche ne peut pas entrer en contact
avec l’eau. Détacher la tête de l’appareil pour la rincer
sous l’eau. Veiller à ce que la tête soit entièrement sèche
avant de la replacer sur l’appareil et la faire pivoter vers
la gauche jusqu’à ce que les marquages soient alignés.
Ne pas utiliser l’appareil sous la douche ou dans le bain.
TRIMMER FÜR NASE UND OHREN
Lesen Sie vor jeglichem Gebrauch des Geräts sorgfältig die
Sicherheitshinweise.
Mit diesem Trimmer von BaByliss können Haare in Nase und
Ohren schnell und sicher entfernt werden. Das prolierte
Design sorgt für Grisicherheit und durch das kreisende
Schersystem ist dieses Gerät ausgesprochen praktisch und
sicher. Der Kopf des Gerätes wird einfach unter ießendem
Wasser gereinigt.
BETRIEB DES SCHERGERÄTS
1. Zum Einsetzen einer Batterie den unteren Teil des Geräts
abnehmen. Diesen dazu nach links drehen, bis die
Markierung
(I)
mit der Markierung
( )
übereinstimmt.
Daraufhin den unteren Teil des Geräts nach unten
abziehen (Abb. 1).
2. Eine alkalische AA-Batterie mit der positiven Seite nach
oben einlegen. (Wenn das Gerät über einen längeren
Zeitraum nicht verwendet wird oder die Batterie leer
ist, sollte diese aus dem Gerät entfernt werden. Dies
verlängert seine Lebensdauer.)
3. Nach dem Einsetzen der Batterie den unteren Teil des
Geräts wieder aufsetzen.
4. Um das Gerät in Betrieb zu nehmen, den unteren Teil des
Geräts nach rechts drehen, bis die beiden Markierungen
übereinstimmen
(I)
(Abb. 2).
Zum Entfernen von überflüssigen Haaren aus Nase und
Ohren.
Den kreisförmigen Scherkopf vorsichtig in Nasenloch bzw.
Ohrengang einführen und die Haare kürzen.
Scherkopf einsetzen und abnehmen
Vor dem Einsetzen des Scherkopfes das Gerät ausschalten.
Dazu den unteren Teil des Geräts nach links drehen, bis
die Markierung
(I)
mit der Markierung
(0)
übereinstimmt
(Abb. 3).
- Den Scherkopf vorsichtig auf das Gerät setzen und
durch Linksdrehung, bis die beiden Markierungen
übereinstimmen
(I)
(Abb. 4), verriegeln.
- Um den Scherkopf abzunehmen, drehen Sie diesen
nach rechts, bis die Markierung
(I)
mit der Markierung
( )
übereinstimmt. Dann den Kopf des Geräts nach oben
abziehen (Abb. 5).
PFLEGE
Das Gerät auf „Aus“ schalten (Abb. 3). Um den Scherkopf
abzuziehen, diesen nach rechts drehen, bis die Markierung
(I)
mit der Markierung
( )
übereinstimmt. Dann den Kopf
des Geräts nach oben abziehen (Abb. 5). Die Haare, die
sich auf dem Scherkopf angesammelt haben, wegpusten
oder mit einer kleinen Reinigungsbürste entfernen. Es ist
auch möglich, den Gerätekopf unter ießendem Wasser
abzuspülen (Abb. 6). Allerdings darf der Griff nicht mit
Wasser in Berührung kommen. Den Gerätekopf abnehmen
und unter ießendem Wasser reinigen. Achten Sie darauf,
dass der Scherkopf völlig trocken ist, bevor Sie ihn durch
eine Linksdrehung wieder so auf dem Gerät befestigen, dass
die Markierungen übereinander liegen. Verwenden Sie das
Gerät nie unter der Dusche oder in der Badewanne.
SFOLTITRICE PER NASO/ORECCHIE
Prima di utilizzare l’apparecchio, leggere attentamente le
indicazioni in materia di sicurezza.
La sfoltitrice Babyliss consente di eliminare rapidamente
e in tutta sicurezza i peli del naso e delle orecchie. Il
suo design prolato garantisce facilità di impugnatura,
mentre il sistema di taglio circolare la rende pratica e
sicura. La testina dell’apparecchio è lavabile in acqua, per
facilitare la pulizia.
FUNZIONAMENTO DELL’APPARECCHIO
1. Per introdurre una pila, rimuovere la parte inferiore
dell’apparecchio ruotando verso sinistra no a fare
coincidere il riferimento (I)
con ( ). Quindi tirare verso
il basso la parte inferiore dell’apparecchio (Fig. 1).
2. Inserire una pila alcalina AA, con il morsetto positivo
rivolto verso l’alto. (In caso di inutilizzo prolungato
dell’apparecchio o fine durata della pila, estrarre
quest’ultima dall’apparecchio. Ciò contribuirà ad
allungarne la durata)
3. Dopo avere introdotto la pila, riposizionare
correttamente la parte inferiore dell’apparecchio.
4. Accendere l’apparecchio ruotando la parte inferiore
verso destra no a fare coincidere i due riferimenti (I)
(Fig. 2).
Per eliminare i peli superflui da naso e orecchie
Introdurre delicatamente la testina di taglio circolare
nella narice o nel padiglione auricolare per tagliare i peli.
Posizionamento e rimozione della testina di taglio
Prima di posizionare la testina di taglio, posizionare
l’apparecchio su «arresto» ruotando la parte inferiore
verso sinistra no a fare coincidere il riferimento (I)
con
(0) (Fig. 3)
- Posizionare delicatamente la testina di taglio
sull’apparecchio, quindi bloccarla facendola ruotare
verso sinistra in modo da fare coincidere i due riferimenti
(I)
(Fig. 4).
- Rimuovere la testina di taglio dell’apparecchio
ruotandola verso destra fino a fare coincidere il
riferimento (I) con ( ). Quindi tirare verso l’alto la testina
dell’apparecchio (Fig. 5).
MANUTENZIONE
Posizionare l’apparecchio su «arresto» (Fig. 3). Rimuovere
la testina dell’apparecchio facendola ruotare verso destra
no a fare coincidere il riferimento (I)
con ( ). Quindi tirare
verso l’alto la testina dell’apparecchio (Fig. 5). Eliminare
i peli accumulati sulla testina soffiando o utilizzando
una spazzolina per la pulizia. Si può inoltre lavare la
testina dell’apparecchio sotto l’acqua corrente (Fig. 6).
Al contrario, non porre il manico a contatto con l’acqua.
Staccare la testina dell’apparecchio per lavarla con acqua.
Prima di riposizionarla sull’apparecchio, vericare che la
testina sia completamente asciutta e farla ruotare verso
sinistra in modo da allineare le marcature. Non utilizzare
l’apparecchio sotto la doccia o a bagno.
APARADOR PARA NARIZ/ORELHAS
Leia atentamente estes conselhos de segurança antes de
utilizar o aparelho pela primeira vez.
Este aparador BaByliss permite eliminar rapidamente e
com toda a segurança os pelos do nariz e das orelhas.
O seu design elegante garante um bom manuseamento
e o sistema de corte circular torna o aparador prático e
seguro. Para uma limpeza fácil, a cabeça do aparelho
pode ser lavada com água.
COLOCAÇÃO DO APARELHO EM FUNCIONAMENTO
1. Para colocar uma pilha, retire a parte inferior do
aparelho rodando-a para a esquerda para fazer
coincidir a marca (I) com a marca ( ). Depois, puxe a
parte inferior do aparelho para baixo (Fig. 1).
2. Introduza uma pilha alcalina AA, com o polo positivo
virado para cima. (Retire a pilha do aparelho se este não
for utilizado durante longos períodos de tempo ou se
a pilha estiver gasta. Isto contribuirá para um aumento
da vida útil do aparelho.)
3. Depois de introduzir a pilha, volte a colocar a parte
inferior do aparelho.
4. Coloque o aparelho em funcionamento rodando
a parte inferior do mesmo para a direita, fazendo
coincidir as duas marcas (I) (Fig. 2).
Para eliminar os pelos supérfluos do nariz e das orelhas
Introduza cuidadosamente a cabeça de corte circular na
narina ou no pavilhão da orelha para cortar os pelos.
Colocação e remoção da cabeça de corte
Antes de colocar a cabeça de corte, desligue o aparelho
rodando a parte inferior para a esquerda para fazer
coincidir a marca (I) com a marca (0) (Fig. 3)
- Coloque cuidadosamente a cabeça de corte no aparelho
e depois encaixe-a rodando-a para a esquerda para
fazer coincidir as duas marcas (I) (Fig. 4).
- Retire a cabeça de corte do aparelho rodando-a para
direita para fazer coincidir a marca (I) com a marca ( ).
Depois, puxe a cabeça do aparelho para cima (Fig. 5).
MANUTENÇÃO
Desligue o aparelho colocando-o na respetiva posição
(Fig. 3). Retire a cabeça do aparelho rodando-a para
direita para fazer coincidir a marca (I) com a marca ( ).
Depois, puxe a cabeça do aparelho para cima (Fig. 5).
Elimine os pelos acumulados na cabeça soprando ou
usando uma pequena escova de limpeza. Também é
possível lavar a cabeça do aparelho em água corrente
(Fig. 6). O corpo do aparelho, pelo contrário, não pode
entrar em contacto com a água. Separe a cabeça do
aparelho para a lavar com água. Certique-se de que a
cabeça está totalmente seca antes de a voltar a colocar
no aparelho e de a rodar para a esquerda de forma a que
as marcas quem alinhadas. Não utilize o aparelho no
duche nem no banho.
NOSE AND EAR HAIR TRIMMER
Please carefully read the safety instructions before using
the unit.
This BaByliss trimmer safely and quickly trims nasal or ear
hair. It is easy to handle by virtue of its sleek design, and
its rotary cutting system makes the trimmer convenient
and safe. For easy cleaning, the head of the device is
rinsed in water.
TO OPERATE THE DEVICE
1. To insert a battery, remove the base of the device by
turning it to the left, so that mark (I) lines up with mark
( ). Then pull the base of the device downwards (Fig. 1).
2. Insert one AA alkaline battery, positive terminal up. (If
you are not going to use the device for long periods,
or if the battery is at, remove the battery from the
device. This will increase the trimmer’s working life.)
3. After inserting the battery, put the base of the device
rmly back in position.
4. Turn the device on by turning the base of the device to
the right to line up the two marks (I) (Fig. 2).
To get rid of unwanted nasal or ear hairs,
Gently insert the rotary cutting head into the nostril or
ear to cut the hair.
Inserting and removing the cutting head
Turn the device to the «o» position by turning the base of
the device to the left so that mark (I) lines up with mark (0)
(Fig. 3).
- Gently place the cutting head on the device, then lock in
position by turning the cutting head to the left so that
the two marks line up (I) (Fig. 4).
- Remove the cutting head of the device by turning it to
the right, to line up mark (I) with mark ( ). Then pull the
head of the device upwards (Fig. 5)
MAINTENANCE
Turn the device to the «o» position (Fig. 3). Remove the
head of the device by turning it to the right to line up mark
(I) with mark ( ). Then pull the head of the device upwards
(Fig. 5) R emove any b uild -up o f hairs o n the he ad by bl owing
on them or using a small cleaning brush. You can also
rinse the head of the device under running water (Fig. 6).
However, the handle must not come into contact with
water. Remove the cutting head of the device to rinse it
under water. Ensure the head is completely dry before
replacing on the device and turn it to the left until the
marks are lined up. Do not use the device in the shower
or bath.
NEUS EN OORHAARTRIMMER
Lees nauwkeurig de veiligheidsvoorschriften voordat u het
apparaat gaat gebruiken.
Met deze BaByliss tondeuse verwijdert u snel en veilig de
haartjes in neus en oren. Door zijn elegante vormgeving
ligt de tondeuse goed in de hand en het ronddraaiende
scheersysteem maakt de tondeuse praktisch en veilig. Voor
een gemakkelijke reiniging kan de kop van het apparaat onder
de kraan worden afgespoeld.
HET APPARAAT AANZETTEN
1. Om een batterij te plaatsen, dient u eerst het onderste
gedeelte van het apparaat te verwijderen door het naar
links te draaien zodat markering
(I)
en markering
( )
op een
lijn staan. Trek vervolgens het onderste gedeelte van het
apparaat naar beneden (g. 1).
2. Plaats een AA-alkalinebatterij met de positieve pool naar
boven. (Haal de batterij uit het apparaat, als het apparaat
gedurende lange tijd niet wordt gebruikt of als de batterij
bijna leeg is. Zo gaat het apparaat langer mee.)
3. Nadat u de batterij hebt geplaatst, duwt u het onderste
gedeelte van het apparaat weer stevig op zijn plaats.
4. Zet het apparaat aan door het onderste gedeelte van het
apparaat naar rechts te draaien zodat de twee markeringen
(I)
samenvallen (g. 2).
Voor het verwijderen van ongewenste haren uit de
neus en de oren
Steek de ronde scheerkop van het apparaat voorzichtig in het
neusgat of de oorschelp om de haren te verwijderen.
Plaatsen en verwijderen van de scheerkop
Zet, voordat u de scheerkop plaatst, het apparaat in de stand
‘stop’ door het onderste deel van het apparaat naar links te
draaien zodat markering
(I)
en markering
(0)
samenvallen
(g. 3).
- Zet voorzichtig de scheerkop op het apparaat en zet hem
vast door de scheerkop naar links te draaien zodat de twee
markeringen
(I)
samenvallen (g. 4).
- Verwijder de scheerkop van het apparaat door hem naar
rechts te draaien, zodat markering
(I)
en markering
( )
samenvallen. Trek vervolgens de scheerkop naar boven van
het apparaat af (g. 5).
ONDERHOUD
Zet het apparaat in de stand “stop” (fig. 3). Verwijder de
scheerkop van het apparaat door hem naar rechts te draaien,
zodat markering
(I)
en markering
( )
samenvallen. Trek
vervolgens de scheerkop naar boven van het apparaat af (g. 5).
Verwijder de opgehoopte haartjes van de scheerkop door ze
weg te blazen of gebruik een reinigingsborsteltje. U kunt de
scheerkop van het apparaat ook onder de kraan afspoelen
(g. 6). De handgreep mag echter niet in contact komen met
water. Verwijder de scheerkop van het apparaat voordat u
hem afspoelt onder de kraan. Zorg dat de scheerkop helemaal
droog is voordat u hem terugplaatst op het apparaat, en draai
hem naar links totdat de markeringen op 1 lijn staan met elkaar.
Gebruik het apparaat niet onder de douche of in bad.
CORTAPELO NARIZ/OREJAS
¡Lea atentamente estas consignas de seguridad antes de
utilizar el aparato!
Este cortapelo de BaByliss permite eliminar rápidamente
y con toda seguridad el vello de nariz y orejas. Su diseño
estilizado facilita su manejo y el sistema de corte circular
permite utilizarlo de forma práctica y segura. El cabezal
del cortapelo se limpia fácilmente enjuagándolo con
agua.
PUESTA EN FUNCIONAMIENTO DEL APARATO
1. Para colocar la pila, retire la parte inferior del aparato
girándola hacia la izquierda hasta que la marca (I)
coincida con la marca ( ) y tire de ella hacia abajo (Fig.
1).
2. Coloque una pila alcalina AA, con el polo positivo
hacia arriba. (Retire la pila del aparato si no lo utiliza
durante periodos largos o si la pila está descargada.
De esta forma también podrá prolongar la vida útil del
cortapelo).
3. Una vez introducida la pila, vuelva a colocar la parte
inferior del aparato.
4. Ponga el aparato en marcha girando la parte inferior
hacia la derecha hasta que coincidan las dos marcas (I)
(Fig. 2).
Para eliminar el vello superfluo de la nariz y las orejas
Introduzca con cuidado el cabezal de corte circular en el
oricio de la nariz o de la oreja y corte el vello.
Colocar y retirar el cabezal de corte
Antes de colocar el cabezal de corte, ponga el aparato
en posición «parada» girando la parte inferior hacia la
izquierda hasta que la marca (I) coincida con la marca (0)
(Fig. 3)
- Coloque con cuidado el cabezal de corte sobre el
aparato y encájelo girándolo hacia la izquierda hasta
que coincidan las dos marcas (I) (Fig. 4).
- Retire el cabezal de corte del aparato girándolo hacia la
derecha hasta que la marca (I) coincida con la marca ( )
y tire de él hacia arriba (Fig. 5).
MANTENIMIENTO
Ponga el aparato en posición «parada» (Fig. 3). Retire
el cabezal del aparato girándolo hacia la derecha hasta
que la marca (I) coincida con la marca ( ) y tire de él hacia
arriba (Fig. 5). Elimine el vello acumulado en el cabezal
soplando o bien con un pequeño cepillo de limpieza.
También puede aclarar el cabezal del aparato con agua
corriente (Fig. 6). No obstante, el mango no puede entrar
en contacto con el agua. Suelte el cabezal del aparato
para enjuagarlo con agua. Asegúrese de que el cabezal
esté totalmente seco y vuelva a encajarlo en el aparato
girándolo hacia la izquierda hasta que las marcas queden
alineadas. No utilice el aparato bajo la ducha ni en la
bañera.
KLIPPEMASKINE TIL NÆSE/ØRER
Læs disse sikkerhedsanvisninger grundigt, før apparatet
tages i brug.
Denne klippemaskine fra BaByliss gør det muligt at
erne hår i næse og ører på en hurtig og sikker måde.
Det gennemtænkte design gør, at den ligger godt i
hånden og det cirkulære klippesystem sørger for, at
klippemaskinen er praktisk og sikker. For enkel rengøring
kan apparatets hoved skylles med vand.
START AF APPARATET
1. Når du skal indsætte et batteri, skal apparatets nederste
del ernes ved at vride den til venstre, så mærket (I)
ugter med mærket ( ). Træk dernæst apparatets
nederste del nedad (Fig. 1).
2. Indsæt et alkalisk AA-batteri, med positiv pol øverst.
(Hvis apparatet ikke skal bruges i længere perioder,
eller hvis batteriet er aadet, skal batteriet tages ud af
apparatet. Dette forlænger levetiden.)
3. Når du har sat et batteri i, skal apparatets nederste del
sættes godt på plads igen.
4. Tænd for apparatet ved at dreje apparatets nederste
del til højre, så de to mærker står overfor hinanden (I)
(Fig. 2).
Fjernelse af overflødigt hår i næse og ører
Før forsigtigt klippehovedet med det cirkulære
klippesystem ind i næseboret eller det ydre øre for at
klippe hårene.
Påsætning og ernelse af klippehovedet
Før du påsætter klippehovedet, skal du sætte apparatet
i «stop»-position ved at dreje apparatets nederste del til
venstre, så mærket (I) står overfor mærket (0) (Fig. 3)
- Sæt forsigtigt klippehovedet på apparatet, og lås det
ved at få de to mærker (I) til at stå overfor hinanden
(Fig. 4).
- Fjern klippehovedet fra apparatet ved at vippe det
til højre, så mærket (I) står overfor mærket ( ). Træk
dernæst apparatets hoved opad (Fig. 5).
VEDLIGEHOLD
Sæt apparatet i «stop»-position (Fig. 3). Fjern
klippehovedet fra apparatet ved at vippe det til højre,
så mærket (I) står overfor mærket ( ). Træk dernæst
apparatets hoved opad (Fig. 5). Fjern opsamlet hår på
apparatets hoved ved at puste dem bort eller ved at
bruge en lille rengøringsbørste. Det er også muligt at
skylle apparatets hoved under rindende vand (Fig. 6).
Håndtaget må imidlertid ikke udsættes for vand. Fjern
klippehovedet fra apparatet for at skylle det under vand.
Vent til apparatets hoved er helt tørt, sæt det på igen og
drej det til venstre til mærkerne ugter med hinanden.
Apparatet må ikke anvendes i bruseren eller badekarret.
Made in China
BABYLISS SARL
99 avenue Aristide Briand
92120 Montrouge
France
www.babyliss.com
Fig. 1
Fig. 3
Fig. 5
Fig. 2
Fig. 4
Fig. 6
15_E650E_IB.indd 1 09/06/2015 10:23 AM

Join the conversation about this product
Here you can share what you think about the BaByliss E650E Nose Hair Trimmer. If you have a question, first carefully read the manual. Requesting a manual can be done by using our contact form.
reply | This was helpful (3) (Translated by Google)
reply | This was helpful (0) (Translated by Google)