GB/IE GB/IE
GB/IE GB/IEGB/IE GB/IEGB/IE GB/IE
SESESESESESE
j Tryck RESET-knappen
4
för att stoppa larmet. Om du inte tryck-
er någon knapp, ljuder larmet i ca. 1 minut.
j Tryck RESET-knappen
4
när du befinner dig i tidsläge för att
visa inställd larmtid.
j Tryck och håll RESET-knappen
4
när klockan befinner sig i tids-
läge. Tryck sedan START-knappen
2
för att inaktivera larmet.
Larmsymbolen
7
slocknar.
Q
Aktivera/inaktivera signalton
Obs: Varje heltimme ljuder en signalton.
j Tryck MODE-knappen
6
tills klockslaget
3
visas i displayen.
j Håll RESET-knappen
4
tryckt och tryck samtidigt MODE-knap-
pen
6
. Alla veckodagar
1
lyser. Signaltonen är aktiverad.
j Håll RESET-knappen
4
tryckt och tryck samtidigt MODE-knap-
pen
6
. Alla veckodagar
1
slocknar. Signaltonen är inaktiverad.
Q
Använda tidtagningsur
j Tryck MODE-knappen
6
tills klockslaget
3
visas i displayen.
j Tryck MODE-knappen
6
en gång för att komma till tidtagnings-
läge.
j Tryck START-knappen
2
för att starta tidtagningsuret.
j Tryck START-knappen
2
igen för att stoppa tidtagningsuret.
j Tryck RESET-knappen
4
för att sätta tidtagningsuret till 0.
Mäta mellantid:
j Tryck MODE-knappen
6
tills klockslaget
3
visas i displayen.
j Tryck MODE-knappen
6
en gång för att komma till tidtagnings-
läge.
Q
Använda belysning
j Tryck och håll LIGHT-knappen
8
för att tända ljuset.
j Släpp LIGHT-knappen
8
igen, ljuset slocknar efter ca 3 sekun-
der.
Q
Visa datum
j Tryck START-knappen
2
när du befinner dig i tidsläge. Datum
visas i displayen.
j Släpp START-knappen
2
igen för att gå till tidsläge.
Q
Ställa in larm
j Tryck MODE-knappen
6
två gånger för att komma till larmlä-
ge. Timmarna för larmet blinkar i displayen.
j Tryck START-knappen
2
för att ställa in timmarna.
j Tryck RESET-knappen
4
för att bekräfta inmatningen. Minuter-
na blinkar i displayen.
j Tryck START-knappen
2
för att ställa in minuterna.
j Tryck RESET-knappen
4
för att bekräfta inmatningen.
j Tryck MODE-knappen
6
för att gå till tidsläge.
Q
Aktivera/inaktivera larm
j Aktivera och inaktivera larmet genom att trycka och hålla
START-knappen
2
och RESET-knappen
4
i tidsläge. Larmsym-
bolen
7
visas i displayen när larmet är aktiverat.
j Aktivera snooze-funktionen när larmet ljuder genom att trycka
START-knappen
2
. Larmet ljudet igen efter 4 till 5 minuter.
Larmet ljudet igen så länge du trycker START-knappen
2
.
Q
Ställa in klockslag och datum
1. Tryck MODE-knappen
6
tre gånger. Sekunderna
5
och
veckodagen
1
blinkar i displayen.
2. Tryck START-knappen
2
för att sätta sekunderna
5
till 0.
3. Tryck RESET-knappen
4
för att bekräfta inmatningen. Minuter-
na blinkar i displayen.
4. Tryck START-knappen
2
för att ställa in minuterna.
5. Tryck RESET-knappen
4
för att bekräfta inmatningen. Timmar-
na blinkar i displayen.
6. Tryck START-knappen
2
för att ställa in timmarna.
Obs: Kontrollera symbolerna A, P och H
9
som visas i dis-
playen när timmarna ställs in. A och P (A = förmiddag / P = ef-
termiddag) betyder 12-timmarsformat. H betyder 24-timmarsfor-
mat. Tryck START-knappen
2
, för att ställa in önskat värde och
önskat format. Tryck RESET-knappen
4
för att bekräfta inmat-
ningen.
7. Tryck RESET-knappen
4
för att bekräfta inmatningen. Datum
blinkar i displayen.
8. Tryck START-knappen
2
för att ställa in datum.
9. Tryck RESET-knappen
4
för att bekräfta inmatningen. Månad
blinkar i displayen.
10. Tryck START-knappen
2
för att ställa in månad.
11. Upprepa arbetsmomenten 8 och 9 för att ställa in veckodag
1
.
Veckodagarna förkortas enligt följande:
MO = Måndag
TU = Tisdag
WE = Onsdag
TH = Torsdag
FR = Fredag
SA = Lördag
SU = Söndag
12. Tryck MODE-knappen
6
för att gå till standardindikering.
på apparaten ska kunna undvikas!
J Undvik kontakt med hud, ögon och slemhinnor. Om du kommer i
beröring med batterisyra, skölj det berörda stället med rikligt
med vatten och / eller uppsök läkare!
Q
Vattentäthet
J Denna klocka är vattentät till 3 bar enligt DIN 8310.
3 bar vattenresistent
J Tryck inga knappar när klockan varit i kontakt med vatten.
Q
Byta batteri
J Låt endast behörig optiker byta batteriet och utföra reparationer
för att undvika att urverket skadas.
J Avfallshantera tomma batterier på miljövänligt sätt.
J Kasta inte klockan i hushållssoporna!
Q
Användning
j Tryck MODE-knappen
6
, för att ställa in önskat läge: Tid >
Tidtagningsur > Larm > Tidsinställning > Tid.
Säkerhetsinformation
Förvara alla säkerhetsinstruktioner och
anvisningar För Framtida behov.
J
VARNING!
RISK FÖR LIVSFARLIGA
SKADOR FÖR SPÄDBARN OCH BARN!
Låt inte barn leka med förpackningsmaterial.
Kvävningsrisk föreligger.
VARNING!
LIVSFARA! Batterier är lätta att svälja vilket
innebär livsfara. Uppsök omedelbart läkare om någon svalt ett
batteri.
J Ta aldrig isär produkten. Icke fackmässiga reparationer kan
medföra allvarlig fara för användaren. Låt endast kvalificerad
personal utföra reparationer.
Säkerhetsinformation
beträffande batterier
J VARNING! EXPLOSIONSRISK! Ladda
aldrig upp batterier igen!
J Se till att tomma batterier tas ur apparaten omgående. Risk för
att batterierna läcker!
J Batterier får ej kastas i hushållsavfallet!
J Alla konsumenter är enligt lag skyldiga att kasta bort förbrukade
batterier på föreskrivet sätt!
J Förvara batterier oåtkomliga från barn, kasta ej in dem i eld,
kortslut dem ej och ta inte sönder dem.
J Om detta ej beaktas kan batteriet urladdas utöver dess slutspän-
ning. Det finns då risk för att batteriet läcker. Om batteriet i din
apparat läcker, måste det avlägsnas omedelbart för att skador
Armbandsur
Q
Inledning
Gör dig bekant med produkten innan du använder den.
Läs nedan-stående säkerhetsanvisningar och bruksanvisning.
Använd endast produkten i enlighet med beskrivningen
och för angivna ändamål. Förvara denna bruksanvisning på säker
plats. Se till att bruksanvisningen alltid finns tillgänglig även
vid vidare
användning av tredje man.
Q
Avsedd användning
Armbandsklockan visar tid och datum och har funktioner för larm-
och tidtagningsur. En annan användning än den som beskrivits eller
en förändring av produkten är inte tillåten och kan förorsaka person-
skador och / eller skador på produkten. Tillverkaren ansvarar inte för
skador som förorsakas av icke ändamålsenlig användning. Denna
produkt är ej lämplig för yrkesmässig användning.
Q
Beskrivning av komponenterna
1
Veckodag
2
START-knapp
3
Klockslag
4
RESET-knapp
5
Sekunder
6
MODE-knapp
7
Larmsymbol
8
LIGHT-knapp
9
“A“ / “P“ / “H“-indikering
10
Ring (endast modell Z30483F)
FIFIFIFIFIFI
FIFI
Vialliset ja käytetyt paristot on toimitettava kierrätykseen direktiivin
2006 / 66 / EC mukaisesti. Palauta paristot ja / tai laite tarjolla ole-
vaan keräyslaitokseen.
Pb
Akkujen väärä hävittäminen
aiheuttaa ympäristövahinkoja!
Paristoja ei saa hävittää talousjätteenä. Ne voivat sisältää myrkylli-
siä raskasmetalleja ja ne kuuluvat ongelmajätekäsittelyyn. Raskasme-
tallien kemialliset merkit ovat seuraavat: Cd = kadmium, Hg = eloho-
pea, Pb = lyijy. Toimita tästä syystä vanhat paristot kunnalliseen
keräyspisteeseen.
Tuotenimike:
Rannekello
Malli nro.: Z30483F / Z30483G
Versio: 10 / 2010
Päivitetty: 08/2010
Tunnistenro: Z30483F/G082010-3
Väliajan mittaaminen:
j Paina niin usein MODE-näppäintä
6
, kunnes kellonaikanäyttö
3
tulee näyttöruutuun.
j Paina kerran MODE-näppäintä
6
päästäksesi ajanottokellon
toimintoon.
j Paina START-näppäintä
2
käynnistääksesi ajanottokellon.
j Paina RESET-näppäintä
4
saadaksesi väliajan näyttöön. Ajan-
ottokello käy taustalla edelleen.
j Paina RESET-painiketta
4
uudelleen palataksesi ajanottoai-
kaan.
j Paina START-näppäintä
2
pysäyttääksesi ajanottokellon.
j Paina RESET-näppäintä
4
nollataksesi ajanottokellon.
Q
Puhdistus ja hoito
j Puhdista tuote kuivalla liinalla, joka ei nukkaannu. Silmälasien
puhdistusliina on ihanteellinen tähän tarkoitukseen.
Q
Jätehuolto
Pakkaus on ympäristöystävällista materiaalia, jonka voit
viedä paikalliseen kierrätyspisteeseen.
Saat lisätietoa käytettyjen tuotteiden jätehuoltomahdollisuuksista kun-
nan- tai kaupungintoimistosta.
Älä heitä käytettyä tuotetta talousjätteisiin. Toimi ympäris-
töystäväl-lisesti toimittamalla se asianmukaiseen jätehuol-
toon. Paikallisesta kunnan- tai kaupungintoimistosta saat
lisätietoa kierrätyspisteistä ja aukioloajoista.
START-näppäintä
2
.
j Paina RESET-näppäintä
4
pysäyttääksesi herätyksen. Ellet
paina mitään näppäintä, herätys kuuluu noin minuutin.
j Paina START-näppäintä
4
, kun kello on aikamoodissa näyttääk-
sesi asetetun herätysajan.
j Kun kello on aikamoodissa, paina RESET-näppäintä
4
ja pidä
se painettuna. Paina tämän jälkeen START- näppäintä
2
, kun
haluat katkaista herätyksen. Herätyssymboli
7
sammuu.
Q
Herätysäänen käynnistys / pysäytys
Huomautus: Jokaisena täytenä tuntina kuuluu lyhyt herätysääni.
j Paina niin usein MODE-näppäintä
6
, kunnes kellonaikanäyttö
6
tulee näyttöruutuun.
j Pidä RESET-näppäintä
4
painettuna ja paina samanaikaisesti
MODE-näppäintä
6
. Kaikki paivät viikonpäivien näytössä
1
syttyvät. Herätysääni on käynnistetty.
j Pidä RESET-näppäintä
4
painettuna ja paina samanaikaisesti
MODE-näppäintä
6
. Kaikki päivät viikonpäivien näytossä
1
sammuvat. Herätysääni on pysäytetty.
Q
Ajanottokellon käyttö
j Paina niin usein MODE-näppäintä
6
, kunnes kellonaikanäyttö
3
tulee näyttöruutuun.
j Paina kerran MODE-näppäintä
6
päästäksesi ajanottotoimin-
toon.
j Paina START-näppäintä
2
käynnistääksesi ajanottokellon.
j Paina START-näppäintä
2
uudelleen pysäyttääksesi ajanotto-
kellon.
j Paina RESET-näppäintä
4
nollataksesi ajanottokellon.
Q
Valaistuksen käyttö
j Paina LIGHT-näppäintä
8
, kun haluat sytyttää valon.
j Päästä LIGHT-näppäin
8
taas irti ja valo sammuu noin 3 sekun-
nin kuluttua.
Q
Päivämäärän näyttö
j Paina START-näppäintä
2
, kun kello on aikamoodissa. Näyttö-
ruutuun tulee päivämäärä.
j Päästä START-näppäin
2
irti päästäksesi takaisin aikamoodiin.
Q
Herätyksen asetus
j Paina MODE-näppäintä
6
kaksi kertaa päästäksesi herätystoi-
mintoon. Herätysajan tuntinäyttö vilkkuu näyttöruudussa.
j Paina START-näppäintä
2
, kun haluat asettaa tunnit.
j Vahvista syöttö painamalla RESET-näppäintä
4
. Minuuttinäyttö
vilkkuu näyttöruudussa.
j Aseta minuutit painamalla START-näppäintä
2
.
j Vahvista syöttö painamalla RESET-näppäintä
4
.
j Paina MODE-näppäintä
6
päästäksesi aikamoodiin.
Q
Herätyksen kytkeminen päälle / pois
j Kytke herätys päälle ja pois painamalla aikamoodissa START-
näppäintä
2
ja RESET-näppäintä
4
ja pidä painettuna. Kun
herätys on kytketty päälle, näyttöruutuun tulee herätyssymboli
7
.
j Kun herätys kuuluu, käynnistä Snooze-toiminto painamalla
START-näppäintä
2
. Herätys kuuluu uudelleen 4 - 5 minuutin
kuluttua. Herätys kuuluu uudelleen niin kauan, kun painat
Q
Kellonajan ja päivämäärän asetus
1. Paina MODE-näppäintä
6
kolme kertaa. Sekuntinäyttö
5
sekä viikonpäivien näyttö
1
vilkkuvat näyttöruudussa.
2. Paina START-näppäintä
2
nollataksesi sekuntinäytön
5
.
3. Vahvista syöttö painamalla RESET-näppäintä
4
. Minuuttinäyttö
vilkkuu näyttöruudussa.
4. Aseta minuutit painamalla START-näppäintä
2
.
5. Vahvista syöttö painamalla RESET-näppäintä
4
. Tuntinäyttö
vilkkuu näyttöruudussa.
6. Paina START-näppäintä
2
, kun haluat asettaa tunnit.
Huomautus: Huomioi tunteja asettaessasi symbolit A, P ja H
9
,
jotka tulevat näyttöruutuun. A ja P (A = aamupäivä / P = iltapäi-
vä) tarkoittavat 12-tunnin näyttömuotoa. H tarkoittaa 24-tunnin
näyttömuotoa. Paina START-näppäintä
2
, kun haluat asettaa
halutun arvon ja halutun näyttömuodon. Vahvista syöttö paina-
malla RESET-näppäintä
4
.
7. Vahvista syöttö painamalla RESET-näppäintä
4
. Päivämäärän
näyttö vilkkuu näyttöruudussa.
8. Paina START-näppäintä
2
, kun haluat asettaa päivämäärän.
9. Vahvista syöttö painamalla RESET-näppäintä
4
. Kuukausinäyttö
vilkkuu näyttöruudussa.
10. Aseta kuukausi START-näppäintä
2
painamalla.
11. Toista askeleet 8. ja 9. viikonpäivän
1
asettamiseksi. Viikonpäi-
vät on lyhennetty seuraavasti:
MO= maanantai,
TU= tiistai,
WE= keskiviikko,
TH= torstai,
FR= perjantai,
SA= lauantai,
SU= sunnuntai
12. Paina MODE-näppäintä
6
päästäksesi vakionäyttöön.
J Vältä kosketusta ihoon, silmiin ja limakalvoihin. Paristohappo on
huuhdeltava altistuneelta alueelta heti pois runsaalla vedellä
ja / tai on otettava yhteys lääkäriin!
Q
Vesitiiviys
J Tämä kello on vedenpitävä 3 bariin asti DIN 8310 mukaisesti.
3 barin vedenpitävyys
J Älä paina mitään näppäintä, jos kello joutuu kosketuksiin veden
kanssa.
Q
Pariston vaihtaminen
J Anna vain ammattihenkilön suorittaa paristojen vaihto ja korja-
ukset, jotta välttäisit kellokoneiston vaurioitumisen.
J Hävitä käytetyt paristot ympäristöystävällisesti.
J Älä heitä kelloa talousjätteisiin.
Q
Käyttö
j Paina MODE-näppäintä
6
, kun haluat asettaa halutun toimin-
non: aikamoodi > ajanottokello > hälytys > ajan asetus > aika-
moodi.
Turvallisuusohjeita
säilytä kaikki turva- ja muut ohjeet tulevaa tarvetta
varten!
J
VAROLTUS!
HENGENVAARA
JA
TAPATURMAVAARA PIKKULAPSILLE JA
LAPSILLE! Älä koskaan jätä lapsia pakkausmateri-
aalien läheisyyteen ilman valvontaa. Tukehtumisvaara.
VAROLTUS!
HENGENVAARA! Paris-tojen nieleminen voi
olla hengenvaarallista. Pariston nielleen henkilön on välittömästi
mentävä lääkärille.
J Älä pura laitetta osiin. Asiaankuulumattomat korjaukset voivat ai-
heuttaa käyttäjälle huomattavan vaaran. Anna ainoastaan asi-
antuntijan suorittaa korjaukset.
Paristojen turvaohjeet
J VAROITUS! RÄJÄHDYSVAARA! Paristoja ei
saa koskaan ladata uudelleen!
J Anna välittömästi poistaa loppuunkuluneet paristot kellosta. On
olemassa vuotovaara!
J Paristot eivät kuulu tavallisiin talousjätteisiin!
J Jokainen käyttäjä on laillisesti velvollinen hävittämään paristot
säädösten mukaisesti!
J Paristoja ei saa antaa lasten käsiin, heittää tuleen, oikosulkea
eikä purkaa.
J Virheellinen käyttö saattaa johtaa pariston purkautumiseen sen
loppujännitteen ylitse. Silloin on olemassa vuotovaara. Jos lait-
teen paristo on vuotanut, poista se heti välttääksesi tuotteen va-
hingoittumista!
Rannekello
Q
Johdanto
Tutustu laitteeseen ennen ensimmäistä käyttöönottoa. Lue
sitä varten tämä käyttöohje ja turvallisuusohjeet. Käytä
laitetta ainoastaan kuvatulla tavalla ja mainitussa käyttö-
tarkoituksessa. Säilytä käyttöohje huolellisesti. Anna kaikki asiakirjat
laitteen mukana mahdolliselle uudelle omistajalle.
Q
Määräystenmukainen käyttö
Rannekello näyttää ajan ja päivämäärän ja siinä on herätys- ja ajan-
ottotoiminto. Tuotetta ei saa käyttää muulla kuin edellä kuvatulla ta-
valla eikä sitä saa muuttaa. Se voi aiheuttaa loukkaantumisia ja / tai
tuotteen vanhinkoitumista. Valmistaja ei vastaa virheellisestä käytöstä
johtuneista vahingoista. Tuote ei ole tarkoitettu ammattimaiseen
käyttöön.
Q
Osien kuvaus
1
Viikonpäivien näyttö
2
START-näppäin
3
Kellonajan näyttö
4
RESET-näppäin
5
Sekuntinäyttö
6
MODE-näppäin
7
Herätyssymboli
8
LIGHT-näppäin
9
“A“ / “P“ / “H“-näyttö
10
Kiertyvä ulkorengas (vain malli Z30483F)
Faulty or used batteries must be recycled in accordance with Directive
2006 / 66 / EC. Please return the batteries and / or the device to the
available collection points.
Pb
Environmental damage through
incorrect disposal of the batteries!
Batteries may not be disposed of with the usual domestic waste.
They may contain toxic heavy metals and are subject to hazardous
waste treatment rules and regulations. The chemical symbols for
heavy metals are as follows: Cd = cadmium, Hg= mercury, Pb = lead.
That is why you should dispose of used batteries at a local collection
point.
Product Description:
Wristwatch
Model-no.: Z30483F / Z30483G
Version: 10 / 2010
Last Information Update: 08/2010
Ident.-no.: Z30483F/G082010-3
Measuring an intermediate time:
j Press the MODE button
6
repeatedly until the time field
3
appears in the display.
j Press the MODE button
6
once to enter the stopwatch mode.
j Press the START button
2
to start the stopwatch.
j Press the RESET button
4
to display the intermediate time. The
stopwatch continues to run in the background.
j Press the RESET button
4
to return to the stopwatch time.
j Press the START button
2
to stop the stopwatch.
j Press the RESET button
4
to set the stopwatch to 0.
Q
Cleaning and care
j Clean the product with a dry, fluff-free cloth. A spectacles cloth
is ideal.
Q
Disposal
The packaging is made entirely of recyclable materials,
which you may dispose of at local recycling facilities.
Contact your local refuse disposal authority for more details of how
to dispose of your worn-out product.
To help protect the environment, please dispose of the
product properly when it has reached the end of its use-
ful life and not in the household waste. Information on
collection points and their opening hours can be
obtained from your local authority.
to 5 minutes. The alarm will keep on sounding as many times as
you press the START button
2
.
j Press the RESET button
4
to stop the alarm. The alarm will keep
on sounding for approx. 1 minute if you don’t press any button.
j Press the RESET button
4
when the watch is in time mode to
display the alarm time.
j If the watch is in time mode, press and keep pressed the RESET
button
4
. Press the START button
2
to switch off the alarm.
The alarm symbol
7
disappears.
Q
Activating / deactivating
the acoustic signal
Note: An acoustic signal will sound every hour on the hour.
j Press the MODE button
6
repeatedly until the time field
3
appears in the display.
j Press and keep pressed the RESET button
4
and while doing
this, press the MODE button
6
. All the day of the week fields
1
appear. The audible signal function is activated.
j Press and keep pressed the RESET button
4
and while doing
this, press the MODE button
6
. All the day of the week fields
1
disappear. The audible signal function is deactivated.
Q
Using the stopwatch
j Press the MODE button
6
repeatedly until the time field
3
appears in the display.
j Press the MODE button
6
once to enter the stopwatch mode.
j Press the START button
2
to start the stopwatch.
j Press the START button
2
again to stop the stopwatch.
j Press the RESET button
4
to set the stopwatch to 0.
Q
Lighting the display
j Press and keep pressed the LIGHT button
8
to switch on the light.
j Release the LIGHT button
8
and the light will switch off after
approx. 3 seconds.
Q
Displaying the date
j Press the START button
2
while the watch is in time mode. The
date appears on the display.
j Release the START button
2
to return to time mode.
Q
Setting the alarm
j Press the MODE button
6
twice to enter the alarm mode. The
hour field of the alarm time flashes in the display.
j Press the START button
2
to set the desired hour value.
j Press the RESET button
4
to confirm your setting. The minute
field flashes in the display.
j Press the START button
2
to set the desired minute value.
j Press the RESET button
4
to confirm your setting.
j Press the MODE button
6
to enter the time mode.
Q
Switching the alarm on / off
j Switch the alarm on or off by pressing and keeping pressed the
START button
2
and the RESET button
4
while in time mode. If
the alarm is switched on, the alarm symbol
7
appears in the
display.
j When the alarm sounds, you can activate the Snooze function
by pressing the START button
2
. The alarm sounds again after 4
Q
Setting the time and date
1. Press the MODE button
6
three times. The second field
5
and
the day of the week field
1
flash in the display.
2. Press the START button
2
to set the second field
5
to 0.
3. Press the RESET button
4
to confirm your setting. The minute
field flashes in the display.
4. Press the START button
2
to set the desired minute value.
5. Press the RESET button
4
to confirm your setting. The hour field
flashes in the display.
6. Press the START button
2
to set the desired hour value.
Note: Pay attention to the symbols A, P and H
9
in the display
when setting the hour value. A and P (A = a.m. / P = p.m.) are
used for the 12-hour time format. H is used for the 24-hour
format. Press the START button
2
to set the desired value and
format. Press the RESET button
4
to confirm your setting.
7. Press the RESET button
4
to confirm your setting. The date field
flashes in the display.
8. Press the START button
2
to set the desired date value.
9. Press the RESET button
4
to confirm your setting. The month
field flashes in the display.
10. Press the START button
2
to set the desired month value.
11. Repeat steps 8 and 9 to set the day of the week
1
field. The
names of the days of the week are shortened as follows:
MO = Monday
TU = Tuesday
WE = Wednesday
TH = Thursday
FR = Friday
SA = Saturday
SU = Sunday
12. Press the MODE button
6
to enter the default display.
diately to prevent damage to the instrument.
J Avoid contact with skin, eyes and mucous membrane. In the
event of contact with battery acid, rinse the affected area with
plenty of water and /or consult a doctor.
Q
Water resistance
J This watch is water-resistant up to 3 bar in accordance with
DIN 8310.
3 bar water resistant
J Do not press any buttons if the watch comes into contact with
water.
Q
Replacing the battery
J Have any repairs or battery replacements carried out by a suita-
bly experienced specialist in order to avoid damaging the in-
sides of the watch.
J Dispose of used batteries in an environmentally compatible man-
ner.
J Do not dispose of the watch with the household rubbish.
Q
Operation
j Press the MODE button
6
to set the desired mode: Time mode
> Stop watch > Alarm > Setting the time > Time mode.
General Safety Instructions
keep all the saFety advice and instructions in a saFe
place For Future reFerence!
J
WARNING!
DANGER TO LIFE AND
RISK OF ACCIDENTS FOR INFANTS AND
CHILDREN! Never leave children unattended
with the packaging material. Packaging material can cause
suffocation.
WARNING!
DANGER TO LIFE! Batteries can be swallowed,
which can prove fatal. Consult a doctor immediately if anyone
swallows a battery.
J Never take the product apart on any account. Improper repairs
could cause considerable danger for the user. Only let qualified
people carry out any repairs.
Battery Safety Instructions
J CAUTION! RISK OF EXPLOSION! Never
recharge the batteries.
J Have a spent battery removed from the instrument immediately.
There is an increased risk of leakage.
J Batteries must not be disposed of in household waste.
J Consumers are under a legal obligation to dispose of batteries in
the proper way.
J Keep the battery out of the reach of children, do not dispose of
the battery in fire, do not short-circuit it, and do not take it apart.
J Failure to observe these instructions may result in the battery dis-
charging beyond its end voltage, which poses a risk of leakage. If
the battery in your instrument has leaked, have it removed imme-
Wristwatch
Q
Introduction
Familiarise yourself with the product before using it for
the first time. In addition please refer carefully to the
operating instructions below and the safety advice. Use
the product only as described and for the
indicated purpose. Keep
these instructions in a safe place. If you pass the product
on to anyone
else, please ensure that you also pass on all the documentation.
Q
Proper use
The wrist watch displays the time and date. It also has an alarm and
can be used as a stopwatch. Other uses or modification
of the product
shall be considered as improper use and may lead to injury
or damage.
The manufacturer will not accept liability for loss or damage arising
from improper use. The product is not intended for commercial use.
Q
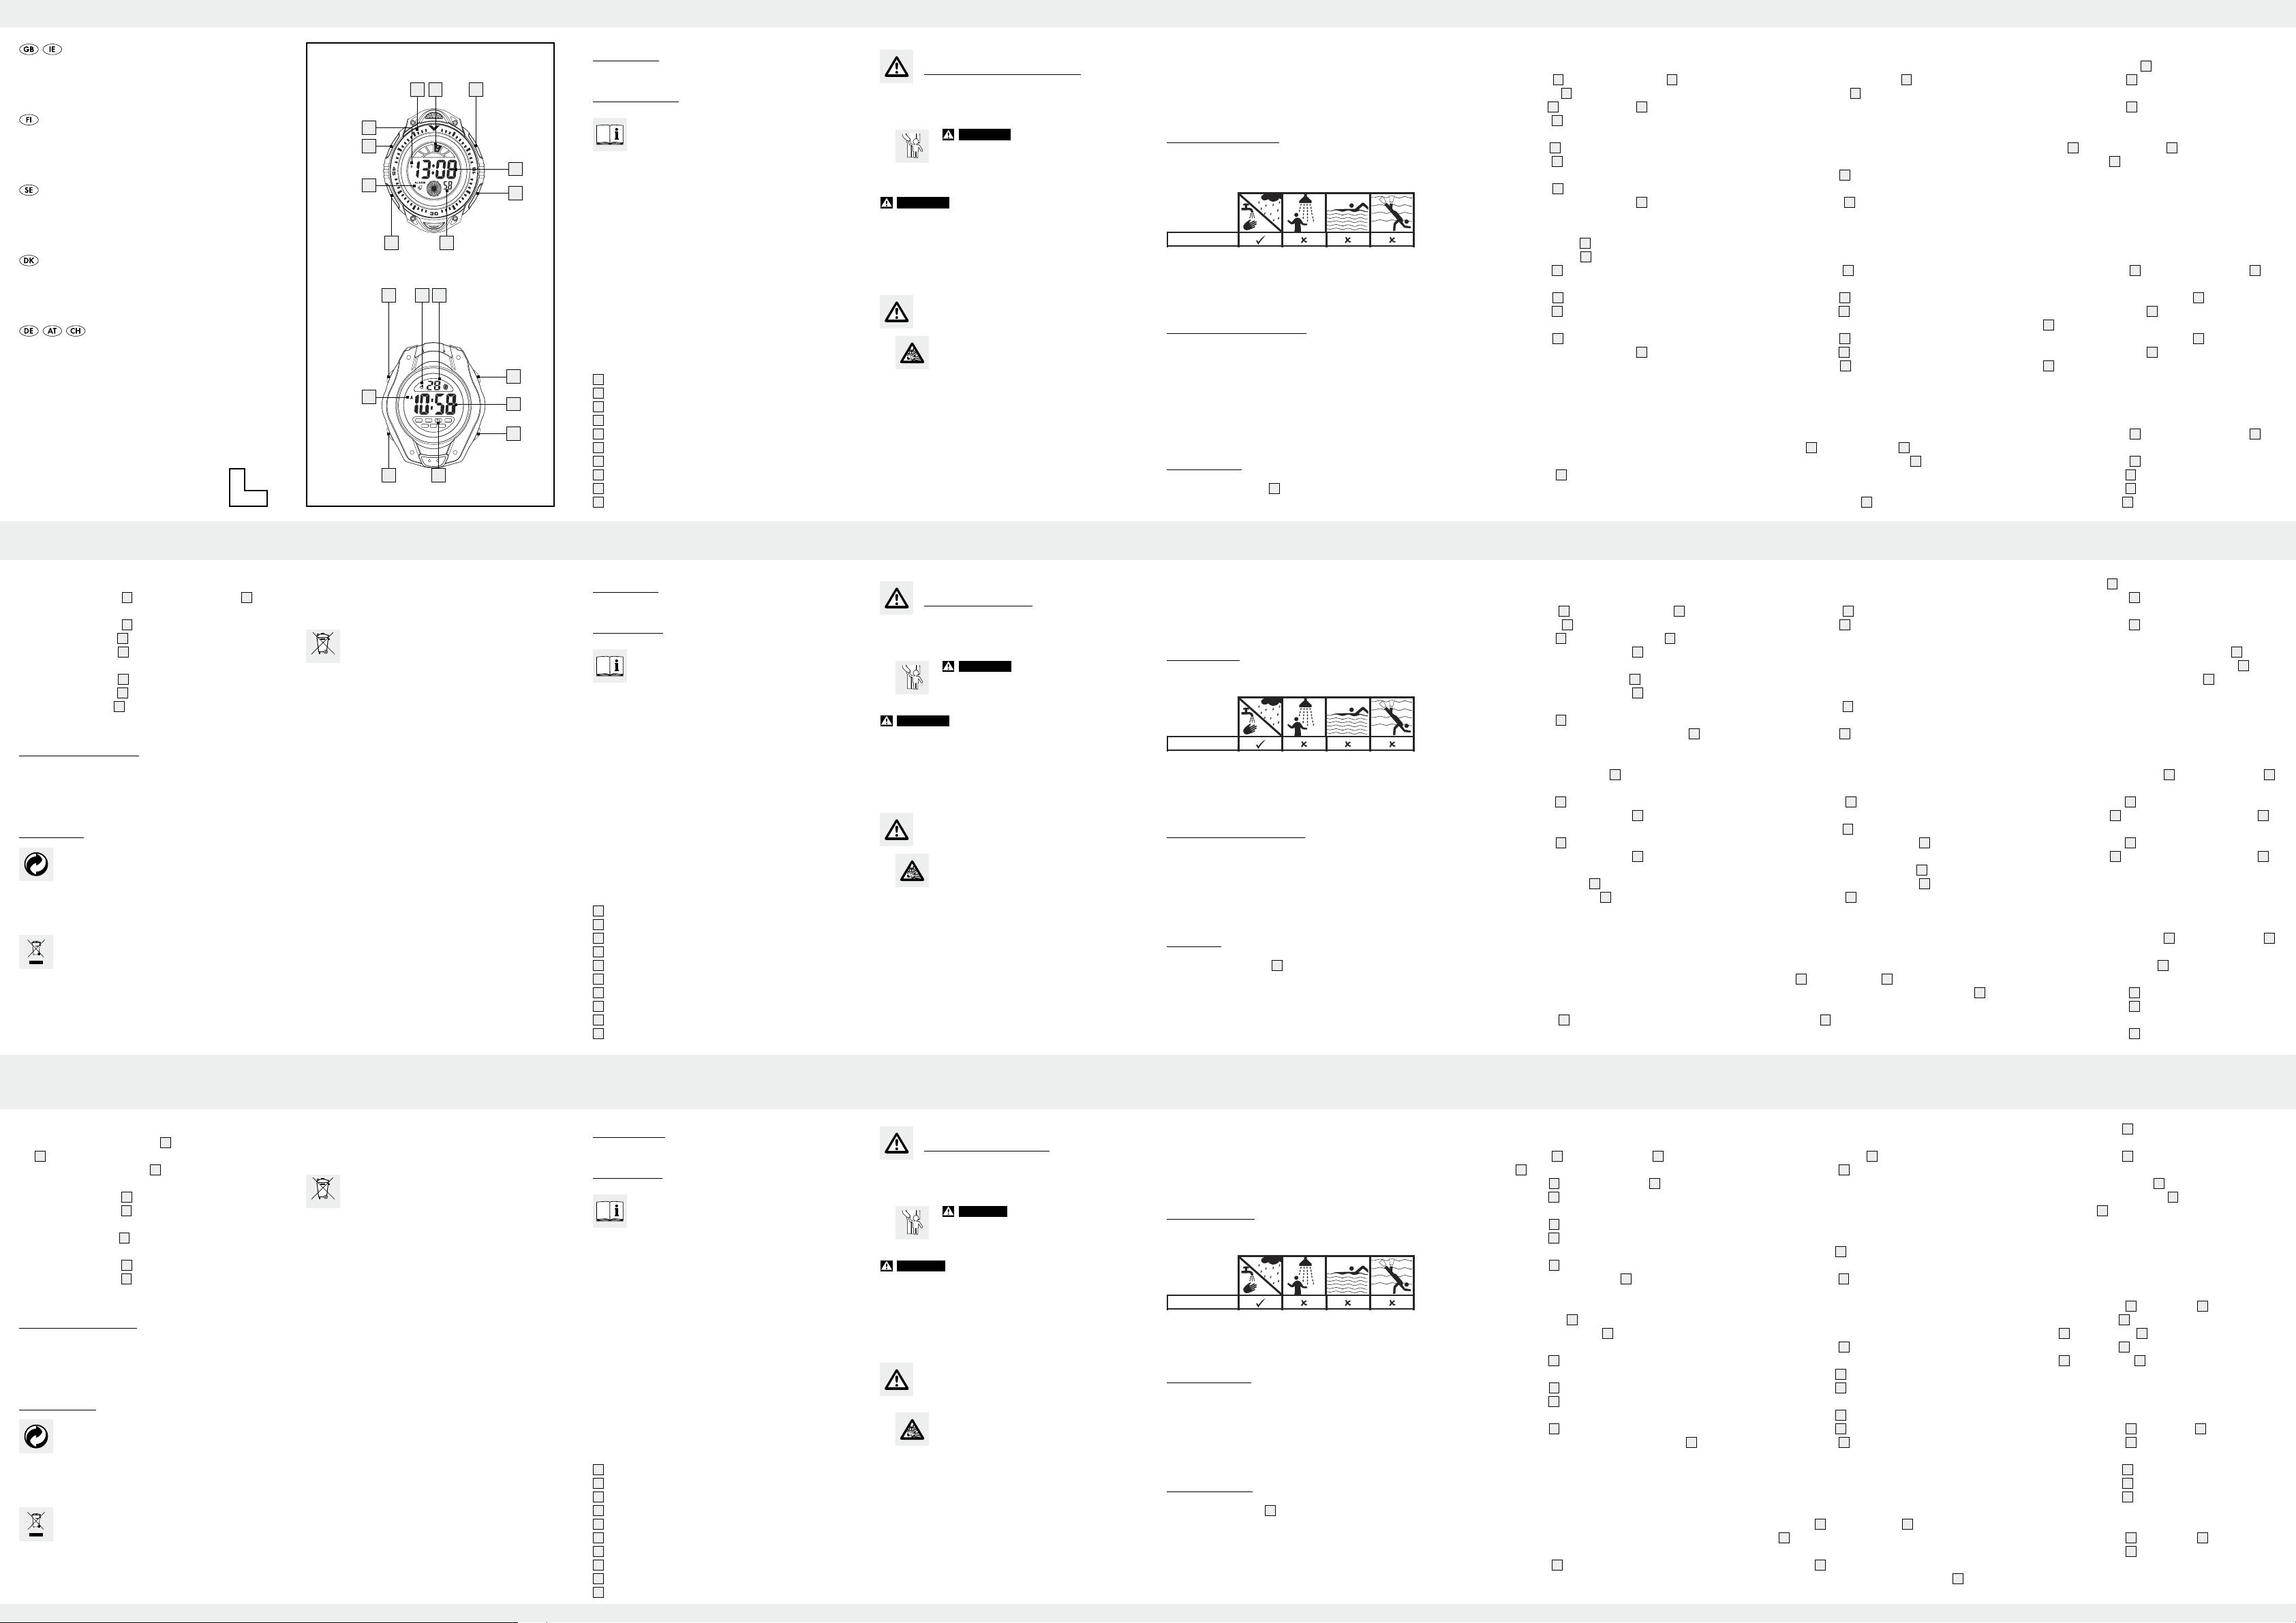
Description of parts
1
Day of the week display field
2
START button
3
Time field
4
RESET button
5
Second field
6
MODE button
7
Alarm symbol
8
LIGHT button
9
“A” / “P” / “H” indicator
10
Bezel (Model Z30483F only)
Z30483F /
Z30483G
1
578
10 2
5
1
6
6
3
2
3
4
4
7
9
8
9
Z30483F
Z30483G
WRISTWATCH
Operation and Safety Notes
RANNEKELLO
Käyttö- ja turvallisuusohjeet
ARMBANDSUR
Bruksanvisning och säkerhetsanvisningar
ARMBÅNDSUR
Betjenings- og sikkerhetshenvisninger
ARMBANDUHR
Bedienungs- und Sicherheitshinweise
3


Join the conversation about this product
Here you can share what you think about the Auriol IAN 56449 Watch. If you have a question, first carefully read the manual. Requesting a manual can be done by using our contact form.