
EN
Instruction Manual
NL
Gebruiksaanwijzing
FR
Mode d’emploi
DE
Bedienungsanleitung
ES
Manual de instrucciones
PT
Manual de Instruções
PL
Instrukcje użytkowania
IT
Istruzioni per l’uso
SV
Bruksanvisning
CS
Návod na použití
SK
Návod na použitie
C l o c k r a d i o
Projection - hi-lo dimmer CL-1492
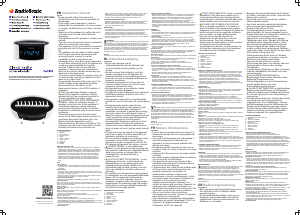
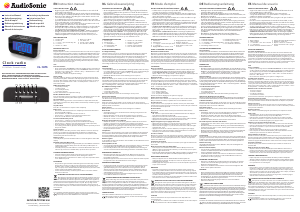
PARTS DESCRIPTION / ONDERDELENBESCHRIJVING / DESCRIPTION DES PIÈCES / TEILEBESCHREIBUNG /
DESCRIPCIÓN DE LAS PIEZAS / DESCRIZIONE DELLE PARTI / DESCRIÇÃO DOS COMPONENTES /
BESKRIVNING AV DELAR / OPIS CZĘŚCI / POPIS SOUČÁSTÍ / POPIS SÚČASTÍ
1 2 3 4
5 6 7 8 9
SERVICE.TRISTAR.EU
Tristar Europe B.V. | Jules Verneweg 87
5015 BH Tilburg | The Netherlands
ENInstructionmanual
SAFETY
• Byignoringthesafetyinstructionsthemanufacturercannotbehold
responsibleforthedamage.
• Ifthesupplycordisdamaged,itmustbereplacedbythemanufacturer,
itsserviceagentorsimilarlyqualifiedpersonsinordertoavoidahazard.
• Nevermovetheappliancebypullingthecordandmakesurethecord
cannotbecomeentangled.
• Toprotectyourselfagainstanelectricshock,donotimmersethecord,
plugorapplianceinthewateroranyotherliquid.
•
Withinanequilateraltriangle,isusedtoindicatethataspecific
componentshallbereplacedonlybythecomponentspecifiedinthat
documentationforsafetyreason.
•
LIGHTNINGFLASHWITHARROWHEADSYMBOLwithinan
equilateraltriangle,isintendedtoalerttheusertothepresenceof
uninsulateddangerousvoltagewithintheproductsenclosurethatmay
beofsufficientmagnitudetoconstitudeariskofelectricshockto
persons.
• Themainsplugisusedasthedisconnectdeviceanditshallremain
readilyoperable.Tocompletelydisconnectthepowerinput,theMains
plugoftheapparatusmustbedisconnectedfromthemainsCompletely.
ThemainsplugshouldnotbeobstructedorshouldbeEasilyaccessed
duringintendeduse.
PARTSDESCRIPTION
1. ProjectionOn/Off
2. Projection180°flip
3. Snooze/Sleep/Dimmer/DST
4. On/Off/Alarmoff
5. MEM/M+/NAP
6. Tune/year/month/day
7. Tune+/Displayautooff
8. Alarm1/Volumedown
9. Alarm2/Volumeup
BEFORETHEFIRSTUSE
• PlugtheACpowercordtoahouseholdoutletACsource.Thisunitis
equippedwithabatterybackupsystem,itrequiresa3VCR2032flat
lithiumbattery(notincluded).Insertthebatteryinthebattery
compartment,makingcertainthatthepositiveandnegative(+and)
batteryterminalsareattachedtothecorrespondingterminalsonthe
plateinthebatterycompartment.IfanACpowerfailureoccurs,the
clockautomaticallyswitchestothebatterypowersupply,theclockand
timermemorycontinuerunning.WhentheACpowerresumes,theclock
switchesbacktoACagain.
USE
Timeandcalender
• Pressandholdthe"MEM/M+"buttoninstandbymodetoentertimeset
mode,usethetunebuttonstoadjustthesettings.Pressthe"MEM/M+"
buttontochangethemodecycleasfollows:Year→date→12/24H
format→RealtimeHour→RealtimeMin.
Alarmsetting
• Pressthe"alarm1/2"buttoninstandbymodetoshowthealarmtime.
Press,andpressimmediatelyagainandhold(whenthealarmtimeis
stilldisplayed)toenterthealarmsetmode.Usethetunebuttonsto
adjustthesettings,pressthealarmsetbuttontoconfirmandchangethe
modecycleasfollows:Hour→Min→Weekdayalarm→waketone→
wakeradiovolume.
• Differentweekdaymodes:
– 15:MondaytoFriday
– 17:Wholeweek
– 67:Saturday&Sunday
– 11:Onedayofweek
Enable/disablethealarm
• Pressandholdthe"alarm1/2”buttontoenableordisablethealarm.
Oncethealarmisactivated,thesymbolwillappearonthedisplay.
SnoozeFunction
• Whenthealarmrings,pressthe"snooze"buttontosuspendthealarm&
toactivatethesnoozefunction,BeeporRadioalarmwillstopandwill
ringagainafter9minutes.
Stopthealarm
• Pressthe"on/off"buttontostopthealarmcompletely.
Radiomode
Note:EnsurethattheFMantennaiscompletelyunrolledandextendedto
havethebestFMreception.
• PresstheRadio"on/off"buttontoturntheuniton.
• Usethe"tune/+"buttontoselectthedesiredradiostation.
Setandrecalltheradiopresets
• Pressandholdthe"memory"button;“P01”willblinkinthedisplay.Use
the"tune+/"buttontoselectthedesiredpresetstation(P01P10).
Pressthe"memory"buttonagaintosetthepreset.
• Forrecallingpresetstations,pressthe"memory"buttonrepeatedlyto
selectthepresetnumber.
Dimmercontrol
• Instandbymode,pressthe"dimmer"buttontosetthebrightnessofthe
LCDdisplay.
Sleepoperation
• Whenyoulistentotheradio,pressthe"sleep"buttontoenterintothe
sleepmode.Youcanadjustthesleeptimerfrom90minutesto15
minutesbypressingthisbuttonrepeatedly.Whensleeptimeris
selected,theunitwillautomaticallyturnoffoncetimeisup.
NAPtimerfunction
• PresstheNAPbuttoninstandbymode,bypressingthisbuttonagain
theNAPtimewillchangefrom90min.to10min.
Projection
• Pressthe"ProjectionOn/off"buttontoactivatetheprojection.Adjustthe
projectionbrightness/focusbyturningtheadjustmentwheelunderthe
projectionlens.Pressthe"180°Flip"buttontofliptheprojectedtime.
Displayautooff
• Pressandholdthe"displayautooff"buttonfor3seconds,theindicator
willlighton,theLEDdisplaywillautomaticallyturnoffafter15seconds.
PressanybuttontolightuptheLEDdisplayfor15seconds.
• Pressandholdthe"displayautooffbutton"for3seconds,theLED
displayIndicatorwilllightofftocancelthisfunction.
GUARANTEE
• Thisproductisguaranteedfor24monthsgranted.Yourwarrantyisvalid
iftheproductisusedinaccordancetotheinstructionsandforthe
purposeforwhichitwascreated.Inaddition,theoriginalpurchase
(invoice,salessliporreceipt)istobesubmittedwiththedateof
purchase,thenameoftheretailerandtheitemnumberoftheproduct.
• Forthedetailedwarrantyconditions,pleaserefertoourservicewebsite:
www.service.tristar.eu
ENVIRONMENT
Thisapplianceshouldnotbeputintothedomesticgarbageattheend
ofitsdurability,butmustbeofferedatacentralpointfortherecyclingof
electricandelectronicdomesticappliances.Thissymbolontheappliance,
instructionmanualandpackagingputsyourattentiontothisimportant
issue.Thematerialsusedinthisappliancecanberecycled.Byrecycling
ofuseddomesticappliancesyoucontributeanimportantpushtothe
protectionofourenvironment.Askyourlocalauthoritiesforinformation
regardingthepointofrecollection.
Support
Youcanfindallavailableinformationandsparepartsatservice.tristar.eu!
NLGebruiksaanwijzing
VEILIGHEID
• Bijhetnietopvolgenvandeveiligheidsinstructieskandefabrikantniet
verantwoordelijkwordengesteldvoordeschade.
• Alshetnetsnoerbeschadigdis,moethetwordenvervangendoorde
fabrikant,deonderhoudsmonteurvandefabrikantofdoorpersonenmet
eensoortgelijkekwalificatieomgevaartevoorkomen.
• Verplaatshetapparaatnooitdooraanhetsnoertetrekken.Zorgervoor
dathetsnoernergensinverstriktkanraken.
• Dompelhetsnoer,destekkerofhetapparaatnietonderinwaterof
anderevloeistoffenomelektrischeschokkentevoorkomen.
•
UITROEPTEKENineengelijkbenigedriehoekwordtgebruiktom
aantegevendateenspecifiekonderdeelomveiligheidsredenenalleen
magwordenvervangendoorhetonderdeeldatindedocumentatieis
gespecificeerd.
•
LICHTFLITSMETPIJLSYMBOOLineengelijkbenigedriehoek
wordtbedoeldalswaarschuwingvoordeaanwezigheidvan
ongeïsoleerdegevaarlijkevoltageindeproductbehuizingdiesterk
genoegisomeenrisicovanelektrischeschoktevormenvoorpersonen.
• Denetstekkerwordtgebruiktomhetapparaatteontkoppelenenmoet
gemakkelijkbereikbaarblijven.Omhetapparaatvolledigvande
stroomtoevoerlostekoppelen,moetdenetstekkervolledigvande
netvoedingwordenlosgekoppeld.Denetstekkermagnietworden
belemmerdenmoetgemakkelijktoegankelijkzijntijdenshetbeoogde
gebruik.
ONDERDELENBESCHRIJVING
1. Projectieaan/uit
2. Projectie180°draaien
3. Sluimer/Slaap/Dimmer/DST
4. Aan/Uit/Alarmuit
5. MEM/M+/Dut
6. Afstemmen/jaar/maand/dag
7. Afstemmen+/Displayautouit
8. Alarm1/Volumeomlaag
9. Alarm2/Volumeomhoog
VOORHETEERSTEGEBRUIK
• Sluithetnetsnoeraanopeenstopcontact.Ditapparaatisuitgerustmet
eenbatterijbackupsysteem.Hetapparaatvereisteen3VCR2032
plattelithiumbatterij(nietinbegrepen).Plaatsdebatterijinhet
batterijcompartiment.Zorgervoordatdepositieveennegatieve(+en)
contactpuntenvandebatterijzijnbevestigdaandeovereenkomstige
aansluitingenopdeplaatinhetbatterijcompartiment.Indienzicheen
stroomstoringvoordoet,schakeltdeklokautomatischoveropde
batterijvoedingenblijvendeklokenhettimergeheugenwerken.Alsde
netspanninghersteldis,schakeltdeklokterugnaarnetvoeding.
GEBRUIK
Tijdenkalender
• Houdindestandbymodusde"MEM/M+"knopingedruktomdetijdinte
stellen.Gebruikdeafstemknoppenomdeinstellingentewijzigen.Druk
opde"MEM/M+"knopomdemoduscyclusalsvolgttewijzigen:Jaar→
Datum→12/24uursformaat→ActueletijdUur→ActueletijdMin.
Alarminstelling
• Drukindestandbymodusopde"Alarm1/2"knopomdealarmtijdte
tonen.Druk,drukdirectnogmaalsenhoudingedrukt(alsdealarmtijd
nogzichtbaaris)omhetalarmintestellen.Gebruikdeafstemknoppen
omdeinstellingentewijzigen.Drukopdealarminstelknopomde
moduscyclusalsvolgttewijzigen:Uur→Min.→Weekdagalarm→
Wekkertoon→Wekkerradiovolume.
• Verschillendeweekdagmodi:
– 15:Maandagt/mvrijdag
– 17:Geheleweek
– 67:Zaterdag&zondag
– 11:Eéndagvandeweek
Hetalarminschakelen/uitschakelen
• Houdde"Alarm1/2"knopingedruktomhetalarminofuitteschakelen.
Alshetalarmgeactiveerdis,zalhetsymboolopdedisplayverschijnen.
Sluimerfunctie
• Alshetalarmafgaat,drukdanopdesluimerknopomhetalarmopte
schortenendesluimerfunctieteactiveren.Hetpiepofradioalarmzal
stoppenenna9minutenopnieuwafgaan.
Hetalarmstoppen
• Drukopdeaan/uitschakelaaromhetalarmvolledigtestoppen.
Radiomodus
Letop:ZorgervoordatdeFMantennevollediguitgeroldenuitgeschoven
isomdebesteFMontvangstteverkrijgen.
• Drukopderadioaan/uitknopomhetapparaatinteschakelen
• Gebruikde"Afstemmen+/"knopomhetgewensteradiostationte
selecteren.
Radiovoorinstellingeninstellenenoproepen
• Houddegeheugenknopingedrukt."P01"zalindedisplayknipperen.
Gebruikde"Afstemmen+/"knopomhetgewenstevooringestelde
stationteselecteren.Druknogmaalsopdegeheugenknopomde
voorinstellingintestellen.
• Drukvoorhetoproepenvanvooringesteldestationsherhaaldelijkopde
geheugenknopomhetvooringesteldenummerteselecteren.
Dimmerbediening
• Drukindestandbymodusopdedimmerknopomdehelderheidvande
LCDdisplayintestellen.
Slaapfunctie
• Druktijdenshetluisterennaarderadioopdeslaapknopomde
slaapmodusteactiveren.Ukuntdeslaaptimervan90minutentot15
minuteninstellendoorherhaaldelijkopdezeknoptedrukken.Alsde
slaaptimergeselecteerdis,zalhetapparaatnahetverstrijkenvandetijd
automatischuitschakelen.
Duttimerfunctie
• Drukindestandbymodusopdedutknop.Doornogmaalsopdezeknop
tedrukken,verandertdeduttijdvan90min.naar10min.
Projectie
• Drukopde"Projectieaan/uit"knopomdeprojectieteactiveren.Draai
hetinstelwielonderdeprojectielensomdehelderheid/focusvande
projectieintestellen.Drukopde"180°draaien"knopomde
geprojecteerdetijdtedraaien.
Displayautouit
• Houdde"displayautouit"knop3secondeningedrukt.Deindicatorgaat
branden.DeLEDdisplayschakeltautomatischuitna15seconden.Druk
opeenwillekeurigeknopomdeLEDdisplaygedurende15secondente
verlichten.
• Houdde"displayautouit"knop3secondeningedrukt.DeLED
displayindicatorschakeltuitomaantegevendatdefunctieis
uitgeschakeld.
GARANTIEVOORWAARDEN
• Opditproductwordteengarantievan24maandenverleend.Uw
garantieisgeldigindienhetproductisgebruiktinovereenstemmingmet
degebruiksaanwijzingenvoorhetdoelwaarvoorhetgemaaktis.
Tevensdientdeorigineleaankoopbon(factuur,kassabonofkwitantie)
tewordenoverlegdmetdaaropdeaankoopdatum,denaamvande
retailerenhetartikelnummervanhetproduct.
• Vooruitgebreidegarantievoorwaardenverwijzenwijunaaronze
servicewebsite:www.service.tristar.eu
MILIEU
Ditapparaatmagaanheteindevandelevensduurnietbijhetnormale
huisafvalwordengedeponeerd,maarmoetbijeenspeciaalinzamelpunt
voorhergebruikvanelektrischeenelektronischeapparatenworden
aangeboden.Hetsymboolophetapparaat,indegebruiksaanwijzingen
opdeverpakkingattendeertuhierop.Deinhetapparaatgebruikte
materialenkunnenwordengerecycled.Methetrecyclenvangebruikte
huishoudelijkeapparatenlevertueenbelangrijkebijdrageaande
beschermingvanonsmilieu.Informeerbijuwlokaleoverheidnaarhet
inzamelpunt.
Support
Ukuntallebeschikbareinformatieenreserveonderdelenvindenop
service.tristar.eu!
FRManueld'instructions
SÉCURITÉ
• Sivousignorezlesinstructionsdesécurité,lefabricantnesauraitêtre
tenuresponsabledesdommages.
• Silecordond'alimentationestendommagé,ildoitêtreremplacéparle
fabricant,sonréparateuroudespersonnesqualifiéesafind'évitertout
risque.
• Nedéplacezjamaisl'appareilentirantsurlecordonetveillezàceque
cederniernesoitpasentortillé.
• Afindevouséviterunchocélectrique,n'immergezpaslecordon,la
priseoul'appareildansdel'eauouautreliquide.
•
POINTD'EXCLAMATIONDansuntriangleéquilatéral,ilestutilisé
pourindiquerqu'uncomposantspécifiquepeutuniquementêtre
remplacéparlecomposantspécifiédanscettedocumentationpourune
raisondesécurité.
•
ÉCLAIRAVECSYMBOLEDEFLÈCHEDansuntriangle
équilatéral,ilestdestinéàavertirl'utilisateurdelaprésencedetension
dangereusenonisoléeàl'intérieurduboîtierduproduitquipeutêtrede
magnitudesuffisantepourconstituerunrisqued'électrocution.
• Laprisesecteursertdedispositifdedéconnexionetdoitdemeureren
étatdefonctionnement.Pourêtretotalementdéconnectéede
l'alimentation,lafichesecteurdel'appareildoitêtredébranchée
complètementdusecteur.Lafichesecteurnedoitpasêtreobstruéeou
doitêtrefacilementaccessiblependantl'utilisationprévue.
DESCRIPTIONDESPIÈCES
1. ProjectionOn/Off
2. Projectionrotation180°
3. Rappeld'alarme/Veille/Atténuation/Heured'été
4. On/Off/Alarmeoff
5. MÉM/M+/Sommeil
6. Réglage/année/mois/jour
7. Réglage+/Arrêtautoécran
8. Alarme1/Volumebas
9. Alarme2/Volumehaut
AVANTLAPREMIÈREUTILISATION
• EnfichezlecordonCAdansunesourceCAàprisedomestique.Cette
unitébénéficied'unsystèmedebatteriedesecoursnécessitantune
batterielithiumplate3VCR2032(nonfournie).Insérezlabatteriedans
soncompartimentenvousassurantquelesbornespositiveetnégative
(+et)delabatteriesontassociéesauxbornescorrespondantessurla
plaqueducompartimentdebatterie.Encasdepanned'alimentationCA,
l'horlogepasseautomatiquementsurl'alimentationdebatterieet
continuedefonctionnertoutcommelamémoiredeminuterie.Lorsque
l'alimentationCAestrétablie,l'horlogepasseànouveauàl'alimentation
CA.
UTILISATION
Heureetcalendrier
• Appuyezsurlebouton"MÉM/M+"enmodeveillepouraccéderaumode
deréglaged'heureetutilisezlesboutonsd'ajustementpourdéfinirles
réglages.Appuyezsurlebouton"MÉM/M+"pourchangerlecyclede
modecommesuit:Année→date→Format12/24H→Heuretemps
réel→Min.tempsréel
Réglagedel'alarme
• Appuyezsurlebouton"alarme1/2"enmodeveillepourafficherl'heure
d'alarme.Appuyezetappuyezimmédiatementànouveausansrelâcher
(lorsquel'heured'alarmeestencoreaffichée)pourpasseraumodede
réglaged'alarme.Utilisezlesboutonsd'ajustementpourajusterles
réglages.Appuyezsurleboutonderéglaged'alarmepourconfirmeret
changezlecycledemodecommesuit:Heure→Min→Alarmejourde
semaine→tonalitéréveil→volumeradioréveil
• Différentsmodesdejourdesemaine:
– 15:Lundiàvendredi
– 17:Semaineentière
– 67:Samedietdimanche
– 11:Unjourparsemaine
Activer/désactiverl'alarme
• Appuyezsurlebouton"alarme1/2”sanslerelâcherpouractiver/
désactiverl'alarme.Unefoisl'alarmeactivée,lesymboles'afficheà
l'écran.
Fonctionderappeld'alarme
• Lorsquel'alarmeretentit,appuyezsurlebouton"rappeld'alarme"pour
suspendrel'alarmeetactiverlafonctionderappeld'alarme.Lebipou
l'alarmeradiocesseetretentitànouveauaprès9minutes.
Arrêterl’alarme
• Appuyezsurlebouton"on/off"pourarrêtercomplètementl'alarme.
Moderadio
Remarque:assurezvousquel'antenneFMestcomplètementdérouléeet
déployéepouroptimiserlaréceptionFM.
• AppuyezsurleboutonRadio"on/off"pouractiverl'unité.
• Utilisezlebouton"réglage/+"poursélectionnerlastationderadio
voulue.
Régleretrappelerlespréréglagesradio
• Appuyezsanslerelâchersurlebouton"mémoire";“P01”clignoteà
l'affichage.Utilisezlebouton"réglage/+"poursélectionnerlastation
prérégléevoulue(P01P10).Appuyezànouveausurlebouton
"mémoire"pourréglerlepréréglage.
• Pourrappelerlesstationspréréglées,appuyezsurlebouton"mémoire"
demanièrerépétéepoursélectionnerlenuméropréréglé.
Commanded'atténuation
• Enmodeveille,appuyezsurlebouton"atténuation"pourréglerla
luminositédel'écranLCD.
Activationdeveille
• Lorsquevousécoutezlaradio,appuyezsurlebouton"veille"pour
accéderaumodeveille.Vouspouvezajusterleminuteurdeveillede90
à15minutesenappuyantdemanièrerépétéesurcebouton.Lorsquele
minuteurdeveilleestsélectionné,l'unitésecoupeautomatiquement
unefoisledélaiécoulé.
Fonctiondeminuteurdesommeil
• AppuyezsurleboutonSommeilenmodeveillepuisappuyezànouveau
surceboutonpourchangerletempsdesommeilde90minà10min.
Projection
• Appuyezsurlebouton"Projectionon/off"pouractiverlaprojection.
Ajustezlaluminosité/miseaupointdelaprojectionentournantla
molettederéglagesousl'objectifdeprojection.Appuyezsurlebouton
"Rotation180°"pourinverserletempsdeprojection.
Arrêtautoécran
• Appuyezsurlebouton"Arrêtautoécran"sanslerelâcherpendant3
secondes.Levoyants'allumeetl'écranLEDs'éteintautomatiquement
après15secondes.Appuyezsurunboutonquelconquepourallumer
l'écranLEDpendant15secondes.
• Appuyezsurlebouton"Arrêtautoécran"sanslerelâcherpendant3
secondes.Levoyantdel'écranLEDs'éteintpourannulercettefonction.
GARANTIE
• Ceproduitestgarantipourunepériodede24mois.Votregarantieest
valablesileproduitestutiliséselonlesinstructionsetpourl'usage
auquelilestdestiné.Deplus,lapreuved'achatd'origine(facture,reçu
outicketdecaisse)doitêtreprésentée,montrantladated'achat,lenom
dudétaillantetlenumérod'articleduproduit.
• Pourconnaîtrelesconditionsdegarantiedétaillées,veuillezconsulter
notresiteInternetdeservice:www.service.tristar.eu
ENVIRONNEMENT
Cetappareilnedoitpasêtrejetéaveclesdéchetsménagersàlafinde
saduréedevie,ildoitêtreremisàuncentrederecyclagepourles
appareilsélectriquesetélectroniques.Cesymbolesurl'appareil,le
manueld'utilisationetl'emballageattirevotreattentionsurunpoint
important.Lesmatériauxutilisésdanscetappareilsontrecyclables.En
recyclantvosappareils,vouscontribuezdemanièresignificativeàla
protectiondenotreenvironnement.Renseignezvousauprèsdesautorités
localespourconnaîtrelescentresdecollectedesdéchets.
Support
Vouspouveztrouvertouteslesinformationsetpiècesderechangesur
service.tristar.eu!
DEBedienungsanleitung
SICHERHEIT
• BeimIgnorierenderSicherheitshinweisekannderHerstellernichtfür
Schädenhaftbargemachtwerden.
• IstdasNetzkabelbeschädigt,mussesvomHersteller,dem
KundendienstoderähnlichqualifiziertenPersonenersetztwerden,um
Gefahrenzuvermeiden.
• BewegenSiedasGerätniemalsdurchZiehenamKabel,undstellenSie
sicher,dasssichdasKabelnichtverwickelt.
• TauchenSiezumSchutzvoreinemStromschlagdasKabel,den
SteckeroderdasGerätniemalsinWasserodersonstigeFlüssigkeiten.
•
DasAUSRUFUNGSZEICHENimgleichseitigenDreieckweistdarauf
hin,dassbestimmteKomponentenausSicherheitsgründennurdurch
Komponentenersetztwerdendürfen,dieinderDokumentation
spezifiziertsind.
•
DerBLITZMITDEMPFEILimgleichseitigenDreieckweistden
BenutzerauffreiliegendegefährlicheSpannungimGehäusedesGeräts
hin,diehochgenugist,einenStromschlagzuverursachen.
• DerNetzsteckerdientzumTrennendesGerätsvomStromnetzund
mussjederzeitfreizugänglichsein.ZumvollständigenTrennendes
NetzeingangsmussderNetzsteckerdesGerätsausderSteckdose
gezogenwerden.DerNetzsteckersolltenichtblockiertwerden,sondern
mussbeimbestimmungsgemäßenGebrauchjederzeitfreizugänglich
sein.
TEILEBESCHREIBUNG
1. Projektionein/aus
2. Projektion180°umdrehen
3. Schlummer/Schlaf/Dimmer/Sommerzeit(DST)
4. Ein/Aus/Alarmaus
5. MEM/M+/KURZSCHLAF
6. Senderwahl/Jahr/Monat/Tag
7. Senderwahl+/AnzeigeAutoaus
8. Alarm1/Lautstärkeleiser
9. Alarm2/Lautstärkelauter
VORDERERSTENINBETRIEBNAHME
• SteckenSiedenNetzsteckerineineHaushalts
Wechselstromsteckdose.DiesesGerätverfügtüberein
Batteriepufferungssystem;esbenötigteineflache3VLithiumBatterie
desTypsCR2032(nichtimLieferumfang).SetzenSiedieBatterieindas
Batteriefachein.StellenSiedabeisicher,dassdiePlusundMinus
Batterieanschlüsse(+und)mitdenentsprechendenAnschlüssenauf
derPlatineimBatteriefachverbundenwerden.BeieinemStromausfall
schaltetdieUhrautomatischaufBatteriebetriebum,undUhrundTimer
Speicherlaufenweiter.IstderNetzstromwiedervorhanden,schaltetdie
UhrwiederaufNetzbetriebum.
GEBRAUCH
ZeitundKalender
• DrückenundhaltenSiedieTaste"MEM/M+"imStandbyModus,um
denZeiteinstellmodusaufzurufen.VerwendenSiedie
Sendereinstelltasten,umdieEinstellungenzuändern.DrückenSieauf
dieTaste"MEM/M+",umdenModuszykluswiefolgtzuändern:Jahr→
Datum→12/24HFormat→EchtzeitStunde→EchtzeitMin.
Weckfunktioneinstellen
• DrückenSieaufdieTaste"alarm1/2"imStandbyModus,umdie
Weckzeitanzeigenzulassen.DrückenSie,drückenSiesoforterneut
undhaltenSiedieTaste(wenndieWeckzeitnochangezeigtwird),um
denWeckzeiteinstellmodusaufzurufen.VerwendenSiedie
Sendertasten,umdieEinstellungenzuändern.DrückenSieaufdie
Weckzeiteinstelltaste,umdieEinstellungzubestätigen,undändernSie
denModuszykluswiefolgt:Stunde→Min→Wochentag
Weckfunktion→Weckton→WeckRadiolautstärke.
• VerschiedeneWochentagModi:
– 15:MontagbisFreitag
– 17:GanzeWoche
– 67:Samstag&Sonntag
– 11:EinTagderWoche
Aktivierung/DeaktivierungderWeckfunktion
• DrückenundhaltenSiedieTaste"alarm1/2",umdieWeckfunktionzu
aktivierenoderzudeaktivieren.SobalddieWeckfunktionaktiviertist,
erscheintdasSymbolaufderAnzeige.
Schlummerfunktion
• SobaldderWeckerertönt,drückenSieaufdieTaste"snooze",umdie
WeckfunktionaufeinenspäterenZeitpunktzuverschiebenunddie
Schlummerfunktionzuaktivieren.DerWecktonbzw.derRadiowecker
verstummtundertöntnach9Minutenerneut.
Weckfunktionstoppen
• DrückenSieaufdieTaste"on/off",umdieWeckfunktionkomplettzu
stoppen.
Radiomodus
Hinweis:VergewissernSiesich,dassdieFMAntennevollkommen
ausgerolltundausgestrecktist,umdenbestenFMEmpfangzuerzielen.
• DrückenSieaufdieTaste"on/off"desRadios,umdasGerät
einzuschalten.
• VerwendenSiedieTaste"tune/+",umdiegewünschteRadiostation
zuwählen.
EinstellungundAufrufenderRadiostationsVoreinstellungen
• DrückenundhaltenSiedieTaste"memory";“P01”blinktnuninder
Anzeige.VerwendenSiedieTaste"tune+/",umdiegewünschte
RadiostationsVoreinstellung(P01P10)zuwählen.DrückenSieerneut
aufdieTaste"memory",umdieRadiostationsVoreinstellung
einzustellen.
• UmdieRadiostationsVoreinstellungenwiederaufzurufen,drückenSie
wiederholtaufdieTaste"memory",umdieVoreinstellungsnummerzu
wählen.
Dimmersteuerung
• DrückenSieimStandbyModusaufdieTaste"dimmer",umdie
HelligkeitderLCDAnzeigeeinzustellen.
Einschlafbetrieb
• WennSieRadiohören,drückenSieaufdieTaste"sleep",umden
Einschlafmodusaufzurufen.SiekönnendenEinschlafTimervon90
Minutenbis15Minuteneinstellen,indemdieseTastewiederholt
gedrücktwird.IstderEinschlafTimereingeschaltet,schaltetdasGerät
automatischab,sobalddieZeitabgelaufenist.
KurzschlafTimerFunktion
• DrückenSieimStandbyModusaufdieKURZSCHLAFTaste;wennSie
dieseTasteerneutdrücken,ändertsichdieKurschlafzeitvon90
Minutenauf10Minuten.
Projektion
• DrückenSieaufdieTaste"Projektionein/aus",umdieProjektion
einzuschalten.StellenSiedieProjektionshelligkeit/denBrennpunktein,
indemSiedasEinstellradunterderProjektionslinsedrehen.Drücken
SieaufdieTaste"180°umdrehen",umdieprojizierteZeitumzudrehen.
AutomatischesAbschaltenderAnzeige
• DrückenundhaltenSiedieTaste"Anzeigeautoaus"3Sekundenlang;
dieAnzeigeleuchtetaufunddieLEDAnzeigeschaltetnach15
Sekundenautomatischaus.DrückenSieaufeinebeliebigeTaste,um
dieLEDAnzeige15Sekundenaufleuchtenzulassen.
• DrückenundhaltenSiedieTaste"Anzeigeautoaus"3Sekunden;die
LEDAnzeigeerlischtunddieseFunktionwirdbeendet.
GARANTIE
• DiesesProdukthateineGarantievon24Monaten.Der
Garantieanspruchgiltnur,wenndasProduktgemäßdenAnweisungen
undgemäßdemZweck,fürdeneskonzipiertwurde,benutztwird.Der
OriginalKaufbeleg(Rechnung,BelegoderQuittung)musszusammen
mitdemKaufdatum,demNamendesEinzelhändlersundder
ArtikelnummerdesProdukteseingereichtwerden.
• DetaillierteInformationenüberdieGarantiebedingungenfindenSieauf
unsererServiceWebsiteunter:www.service.tristar.eu
UMWELT
DiesesGerätdarfamEndeseinerLebenszeitnichtimHausmüll
entsorgtwerden,sondernmussaneinerSammelstellefürdasRecyceln
vonelektrischenundelektronischenHaushaltsgerätenabgegeben
werden.DasSymbolaufdemGerät,inderBedienungsanleitungundauf
derVerpackungmachtSieaufdieseswichtigeThemaaufmerksam.Diein
diesemGerätverwendetenMaterialienkönnenrecyceltwerden.Durch
dasRecycelngebrauchterHaushaltsgeräteleistenSieeinenwichtigen
BeitragzumUmweltschutz.FragenSieIhreörtlicheBehördenach
InformationenübereineSammelstelle.
Support
SämtlicheInformationenundErsatzteilefindenSieunterservice.tristar.eu!
ESManualdeinstrucciones
SEGURIDAD
• Siignoralasinstruccionesdeseguridad,eximiráalfabricantedetoda
responsabilidadporposiblesdaños.
• Sielcabledealimentaciónestádañado,correspondealfabricante,al
representanteoaunapersonadecualificaciónsimilarsureemplazo
paraevitarpeligros.
• Nuncamuevaelaparatotirandodelcableyasegúresedequenose
puedaenredarconelcable.
• Paraprotegersecontraunadescargaeléctrica,nosumerjaelcable,el
enchufenielaparatoenelaguaocualquierotrolíquido.
•
SIGNODEEXCLAMACIONdentrodeuntriánguloequilátero,se
utilizaparaindicarqueuncomponenteespecíficodebesustituirse
únicamenteporelcomponenteindicadoenladocumentaciónpor
razonesdeseguridad.
•
SÍMBOLODELRAYOCONUNAFLECHAdentrodeuntriángulo
equilátero,indicaalusuarioquelacajadelsistemapuedeconteneruna
tensiónsinaislardemagnitudsuficienteparaconstituirunriesgode
descargaeléctrica.
• Elenchufederedseutilizaparadesconectareldispositivoydebepoder
accionarsefácilmente.Paradesconectarcompletamentelaentradade
alimentación,elenchufedereddelaparatodebedesconectarsedela
redeléctrica.Elenchufederednodeberáobstruirseodeberá
permanecerfácilmenteaccesibleduranteelusoprevisto.
DESCRIPCIÓNDELOSCOMPONENTES
1. Encendido/apagadodeproyección
2. Girode180°deproyección
3. Repeticióndealarma/reposo/atenuación/DST
4. Encendido/apagado/apagadodealarma
5. MEM/M+/SIESTA
6. Sintonizar/año/mes/día
7. Sintonizar+/Autoapagadodelvisor
8. Alarma1/Bajarvolumen
9. Alarma2/Subirvolumen
ANTESDELPRIMERUSO
• EnchufeelcableeléctricodeCAaunatomadomésticadeCA.Esta
unidadestáequipadaconunsistemaderespaldoconpila.Esnecesaria
unapiladelitioplanaCR2032de3V(noincluida).Introduzcalapilaen
elcompartimentodelapila,asegurándosedequelosterminales
positivoynegativo(+y)delapilacoincidanconlosterminales
correspondientesenlaplacadelcompartimentodelabatería.Sise
produceunfallodealimentacióndeCA,elrelojcambia
automáticamentealsuministrodelapila.Elrelojylamemoriadel
temporizadorsiguenfuncionando.Cuandosereanudalaalimentación
deCA,elrelojcambiadenuevoaCA.
USO
Horaycalendario
• Aprieteymantengaapretadoelbotón"MEM/M+"enelmododeespera
paraaccederalmododeajustedehora.Utilicelosbotonesde
sintonizaciónpararealizarlosajustes.Aprieteelbotón"MEM/M+"para
cambiarelciclodemodocomosigue:Año→Fecha→Formato12/24H
→Horaentiemporeal→Min.entiemporeal
Ajustesdelaalarma
• Aprieteelbotón"alarma1/2"enelmododeesperaparamostrarlahora
dealarma.Apriete,aprietedenuevoinmediatamenteymantenga
apretado(cuandoaúnsemuestrelahoradealarma)paraaccederal
mododeajustedealarma.Utilicelosbotonesdesintonizaciónpara
realizarlosajustes.Aprieteelbotóndeajustedealarmaparaconfirmar
ycambiarelciclodemodocomosigue:Hora→Min.→Alarmadedía
laborable→Tonoparadespertar→Volumenderadioparadespertar.
• Diferentesmodosdedíaslaborables:
– 15:Lunesaviernes
– 17:Todalasemana
– 67:Sábadoydomingo
– 11:Undíadelasemana
Activar/desactivarlaalarma
• Aprieteymantengaapretadoelbotón"alarma1/2”paraactivaro
desactivarlaalarma.Unavezactivadalaalarma,elsímboloaparecerá
enelvisor.
Funciónderepeticióndealarma
• Cuandosuenelaalarma,aprieteelbotón"snooze"parasuspenderla
alarmayactivarlafunciónderepeticióndealarma.Laalarmadepitido
oradiosedetendráyvolveráasonartras9minutos.
Detenerlaalarma
• Aprieteelbotóndeencendido/apagadoparapararlaalarma
completamente.
Mododeradio
Nota:AsegúresedequelaantenaFMestétotalmentedesplegaday
extendidaparatenerlamejorrecepcióndeFM.
• Aprieteelbotóndeencendido/apagadoderadioparaencenderla
unidad.
• Utiliceelbotón"tune/+"paraseleccionarlaemisoraderadiodeseada.
Ajustaryrecordarlaspresintoníasderadio
• Aprieteymantengaelbotón"memory";“P01”parpadearáenelvisor.
Utiliceelbotón"tune/+"paraseleccionarlaemisorapresintonizada
deseada(P01P10).Aprieteelbotón"memory"denuevoparaajustarla
presintonía.
• Pararecordarlaspresintonías,aprieteelbotón"memory"repetidamente
paraseleccionarelnúmerodepresintonía.
Controldeatenuación
• Enelmododeespera,aprieteelbotón"dimmer"paraajustarelbrillodel
visorLCD.
Funcionamientodeltemporizadordereposo
• Cuandoescuchelaradio,aprieteelbotón"sleep"paraaccederalmodo
dereposo.Puedeajustareltemporizadordereposode90a15minutos
apretandoestebotónrepetidamente.Cuandosehaseleccionadoel
temporizadordereposo,launidadseapagaráautomáticamentecuando
hayatranscurridoeltiempo.
FuncióndetemporizadordeSIESTA
• AprieteelbotónSIESTAenelmododeespera.Alapretardenuevo
estebotóneltiempodeSIESTAcambiaráde90a10min.
Proyección
• Aprieteelbotónde"encendido/apagadodeproyección"paraactivarla
proyección.Ajusteelbrillo/enfoquedelaproyeccióngirandolaruedade
ajustedebajodelalentedeproyección.Aprieteelbotón"Girode180°"
paragirarlahoraproyectada.
Autoapagadodelvisor
• Aprieteymantengaapretadoelbotón"autoapagadodelvisor"durante3
segundos.Elindicadorseencenderá;elvisorLEDseapagará
automáticamentedespuésde15segundos.Aprietecualquierbotón
paraencenderelvisorLEDdurante15segundos.
• Aprieteymantengaapretadoelbotón"autoapagadodelvisor"durante3
segundos.ElindicadorLEDdelvisorseapagaráparacancelaresta
función.
GARANTÍA
• Esteproductocuentacon24mesesdegarantía.Sugarantíaesválida
sielproductoseutilizadeacuerdoconlasinstruccionesyelpropósito
paraelquesecreó.Además,debeenviarseunjustificantedelacompra
original(factura,tíquetorecibo)enelqueaparezcalafechadela
compra,elnombredelvendedoryelnúmerodeartículodelproducto.
• Paramásdetallessobrelascondicionesdelagarantía,consultela
páginawebdeservicio:www.service.tristar.eu
MEDIOAMBIENTE
Esteaparatonodebedesecharseconlabasuradomésticaalfinalde
suvidaútil,sinoquesedebeentregarenunpuntoderecogidaparael
reciclajedeaparatoseléctricosyelectrónicos.Estesímboloenelaparato,
manualdeinstruccionesyembalajequiereatraersuatenciónsobreesta
importantecuestión.Losmaterialesutilizadosenesteaparatosepueden
reciclar.Medianteelreciclajedeelectrodomésticos,ustedcontribuyea
fomentarlaproteccióndelmedioambiente.Solicitemásinformaciónsobre
lospuntosderecogidaalasautoridadeslocales.
Soporte
¡Puedeencontrartodalainformaciónyrecambiosenservice.tristar.eu!


Join the conversation about this product
Here you can share what you think about the AudioSonic CL-1492 Alarm Clock Radio. If you have a question, first carefully read the manual. Requesting a manual can be done by using our contact form.
reply | This was helpful (14) (Translated by Google)
reply | This was helpful (12) (Translated by Google)
reply | This was helpful (10) (Translated by Google)
reply | This was helpful (10) (Translated by Google)
reply | This was helpful (7) (Translated by Google)
Loading…
reply | This was helpful (6) (Translated by Google)
reply | This was helpful (6) (Translated by Google)
reply | This was helpful (6) (Translated by Google)
reply | This was helpful (6) Read more (Translated by Google)
This was helpful (1) (Translated by Google)
reply | This was helpful (3) (Translated by Google)
reply | This was helpful (3) (Translated by Google)
reply | This was helpful (2) (Translated by Google)
reply | This was helpful (1) (Translated by Google)
reply | This was helpful (1)
reply | This was helpful (0) (Translated by Google)
reply | This was helpful (0) (Translated by Google)
reply | This was helpful (0) (Translated by Google)
reply | This was helpful (0) (Translated by Google)
reply | This was helpful (0) (Translated by Google)
reply | This was helpful (0) (Translated by Google)
reply | This was helpful (0) (Translated by Google)
reply | This was helpful (0)
reply | This was helpful (0) (Translated by Google)
reply | This was helpful (0) (Translated by Google)