1
2 3 4 5 6 7 8
IT
D
Fig. 1
Fig. 2
Fig. 4
EF
G
C
B
A
L
H
AVVERTENZE IMPORTANTI
LEGGERE ATTENTAMENTE LE ISTRUZIONI PRIMA DELL’USO.
• L’apparecchio è destinato solo ad un uso domestico, non deve essere adibito ad
un uso industriale o professionale.
• Usare il ferro solo per l’uso per cui è stato destinato.
Pericolo per i bambini
• Gli elementi dell’imballaggio non devono essere lasciati alla portata dei bambini in
quanto potenziali fonti di pericolo.
• Non lasciare mai l’apparecchio alla portata dei bambini o incapaci.
• Allorchésidecidadismaltirecomeriutoquestoapparecchio,siraccomandadi
renderlo inoperante tagliandone il cavo di alimentazione. Si raccomanda inoltre di
rendere innocue quelle parti dell’apparecchio suscettibili di costituire un pericolo,
specialmente per i bambini che potrebbero servirsi dell’apparecchio per i propri
giochi.
Pericolo dovuto a elettricità
• Prima di collegare l’apparecchio alla rete di alimentazione controllare che la ten-
sione indicata sulla targhetta corrisponda a quella della rete locale.
• Collegare sempre l’apparecchio ad una presa con messa a terra.
• NON IMMERGERE L’APPARECCHIO IN ACQUA O ALTRI LIQUIDI.
• Non iniziate a stirare se avete la mani bagnate o se avete i piedi nudi.
Pericolo di danni derivanti da altre cause
• Riempire il serbatoio con acqua prima di mettere in funzione l’apparecchio. Le
operazioni di riempimento di acqua devono essere effettuate con la spina del cavo
di alimentazione elettrica staccata dalla presa.
• Per rifornire il serbatoio usare sempre il misurino (L) in dotazione. Non mettere
mai il ferro da stiro direttamente sotto al rubinetto.
• Dopo il riempimento chiudere lo sportellino, assicurandosi che sia perfettamente
chiuso.
• Accendere l’apparecchio solo quando è in posizione di lavoro.
• Quando usate l’apparecchio per la prima volta può accadere che emani un po’ di
fumo; non preoccupatevi, è perfettamente normale perché alcune parti sono state
leggermentelubricate,quindidopopocotempoilfenomenoscomparirà.
• Durante l’utilizzo posizionare l’apparecchio su di un piano orizzontale stabile e ben
illuminato.
• Non lasciare incustodito l’apparecchio mentre è collegato alla rete elettrica.
• L’apparecchiodeveessereutilizzatoelasciatoaripososuunasuperciestabile.
• Quandosiriponeilferrosulsuoappoggiaferro,assicurarsichelasuperciedi
appoggio sia stabile.
• Quando vi dovete assentare anche per poco tempo, spegnere il ferro, riporlo sul
suo appoggia ferro e scollegare sempre il cavo di alimentazione elettrica dalla
presa di corrente.
• L’apparecchio non deve essere utilizzato se è stato fatto cadere, se vi sono segni
di danni visibili o se ha perdite di acqua. Tutte le riparazioni, compresa la sosti
-
tuzione del cavo di alimentazione, devono essere eseguite solamente dal Centro
AssistenzaAutorizzatoodapersonaconqualicasimilare,al nediprevenire
ogni rischio.
• Non usare l’apparecchio se il cavo di alimentazione si presenta danneggiato, con
parti recanti bruciature, ecc...; la riparazione e la sostituzione del cavo di alimenta
-
zione devono essere effettuate da un centro di assistenza autorizzato Ariete; pena
il decadimento della garanzia.
• Non lasciare l’apparecchio esposto ad agenti atmosferici (pioggia, sole, ecc...).
Avvertenza relativa a ustioni
• Mai tentare di stirare indumenti indosso.
• Non toccare le parti metalliche del ferro quando è in funzione e nei minuti seguenti
al suo spegnimento poiché potrebbero causare scottature.
• Non dirigere il getto vapore verso parti del corpo o verso animali domestici.
Attenzione - danni materiali
• Si consiglia di conservare gli imballi originali, poiché l’assistenza gratuita non è
prevista per i guasti causati da imballo non adeguato del prodotto al momento
della spedizione ad un Centro di Assistenza autorizzato.
• Prima di utilizzare l’apparecchio per la prima volta togliere eventuali etichette o
protezioni dalla piastra del ferro da stiro.
• Svolgere sempre il cavo prima dell’utilizzo.
• L’uso di prolunghe elettriche non autorizzate dal fabbricante dell’apparecchio può
provocare danni ed incidenti.
• Non utilizzare acqua gassata (addizionata di anidride carbonica). In caso di acqua
particolarmente calcarea si consiglia l’uso di acqua demineralizzata.
• Non appoggiare il ferro da stiro caldo sul cavo di alimentazione.
• Non piegare la protezione del cavo elettrico quando questo viene avvolto attorno
al ferro da stiro: col tempo il cavo potrebbe rompersi.
• Non scollegare la spina dalla presa di corrente tirandola per il cavo.
• Dopo aver staccato la spina del cavo di alimentazione elettrica dalla presa e dopo
chetuttelepartisisarannoraffreddate,l’apparecchiopotràesserepulitoesclu
-
sivamente con un panno non abrasivo e appena umido di acqua. Non usare mai
solventi che danneggiano le parti in plastica.
• Non avvolgere il cavo di alimentazione attorno alla piastra quando il ferro è cal
-
do.
• Nonmetterelapiastraacontattoconsupercimetalliche.
• Spegnere sempre il ferro ruotando la manopola del termostato sulla posizione
MIN e staccare la spina dalla presa di corrente elettrica prima di riempire il serba
-
toio con acqua o prima di svuotarlo.
• Nonsiassumonoresponsabilitàperusoerratooperimpieghidiversidaquelli
previsti dal presente libretto.
• L’apparecchio è conforme alla Direttiva 2006/95/CE.
• CONSERVARE SEMPRE QUESTE ISTRUZIONI
Note: alprimoutilizzodelferro,provatelosuunvecchiopezzodistoffapervericare
che la piastra ed il serbatoio dell’acqua siano perfettamente puliti.
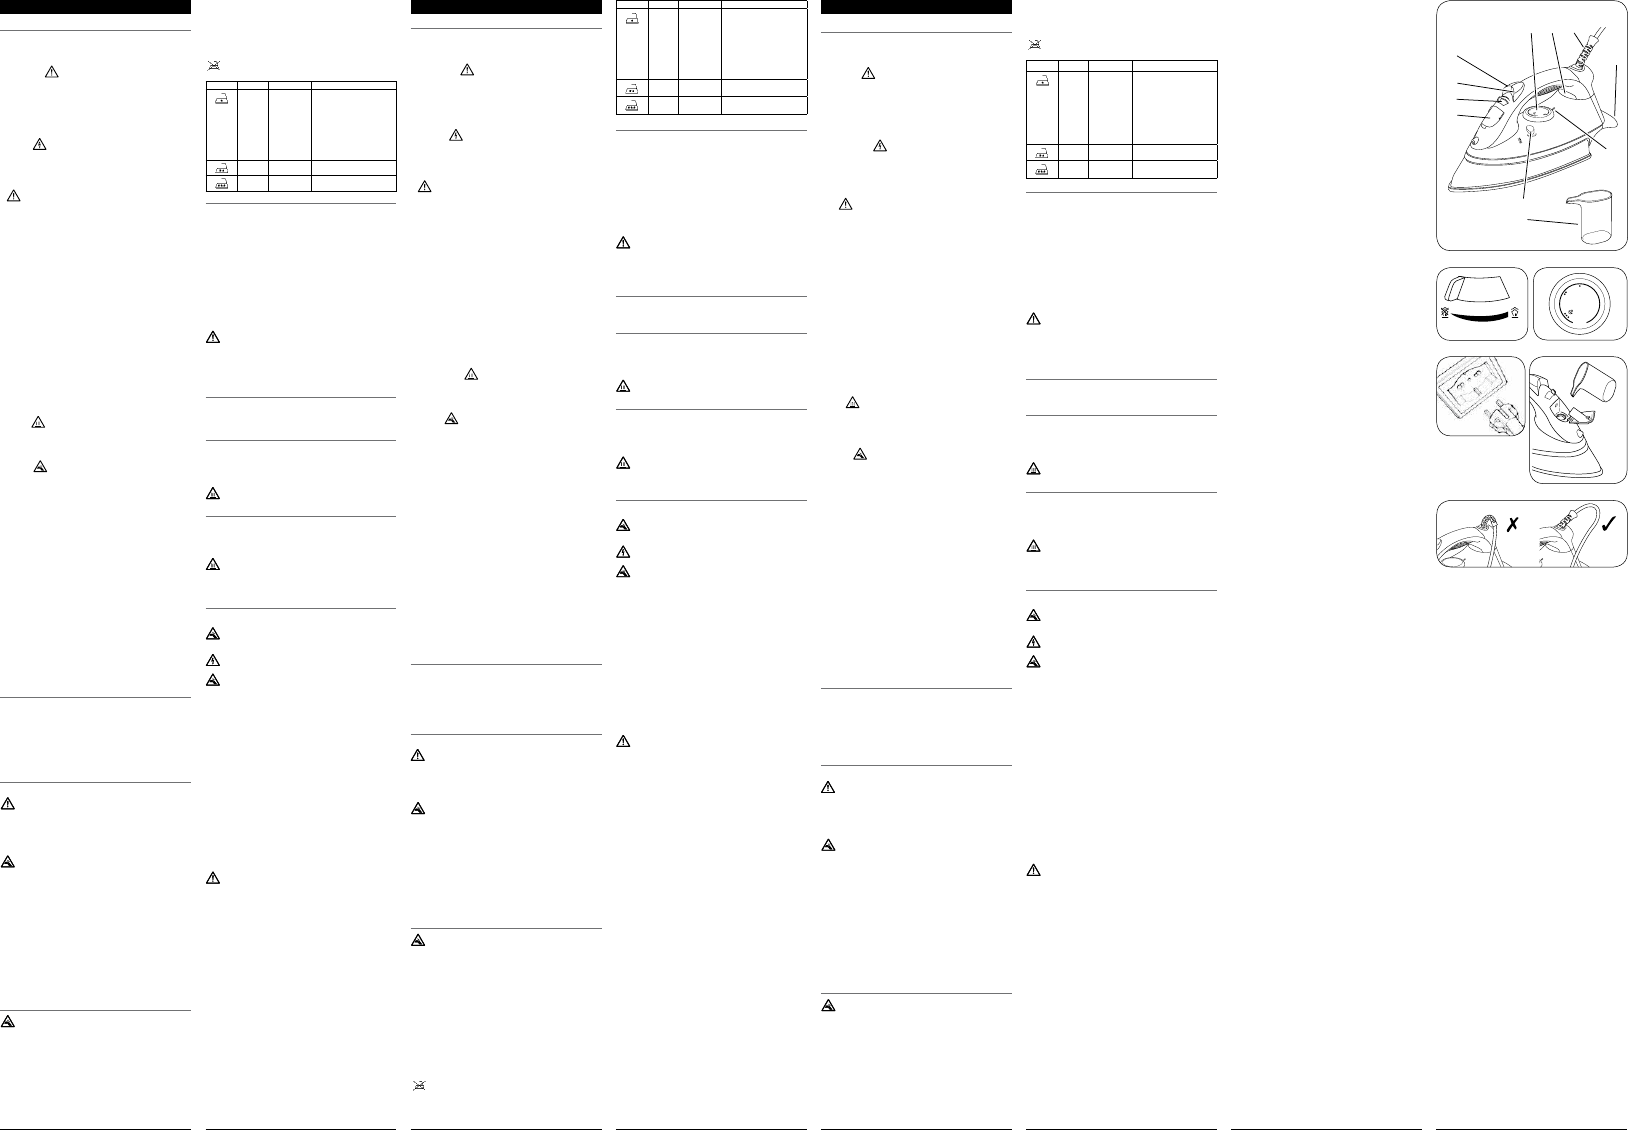
DESCRIZIONE DELL’APPARECCHIO (FIG. 1)
A - Sportellino di riempimento
serbatoio acqua
G - Protezione cavo di alimentazione
H - Appoggia ferro
B - Selettore di regolazione vapore I - Riferimento per impostazione
temperatura
C - Pulsante vapore
D - Pulsante spray L - Misurino acqua
E - Spia di controllo temperatura ferro M - Pulsante autopulizia (self clean)
F - Manopola di regolazione
della temperatura
ISTRUZIONI PER L’USO
Riempimento del serbatoio
Accertarsi che il ferro sia staccato dalla rete di alimentazione elettrica prima
di riempire il serbatoio con acqua.
Impostare il selettore vapore (B) su “0” (Fig. 2).
Aprire lo sportellino (A) tirandolo verso l’alto, e tenendo il ferro orizzontale riempire
ilserbatoioconacquadirubinettonoallivellomassimoutilizzandoilmisurinoin
dotazione (Fig. 5). Richiudere lo sportellino (A). Se l’acqua del vostro rubinetto è
molto calcarea, utilizzare acqua naturale; questo consente una maggiore durata del
ferro da stiro. Non utilizzare acqua distillata.
Non riempire MAI il serbatoio oltre il livello indicato con “MAX”.
Nonversarenelserbatoioaceto,additivichimici,sostanzeprofumantiedecalcicanti:
pena la decadenza della garanzia.
Se fosse necessario aggiungere acqua durante la stiratura, spegnere sempre il ferro
e staccare la spina del cavo di alimentazione dalla presa di corrente elettrica prima
di riempire il serbatoio con acqua.
Aprire lo sportellino di riempimento acqua e capovolgere il ferro da stiro per svuotare
il serbatoio.
Accensione dell’apparecchio
Appoggiare il ferro in posizione verticale sul suo appoggia ferro (H).
Inserire la spina nella presa di corrente. La spia (E) di controllo della temperatura
si accende.
Selezionare la temperatura desiderata ruotando la manopola di regolazione tem
-
peratura (F) e allineandola con il riferimento (I) sul ferro da stiro. Quando il ferro da
stiro raggiunge la temperatura selezionata, la spia (E) si spegne (mentre si stira, la
spia della temperatura si accende e si spegne, indicando che il ferro mantiene la
giusta temperatura).
Seguire l’indicazione riportata sull’etichetta del capo da stirare in modo da fare corri
-
spondereipallinirafguratisudiessaconquelliindicatisull’etichetta.
SUGGERIMENTI
Per non compromettere lo strato antiaderente non passare la piastra del ferro
sopra cerniere od altri oggetti di materiale duro.
Suddividere i capi da stirare in base al tipo di tessuto: lana con lana, cotone con
cotone, ecc...
Poiché il riscaldamento della piastra del ferro avviene molto più rapidamente del suo
raffreddamento è consigliabile iniziare a stirare tutti i tessuti che richiedono tempe
-
rature più basse per poi passare a stirare quei tessuti che richiedono progressiva
-
mente temperature più elevate.
Seiltessutoècompostodapiùtipidibre,regolaresemprelatemperaturaperla
bracherichiedeilminorcalore.Adesempioseiltessutoècompostodaun70%di
bresinteticheedun30%dicotone,bisogneràregolarelatemperaturasullaposizio
-
ne (•) (vedi tabella) senza vapore, cioè quella per i tessuti sintetici.
Se non siete a conoscenza della composizione del tessuto del capo da stira-
re, cercare un punto del tessuto che non sia visibile. Fare una prova stirando
questo punto e stabilire la temperatura più adatta (iniziare sempre da una tem
-
peraturarelativamentebassaedaumentarlagradatamentenoaraggiungere
quellaidonea).Itessutidipuralana(100%)sipossonostirareancheconil
ferro regolato su una delle posizioni vapore. Per i tessuti di pura lana, seta e
sintetici, abbiate l’accortezza, per evitare che il tessuto stirato prenda il lucido,
di stirarli a rovescio. Per gli altri tipi di tessuto ed in special modo per il velluto,
onde evitare che diventino facilmente lucidi, stirarli in una sola direzione (con
un telo), facendo una pressione molto leggera. Il ferro da stiro deve essere
mantenuto in costante movimento sul tessuto da stirare.
Nota: Questo simbolo posto sull’etichetta indica che l’articolo non può essere
stirato!(peres.clorobra,elastodiene).
Etichetta Ferro
Tipo di tessuto
Fibra
•
Sintetico
Seta
Acrilico
Modacrile
Polipropilene
Poliuretano
Acetato
Triacetato
Rame metallizato
Poliammide (nylon)
Viscosa modale
Poliestere (raion)
• •
Lana Lana
• • •
Cotone
Lino
Cotone (vapore o secco)
Lino (vapore o secco)
STIRATURA A VAPORE
La stiratura a vapore è possibile solo ad alta temperatura.
Accertarsichevisiaacquaasufcienzaall’internodelserbatoio.
Posizionare il ferro appoggiandolo sull’appoggia ferro (H) in posizione verticale.
Inserire la spina nella presa elettrica.
Posizionare la manopola di regolazione della temperatura (F) sulla posizione
•••
o superiore.
Quando la spia (E) di controllo della temperatura si spegne ruotare il selettore di
regolazione vapore (B) nella posizione richiesta. La massima erogazione di vapore
si ottiene spostando il selettore in posizione “max”. Spostandolo su “0” non viene
erogato vapore (Fig. 2).
NOTA: questo modello è dotato di un sistema antigoccia che automaticamente
blocca il passaggio di acqua dal serbatoio ai fori della piastra. Il sistema antigoccia
disinserisce automaticamente la funzione vapore, qualora la temperatura del ferro
fosse eccessivamente bassa.
Colpo vapore
Se c’è acqua nel serbatoio e la temperatura è impostata su
•••
o su un livello
superiore,èsufcientepremereilpulsantevapore(C).
Quando si utilizza il getto di vapore e la temperatura è troppo bassa potreb
-
berovericarsifuoriuscited’acquadaiforipresentisullapiastradelferro.
Pulsante spray
Assicurarsi che il selettore di regolazione del vapore sia impostato su “0” e che ci sia
acqua nel serbatoio. Premere il pulsante spray (D).
Per attivare questa funzione potrebbe essere necessario premere ripetutamente il
pulsante spray.
STIRATURA A SECCO
Inserire la spina nella presa elettrica. Impostare il selettore vapore (B) su “0”.
Impostare la manopola (F) di regolazione della temperatura a seconda del tipo di
tessutodastirare.Attenderequalcheminutoafnchélapiastraraggiungalatem
-
peratura.
STIRARE IN VERTICALE
Potete usare il getto di vapore continuo per stirare i tessuti in verticale. Questa spe-
ciale procedura di stiratura serve per rimuovere le pieghe dalle tende, dai tessuti
etc… Impostare la temperatura di stiratura tramite la manopola di regolazione (F)
oltre il simbolo (
•••
). Posizionare la tenda o il tessuto nel modo in cui volete stirarlo
in verticale e premere il pulsante vapore. Se la spia della temperatura è accesa non
premere il pulsante vapore più di tre volte di seguito.
Attenzione
Non stirare tessuti che vengono sorretti da altre persone.
DOPO AVER STIRATO
Posizionare la manopola di regolazione della temperatura (F) su “min”.
Staccare la spina dalla presa elettrica.
Appoggiare il ferro in posizione verticale e lasciarlo raffreddare.
Svuotare il serbatoio: aprire lo sportellino (A) di riempimento acqua, capovolgere il
ferro da stiro e lasciare fuoriuscire l’acqua.
Attenzione
Prima di svuotare il serbatoio lasciare raffreddare il ferro da stiro: pericolo
di ustioni.
Avvolgere il cavo di alimentazione intorno al ferro, senza stringerlo eccessivamente
(Fig. 6). Riporre il ferro in posizione verticale.
PULIZIA DELL’APPARECCHIO
Prima di pulire il ferro, accertarsi che sia staccato dalla rete di alimentazione elettrica
e che sia completamente raffreddato.
Attenzione
Non fare uso di abrasivi per pulire la piastra. Fare in modo che la piastra
rimanga liscia: evitare il contatto con oggetti metallici.
Attenzione
Non immergere mai l’apparecchio in acqua o altri liquidi.
Attenzione
Controllare le condizioni del cavo di alimentazione del vostro ferro regolar-
mente prima di utilizzarlo e nel caso di danneggiamento portarlo al più vicino
centro di assistenza per farlo sostituire solo dal personale specializzato.
Sistema di auto-pulizia
Si consiglia di effettuare questa operazione ad intervalli regolari (una o due volte al
mese) per prolungare la durata del vostro ferro da stiro.
Riempire per un quarto il serbatoio dell’acqua utilizzando il misurino in dotazione
(Fig. 5).
Appoggiareilferrosuunasuperciestabileinposizioneverticalesull’appoggiaferro
(H). Inserire la spina nella presa elettrica. Assicurarsi che il selettore di regolazione
del vapore sia impostato su “0”.
Posizionare la manopola di regolazione della temperatura su “max”.
Farriscaldareilferronoachelaspia(E)sispegneperlasecondavolta.
Posizionare la manopola di regolazione della temperatura su “min”.
Disinserire la spina dalla presa di corrente e tenere il ferro da stiro in posizione
orizzontale su un lavandino.
Premere il pulsante (M) di autopulizia “self clean” e mantenere il ferro in posizione
orizzontale. Dai fori della piastra usciranno vapore e acqua bollente, che rimuoveran
-
noleincrostazionidicalcareeleimpuritàaccumulatisiall’internodellacaldaia.
Muoverecondelicatezzailferrodastiroavantieindietro,noasvuotarecomple
-
tamente il serbatoio.
Al termine della procedura di autopulizia riportare il selettore di regolazione vapore
sul minimo “0”.
Posizionare il ferro in verticale sull suo appoggiaferro e aspettare che la piastra si
raffreddi completamente.
Accertarsi che la piastra sia completamente asciutta prima di riporre il ferro.
Prima di riutilizzare il ferro, provarlo su un vecchio panno di stoffa per assi
-
curarsi che la piastra ed il serbatoio siano puliti e per permettere la vaporiz
-
zazione dell’acqua residua.
Pulizia della piastra e dell’involucro
Gli eventuali depositi e altre parti residue presenti sulla piastra possono essere tolti
utilizzando un panno imbevuto di soluzione di acqua e aceto.
Pulire le parti in plastica con un panno umido non abrasivo e asciugarle con un
panno asciutto.
IL MANCATO RISPETTO DELLE NORME SOPRA CITATE PROVOCA IL DECADI
-
MENTO DELLA GARANZIA.
Fig. 3
Fig. 6
Fig. 5
I
M
EN FR
IMPORTANT WARNINGS
READ THESE INSTRUCTIONS CAREFULLY.
• The appliance has been designed for home use only and must not be used for
commercial or industrial purposes.
• Use the iron only for the use for which it has been designed.
Danger for children
• Do not leave the packaging near children because it is potentially dangerous.
• Keep the appliance out of the reach of children and disabled persons when in
use.
• In the event that this appliance is to be disposed of, it is suggested that the power
chord is cut off. It is also recommended that all potentially dangerous components
are rendered harmless to prevent children hurting themselves when playing with
the apparatus.
Danger due to electricity
• Before plugging the appliance into the mains socket, ensure that the voltage
shown on the rating plate matches the local voltage supply.
• Always connect the iron to an earthed socket.
• DO NOT IMMERSE THE APPLIANCE IN WATER OR OTHER LIQUIDS.
• Do not start ironing if your hands are wet or if you are barefoot.
Danger of damage originating from other
causes
• Fill up the tank with water before starting up the appliance. Be sure to unplug the
appliance before pouring water into the tank.
• Alwaysusethemeasure(L)suppliedforllingthetank.Neverputtheirondirectly
underneath the tap.
• Closethecoverafterlling,makingsurethatitisperfectlyclosed.
• Turn on the appliance only when it is in working position.
• Theappliancemaygiveoutalittlesmokewhenusedforthersttime.Thistransi
-
tory effect is perfectly normal and is due to the fact that some of components have
been slightly lubricated.
• Place the appliance on a stable and well-lit horizontal surface during use.
• Never leave the appliance unattended when it is connected to the power supply.
• The appliance must be used and rested on a stable surface.
• When placing the iron on its stand, ensure that the surface
it sits on is stable.
• When you have to leave for even a short period of time, turn off the iron, place it
on its stand and always unplug the power cord.
• The appliance is not to be used if it has been dropped, if there are visible sign
of damage or if it is leaking. To prevent any accident, all repairs, including the
replacement of the power cord, must be carried out by an Authorised Service
Centreor,inanycase,byqualiedpersonnel.
• Do not use the appliance if the power cord appears to be damaged, with parts
showing burns, etc.; an authorised Ariete service centre must repair and replace
the power cable, under penalty of the warranty being forfeited.
• Do not expose the appliance to atmospheric agents (rain, sun …).
Warning of burns
• Never try to iron garments being worn.
• Do not touch the metal parts of the iron when in operation and for several minutes
after it is turned off since it could cause burns.
• Do not aim the jet of steam towards parts of the body or pets.
Warning – material damage
• We suggest you keep the original box and packaging, as our free-of-charge
service does not cover any damage resulting from inadequate packaging of the
product when this is sent back to an Authorised Service Centre.
• Remove any labels and protections from the soleplate before using the appliance
forthersttime.
• Always unwind the power cord before use.
• The use of extensions not approved by the manufacturer can result in damage to
property and personal injury.
• Do not use sparkling (carbonated) water. If your water supply is very hard, we
suggest you use demineralised water instead.
• Do not place the iron on top of the power cord when it is hot.
• Do not bend the power cord protection when it is wrapped around the iron: the
cord could break with time.
• Do not pull the power cord to unplug the appliance.
• The appliance must only be cleaned with a soft, slightly damped, cloth after un
-
plugging the iron and allowing all its parts to cool down. Never use solvents which
may damage the plastic parts.
• Do not wrap the power cord around the soleplate when the iron is hot.
• Do not put the soleplate in contact with metal surfaces.
• Always turn off the iron by turning the thermostat knob to the position MIN and by
unpluggingthepowercordbeforeremovingthetanktollitwithwaterortoempty
it, before cleaning the iron, and immediately following use.
• Always take off the appliance turning the temperature control knob to “MIN” and
disconnectthemainplugfromthewallsocketbeforellingtheironwithwateror
pouring the remaining water out.
• We decline any responsibility resulting from misuse or any use other than those
covered in this booklet.
• This product complies with the 2006/95/CE Directive.
• KEEP THESE INSTRUCTIONS IN A SAFE PLACE AT
ALL TIMES
Notes:
When using the iron for the first time, test it on an old piece of fabric to ensure
that the sole plate and water tank are completely clean.
DESCRIPTION OF THE APPLIANCE (FIG. 1)
A - Watertankllingcover G - Power cord protection
B - Steam adjustment selector
H - Iron stand
C - Steam button I - Reference for temperature setting
D - Spray button L - Water measure
E - Iron temperature control lamp M - Self clean button
F - Temperature adjustment knob
INSTRUCTIONS FOR USE
Filling the tank before use
Makesuretheironisunpluggedfromthesupplymainsbeforellingthetank
with water.
Set the steam control knob (B) onto “0” (Fig. 2).
Openthedoor(A)bypushingitupwardsand,holdingtheironhorizontally,llthe
water tank up to the maximum level using the measuring beaker provided (Fig. 5).
Close the cover (A) again. If your tap water is very hard, use natural mineral water;
this helps the iron to last longer. Do not use distilled water.
NEVERexceedtheMAXmarkwhenllingthetank.
Do not pour vinegar, descalers or other scented substances into the tank; under
penalty of immediate cancellation of the warranty.
If it proves necessary to add water while ironing, always turn off the iron and unplug
thepowercordbeforellingthetankwithwater.
Openthewaterllingcoverandturntheironupsidedowntoemptythetank.
Turning on the appliance
Rest the iron upright on the iron stand (H).
Plug it into the socket. The temperature control lamp (E) turns on.
Select the desired temperature by turning the temperature adjustment knob (F),
lining it up with the reference (I) on the iron. When the iron reaches the selected
temperature, the lamp (E) turns off (the temperature lamp turns off and on while
ironing, indicating that the iron is maintaining the right temperature).
Follow the instructions on the care label of the garment to be ironed so that the dots
shown on the iron correspond to those shown on the label.
SUGGESTIONS
Do not run the iron over zippers or other objects made of a hard material so
as to not damage the anti-adherent coating.
Divide the articles to be ironed according to the types of material: wool with wool,
cotton with cotton, etc…
Because the iron heats up much more quickly than it cools down, it is advisable
to start with those fabrics which require lower temperatures and move on to those
which require progressively higher temperatures.
Ifthematerialismadeupofmorethanonetypeofbre,alwayssetthetemperature
tothebrewhichrequireslessheat.Forexample,ifthematerialismadeupof70%
syntheticsand30%cotton,setthetemperaturecontroltoposition (•) (see table)
without steam, that is, the temperature for synthetic fabrics.
If you do not know the composition of the article to be ironed, choose a part of the
article which will not be seen. Do a test ironing on this part to establish the appropri
-
ate temperature (always start with a relatively low temperature and work up until the
ideal temperature is reached).
Pure(100%)woolarticlescanbeironedwiththeironsettooneofthesteamposi
-
tions. To avoid pure wool, silk and synthetic materials becoming shiny, it makes good
sense to iron them on the reverse side. For other materials, especially velvet, which
can become shiny very easily, cover them with a cloth and iron in one direction only,
using light pressure. The iron must be kept constantly moving over the fabric.
Nota: This symbol on label means: this article cannot be ironed! (e.g. chlo-
robre,elastodiene).
CONSEILS DE SÉCURITÉ
LISEZ ATTENTIVEMENT CES INSTRUCTIONS.
• L’appareilestdestinéuniquementàunusagedomestique,ilnedoitpasêtreaf-
fectéàunusageindustrielouprofessionnel.
• N’utiliser le fer que pour l’usage auquel il est destiné.
Danger pour les enfants
• Lesélémentsdel’emballagenedoiventpasêtrelaissésàlaportéedesenfants
car ils représentent une source de danger.
• Nelaissezjamaisl’appareilàlaportéedesenfantsoudespersonnesnepossé
-
dant pas les capacités requises.
• Lorsqu’on décidera de jeter cet appareil, il est recommandé de le mettre hors
d’usage en coupant le câble d’alimentation. Il est également recommandé de
protéger les parties susceptibles de constituer un danger spécialement pour les
enfants qui pourraient se servir de l’appareil pour jouer.
Danger électrique
• Avant de brancher l’appareil, assurez-vous que la tension indiquée sur la pla-
quettecorrespondeeffectivementàcelleduréseau.
• Brancheztoujoursl’appareilàuneprisepourvuedemiseàterre.
• NE TREMPEZ PAS L’APPAREIL DANS L’EAU NI DANS TOUT AUTRE LIQUI-
DE.
• Ne pas repasser avec les mains mouillées ou les pieds nus.
Dangers provenant d’autres causes
• Remplir le réservoir d’eau avant de faire fonctionner l’appareil. Le remplissage en
eau s’effectue avec l’appareil débranché de la prise de courant.
• Pour remplir le réservoir, toujours utiliser le doseur (L) fourni avec l’appareil. Ne
jamaismettreleferàrepasserdirectementsouslerobinet.
• Après avoir rempli, refermer le volet et s’assurer qu’il est parfaitement fermé.
• Allumez l’appareil uniquement lorsqu’il est en position de travail.
• Lapremièrefoisquevousutilisezl’appareilàrepasser,ilpeutarriverqu’unpeu
de fumée se dégage : ne vous inquiétez pas car il s’agit d’un phénomène normal,
dûaufaitquecertainespartiesontétélégèrementlubriées,quidisparaîtratrès
rapidement.
• Durant l’utilisation, disposer l’appareil sur un plan horizontal, stable et bien éclairé.
• Ne laissez pas l’appareil sans surveillance lorsqu’il est branché.
• L’appareildoitêtreutiliséetlaisséaurepossurunesurfacestable.
• Quand on place le fer en position verticale sur son support, s’assurer que la sur
-
face d’appui soit stable.
• Si on doit s’absenter un instant, éteindre le fer, le poser sur la grille d’appui et
toujours débrancher le cordon d’alimentation de la prise de courant.
• L’appareilnedoitpasêtreutilisésiilesttombé,s’ilprésentedessignesvisiblesde
détérioration ou s’il perd de l’eau. Toutes les réparations, y compris le remplace
-
mentducordond’alimentation,doiventêtreeffectuéesuniquementparleservice
après-venteouunréparateuragrééand’évitertoutrisque.
• Ne pas utiliser l’appareil si le cordon d’alimentation est endommagé, présente des
parties brûlées, ect...; la réparation et le remplacement du cordon d’alimentation
doiventêtreeffectuésauprèsd’unserviceaprès-venteagrééAriete;souspeine
de déchéance de la garantie.
• Ne pas laisser l’appareil exposé aux agents atmosphériques (pluie, soleil etc...).
Avertissements sur les brûlures
• Nejamaisessayerderepasserlesvêtementsquel’onasursoi.
• Ne pas toucher les parties métalliques du fer lorsqu’il marche ou quelques minu
-
tes après l’avoir éteint car on pourrait se brûler.
• Ne pas diriger le jet vapeur vers des parties du corps ou vers les animaux domes
-
tiques.
Attention - dégâts matériels
• Il est conseillé de conserver l’emballage d’origine vu que l’assistance gratuite ne
joue pas pour les dommages causés par un emballage du produit non adéquat
lorsdel’expéditionàunserviceaprès-venteagréé.
• Avant d’utiliser l’appareil la première fois, retirez les protections et les étiquettes
éventuellessurlasemellechauffanteduferàrepasser.
• Déroulez toujours le câble avant utilisation.
• L’utilisation de rallonges électriques non autorisées par le fabricant de l’appareil peut
provoquer des dégâts et des accidents.
• N’utilisez jamais d’eau gazeuse (additionnée d’anhydride de carbone). Au cas où
l’eau serait particulièrement calcaire il est conseillé d’utiliser de l’eau déminérali
-
sée.
• Nepasmettreleferàrepasserchaud,enappuisurlecordond’alimentation.
• Ne pas plier la protection du câble électrique au moment où on l’enroule autour du
feràrepasser:avecletemps,lecordonpourraitsecasser.
• Ne débranchez pas le fer de la prise de courant en tirant sur le cordon.
• Une fois que l’appareil aura été débranché et que toutes les parties auront refroidi,
ilserapossibledelenettoyerexclusivementavecunchiffonnonabrasifetàpeine
humide. N’utilisez jamais de solvants car ils altèrent les parties en plastique.
• Ne pas enrouler le cordon d’alimentation autour de la plaque lorsque le fer est
encore chaud.
• Ne pas mettre la plaque en contact avec les surfaces métalliques.
• Toujours éteindre le fer en tournant le bouton du thermostat sur la position MIN et
débrancher le câble de la prise de courant électrique avant de remplir le fer avec
de l’eau ou de vider l’eau contenue dans le réservoir.
• Le constructeur décline toute responsabilité pour une utilisation erronée ou pour
des emplois autres que ceux prévus par ce livret.
• L’appareilestconformeàlaNorme2006/95/CE.
• CONSERVER CES INSTRUCTIONS
Remarques:
Lors de la première utilisation, essayez le fer sur un vieux morceau de
tissupourvérierquelasemelleetleréservoird’eausontparfaitementpropres.
DESCRIPTION DE L’APPAREIL (FIG. 1)
A - Volet de remplissage
du réservoir d’eau.
F - Bouton de réglage de la température
G - Protection du cordon d’alimentation
B - Sélecteur de vapeur
H - Support du fer
C - Bouton vapeur I - Repère pour réglage température
D - Spray L - Doseur eau
E - Voyant de contrôle
température du fer
M - Bouton auto-nettoyage (self clean)
MODE D’EMPLOI
Remplissage du réservoir
Vérierqueleferestdébranchéduréseaud’alimentationélectriqueavantde
remplir le réservoir avec de l’eau.
Régler le sélecteur de vapeur (B) sur «0» (Fig. 2).
Ouvrirlevolet(A)enletirantverslehaut.Tenirleferàl’horizontaleetremplirle
réservoir jusqu’au niveau maximum en utilisant le doseur fourni (Fig. 5).
Refermer le volet (A). Si l’eau de votre robinet est très calcaire, utiliser de l’eau
minérale;ceci permettaà votre ferà repasserde durer pluslongtemps. Nepas
utiliser d’eau distillée.
NeJAMAISremplirleréservoirau-delàduniveau«MAX»
.
Nepas verser devinaigre, décalciantou autres substancesparfumées dans le
réservoir; sous peine de déchéance immédiate de la garantie.
Si on devait ajouter de l’eau pendant le repassage, toujours éteindre le fer et dé
-
brancherlacheducordond’alimentationdelaprisedecourantavantderemplir
le réservoir en eau.
Ouvrirlevolet deremplissaged’eau et renverserlefer àrepasserpour vider le
réservoir.
Régler le thermostat sur la température désirée.
Poserleferenappuiàlaverticale,sursonsupport(H).
Introduirelachedanslaprisedecourant.Levoyant(E)decontrôledelatempé
-
rature s’allume.
Sélectionner la température désirée en tournant le bouton de réglage de tempé
-
rature(F)etl’alignersurlerepère(I)duferàrepasser.Quandleferàrepasser
atteint la température sélectionnée, le voyant (E) s’éteint (pendant le repassage,
le voyant de température s’allume et s’éteint, ce qui indique que le fer maintient la
bonne température).
Suivrel’indicationreportéesurl’étiquetteduvêtementàrepasserdefaçonàfaire
coïncider les points représentés sur celle-ci et ceux inscrits sur le fer.
CONSEILS
Pour ne pas compromettre la pellicule anti-adhérente, ne pas passer la se-
melle du fer sur les fermetures éclairs ou autres objets en matériel dur.
Répartirlespiècesàrepasserenfonctiondutypedetissu:laine/laine,coton/coton,
etc.
Etant donné que la semelle du fer chauffe plus vite qu’elle ne se refroidit, nous
conseillonsdecommenceràrepassertouslestissusquiexigentdestempératures
plus basses pour passer aux tissus qui exigent progressivement des températures
plus élevées.
Siletissuestcomposédeplusieurstypesdebres,toujoursréglerlatempérature
enfonctiondelabrequiexigelemoinsdechaleur.Parexemple,siletissuest
composéde70%debressynthétiquesetde30%decoton,réglerlatempérature
surlaposition(•)(voirtableau)sansvapeur,c’estàdirecellequiestpréconisée
pour les tissus synthétiques.
Sivousignorezlacompositiondutissuàrepasser,chercherunpointdetissuqui
n’est pas visible. Faire un essai en repassant ce point et déterminer la température
la mieux appropriée (toujours commencer par une température relativement basse
et l’augmenter graduellement pour atteindre la température correcte).
Onpeutégalementrepasserlestissuspurelaine(100%)enréglantlefersurune
Label Iron Kind of textile Fibre material
•
Synthetic
Silk
Acrylic
Modacryl
Polypropylene
Polyurethane
Acetate
Triacetate
Metallized cupro
Polyamide (nylon)
Modal viscose
Polyester (rayon)
• •
Wool Wool
• • •
Cotton
Linen
Cotton (steam or dry)
Linen (steam or dry)
STEAM IRONING
Steam ironing is only possible at high temperature.
Ensure that there is enough water in the water tank.
Rest the iron upright on the iron stand (H).
Insert the plug into the wall socket.
Position the temperature adjustment knob (F) on position
•••
or higher.
When the temperature control lamp (E) turns off, turn the steam adjustment selector
(B) to the desired position. You get maximum steam dispensing by moving the selec
-
tor to the “max” position. Steam is not dispensed when it is moved to “0” (Fig. 2).
NOTE: this model is equipped with a drip-proof system that automatically blocks wa
-
ter from going from the tank to the holes of the soleplate. The drip-proof system auto
-
matically cuts out the steam function if the iron’s temperature should be too low.
Shot of steam
If there is water in the tank and the temperature is set on
•••
or on a higher level,
all you have to do is press the steam button (C).
When you use the shot of steam and the temperature is too low, water may
leak from the holes on the iron soleplate.
Spray button
Make sure the steam adjustment selector is set on “0” and that there is water in the
tank. Press the spray button (D).
It may be necessary to press the spray button repeatedly to activate this function.
DRY IRONING
Insert the plug into the wall socket. Move the steam adjusting knob (B) onto “0”.
Set the temperature control knob (F) according to the type of fabric to be ironed.
Wait a few minutes for the soleplate to reach the set temperature.
VERTICAL IRONING
You can use the jet of continuous steam for ironing hanging fabrics. This special iron-
ing procedure serves to remove creases from curtains, fabrics, etc. Set the ironing
temperature by turning the adjustment knob (I) past the symbol (
•••
). Put the cur-
tain or fabric in the position you want to iron it vertically and press the steam button.
If the temperature lamp is on, do not press the steam button more than three times
in a row.
Warning!
Do not iron fabrics held by other people.
AFTER IRONING
Turn the temperature control knob (F) to «MIN» and the steam control knob (B)
to “0”.
Disconnect the plug from the wall socket.
Put the iron in a vertical position and let it cool down.
Emptythetank:openthewaterllingcover(A),turntheironupside-downandlet
the water pour out.
Caution
Let the iron cool down before emptying the tank: danger of burns.
Wrap the power cord around the iron without pulling it too tight (Fig. 6). Store the
iron in a vertical position.
CLEANING THE APPLIANCE
Before cleaning the iron, make sure that it is disconnected from the power supply
and that it has completely cooled down.
Warning!
Do not use abrasives for cleaning the soleplate. Try and keep the sole-
plate smooth: avoid contact with metal objects.
Warning!
Never immerse the appliance in water or other liquids.
Warning!
Check the state of the power cable of your iron on a regular basis before us-
ing it, and if it is damaged, take it to the service centre closest to you to have
it replaced only by specialised personnel.
Self clean system
To prolong the life of your iron, we recommend that this procedure be carried out at
regular intervals (once or twice a month).
Fill the tank one-fourth full with water using the measure provided (Fig. 5).
Set the iron on a stable surface in a vertical position on the iron stand (H). Plug it into
the socket. Make sure the steam adjustment selector is set on “0”.
Position the temperature adjustment knob on “max”.
Heat the iron until the lamp (E) turns off a second time.
Position the temperature adjustment knob on “min”.
Unplug the iron and keep the iron in a horizontal position on a sink.
Press the self clean button (M) and keep the iron in a horizontal position. Steam and
boiling water will come out of the holes of the soleplate. They will remove the lime
deposits and impurities that have accumulated inside the boiler.
Gently move the iron back and forth until the tank is completely emptied.
Put the steam adjustment selector back on minimum “0” at the end of the self-clean
-
ing procedure.
Put the iron in a vertical position on its stand and wait for the soleplate to cool down
completely.
Make sure that the soleplate is completely dry before storing the iron.
Before using the iron again, try it on an old piece of cloth to make sure that
the soleplate and tank are clean and to allow residual water to vaporize.
Cleaning the soleplate and shell
Deposits and other residues on the soleplate can be removed with a rough cloth
soaked in a vinegar/water solution.
Clean plastic parts with a damp, non-abrasive cloth and dry them with a dry cloth.
FAILURE TO OBSERVE THE RULES ABOVE CAUSES THE WARRANTY TO BE
FORFEITED.
despositionsvapeur.Repasseràl’enverslestissuspurelaine,soie,synthétiques,
pour éviter que le tissu repassé ne devienne brillant. Pour les autres types de tissu
et en particulier le velours, pour éviter qu’ils ne deviennent facilement brillants, les
repasser dans une seule direction (avec une toile), en appuyant très légèrement. Le
feràrepasserdoittoujoursêtreenmouvementsurletissu.
Remarque: La présence de ce symbole sur l’étiquette indique que l’article ne
peutpasêtrerepassé(parex.chlorofibreouautres).
Etiquette Fer Type de tissu Fibre
•
Synthétique
Soie
Acrylique
Modacryle
Polypropylène
Polyuréthane
Acétate
Triacétate
Cuivre métallisé
Polyamide (nylon)
Viscose
Polyester (rayon)
• •
Laine Laine
• • •
Coton
Lin
Coton(vapeurouàsec)
Lin(vapeurouàsec)
REPASSAGE A LA VAPEUR
Lerepassageàlavapeurn’estpossiblequ’àhautetempérature.
Assurez-vousqu’ilyasufsammentd’eauàl’intérieurduréservoir.
Posez le fer sur l’appui (H) en position verticale.
Branchez le fer.
Mettre le bouton de réglage de la température (F) sur la position
•••
o supérieure.
Quand le voyant (E) de contrôle de la température s’éteint, tourner le sélecteur de
réglage de la vapeur (B) sur la position désirée. Le débit de vapeur maximum s’ob
-
tientendéplaçantlesélecteursurlaposition«max».Sionleplacesur“0”aucune
vapeur ne sort (Fig. 2).
REMARQUE: ce modèle est équipé d’un système anti-goutte qui bloque automati
-
quement le passage de l’eau du réservoir aux perforations sur la semelle. Ce sys
-
tème anti-goutte annule automatiquement la fonction vapeur dès que la température
du fer est trop basse.
Jet de vapeur
S’il y a de l’eau dans le réservoir et que la température est réglée sur
•••
o, sur le
niveausupérieur,ilsuftd’appuyersurleboutonvapeur(C).
Quand on utilise le jet de vapeur et que la température est trop basse, on
pourrait voir de l’eau sortir par les trous situés sur la semelle du fer.
Bouton spray
Vérierquelesélecteurderéglagedelavapeurestsur“0”etqu’ilyadel’eaudans
le réservoir. Appuyer sur le bouton spray (D).
Pourmettre la fonctionen marche, ilpourraitêtre nécessairededevoir appuyer
plusieurs fois sur le bouton spray.
REPASSAGE À SEC
Branchez l’appareil. Tourner le régulateur de vapeur (B) sur «0».
Réglerleboutonthermostat(F)enfonctiondutypedetissuàrepasser.
Attendrequelquesminutesdefaçonàcequelasemellearriveàtempérature.
REPASSAGE VERTICAL
Onpeututiliserlejetdevapeurcontinupourrepasseràlaverticale.Ceprocédé
spécialderepassagesertàéliminerlesplissurlesrideaux,lestissusetc…Réglerla
températurederepassageparleboutonderéglage(F)au-delàdusymbole(
•••
).
Positionnerlerideauouletissudefaçonàpouvoirrepasseràlaverticaleetappuyer
sur le bouton vapeur. Si le voyant de la température est allumé, appuyer sur le
bouton vapeur plus de trois fois de suite.
Attention
Ne pas repasser les tissus qui sont soutenus par une autre personne.
APRÈS AVOIR REPASSÉ
Tourner le régulateur de température (F) sur “MIN” et le sélecteur de vapeur (B)
sur «0»
.
Débrancherlachedelaprisedecourant.
Mettre le fer en position verticale et le laisser refroidir.
Viderleréservoir:ouvrirlevolet(A)deremplissagedel’eau,renverserleferàre
-
passer et laisser sortir l’eau.
Attention
Avantdeviderleréservoir,laisserrefroidirleferàrepasser:dangerdebrû-
lure.
Enrouler le cordon d’alimentation autour du fer, sans le serrer trop (Fig. 6). Replacer
leferàlaverticale.
NETTOYAGE DE L’APPAREIL
Avant de nettoyer le fer, assurez-vous qu’il soit débranché du réseau électrique et
qu’il ait complètement refroidi.
Attention!
Nepasutiliserd’abrasifspournettoyerlasemelle.Nettoyerdefaçonàce
que la semelle reste lisse: éviter le contact avec les objets métalliques.
Attention!
Ne jamais immerger l’appareil dans l’eau ou dans un liquide quelconque.
Attention!
Contrôler régulièrement les conditions du cordon d’alimentation de votre fer
avant de l’utiliser. En cas de détérioration, l’apporter dans le service après-
vente le plus proche et le faire remplacer par un personnel spécialisé.
Système d’autonettoyage
Ilest conseillé deréalisercette opération àintervalles réguliers (une ou
deuxfoisparmois)pourprolongerladuréedeviedevotreferàrepasser.
Remplir le réservoir au quart en utilisant le doseur fourni avec l’appareil (Fig. 5).
Mettreleferenappuiàlaverticalesurunesurfacestable,surlesupport(H).In
-
troduirelachedanslapriseélectrique.Vérierquelesélecteurderéglagedela
vapeur est sur “0”.
Placer le bouton de réglage de la température sur “max”.
Fairechauffeurleferjusqu’àcequelevoyant(E)s’éteignedeuxfoisdesuite.
Placer le bouton de réglage de la température sur “min”.
Enleverlaprisedecourantetgarderleferàrepassersurlapositionhorizontale,
au-dessus d’un lavabo.
Appuyersurlebouton(M)d’auto-nettoyage“selfclean”etmaintenirleferàl’hori
-
zontale. De la vapeur et de l’eau bouillante sortent par les trous de la semelle du fer,
ce qui permet de nettoyer les incrustations de calcaire et les impuretés qui se sont
accumuléesàl’intérieurdelachaudière.
Faireavanceretreculerdélicatementleferàrepasser,jusqu’àcequeleréservoir
se soit complètement vidé.
Alandelaprocédured’auto-nettoyage,ramenerlesélecteurderéglagevapeur
sur le minimum “0”.
Posez le fer en position verticale sur l’appui
et attendez que la semelle ait com-
plètement refroidi.
Assurez-vous que la semelle soit parfaitement sèche avant de ranger le
fer.
Avantderéutiliserlefer,l’essayersurunvieuxlingeentissupourêtresûr
que la semelle et le réservoir sont propres, et permettre la vaporisation de
l’eau résiduelle.
Nettoyage de la semelle et du corps
Les dépôts éventuels et les autres parties résiduelles présentes sur la semelle peu-
ventêtreenlevésavecunchiffonimbibéd’eauvinaigrée.
Nettoyer les parties en plastique avec un linge humide et doux puis sécher avec
un linge sec.
NE PAS RESPECTER LES NORMES CITÉES CI-DESSUS PROVOQUE LA DÉ
-
CHÉANCE DE LA GARANTIE.

Join the conversation about this product
Here you can share what you think about the Ariete 6207 Iron. If you have a question, first carefully read the manual. Requesting a manual can be done by using our contact form.