
Temporis_700_en.qxp 24/08/2009 14:41 Page 1
1. GETTING TO KNOW YOUR TEMPORIS 700
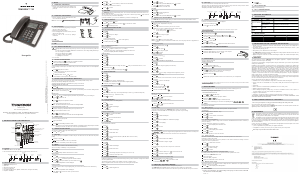
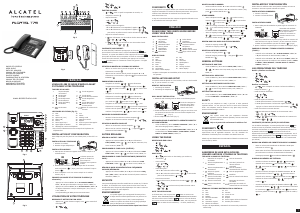
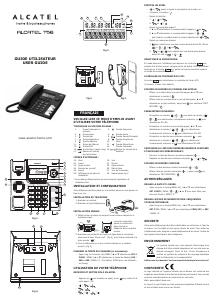
1.1 DISPLAY
Your TEMPORIS 700 has a four-line display:
� 1 line of icons and function data, and 3 lines of 16 alphanumeric characters each
1.2 WHAT’S IN THE BOX
� 1 TEMPORIS 700 telephone set
� 1 spiral cord
� 1 RJ11/RJ11 telephone cord
� 1 memory key label sheet
� 7 user guides (English, French, Spanish, German, Dutch, Portuguese and Italian)
� 1 telephone cord adapter
Voicemail
indicator
Telephone
locked
Mute mode active /
On hold
New calls /
Total calls
Repeat
indicator
Missed
calls
Entry number
in phonebook
Menu
key
Display
Back / Correct key
Confirm key
Pause / Redial key
Flash key
Mute key
Call List key
Phonebook key
Loudspeaker
Hands-free and ringer volume control
Headset key
Hands-free key
Navigation keys (up, down, left, right)
Ringer / Message Waiting LED
Memory keys (M1 to M10)
Memory key labels
Programmable keys
Peg for wall
mounting
Temporis_700_en.qxp 24/08/2009 14:41 Page 2
3.2 DIALLING IN ON-HOOK MODE
Press the hands-free key , then dial your correspondent's number.
Pick up the handset to talk. The key is backlit in blue.
3.3 USING HANDS-FREE MODE
If you are talking to somebody on the handset, and you want to hear and talk to them over the loudspeaker
instead:
Press and replace the handset.
4
The people around you can join in the conversation.
4
The key is backlit in blue.
To adjust the volume, use the and keys.
Lift the handset to return to private conversation mode.
3.4 DIALLING USING THE PHONEBOOK / MEMORY KEYS
The phonebook can hold up to 170 name and number entries and 10 quick-dial memory entries.
Each entry can hold up to 20 digits and 16 characters.
To program the phonebook and the quick-dial memory keys, see Section 4.9.
Using the phonebook to make a call
Press .
Alphabetic order search
Enter the first letter, or the first two letters, of the name you are looking for. The first name starting with that
letter appears. To scroll down, press .
or
Manual search
Press or to scroll through the phonebook until you find the name you are looking for.
Press to initiate the call.
or
Press to dial your correspondent’s number.
or
Pick up the handset and make the call.
NOTE: The call timer starts about 12 seconds after the last digit is dialled.
Using a memory key to make a call
Press the memory key associated with the person you want to call.
Pick up the handset to initiate the call.
2
1
3
3
3
2
2
1
3
2
1
2
1
4
Temporis_700_en.qxp 24/08/2009 14:41 Page 4
5
or
Press to talk in hands-free mode.
NOTE: The call timer starts about 12 seconds after the last digit is dialled.
3.5 TAKING A CALL
There are two ways to pick up a call:
Pick up the handset.
or
Press , and start talking in hands-free mode.
NOTE: If the ringer is off, the incoming call will be indicated on the display (Incoming Call) and by the Call LED
(flashing). You can take the call in either of the two ways described above.
3.6 HANDSET VOLUME CONTROL
You can turn the handset volume up or down during a call.
Press (up) or (down).
3.7 MUTE KEY
The Mute key puts your correspondent on hold so that you can talk to someone else without the first person
hearing.
During the call, press .
8
A beep is emitted on the line every 10 seconds.
To resume the conversation, press the Mute key again.
3.8 REDIAL
The Redial function can store the last 10 numbers in memory.
There are two ways of redialling a recently called number:
Off-hook mode
Press .
8
This automatically redials the last number to be called.
On-hook mode
Press .
8
The most recently dialled number is displayed.
Use or to scroll through the last 10 numbers dialled.
Press or pick up the handset or press the hands-free key .
8
This automatically dials the number displayed.
3
2
1
1
2
1
1
1
1
2
Temporis_700_en.qxp 24/08/2009 14:41 Page 5
Deleting a number
If you want to erase the traces of your outgoing calls, you can delete the numbers from the redial memory.
Press .
8
The most recently dialled number is displayed.
Use or to select the number you want to delete.
Press .
Use or to select "Erase" (to delete the selected number).
or
"Erase All" (to delete all of the numbers).
Press to confirm.
4. SETTINGS
Your TEMPORIS 700 has a "Phone Setting" menu. To access the various sub-menus from the home screen,
follow the instructions below.
You can return to the home screen from anywhere in any menu or sub-menu by pressing again. This will
cancel any action that you started but didn't finish.
If you make a mistake, e.g. if you enter an invalid date, you will hear 3 warning beeps.
4.1 DISPLAY CONTRAST
Press , then press twice.
Use the key to increase the contrast or to decrease the contrast.
Press to confirm your choice.
4.2 RINGER MELODY AND VOLUME
4.2.1 To set the melody
Press .
Press .
Press until you see "Ringer".
Press twice.
8
The set melody is played.
To change the melody, press (choice of 10 ringtones).
To confirm your choice, press .
6
5
4
3
2
1
3
2
1
5
4
3
2
1
6
Temporis_700_en.qxp 24/08/2009 14:41 Page 6
4.2.2 To adjust the ringer volume
When a call comes in
Press or to adjust the volume (level 1, 2, 3 or OFF).
8
The chosen ringer volume setting will apply to subsequent calls as well.
8
At level 0, the display will indicate "Ringer Off".
At all other times
Press .
Press .
Press .
Press .
Press .
Press .
The default volume level is 3. To change this, press until you reach the desired level: 1, 2 or 3.
Confirm by pressing .
To cut the ringer, select 0, and confirm by pressing .
4.3 DISPLAY LANGUAGE
Press .
Press .
Press twice.
Press .
Press until you reach the desired language
(Français, Deutsch, Nederlands, Português, Italiano, English, Español)
Confirm the chosen language with .
4.4 DATE AND TIME
Press .
Press .
Press twice.
Date: Using the number keys, enter the day followed by the month (e.g. 12 and 05 for May 12th).
Time: Enter the time (e.g. 16 and 45 for 16:45).
Press to confirm.
6
5
4
3
2
1
6
5
4
3
2
1
9
8
7
6
5
4
3
2
1
1
7
Temporis_700_en.qxp 24/08/2009 14:42 Page 7
4.5 TYPE OF DIALLING
The default dialling mode is tone dialling (DTMF).
Press .
Press to confirm.
Press to obtain "Call Settings".
Press twice.
8
"Tone" flashes.
To switch to pulse dialling
Press once to obtain "Ratio 60/40".
Press to confirm.
or
Press twice to obtain "Ratio 66/33".
Press to confirm.
4.6 FLASH TIME
The default flash time is 100 ms.
Press .
Press .
Press to obtain "Call Settings".
Press .
Press to obtain "Flash Time".
Press .
Press to select the desired flash time (100, 300, 600 or some other value).
Press to confirm.
4.7 PAUSE TIME
Press .
Press .
Press to obtain "Call Settings".
Press .
Press to obtain "Pause Time".
Press .
6
5
4
3
2
1
8
7
6
5
4
3
2
1
2
1
2
1
4
3
2
1
8
Temporis_700_en.qxp 24/08/2009 14:42 Page 8
Press to scroll through the pause time settings (1.5s, 2s, 3s or 4s).
Press to confirm the chosen pause time.
4.8 KEYPAD LOCK/UNLOCK
Locking the keypad can prevent unwarranted calls being made. By default, a maximum of 4 digits can be dialled
when the keypad is locked.
This maximum number of digits can be modified (see Section 7 "Installer menu").
When the keypad is locked, the function keys on the left of the keypad are inoperative.
Locking
Press .
Press to obtain "Keypad Lock".
Press to confirm.
Enter the PIN code (by default, 0000) and press to confirm.
8
The icon appears on the display.
To change the PIN code, see Section 4.10.
Unlocking
Press .
Press to obtain "Keypad Lock".
Press to confirm.
Enter the PIN code (by default, 0000) and press to confirm.
4.9 MEMORY KEYS AND PHONEBOOK
The TEMPORIS 700 has a phonebook capacity of 170 names and numbers and 10 quick-dial memories.
4.9.1 Programming the memory keys
Press one of the 10 quick-dial memory keys.
Press .
Wait for the cursor to move on before you enter the next letter.
Attendre que le curseur se déplace avant de taper la lettre suivante.
E.g.: To enter an M, press the key once;
To enter an R, press the key three times.
Press .
Enter the number, using the keypad.
Press to save.
7
6
5
4
3
2
1
4
3
2
1
4
3
2
1
8
7
9
Temporis_700_en.qxp 24/08/2009 14:42 Page 9
10
NOTE: Use the key to erase a letter or digit.
NOTE: If "Block Mem. Keys" is enabled in the Installer menu, the memory keys cannot be re-programmed or
erased.
Modifying a memory key
Press the desired memory key .
Press .
To edit the name, press .
Enter the name, using the keypad.
Press to confirm.
Erasing a memory key
Press the memory key .
Press .
Press to confirm.
Storing names and numbers in the phonebook
Press .
Press .
Enter the name, using the keypad (see Section 4.9.1).
Press .
Enter the number.
Press .
NOTE: Use the key to change a mistyped letter or digit before you save.
Editing a phonebook entry
Press .
Enter the first letter, or the first two letters, of the name you are looking for.
Press .
Press 4 times to reach "Modify".
Press .
To edit the name, press .
Enter the new name and press .
To edit the number, press .
Enter the new number and press .
9
8
7
6
5
4
3
2
1
6
5
4
3
2
1
3
2
1
5
4
3
2
1
Temporis_700_en.qxp 24/08/2009 14:43 Page 10
11
Deleting an entry from the phonebook
Repeat steps and .
Use the or key to select "Erase".
Press to confirm.
Deleting all the entries in the phonebook
Repeat steps and .
Use the or key to select "Erase All".
Press to confirm.
4.10 PIN CODE
To access certain functions on your TEMPORIS 700 you need to use a PIN code.
By default, the PIN code is 0000. You can modify this to any number of your choosing.
Press .
Press .
Press to obtain "PIN Keylock".
Press .
Enter the default code (0000) or the modified code (4 digits).
Press .
Enter the new code (4 digits).
Press .
Confirm the new code.
Press .
4.11 SERVICE KEYS
The , and keys on the keypad can be programmed to store various numbers. For example, the
(Voice Mailbox) key can be used to store the number of the voicemail server.
Press .
Press .
Press 4 times to obtain "Voice Mailbox".
Press .
Enter the desired number, using the keypad.
Press .
6
5
4
3
2
1
10
9
8
7
6
5
4
3
2
1
4
3
21
4
3
21
Temporis_700_en.qxp 24/08/2009 14:43 Page 11
Proceed in the same way for the other 2 keys: Service A, Service B.
Press .
Press .
Press 6 times for "Service A" or 7 times for "Service B".
Enter the desired number, using the keypad.
Press .
To dial a number stored on one of these 3 keys
Pick up the handset (or use hands-free mode).
Press and hold , or for at least 2 seconds.
8
The number is dialled.
5. USING THE "CALLER ID" SERVICE*
Your network operator provides a number of subscription-only services.
Your TEMPORIS 700 is compatible with the "Caller ID" service in hands-free or off-hook mode.
This service tells you the name or number of the caller before you take the call, and when you are on the line.
5.1 CALL LIST*
The Call list is linked to the network operator’s caller ID service.
The list can store up to 70 numbers of people who have tried to call you. When the memory is full, the oldest
call (bottom of the list) is deleted to make room for the most recent.
The display icons indicate various caller ID data:
5.2 VIEWING THE CALL LIST
If you have new unanswered calls, the icon appears.
To consult the Call list, press .
Press to view the other calls.
2
1
Voicemail
indicator
Telephone
locked
Mute mode active /
On hold
New calls /
Total calls
Repeat
indicator
Missed
calls
Entry number
in phonebook
2
1
5
4
3
2
1
12
* Subject to availability and subscription from your network operator. For further details, contact your operator.
Temporis_700_en.qxp 24/08/2009 14:43 Page 12
While looking up a number
To call the number, press .
To save a number in the phonebook, press followed by .
Then press to store it in the phonebook or on one of the memory keys .
To delete a contact, press .
Press to reach "Erase".
Press to confirm.
NOTE: "Erase All" (by pressing again) deletes all the calls from the list.
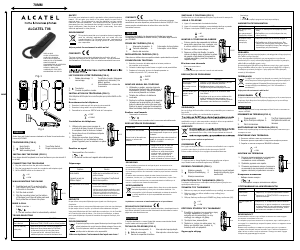
6. CONNECTING AND USING A HEADSET*
6.1 CONNECTION
Remove the plastic stopper on the left of the base of the telephone.
Connect the RJ9 headset cable to the socket.
6.2 HEADSET MODE
Once the headset is connected:
To take an incoming call
Press .
8
This key becomes backlit in blue.
After the call, press again to hang up.
To call out
Press and dial the number, or press one of the memory keys.
8
You can, at any moment, switch the call into:
Hands-free mode: press .
or
Handset mode: pick up the handset and remove the headset to hear your correspondent.
2
2
1
2
1
Headset socket
2
1
3
2
1
2
1
1
13
* Not supplied with the TEMPORIS 700. Your headset must have an RJ9 connector. Use headsets that comply with the EN 60950-1 standard
and which are designed to be connected to telephones.
Temporis_700_en.qxp 24/08/2009 14:44 Page 13
7. INSTALLER MENU
This menu provides access to certain specific programming functions, including system reset.
Procedure for opening the Installer menu
!
The handset must be on-hook.
Press and simultaneously.
While holding these 2 keys down, pick up the handset.
Release the and keys.
Leave the handset off-hook while using the various sub-menus.
Press one of the 4 following keys to access the corresponding menus: , , , .
7.1 KEY 0
Four sub-menus are available.
7.1.1 Memory key lock
To avoid memory keys being accidentally erased. By default, this option is disabled.
To lock/unlock
When the display indicates "Block Mem. Keys":
Press to confirm.
Press to select "Activate" or "Deactivate".
Press to confirm.
7.1.2 Time limit on redial memory
If this option is enabled, it limits the length of time for which the last dialled number is stored to 15 minutes (to
protect your privacy).
To limit the redial memory storage time to 15 minutes:
Press until the display shows "Retention Time".
Press .
8
The display indicates "Illimited".
Press until the display shows: "Limited".
Press to confirm.
Follow the same procedure to remove the time limit.
4
3
2
1
3
2
1
5
4
3
2
1
14
Temporis_700_en.qxp 24/08/2009 14:44 Page 14
15
7.1.3 Detection threshold
This menu is used to detect the voltage of a device connected in parallel to the modem socket.
By default, the voltage value is fixed.
If a problem arises when there is a device in parallel, the value must be switched to “Learning” so that the
telephone can detect the parallel device.
Press to obtain "Phone detection".
Press .
8
The display shows "Fixed Value".
Press to obtain "Learning".
Press to confirm.
If a problem arises with a telephone connected in parallel
If the display indicates "Busy Line", then the telephone connected in parallel is not on line:
Disconnect the TEMPORIS 700 line cord.
Pick up the handset.
Wait for the display to go blank.
Replace the handset and reconnect the line cord.
7.1.4 Maximum number of digits
This menu is used to set the maximum number of digits that can be dialled when the keypad is locked. By
default, the number is set to 4 digits.
Press until the display shows "Nb Digit Max?".
7.2 KEY 3 / RESET
!
Caution: reset is immediate – all program settings, memory keys, etc. will be erased, and the PIN
code will return to its initial value (0000).
Press .
8
Immediate reset.
7.3 KEY 6 / DISPLAY TEST
Display test (technicians only).
7.4 KEY 9 / SOFTWARE VERSION
Software version (technicians only).
1
1
4
3
2
1
4
3
2
1
Temporis_700_en.qxp 24/08/2009 14:44 Page 15
16
8. ADDITIONAL INFORMATION
8.1 TROUBLESHOOTING
8.2 DEFAULT SETTINGS
9. PRECAUTIONS FOR USE / TECHNICAL SPECIFICATIONS
� Caution: never let your telephone set come into contact with water. You may, however use a damp cloth to
clean your telephone.
� For cleaning your set, use only a damp cloth; do not use solvents (alcohol, trichloroethylene, acetone…) and
sprays which may damage your set.
� During storms, you are advised not to use the telephone.
� The TEMPORIS 700 telephone is designed for making and receiving telephone calls and for connection to a
private or public service telephone network.
� Appliance designed for connection to a TNV3-class analogue telephone line as defined in European safety
standard EN60950-1.
The telephone is not
properly connected.
The display is blank.
There is no dial tone.
The telephone has not
been initialized.
Pick up the handset and wait for the icons to appear on
the display (see Section 2 "Setup").
The telephone
doesn't ring.
The ringer has been
turned off.
See Section 4.2 "Ringer melody and volume".
See Section 7.2 "Key 3 / Reset".
Temporis_700_en.qxp 24/08/2009 14:46 Page 16
10. WARRANTY
We would remind you that the TEMPORIS 700 is an appliance approved in compliance with European
regulations, as attested to by the CE marking.
You thus have a legal warranty covering this product and you should contact your reseller for any information
relating to the said warranty.
Regardless of the legal warranty covering the product, the reseller guarantees conformity of the products with
their technical specifications for a period of twelve (12) months including parts and labour, starting from the date
appearing on the proof of purchase of the product. You should therefore retain your invoice or till receipt
specifying the date of purchase of the product and the name of the reseller. However, if the legal warranty
applicable in your country exceeds twelve (12) months, the legal warranty alone then applies. However, if the
legal warranty is less than twelve (12) months, the total period of the warranty (legal and commercial) will be of
twelve (12) months. The faulty part or product will be repaired or replaced free of charge with an identical part
or product or an equivalent or better one in terms of functionality and performance. If it proves impossible to
repair or replace the item, you will be refunded for the product.
Products and spare parts - which may be either new or refurbished - are guaranteed either for three months from
the date of repair or until the end of the initial warranty period, whichever is the longer. Products and parts that
have been returned and replaced become the property of the manufacturer.
However, this warranty does not apply in the following cases:
� installation or use in a way which fails to comply with the instructions contained in this guide;
� incorrect connection or non-standard use of the product, notably with accessories not designed for the
purpose;
� normal wear;
� failure to observe the technical and safety standards in force in the country of use;
� appliances subjected to shocks or falls;
� devices damaged by lightning, voltage surge, heat sources or radiation therefrom, water, exposure to
excessive humidity, or any other cause external to the product itself;
� negligence or poor maintenance;
� maintenance or repair of the product by persons not authorized by the manufacturer or reseller.
THE PRESENT TERMS AND CONDITIONS EXPRESSLY EXCLUDE ALL OTHER WARRANTIES. YOUR
STATUTORY RIGHTS ARE NOT AFFECTED.
11. SAFETY AND DECLARATION OF CONFORMITY
!
Do not use your telephone to notify a gas leak when standing in the vicinity of the leak.
We recommend not using a telephone during a storm.
Thomson Telecom hereby declares that the TEMPORIS 700 conforms to the essential requirements and other
applicable provisions of European directive 1999/5/CE.
17
Temporis_700_en.qxp 24/08/2009 14:46 Page 17
18
12. ENVIRONMENT
This symbol means that your inoperative electronic appliance must be collected separately and not
mixed with the household waste. The European Union has implemented a specific collection and
recycling system for which producers are responsible.
This appliance has been designed and manufactured with high quality materials and components that
can be recycled and reused. Electrical and electronic appliances are liable to contain parts that are necessary
in order for the system to work properly but which can become a health and environmental hazard if they are
not handled or disposed of in the proper way. Consequently, please do not throw out your inoperative appliance
with the household waste.
If you are the owner of the appliance, you must deposit it at the appropriate local collection point or leave it with
the vendor when buying a new appliance.
- If you are a professional user, please follow your supplier's instructions.
- If the appliance is rented to you or left in your care, please contact your service provider.
!
Please help us protect the environment in which we live.
Temporis_700_en.qxp 24/08/2009 14:46 Page 18
Deleting a number
If you want to erase the traces of your outgoing calls, you can delete the numbers from the redial memory.
Press .
8
The most recently dialled number is displayed.
Use or to select the number you want to delete.
Press .
Use or to select "Erase" (to delete the selected number).
or
"Erase All" (to delete all of the numbers).
Press to confirm.
4. SETTINGS
Your TEMPORIS 700 has a "Phone Setting" menu. To access the various sub-menus from the home screen,
follow the instructions below.
You can return to the home screen from anywhere in any menu or sub-menu by pressing again. This will
cancel any action that you started but didn't finish.
If you make a mistake, e.g. if you enter an invalid date, you will hear 3 warning beeps.
4.1 DISPLAY CONTRAST
Press , then press twice.
Use the key to increase the contrast or to decrease the contrast.
Press to confirm your choice.
4.2 RINGER MELODY AND VOLUME
4.2.1 To set the melody
Press .
Press .
Press until you see "Ringer".
Press twice.
8
The set melody is played.
To change the melody, press (choice of 10 ringtones).
To confirm your choice, press .
6
5
4
3
2
1
3
2
1
5
4
3
2
1
6
Temporis_700_en.qxp 24/08/2009 14:41 Page 6
Press to scroll through the pause time settings (1.5s, 2s, 3s or 4s).
Press to confirm the chosen pause time.
4.8 KEYPAD LOCK/UNLOCK
Locking the keypad can prevent unwarranted calls being made. By default, a maximum of 4 digits can be dialled
when the keypad is locked.
This maximum number of digits can be modified (see Section 7 "Installer menu").
When the keypad is locked, the function keys on the left of the keypad are inoperative.
Locking
Press .
Press to obtain "Keypad Lock".
Press to confirm.
Enter the PIN code (by default, 0000) and press to confirm.
8
The icon appears on the display.
To change the PIN code, see Section 4.10.
Unlocking
Press .
Press to obtain "Keypad Lock".
Press to confirm.
Enter the PIN code (by default, 0000) and press to confirm.
4.9 MEMORY KEYS AND PHONEBOOK
The TEMPORIS 700 has a phonebook capacity of 170 names and numbers and 10 quick-dial memories.
4.9.1 Programming the memory keys
Press one of the 10 quick-dial memory keys.
Press .
Wait for the cursor to move on before you enter the next letter.
Attendre que le curseur se déplace avant de taper la lettre suivante.
E.g.: To enter an M, press the key once;
To enter an R, press the key three times.
Press .
Enter the number, using the keypad.
Press to save.
7
6
5
4
3
2
1
4
3
2
1
4
3
2
1
8
7
9
Temporis_700_en.qxp 24/08/2009 14:42 Page 9
Proceed in the same way for the other 2 keys: Service A, Service B.
Press .
Press .
Press 6 times for "Service A" or 7 times for "Service B".
Enter the desired number, using the keypad.
Press .
To dial a number stored on one of these 3 keys
Pick up the handset (or use hands-free mode).
Press and hold , or for at least 2 seconds.
8
The number is dialled.
5. USING THE "CALLER ID" SERVICE*
Your network operator provides a number of subscription-only services.
Your TEMPORIS 700 is compatible with the "Caller ID" service in hands-free or off-hook mode.
This service tells you the name or number of the caller before you take the call, and when you are on the line.
5.1 CALL LIST*
The Call list is linked to the network operator’s caller ID service.
The list can store up to 70 numbers of people who have tried to call you. When the memory is full, the oldest
call (bottom of the list) is deleted to make room for the most recent.
The display icons indicate various caller ID data:
5.2 VIEWING THE CALL LIST
If you have new unanswered calls, the icon appears.
To consult the Call list, press .
Press to view the other calls.
2
1
Voicemail
indicator
Telephone
locked
Mute mode active /
On hold
New calls /
Total calls
Repeat
indicator
Missed
calls
Entry number
in phonebook
2
1
5
4
3
2
1
12
* Subject to availability and subscription from your network operator. For further details, contact your operator.
Temporis_700_en.qxp 24/08/2009 14:43 Page 12
15
7.1.3 Detection threshold
This menu is used to detect the voltage of a device connected in parallel to the modem socket.
By default, the voltage value is fixed.
If a problem arises when there is a device in parallel, the value must be switched to “Learning” so that the
telephone can detect the parallel device.
Press to obtain "Phone detection".
Press .
8
The display shows "Fixed Value".
Press to obtain "Learning".
Press to confirm.
If a problem arises with a telephone connected in parallel
If the display indicates "Busy Line", then the telephone connected in parallel is not on line:
Disconnect the TEMPORIS 700 line cord.
Pick up the handset.
Wait for the display to go blank.
Replace the handset and reconnect the line cord.
7.1.4 Maximum number of digits
This menu is used to set the maximum number of digits that can be dialled when the keypad is locked. By
default, the number is set to 4 digits.
Press until the display shows "Nb Digit Max?".
7.2 KEY 3 / RESET
!
Caution: reset is immediate – all program settings, memory keys, etc. will be erased, and the PIN
code will return to its initial value (0000).
Press .
8
Immediate reset.
7.3 KEY 6 / DISPLAY TEST
Display test (technicians only).
7.4 KEY 9 / SOFTWARE VERSION
Software version (technicians only).
1
1
4
3
2
1
4
3
2
1
Temporis_700_en.qxp 24/08/2009 14:44 Page 15
3
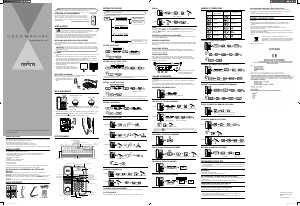
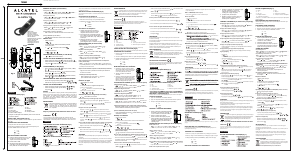
2. SETUP
2.1 CONNECTING THE HANDSET
� Plug one end of the spiral cord into the handset at (A),
and the other end into the socket on the left side of the
phone (B).
2.2 CONNECTING THE TELEPHONE
� Plug the telephone cord into right-hand socket under
the set and into the wall socket.
NOTE: The extra socket is for connecting a modem.
2.3 WALL MOUNTING
� Turn over the wall mounting peg (small grooved plastic
part) on the base using a coin.
� Drill two 6 mm holes 70 mm apart.
� Fit two wall plugs and insert wood screws* (3.5 mm in
diameter and 30 mm long).
� Mount the base on the 2 screws by pulling it
downwards.
3. USE
3.1 CALL / MESSAGE WAITING LED
This light flashes in time with the ringer when you receive a call. It goes out as soon as you take the
line.
If you are connected to an ALCATELPABX with a voicemail service, the message waiting LED tells you
there is a message in your mailbox.
There are two different ways of dialling:
� by lifting the handset, then dialling,
� by dialling in on-hook mode.
Wall-mounted position Horizontal position
Spiral cord socket
(B)
(A)
Headset socket
* Screws not supplied.
Temporis_700_en.qxp 14/09/2009 16:03 Page 3
3
2. SETUP
2.1 CONNECTING THE HANDSET
� Plug one end of the spiral cord into the handset at (A),
and the other end into the socket on the left side of the
phone (B).
2.2 CONNECTING THE TELEPHONE
� Plug the telephone cord into right-hand socket under
the set and into the wall socket.
NOTE: The extra socket is for connecting a modem.
2.3 WALL MOUNTING
� Turn over the wall mounting peg (small grooved plastic
part) on the base using a coin.
� Drill two 6 mm holes 70 mm apart.
� Fit two wall plugs and insert wood screws* (3.5 mm in
diameter and 30 mm long).
� Mount the base on the 2 screws by pulling it
downwards.
3. USE
3.1 CALL / MESSAGE WAITING LED
This light flashes in time with the ringer when you receive a call. It goes out as soon as you take the
line.
If you are connected to an ALCATELPABX with a voicemail service, the message waiting LED tells you
there is a message in your mailbox.
There are two different ways of dialling:
� by lifting the handset, then dialling,
� by dialling in on-hook mode.
Wall-mounted position Horizontal position
Spiral cord socket
(B)
(A)
Headset socket
* Screws not supplied.
Temporis_700_en.qxp 14/09/2009 16:03 Page 3
Head office: 46, quai Alphonse Le Gallo - 92100 Boulogne Billancourt - France
Joint-stock company with capital of €130,037,460 - Reg. 390 546 059 RCS Nanterre
Thomson Telecom
Sales and marketing departments:
Ref.: 905-T7001FE-00 30/09/2009
© Thomson Telecom 2009 - Reproduction prohibited.
The manufacturer reserves the right to modify the specifications of its products in order to make technical improvements or comply with new regulations.
THOMSON, ALCATEL and TEMPORIS are registered trademarks.
The Alcatel name and logo are registered trademarks of Alcatel, licensed to Thomson Telecom.
Temporis_700_en.qxp 24/08/2009 14:46 Page 19

Join the conversation about this product
Here you can share what you think about the Alcatel Temporis 700 Phone. If you have a question, first carefully read the manual. Requesting a manual can be done by using our contact form.
reply | This was helpful (2) (Translated by Google)
reply | This was helpful (0) (Translated by Google)