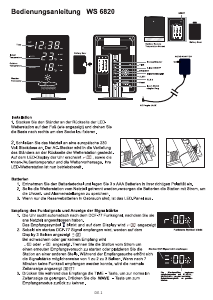
Set the Sensor and Weather Station
1. If you have more than one sensor, set the channel by switching
CHANNEL 1, 2, 3 inside the battery compartment. The battery compartment of
the sensor can be removed by a small screw driver. Press the TX button once
after switching channel.
2. Place the sensor near the weather station.
3. Press and hold CHANNEL button to search for the sensors.
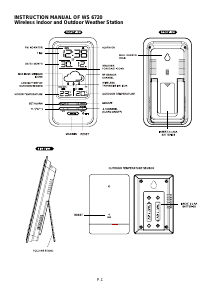
Place the Weather Station and Sensor
● The weather station should always be placed in a well ventilated indoor area and
located away from vents, heating or cooling elements, direct sunlight, windows,
doors, or any other openings.
● The sensor can be placed on a flat surface outdoor. The sensor should
be keep away from direct sunlight and moisture. Make sure the sensor is no more
than 100 feet (30m) away from the weather station and with minimal obstructions.
● The weather station and sensor can both be wall mounted.
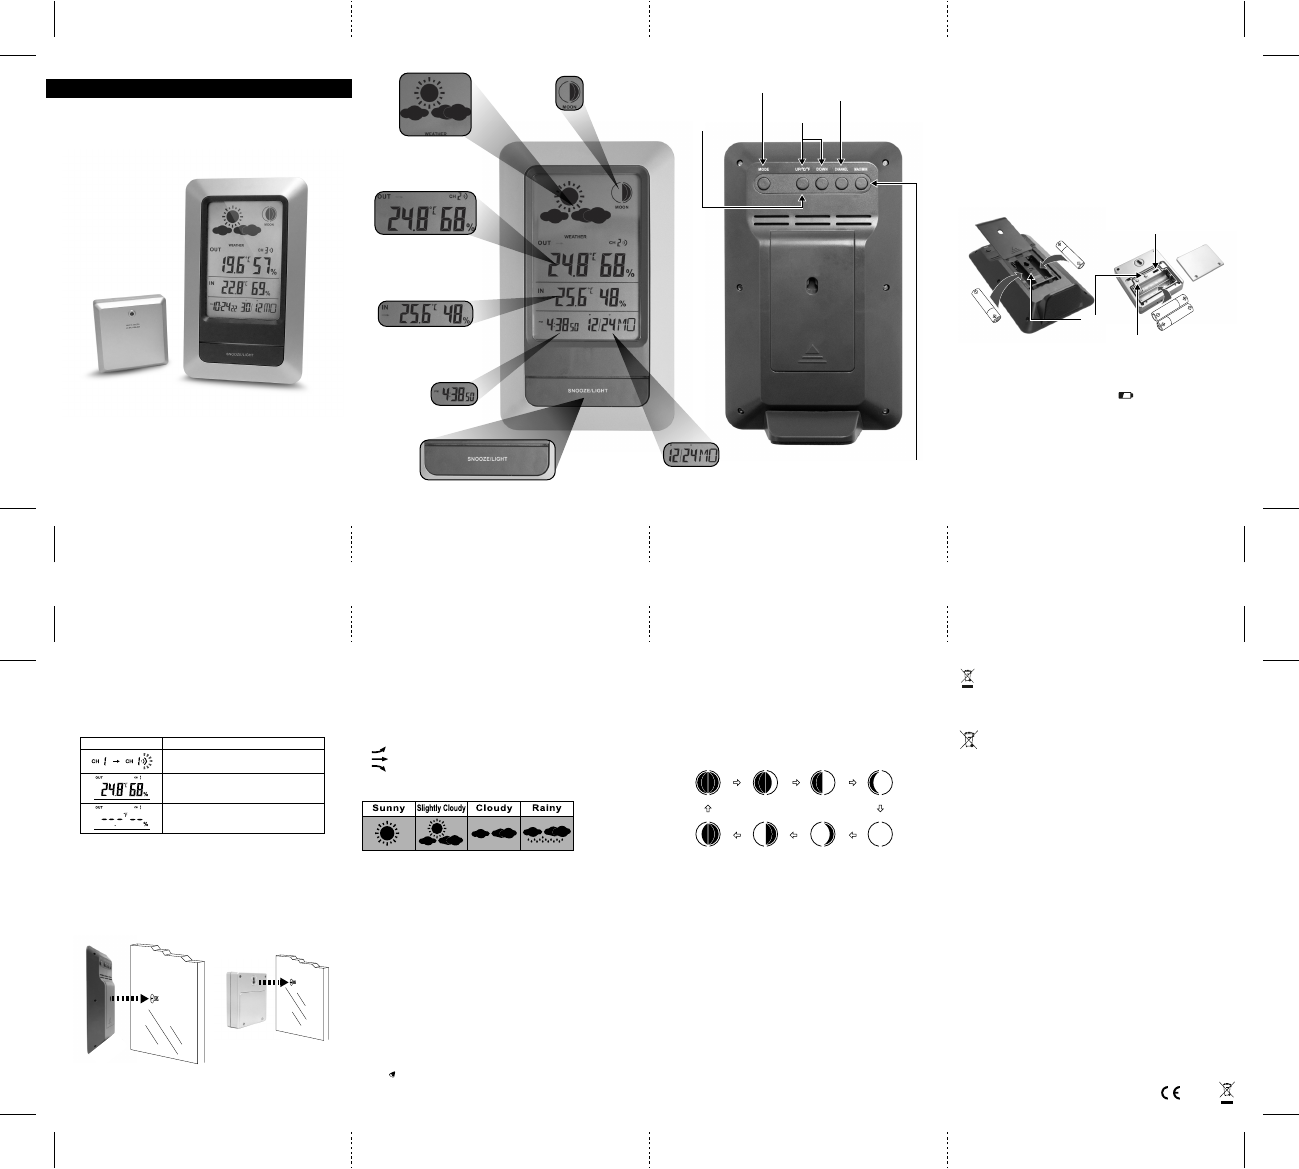
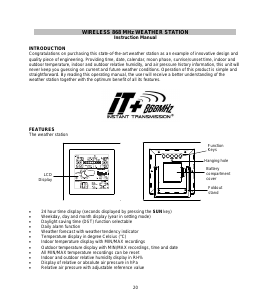
Using the Weather Station
1. Press CHANNEL to display the three different sensor channels.
2. Select the temperature format by pressing the UP/ºC/ºF on the weather station.
Maximum & Minimum Recorded Temperature & Humidity
1. The weather station displays the current, minimum, and maximum temperatures.
2. Press MAX/MIN button to change between current, minimum, and maximum
temperatures & humidity.
3. When the maximum or minimum recorded temperature & humidity is showing,
press and hold MAX/MIN button to clear all records.
Set the clock
1. Press MODE button to change between current time and alarm time.
2. When current time is showing, press and hold MODE button on the weather
station until the hour digits of the clock flashes.
3. Press UP/ºC/ºF or DOWN repeatedly to select and set the following options:
hour, minutes, AM/PM or 24-hour clock, year, month/date date/month setting,
month, date, language (EN for English; GE for German; FR for French;
IT for Italian; NE for Dutch; ES for Spanish; DA for Danish)
4. Press MODE to confirm and go to the next setting.
5. Press MODE when all finished.
Set the alarm
1. Press MODE button to change between current time and alarm time.
2. When alarm time is showing, press and hold MODE button on the weather station
until the hour digits of the clock flashes.
3. Press UP/ºC/ºF or DOWN repeatedly to select and set the following options:
hour, minutes.
4. Press MODE to confirm and go to the next setting.
5. Press MODE when all finished.
Activate the alarm
1. When alarm time is shown, press UP/ºC/ºF or DOWN to turn on the preset alarm
time. will be shown.
2. When the alarm sounds, press any button on the back of the machine to turn off
the alarm or press SNOOZE/LIGHT to activate snooze.
3. Alarm will sound again in 5 minutes.
Weather Forecast Display
Hints and Tips
If the weather station does not connect to the sensor, try the following:
● Press TX on the sensor and then press and hold the CHANNEL button.
● Relocate the sensor and / or the weather station until connection is found.
● Signals from other electronic devices may cause interference. Place the weather
station and sensor away from these devices.
● The sensor may not function properly in extremely temperatures due to battery
power. Replace the batteries or the unit will resume proper function in more
moderate weather.
View Moon Phase
1. Press the MODE button for 3 seconds to enter the clock
state
2. Press the UP/ºC/ºF or DOWN button to adjust the year, the moon phase
corresponding change.
3. Press the UP/ºC/ºF or DOWN button to adjust the day of the month ,the moon
phase corresponding changes.
4. Can view the moon phase of past or future years, one month, one day monthly.
5. Monthly changes in the following figure.
Warnings
• Do not subject the unit to excessive force, shock, dust, temperature or humidity.
• Do not immerse the unit in water.
• Do not remove any screws.
• Do not dispose this unit in a fire. IT MAY EXPLODE.
• Keep unit away from small children. The unit or parts of the unit might be a
choking hazard.
• Never attempt to recharge the batteries in any other methods.
• Dispose the unit legally and recycle when possible.
Specifications
Indoor temperature range: 0°C to 50°C ( 32°F to 122°F)
Outdoor temperature range: : -20°C to 50°C ( -4°F to 122°F)
Relative humidity range: 20% - 95%
Install batteries
1. Insert two AAA batteries into the sensor and two AAA batteries into the weather
station, following the polarity symbols (+ and -) as marked.
2. Use a pointed object to press the RESET button on both units.
a. Reset your system whenever the batteries are replaced or if the system
malfunctions.
b. When you press RESET, all settings will return to default value.
All stored information will be lost.
Battery Notes
● Use alkaline batteries for longer usage, or use consumer grade lithium batteries
in temperatures below -4°F / -20°C
● Replace the batteries when the battery icon appears or the display dims.
● Dispose of batteries promptly and properly.
● Do not burn or bury batteries.
● Use only fresh batteries of the required size and recommended type.
● Do not mix old and new batteries, different types of batteries (standard, alkaline,
or rechargeable), or rechargeable batteries of different capacities.
● If you do not plan to use the weather station for a month or more, remove the
batteries. Batteries can leak chemicals that can destroy electronic parts.
During initial installation, the temperature and humidity sensors may take up to an
hour or more to acclimatise to current conditions.
It is recommended for the main unit and the external sensors are put in the room
where they will be used for at least 1 hour prior to initial installation.
Change between
Celsius and Fahrenheit
UP & DOWN
increase &
decrease setup
Change clock setup
Change between
remote outdoor sensors
Change between current,
maximum and minimum
temperature & humidity con
I
Description
The weather station is searching for a sensor.
A sensor channel has been found.
The sensor channel cannot be found.
Temperature Trend
1. indicates the temperature is in a increasing trend.
2. indicates the temperature is in a no change trend.
3. indicates the temperature is in a decreasing trend.
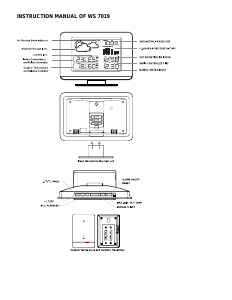
Wireless technoline Weather Station
with Digital Alarm Clock
Press for LCD screen backlight for approx 7 secs.
Clock & Alarm
Calendar
Indoor temperature & humidity
with temperature trend display
(Current, MAX and MIN)
Outdoor temperature & humidity
with temperature trend display
(Current, MAX and MIN)
Moon phase
display
Weather forecast display
A
A
A
AAA
AAA
AAA
RESET
Channel 1 2 3
TX button
New Moon Waxing Crescent First quarter Waxing Gibbous
Waning Crescent Third quarter Waning Gibbous Full Moon
WS 6740
Features
• Water-resistant, temperature remote sensor
• Transmits wirelessly up to 98 feet (30 meters) away
• Predicts local weather patterns and trends and displays a corresponding
weather icon (sunny, cloudy, partly cloudy, rainy)
• Digital clock and calendar
• Table standing or wal mounting
The product function maybe reset when it is subjected to electrostatic discharges.
Follow the instruction described in this manual to set the function again for normal operation.
This symbol means that you must dispose of electrical devices
from the General household waste when it reaches the end of
ist useful life. Take your charger to your local waste collection
Consideration of duty according to the battery law. Old
batteries do not belong to domestic waste because they could
cause damages of health and environment. You can return used
point or recycling centre. This applies to all countries of the European
batteries free of charge to your dealer and collection points. As
end-user you are committed by law to bring back needed batteries to
distributors and other collecting points!
Union, and to other European countries with a separate waste
collection system.


Join the conversation about this product
Here you can share what you think about the Technoline WS 6740 Weather Station. If you have a question, first carefully read the manual. Requesting a manual can be done by using our contact form.