BICYCLE COMPUTER
BICYCLE COMPUTERBICYCLE COMPUTER
BICYCLE COMPUTER
SUNDING SD-560A(15Functions)
FUNCTIONS
FUNCTIONS FUNCTIONS
FUNCTIONS
-
SPD CURRENT SPEED.
-
ODO ODOMETER
(
TOTAL DISTANCE
)
.
-
DST TRIP
DISTANCE .
-
MXS MAXIMUM
SPEED .
-
AVS AVERAGE
SPEED .
-
TM ELAPSED
TIME .
-
RPM ROTATION
PER
MINUTE .
-
CLK CLOCK
(
12H/24H
)
.
-
SCAN
()
ICON.
-
“
▲
” “
▼
” COMPAPATOR.
-
SETTING SPEED SCALE
(
km/h,m/h
)
.
-
SETTING TYRE CIRCUMFERENCE(60CM
~
229CM).
-
SETTING
THE
LAST VALUE
OF ODOMETER.
-
FREEZE FRAME MEMORY
-
AUTO
ON/OFF .
Battery Installation
Battery InstallationBattery Installation
Battery Installation
Remove the battery cover from the bottom of the computer
using a flat blade screwdriver. Install an AG10 battery with
the positive (+) pole facing the battery cover and replace the
cover.
Should the LCD show irregular figures, take out the battery
and install again.
Speedometer Sensor
Speedometer SensorSpeedometer Sensor
Speedometer Sensor
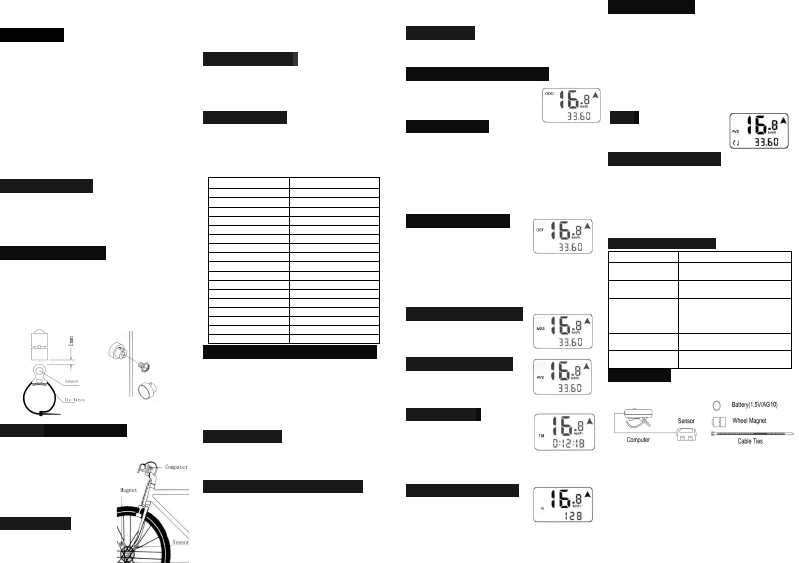
The speedometer sensor bracket attaches to the left fork
blade, using rubber shims to adjust to the diameter of the
fork. Position the sensor and magnet as show, making sure
that the arc of the magnet intersects the alignment mark on
the sensor with 1 mm clearance.
The magnet attaches to the front wheel spoke with the
screws provided.
Mounting
MountingMounting
Mounting Computer Body
Computer Body Computer Body
Computer Body
Attach the mounting shoe to the handlebar using the
back
splint
provided. To check for
proper speed function and sensor
alignment, spin the front wheel
with computer in speed mode.
Adjust the position of sensor and
magnet when there is no or weak
reaction.
Sensor Wiring
Sensor WiringSensor Wiring
Sensor Wiring
Route the sensor wire up the fork blade, using tie wraps to
secure it at the bottom and crown.Wire must not hang
loosely. Leaving enough slack to allow free movement of
the front wheel,route the remaining wire around the front
brake cable and to the handlebar. Excess wire should be
carefully looped and secured to the stem with a tie wrap.
KM/MILE Selection
KM/MILE SelectionKM/MILE Selection
KM/MILE Selection
After installing the battery within 15 seconds (it enters
automatic cycle after 15 seconds), the mainframe display
km/h, press SET button to choose km/h or m/h. Range of
speed recording: 0-99.9km (m) /h.
Press MODE button to enter Wheel size input mode.
Wheel Size Inp
Wheel Size InpWheel Size Inp
Wheel Size Input
utut
ut
The mainframe display 3 flickering number, choose needed
perimeter according to the following diagram, press the SET
button to input (keep pressing SET to input quickly), press
MODE button to confirm. The circumference varies
between 60cm-229cm, default mainframe display is 208cm.
Press MODE button to enter DST mode.
Tyre type(diameter) Tyre Circumference
20" 160
22" 176
24" 192
26" (650A) 207
26.5" (Tubular) 211
26.6" (700x25C) 212
26.8" (700x28C) 214
27" (700x32C) 216
28" (700B) 224
(W/tyre)
ATB 24"x 1.75 189
ATB 26"x1.4 200
ATB 26"x1.5 203
ATB 26"x1.75 205
ATB 26"x2 (650B) 210
27" x1 214
27"x1 1/4 216
Setting the Last Value of Odometer
Setting the Last Value of OdometerSetting the Last Value of Odometer
Setting the Last Value of Odometer
The last value of the total distance (i.e. the figure 0 0 0 0 .0
on the right of the bottom of the screen) can be adjusted.
(After reinstalling the battery, latest value can be input
according to the value exists before the battery is
reinstalled).Press the SET button to change the flickering
digits, Press the MODE button to change to the next digit.
The default last value of the odometer is 0. Press the MODE
button to skip any digit.
Auto Start/Stop
Auto Start/StopAuto Start/Stop
Auto Start/Stop
To preserve batteries, the cycle computer will automatically
switch off if the unit is left unused for over 2 minutes.
Display will reappear with a Press on either button or input
from the sensor.
Recording the Cycle Movements
Recording the Cycle Movements Recording the Cycle Movements
Recording the Cycle Movements
Press the MODE button to enter DST mode, press the SET
button, km/h (m/h) will flashing, press the MODE button to
view the records of DST,MXS,AVS,TM,RPM, when there is
input from the sensor, ‘/’ starts to flash. Only when
km/h(m/h) is flashing, do the computer have these records
except ODO & RPM.
Note: The cycle movements can’t be recorded by ODO
mode.
Speedometer
SpeedometerSpeedometer
Speedometer
Current Speed is indicated on the top line all the time. The
range of measurement is 0-99.9 km/h(0-99.9 m/h) and
accuracy is +/-0.1 km/h(m/h).
Speed
SpeedSpeed
SpeedComparator(Cadence)
Comparator(Cadence)Comparator(Cadence)
Comparator(Cadence)
During riding,“ ▲ ” Indicates that the
instant speed is higher than average
speed(AVS). “▼” indicates the instant
speed is lower than the average speed.
Odometer(ODO)
Odometer(ODO) Odometer(ODO)
Odometer(ODO)
In ODO mode , the total distance is indicated on the bottom
line, its mileage range is 0~99999km(m). Press the SET
button to know the fixed value of the tyre circuference,
press the SET button for 6 seconds to clear out all the ODO
value and other records, the users need to reset km(m), tyre
circuference, and the original ODO value, the CLK will
remain. The display will back to 0 when value exceeds its
maximum limit, press the MODE button to enter DST
mode.
Trip Distance
Trip DistanceTrip Distance
Trip Distance(
((
(DST
DSTDST
DST)
))
)
In DST mode, press the SET to see
km/h (m/h) flashing, the distance for
one trip is indicated on the bottom line.
Reset DST by pressing the SET and MODE button at the
same time. The computer will clear the records of DST,
MXS AVS AND TM. DST ranges from 0-9999km (m),
when the value exceeds the range, it restarts from 0
automatically.
Press the MODE button to enter MXS mode.
Maximum Speed
Maximum SpeedMaximum Speed
Maximum Speed
(MXS)
(MXS) (MXS)
(MXS)
In MXS mode, maximum speed is
indicated on the bottom line.
Press the MODE button to enter AVS
mode.
Av
AvAv
Average speed
erage speederage speed
erage speed
(AVS)
(AVS) (AVS)
(AVS)
In AVS mode, average speed is
indicated on the bottom line. AVS is
calculated with the Trip Time (TM).
Press the MODE button to enter TM mode.
Trip Time
Trip TimeTrip Time
Trip Time
(TM)
(TM)(TM)
(TM)
In TM mode, trip time is indicated on
the bottom line. It records only the
riding time. TM will be cleared by
pressing both SET and MODE buttons
simultaneously. TM ranges from 0:00:00~9:59:59
The computer will restart from 0 when exceeds.
Press MODE button to enter R mode.
Rotation Per Minute(R)
Rotation Per Minute(R) Rotation Per Minute(R)
Rotation Per Minute(R)
In R mode, Wheel frequency
measurement is indicated on the
bottom line.
Press the MODE button to enter CLK mode.
Clock
ClockClock
Clock
(12H/24H)
(12H/24H)(12H/24H)
(12H/24H)
Clock mode: Press SET and MODE button at the same time,
the number indicating HOUR start to flash, press the SET
button to adjust hour, then press the MODE button, the
number indicating MINUTE start to flash, press the SET
button to adjust minute, press the MODE button to go back.
12H/24H mode: The mainframe display 24H originally,
press SET button for 6 seconds, the character “R (P)”
appear on the bottom line, the mainframe goes to “12H”,
again press the SET button for 6 seconds, “R (P)” disappear
and back to “24H” mode.
Press the MODE button to enter “( )” (SCAN) mode.
Scan
ScanScan
Scan
In “( )” (SCAN) mode: Screen
display ODO, DST, MXS, AVS, TM,
RPM, CLK every 4 seconds.
Freeze Frame Memory
Freeze Frame Memory Freeze Frame Memory
Freeze Frame Memory
In any mode of DST, MXS, AVS, TM, when computer
display with km/h(m/h) flashing, means it is recording cycle
movement, press the SET button under this condition,
Freeze Frame Memory will lock the DST, MXS AVS, TM
records. Press the MODE button to read these locked
records. Press the SET and MODE buttons simultaneously
to clear the Freeze Frame Memory to 0. This is particularly
useful to record the information of sports comepetition.
Malfunction and
Malfunction andMalfunction and
Malfunction and
Problem
ProblemProblem
Problem
Malfunction Problem
No speedometer
reading
Improper magnet/sensor
alignment
Slow display
response
Temperature exceeds operating
limits (0~55 º C).
Black display
Temperature too high, or put in
direct sunlight for too long time.
Should take back to shadow for a
period.
Weak display
Poor battery contacts or dead
battery
Display shows
irregular figures
Take out battery and reinstall it
after 10 seconds.
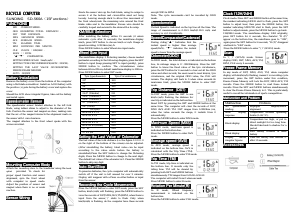
Accessoires
Accessoires Accessoires
Accessoires

Join the conversation about this product
Here you can share what you think about the Sunding SD-560 Cycling Computer. If you have a question, first carefully read the manual. Requesting a manual can be done by using our contact form.