
3LIK0202 - 47/05 - 3LIK020230
INSTALLATION AND OPERATING
INSTRUCTIONS
FOR
STANDARD (CONVENTIONAL)
INTEGRATED
AND
CANOPY HOODS
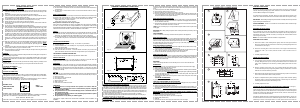
FITTING THE CANOPY HOOD (See Fig. 3)
1. Check the size of the cut-out in the cupboard with the measurements given in Fig.
3.
2. Check the positions of the 2 holes marked C in Fig. 3 on either side of the canopy
hood.
3. Locate the canopy hood carefully into the aperture and using 4 woodscrews, screw
the hood firmly into position.
EXTERNAL EXHAUSTING (See Fig. 1)
Connect the external exhausting venting pipe, which must have an inner diameter of
120 mm to the coupling flange B (See Fig. 3). (NOTE: VENTING KIT NOT SUPPLIED).
According to the positioning, the pipe is then directed to the most convenient outside
wall, or through the ceiling, having no more than two 90° bends in the entire run.
IMPORTANT - When fitting venting kits please follow assembly instructions provided
by venting kit manufacturers.
SAFETY WARNING - Under no circumstances should the hood be vented through that
of other appliances.
INTERNAL RECIRCULATION (See Fig. 2)
If it is intended to use the hood for internal recirculation it will be necessary to obtain
from the dealer a charcoal filter which will trap the odours and purify the air.
(Depending upon use, it will be necessary to change the charcoal filter at least once
every 4-6 months).
NOTE: The charcoal filter cannot be washed or regenerated. (see Fig.4)
PROCEED AS FOLLOWS:
a) Unfasten slide brackets either side of grill G and hinge grill down (see Fig.4).
b) Place the charcoal filter on the centre of the motor support and when firmly located
turn clockwise 90° (
1
/4 of a turn) until the «STOP» click is heard to lock it in position.
c) Carefully reassemble grill and close slide brackets either side of grill G (Fig.4).
USING THE COOKER HOOD
It is advisable to switch the cooker hood on a few minutes before cooking starts and
that it be left on for about 15 minutes after cooking is completed in order to exhaust all
the odours.
On the inner left side of the hood will be found:
a) Light switch - for ON/OFF control.
b) Exhaust fan speed control switch - 3 speed and “OFF”.
c) Cooker hood “ON” indicator RED light.
IMPORTANT
Flames will damage the filters so ensure that they do not come in contact with the
hood.
MAINTENANCE
a) Before carrying out any sort of maintenance disconnect the hood from the mains
supply.
b) Unfasten slide brackets either side of grill and hinge grill down (see Fig.4).
c) Remove the grease filter fixing clamp.
d) Carefully extract the synthetic grease filter which should then be washed by hand in
lukewarm water and liquid detergent at least once a fortnight. When clean squeeze
gently but do not wring it out. Before replacing the synthetic grease filter clean the
filter holder in a warm detergent solution or with a damp cloth. Then replace the
synthetic grease filter when dry.
e) The inside and outside of the hood may also be cleaned with a damp cloth and/or
warm sudsy water. NOTE: NEVER USE ABRASIVES!
f) The hood must not be used without the grease filter.
IMPORTANT REMINDER: Charcoal filters cannot be washed and should be replaced,
depending upon use, every 4-6 months.
REPLACING THE BULB - NOTE: BULB REPLACEMENT IS NOT COVERED BY
YOUR GUARANTEE
a) Switch off the light switch on the cooker hood.
b) Disconnect the hood from the mains supply.
c) Unfasten slide brackets either side of grill and hinge grill down (see Fig.4).
d) Replace bulb or bulbs.
e) Refit grill.
f) Reconnect the hood to mains supply, switch “ON” hood light.
CANOPY COOKER HOOD
cupboards as previously indicated. Then replace retaining screws that hold angle
frame L to underside of hood. Replace door front and grill.
FITTING THE HOOD TO WALL
First remove Grill (see Fig. 2) and door front E (see Fig. 4) as indicated under
FIXING THE FRONT PANEL section.
Check positioning of hood on wall, mark and drill the 6 holes required (see Fig. 8)
and screw in the two hooks T (see Fig. 8) and angle frame L (see Fig. 2) to the wall.
Adjust positions of the upper brackets M (see Fig. 1) located on the top of the hood
to engage the two hooks T. Adjustments and tightening up of the screws on upper
brackets and angle frame L allows for alignment to adjoining cupboards. Finally
replace door front and grill.
USING THE COOKER HOOD
It is advisable to switch the cooker hood on a few minutes before cooking starts
and that it be left on for about 15 minutes after cooking is completed in order to
exhaust all the odours.
On the inner left side of the hood will be found:
a) Light switch - for manual or automatic control.
b) Exhaust fan speed control switch - for manual or automatic control.
c) Cooker hood “ON” indicator light.
IMPORTANT
Flames will damage the filters so ensure that they do not come in contact with the
hood.
MAINTENANCE
a) Before carrying out any sort of maintenance disconnect the hood from the mains
supply.
b) It is necessary first to remove Grill (see Fig. 2) by taking hold of knob Y and
carefully lifting the Grill up and out of groove behind which it is retained.
The grill is then completely free to remove by carefully pulling down and out of
the Hood.
c) Remove the grease filter fixing clamps.
d) Carefully extract the synthetic grease filter which should then be washed by
hand in lukewarm water and liquid detergent at least once a fortnight. When
clean squeeze gently but do not wring it out. Before replacing the synthetic
grease filter clean the filter holder in a warm detergent solution or with a damp
cloth. Then replace the synthetic grease filter when dry.
e) The inside and outside of the hood may also be cleaned with a damp cloth and/
or warm sudsy water.
NOTE: NEVER USE ABRASIVES!
f) The hood must not be used without the grease filter.
IMPORTANT REMINDER: Charcoal filters cannot be washed and should be
replaced, depending upon use, every 4-6 months.
REPLACING THE BULB - NOTE: BULB REPLACEMENT IS NOT COVERED BY
YOUR GUARANTEE
a) Switch off the light switch on the cooker hood.
b) Disconnect the hood from the mains supply.
c) It is necessary first to remove the Grill (see Fig. 2) by taking hold of knob Y and
carefully lifting the Grill up and out of groove behind which it is retained. The
Grill is then completely free to remove by carefully pulling down and out of the
Hood.
d) Replace bulb or bulbs.
e) Refit grill.
f) Reconnect the hood to mains supply, switch “ON” hood light.
282
257
G
C
F
525
=
493
=
148
B
Fig.3 Fig.4
Fig.1
Fig.2
90°
EXTERNAL EXHAUSTING
CANOPY CANOPY
INTERNAL RECIRCULATION


Join the conversation about this product
Here you can share what you think about the Prima LIA135 Cooker Hood. If you have a question, first carefully read the manual. Requesting a manual can be done by using our contact form.