621_MESTRE_10/12/14 Copyright © 2014 Peruzzo Italy - MADE IN ITALY
3/8
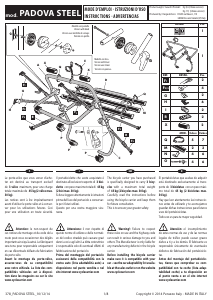
1. Inserire le protezioni H nei ganci G,
.
2. Assemblare le cinghie sul portabici come da
e
, facendo attenzione al giusto verso di entra-
ta nella fibbia
, e al corretto posizionamento
delle cinghie F1 superiori, F2 laterali (se presen-
ti), F3 inferiori,
. Verificare la tenuta delle cinghie
strattonandole.
Attenzione
Prima dell’assemblaggio delle cinghie, consultare la
lista adattabilità auto a disposizione nel punto vendita
e verificare la necessità dell’utilizzo dell’adattato-
re I. La lista specifica il numero e la posizione
( F1-F2-F3 ) che l’eventuale adattatore I deve avere
sulla vostra auto. Se l’adattatore I non è incluso nella
confezione del portabici, acquistarlo separatamente
presso il rivenditore. Una volta determinato lo schema
di montaggio dell’eventuale adattatore I, montarlo
in sostituzione del gancio G,
e
.
MONTAGGIO CINGHIE
1. Insert the protectors H on the clasps G,
2. Assemble the straps on the bicycle carrier as
shown in
and
, paying attention to the
correct direction, of entry in the buckle
and
correct positioning of the upper straps F1, side
straps F2 (if present), and lower straps F3,
.
Check the hold of the straps by pulling on them.
Important:
Before fitting the straps, consult the car adaptability
list available at the sales outlet and check if adapt-
er I has to be used. The list specifies the number and
the position ( F1-F2-F3 ) that the possible adapt-
er I must have on your car. If adapter I is not includ-
ed in the bicycle carrier package, purchase one sepa-
rately from the dealer. After establishing the assembly
layout of the possible adapter I, fit it in place of the
clasp G,
and
.
FITTING THE STRAPS
1. Introducir las protecciones H en los ganchos G,
.
2. Ensamblar las correas en el portabici como en fig.
y
, poniendo atención en la manera correcta de
introducirlas en la hebilla
, y en el correcto posicio-
namiento de las correas F1 superiores, F2 laterales (si
están), F3 inferiores,
. Verificar que las correas estén
firmemente sujetas, tirando de las mismas
Atención
Antes de ensamblar las correas, consultar la lista de
adaptabilidad al coche, disponible en el punto venta y
comprobar si es necesario utilizar el adaptador I. La
lista especifica el número y la posición ( F1-F2-F3 )
que el eventual adaptador I debe tener en tu coche.
Si el adaptador I no viene incluido en la confección
del portabici, puedes adquirirlo por separado en el
punto venta. Una vez determinado el esquema de
montaje del eventual adaptador I, montarlo en susti-
tución del gancho G,
y
.
MONTAJE CORREAS
I GB E
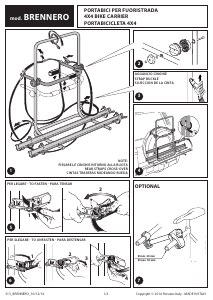
MONTAGGIO PORTACICLO
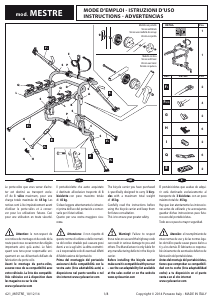
1. Se necessario, seguire la figura
per assemblare
i bloccabici L al tubo D e la figura
per fissare
gli appoggi in gomma P.
2. Controllare il perfetto avvitamento di bulloni e dadi
di assemblaggio, eventualmente avvitarli nuova-
mente.
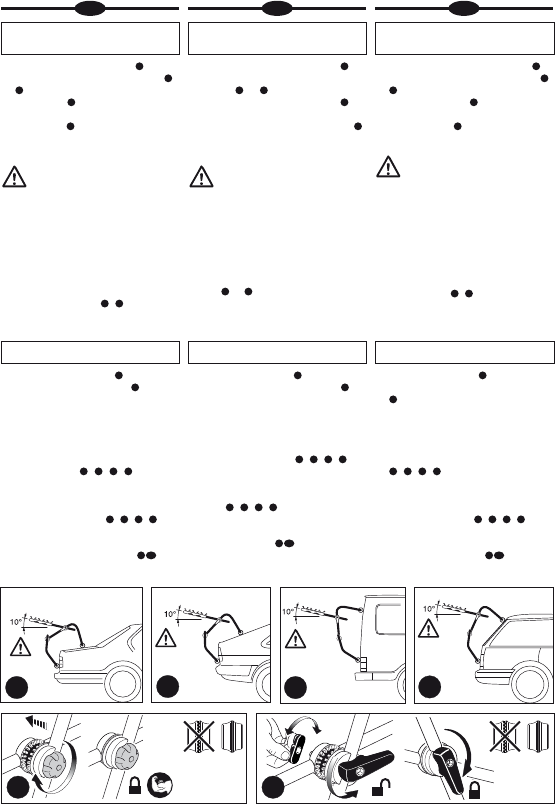
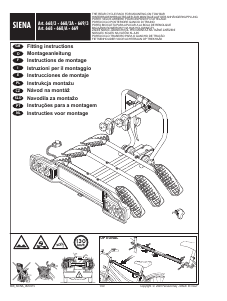
3. Regolare archi e braccia con la triangolazione che
più si avvicina alla sagoma della vostra auto, come
da esempi forniti in
e consultare
la lista adattabilità auto.
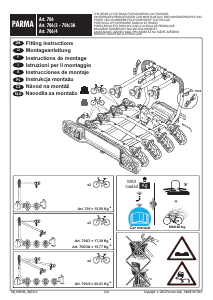
4. Le braccia reggiciclo devono essere regolate con
un’angolazione minima di 10 gradi verso l’alto,
rispetto al piano orizzontale,
5. Bloccare fortemente i rocchetti con il pomello (o la
leva, a seconda del modello) e assicurarsi che i denti
siano perfettamente accoppiati, figure
BICYCLE CARRIER INSTALLATION
1. If necessary, follow figure
to assemble the
bicycle clamps L on pipe D and figure
for
fixing the rubber supports P.
2. Check the perfect tightness of the assembly bolts
and nuts, and retighten if necessary.
3. Adjust the bars and arms with a triangulation as
close as possible to the shape of your car, as shown
in the examples provided in
and
consult the car adaptability list.
4. The bicycle support arms must be adjusted with
an upward angle of at least 10 degrees to the hori-
zontal,
.
5. Tighten the sprockets hard with the knob (or the
lever according to model) and make sure the teeth
are perfectly coupled,
.
MONTAJE PORTABICI
1. Si necesario, seguir la figura
para ensamblar los
bloqueadores de la bici L al tubo D y seguir la figura
para sujetar los soportes de caucho P.
2. Controlar el perfecto atornillado de pernos y de tuercas
de ensamblaje, y si fuera necesario, atornillarlos de
nuevo.
3. Regular arcos y brazos con la triangulación que más se
asemeje al perfil de tu coche, como se explica en las
y consultar la lista de adaptabilidad
al coche.
4. Los brazos que sostienen la bici se tienen que regular
con un ángulo mínimo de 10 grados hacia arriba, con
respecto al plano horizontal,
.
5. Bloquear firmemente los carretes con la perilla (o la
palanca, según el modelo) y comprobar que los dientes
estén perfectamente acoplados,
6
7
8
9
1
2
3
10 10a
OKOK


Join the conversation about this product
Here you can share what you think about the Peruzzo Mestre Bicycle Carrier. If you have a question, first carefully read the manual. Requesting a manual can be done by using our contact form.
reply | This was helpful (0) (Translated by Google)