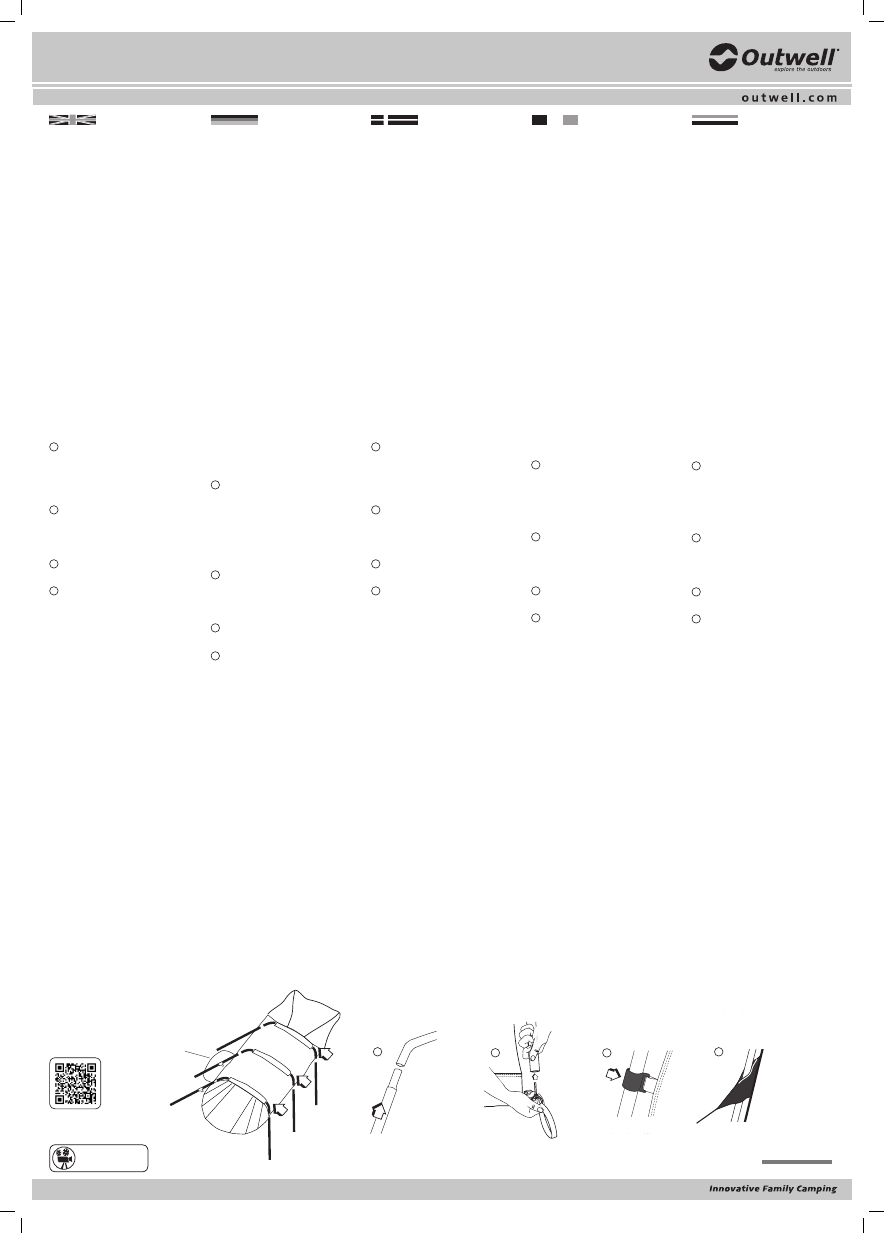
1
2
4
Rain-save
door
3
Wir wünschen Ihnen, dass Sie
mit Ihrem neuen innovativen
Outwell
®
Zelt viele schöne Urlaube
verbringen werden.
Auswahl des Aufstellplatzes und
Positionieren des Zeltes
Öffnen Sie die Tasche und merken Sie sich
beim Herausnehmen des Zeltes, wie es
zusammengelegt ist. So können Sie das Zelt
später leichter wieder verpacken.
Bei der Auswahl des Aufbauplatzes achten
Sie bitte darauf, dass er möglichst frei ist von
Steinen, Ästen oder anderen scharfkantigen
Objekten, und vermeiden Sie, das Zelt unter
Bäumen aufzubauen.
Breiten Sie das Zelt aus, mit dem Eingang
in der gewünschten Richtung und platzieren
Sie das Heck in Windrichtung für höhere
Windstabilität.
Aufbau des Zeltes
Dieses Zelt sollte, wenn möglich, von
zwei Personen aufgestellt werden. Setzen
Sie als erstes die verbundenen Gestänge
zusammen. Öffnen Sie die Eingänge
des Überzeltes, damit beim Aufbau Luft
hineinströmen kann.
Schieben Sie nun die gebogenen Stangen-
teile in die am Dach angebrachten Kanäle
und legen Sie die geraden Gestänge
griffbereit an die Seiten des Zeltes.
1
Stecken Sie die geraden Stangen auf
beiden Seiten des Dachs in die gebogenen
Stangen. Das Zelt kann jetzt aufgestellt
werden. Verankern Sie zuerst die beiden
hinteren Ecken des Zeltes mit Heringen
bevor Sie das Zelt aufstellen.
Das Zelt kann
jetzt aufgestellt werden. Verankern Sie
zuerst die beiden hinteren Ecken des Zeltes
mit Heringen bevor Sie das Zelt aufstellen.
2
Stecken Sie in ein Ende der ersten
Stange einen der Stifte, die sich an den
Metallringen benden. Gehen Sie nun zum
anderen Ende des Gestänges und stecken
Sie auch hier den Stift in das Gestängeende.
3
Befestigen Sie nun die Kunststoffhaken
an den senkrechten Metallstangen.
4
Installieren Sie das Wind Stabilizer
System*, indem Sie die Klettverschlüsse
an den Stangen befestigen. Schließen Sie
unbedingt die Türen, bevor Sie die Heringe
in den Boden schlagen.
Richten Sie das Zelt auf durch Zug an
den Sturmleinen an der Vorder- und
Rückseite des Zeltes und befestigen Sie
diese anschließend mit dem Easy Pegging
System* (Siehe Anleitung im Beutel mit
den Heringen). Ziehen Sie als nächstes die
Ecken nach außen und sichern Sie das Zelt
mit Heringen an den Abspannschlaufen der
Metallringe und den Schlaufen am Zelt.
Spannen Sie dann den regengeschützten
Seiteneingang mit der letzten Stange auf
und stecken Sie die Enden in die Halterungen
an der Seite. Spannen Sie zum Schluss
das Zelt zum Schutz vor starkem Wind an
den Sturmleinen mit dem Easy Pegging
System ab. Benutzen Sie zum Verankern der
Heringe im Boden einen Camping-Hammer,
aber seien Sie bitte vorsichtig, damit Sie
sich dabei nicht an den Händen oder Füßen
verletzen.
Die beiliegenden Stahlstangen sind
zum Aufstellen eines Seiteneingangs als
Sonnensegel bestimmt.
Lassen Sie zum Abbau des Zeltes die
Eingänge geöffnet, damit die Luft aus
dem Zelt entweichen kann. Weitere
Informationen siehe Rückseite. Ein Video
über den Aufbau des Zeltes nden Sie auf
outwell.de.
Congratulations on your new
innovative Outwell
®
Tent designed
and created to accompany you out
into the great outdoors.
Select the campsite and position the
tent
Open the bag and as you take out the tent
look at the way it has been packed. This will
help you when you come to repack it.
When selecting your campsite, the ideal
place would be an area as even and clean
of rocks, branches and other sharp objects
as possible.
Spread out the tent and place it with the
door in the desired direction, avoid placing
the tent directly under trees, and position
it with the end into the wind direction, for
best results in windy conditions.
Assemble and raise the tent
This tent should be erected by at least two
persons. Assemble all the poles. Before
setting-up the tent you should open the
side door to get air into the tent - this will
help you to set-up the tent more easily.
Push in all the curved poles in their pole
sleeves on the roof of the tent and position
the straight poles at each side.
1
Connect the straight steel poles with
the curved ones on both sides.
The tent can now be raised. Peg down the
two rear corners in order to hold the tent in
place before raising it.
2
Place one end of the steel poles down
over the metal pin fastened in the ring. Go
to the opposite end of the pole (or have the
second person doing this) and insert that
pole end over the other pin.
3
Now clamp the hooks on the tent onto
the steel poles.
4
Position the Wind Stabilizer System* by
restraining the Velcro on the tent onto the
poles. Remember to close all doors before
pegging down the tent.
Now you are able to position the tent as
you require, raise the tent and peg it down
using guylines at back and front rst with
the Easy Pegging System* (for instructions
see the peg bag).
Pull the tent out at the corners and peg it
down through the straps attached to the
corners and rings. The remaining straps and
guylines can now be adjusted and pegged
down.
Then put the shorter pole through the
sleeve on the rain-safe door and fasten its
ends to the poles next to the door.
Finally secure the tent against strong winds
with the pre-attached guylines and pegs
using the Easy Pegging System. Use a mallet
to secure the pegs in the ground but be
careful of your hands and feet when hitting
the peg.
Steel poles are supplied for setting up the
side door/awning.
When packing down the tent the doors
should be open to get the air out of the
tent and make the packing easier.
Please turn over for more info and tips on
maintenance or visit outwell.com to watch
the set-up lm.
Set-up Instructions
Aufbauanleitung
Opstillingsvejledning Guide d’installation Installatiehandleiding
ONTARIO LP
Tillykke med dit nye innovative
Outwell
®
telt designet og udviklet
til at følge dig på store oplevelser
ude i naturen.
Udvælg og placér teltet på camping
pladsen
Åbn transporttasken og når du tager teltet
ud læg da mærke til, hvordan det er pakket.
Dette vil hjælpe dig, når teltet skal pakkes
sammen igen.
Når du vælger din campingplads, vil den
ideelle plads være et område, som er så
jævnt og frit for sten, grene og andre skarpe
genstande som muligt.
Bred teltet ud og placér det med døren i
den ønskede retning. Undgå at placere
teltet direkte under træer og stil det med
bagenden mod vindretningen, hvilket giver
de bedste forudsætninger i blæsevejr.
Saml og rejs teltet
Dette telt bør rejses af mindst to personer.
Saml alle stængerne. Før teltet sættes op,
bør du åbne sidedøren, så der kan komme
luft ind i teltet. Det gør det nemmere at
sætte det op. Før alle de buede stænger ind
i deres kanaler på taget af teltet, og placer
de lige stænger på hver side.
1
Den forbøjede og den lige stålstang
sættes nu sammen.
Nu kan teltet sættes op. Fastgør de to
bagerste hjørner for at holde teltet på
plads, før det sættes op.
2
Sæt den ene ende af stålstængerne
ned over metalpinden i ringen. Tag herefter
fat i den anden ende (eller få en anden til at
gøre det), og sæt den ned over den anden
pind.
3
Sæt krogene på teltet om stål-
stængerne.
4
Nu monteres Wind Stabilizer System*
ved at spænde velcrobåndet fra teltet om
stangen og pløkke de fastgjorte barduner
ned. Sørg for, at alle døre er lukkede, før
teltet fastgøres med pløkker.
Nu kan du placere teltet, som du ønsker.
Fastgør først det med pløkker ved hjælp
af bardunerne foran og bagpå. Brug Easy
Pegging System* (se evt. vejledningen i
pløkposen).
Træk teltet ud i hjørnerne, og fastgør det
med pløkker gennem de stropper, der
er fastgjort i hjørnerne og ringene. De
resterende stropper og barduner kan nu
justeres og fastgøres med pløkker.
Tag herefter den korte stang og før den
gennem kanalen på den overdækkede dør.
Stangens ender fastgøres på stængerne ved
siden af døren.
Til sidst sikres teltet mod stærk vind med
de formonterede barduner og pløkker ved
hjælp af Easy Pegging System. Pløkkerne
bør fastgøres ved brug af pløkhammer for
således at undgå eventuel beskadigelse af
hænder eller fødder.
Stålstænger medfølger til opsætning af
sidedøren/den lukkede tilbygning.
Når teltet pakkes sammen, bør dørene være
åbne, så luften kan komme ud af teltet. Det
gør det nemmere at pakke det sammen.
Se yderligere oplysninger og tips til
vedligeholdelse på bagsiden, eller klik
ind på outwell.dk for at se en lm om
opsætning af teltet.
Félicitations pour votre nouvelle
tente Outwell
®
innovatrice, conçue
et créée pour vous accompagner
dans la nature.
Choisissez l’aire de camping et la
position de la tente
Ouvrez le sac, et lorsque vous en sortez
la tente, observez comment elle a été
emballée. Cela vous aidera au moment de
la remballer.
Idéalement, l’aire de camping sélectionnée
devrait offrir une surface aussi plane et libre
de cailloux, de branches et d’objets pointus
que possible.
Étalez la tente et mettez la porte dans la
direction désirée ; évitez de placer la tente
directement sous des arbres et orientez
son extrémité dans la direction du vent
pour obtenir de meilleurs résultats lorsqu’il
vente.
Montage de la tente
Cette tente doit être montée par au moins
deux personnes. Assemblez tous les mâts.
Avant de monter la tente, il est bon d’ouvrir
la porte latérale pour laisser l’air entrer dans
la tente, ce qui facilite le montage. Glissez
tous les mâts incurvés dans leurs gaines sur
le toit de la tente et mettez les mâts droits
de chaque côté.
1
Raccordez les mâts droits en acier de
part et d’autre des mâts incurvés.
La tente peut maintenant être dressée.
Ancrez les deux coins arrière avec des ches
pour maintenir la tente en place avant de
la dresser.
2
Posez une extrémité du mât en acier sur
le crochet métallique xé à l’anneau. Allez à
l’extrémité opposée du mât et engagez-y
l’autre crochet (la deuxième personne peut
aussi s’en occuper).
3
Fixez maintenant les crochets de la
tente sur les mâts en acier.
4
Mettez le système Wind Stabilizer* en
place en refermant le Velcro de l’extension
sur les mâts. Faites de même avec tous les
jeux de mâts. Vériez que toutes les portes
sont fermées avant d’enfoncer les ches de
la tente.
Vous pouvez maintenant placer la tente où
vous le désirez, la dresser et l’ancrer avec
des ches et des haubans, à l’avant puis
à l’arrière, selon le système Easy Pegging*
(reportez-vous aux instructions du sac
de ches). Tirez la tente par les coins et
ancrez-la en passant des ches dans les
courroies munies d’anneaux dans les coins.
Les courroies et les haubans restants
peuvent maintenant être ajustés et xés
avec des ches.
Insérez ensuite le mât le plus court dans la
gaine sur la porte coupe-pluie et attachez
les extrémités aux mâts à côté de la porte.
Enn, sécurisez la tente contre les vents
forts avec les haubans pré-attachés et
des ches selon le système Easy Pegging.
Utilisez un maillet pour enfoncer les ches
dans le sol, mais faites attention de ne pas
vous frapper les mains et les pieds.
Des mâts en acier sont fournis pour monter
la porte latérale/l’auvent.
Lorsque vous remballez la tente, les portes
doivent être ouvertes pour laisser l’air
s’échapper et faciliter l’emballage.
Retournez la présente pour lire des
renseignements supplémentaires et des
conseils d’entretien ou allez sur outwell.com
pour voir le lm sur le montage.
Gefeliciteerd met uw nieuwe,
innovatieve Outwell
®
tent die
speciaal ontworpen en ontwikkeld
is om u veel plezier te bieden
tijdens uw buitenavonturen.
De camping kiezen en de tent opzetten
Open de tas en let er bij het uitpakken van
de tent op hoe deze is ingepakt. Dit maakt
het eenvoudiger om de tent later weer
correct in te pakken.
Bij het kiezen van de campingplaats is de
beste plek een stuk grond dat gelijkmatig is
en waar zo weinig mogelijk stenen, takken
of andere objecten liggen.
Spreid de tent uit en leg hem met de ingang
in de gewenste richting. Probeer de tent
niet direct onder bomen te zetten en plaats
hem met de achterkant in de windrichting.
Zo staat hij beter onder winderige
omstandigheden.
In elkaar zetten en opzetten van de tent
Deze tent moet opgezet worden door
minstens twee personen. Zet alle palen in
elkaar. Voordat u de tent opzet, moet u de
zijingang openen om te zorgen voor lucht
in de tent. Zo kunt u de tent makkelijker
opzetten. Duw alle ronde stokken in de
stokgaten op het tentdak en plaats de
rechte stokken aan de zijkanten.
1
Steek de rechte stalen stokken aan
beide zijden in de ronde stokken.
De tent kan nu rechtop gezet worden. Zet
voordat u de te nt rechtop zet, de twee
achterhoeken met haringen vast zodat de
tent op zijn plek blijft staan.
2
Plaats een uiteinde van de stalen
stokken over de metalen pin die in de ring
zit. Ga naar het andere uiteinde van de stok
(of laat dit doen door een tweede persoon)
en steek dat uiteinde over de andere pin.
3
Klem nu de haken van de tent op de
stalen stokken.
4
Plaats het Wind Stabilizer-systeem*
door het klittenband vast te zetten aan de
extensie op de stokken. Herhaal dit voor
alle sets met stokken. Controleer of alle
deuren gesloten zijn voordat u de tent met
de haringen vastzet.
U kunt nu de tent neerzetten zoals u wilt.
Zet de tent op en zet hem eerst vast met de
scheerlijnen aan de voorkant en achterkant
met het Easy Pegging-systeem* (zie voor
instructies de zak met haringen). Trek de
tent aan de hoeken naar buiten en zet deze
door de koorden aan de hoeken en ringen
met haringen vast. De resterende koorden
en scheerlijnen kunnen nu afgesteld en
vastgezet worden.
Schuif daarna de kortere stok door de
huls op de regendichte ingang en maak
de uiteinden vast aan de stokken aan
weerszijden van de ingang.
Bescherm tot slot de tent tegen harde
windstoten met de bevestigde scheerlijnen
en haringen met behulp van het Easy
Pegging-systeem. Gebruik een hamer om
de haringen in de grond vast te zetten,
maar let op uw handen en voeten als u op
de haringen slaat.
Er zijn stalen stokken meegeleverd voor het
instellen van de zijingang/ het dekzeil.
Als u de tent gaat inpakken moeten de
ingangen open staan om de lucht uit de tent
te laten en het inpakken te vereenvoudigen.
Zie de achterzijde voor meer informatie en
tips over onderhoud of ga naar outwell.com
voor een lm over het opzetten van de tent.
© 09/2011 Oase Outdoors ApS
COLLECTION
Scan for video
Watch set-up video at
outwell.com
*Patent pending, zum Patent angemeldet, Patentanmeldt, Brevet en instance, Patent aangevraagd


Join the conversation about this product
Here you can share what you think about the Outwell Premium Ontario LP Tent. If you have a question, first carefully read the manual. Requesting a manual can be done by using our contact form.