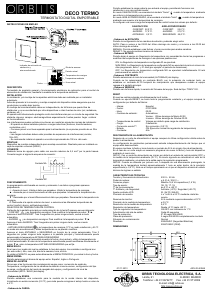
CRONOTERMOSTATO
MIRUS
DESCRIPCIÓN
El cronotermostato MIRUS es un termostato de ambiente electrónico programable
de fácil utilización. Permite asignar distintas temperaturas en diferentes periodos
horarios.
Características generales:
• 7 programas independientes y configurables (uno para cada día de la semana).
• Display de gran tamaño con retroiluminación.
• Comodidad de programación al poderse realizar fuera de la base.
• Control de calefacción.
• 2 Niveles de temperatura regulables: Confort
y Ahorro .
• Regulación de temperatura desde +5 ºC a +35 ºC.
• Resolución de medida de temperatura y regulación 0,1 ºC.
• Temperatura anti-hielo fija en 5 ºC (para evitar congelaciones).
• Programas diarios: Periodos configurables de 30 minutos.
INSTALACIÓN:
ATENCIÓN. La instalación y el montaje de los aparatos eléctricos debe ser
realizada por un instalador autorizado.
ANTES DE PROCEDER A LA INSTALACIÓN DESCONECTAR LA ALIMENTACIÓN
RESTABLECER LA ALIMENTACIÓN CUANDO EL EQUIPO ESTÉ TOTALMENTE INSTALADO.
El aparato está internamente protegido contra las interferencias.
MONTAJE:
Dispositivo de control electrónico de montaje independiente sobre pared o caja de
mecanismos.
Se recomienda instalar el aparato a una altura mínima de 1,5 m. El montaje del
cronotermostato debe ser independiente, de tal forma que quede libre de
obstáculos y no se vea afectado por otros dispositivos u otras fuentes de calor
(sol, radiadores, ventanas, etc.)
Tanto para fijar el aparato a la pared como para sustituir las pilas hay que
desenganchar la base de fijación del dispositivo haciendo presión sobre la pestaña
existente en el lateral izquierdo del aparato mediante un destornillador plano.
Fijar la placa de instalación sobre la pared o sobre caja de mecanismos con los
tornillos adjuntos.
CONEXIÓN:
Retirar la tapa de bornes mediante un destornillador y conectar de acuerdo al
siguiente esquema:
Para controlar una instalación a través de contactores es aconsejable colocar un
condensador en la bobina del mismo de valor adecuado (0,1 μF 275 V~).
COLOCACIÓN Y SUSTITUCIÓN DE PILAS:
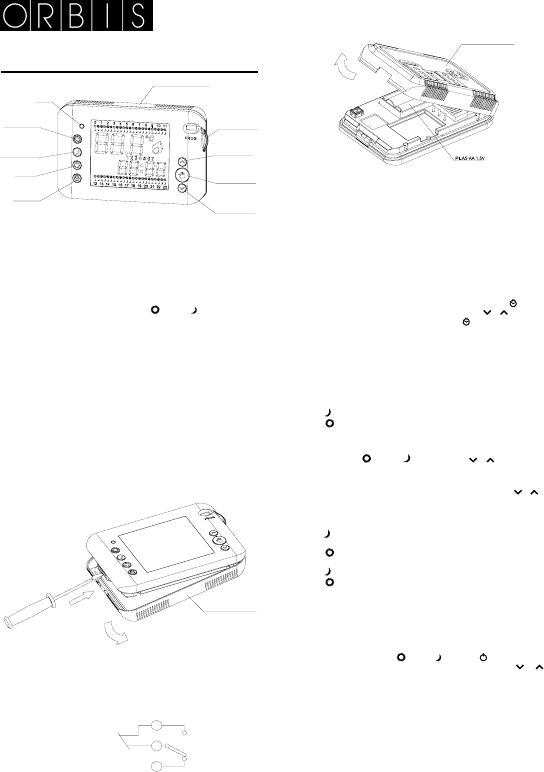
El aparato está alimentado por 2 pilas alcalinas LR6 (AA) de 1,5 V (no incluidas).
Respetar la polaridad indicada en el alojamiento de las pilas. La duración
aproximada de las pilas es de 1 año.
Al colocar las pilas por primera vez se activa la pantalla y aparecen todos los
segmentos del display. Realizar un RESET siempre que se sustituyan las pilas y
volver a reprogramar el aparato.. Tras un periodo corto de detección de pilas, el
MIRUS se pone en funcionamiento.
Cuando el MIRUS tenga las pilas con poco nivel de carga y haya que sustituirlas,
aparecerá en la parte inferior de la pantalla el símbolo: “Lo”.
Deposite las pilas usadas en un contenedor para tal fin. Respete el medio
ambiente.
RETROILUMINACIÓN DE LA PANTALLA
En el MIRUS al pulsar cualquier tecla se activa un backlight temporal, el cual
ilumina el display para poder programarlo con comodidad.
PUESTA EN HORA
Se coloca la rueda de programación en START y se pulsa la tecla
, comenzará
a parpadear el dígito del día de la semana. Con las teclas o seleccionamos
el día correspondiente y pulsando de nuevo la tecla
se repite la operación para
horas y minutos, por este orden. Pasados 5 segundos se pasa a modo automático
con la puesta en hora actualizada.
FUNCIONAMIENTO AUTOMATICO (CRONOTERMOSTATO)
Colocando la rueda de programación en la posición START el MIRUS encenderá
o apagará la calefacción de acuerdo con la programación del día actual. El
CRONOGRAMA mostrará en el display esta programación.
TEMPERATURAS DE CONTROL
Las temperaturas predeterminadas de fábrica son:
Ahorro
: 17 ºC
Confort
: 20 ºC
Para modificar el valor de estas temperaturas, estando en modo START,
pulsamos el botón correspondiente al tipo de temperatura que queremos
configurar (Confort
o Ahorro ) y con las teclas o podemos modificar
su valor.
Para saber que tipo y que valor de temperatura se tiene programado en el MIRUS
en la hora actual, en modo START, se pulsa cualquiera de las teclas
o .
PROGRAMAS PREESTABLECIDOS
El cronotermostato MIRUS sale de fábrica con la siguiente programación:
Lunes a viernes:
Ahorro
: De 00:00h a 06:00h, de 09:00h a 12:00h, de 15:00h a 17:00h y de
22:00h a 00:00h.
Confort
: De 06:00h a 09:00h, de 12:00h a 15:00 y de 17:00h a 22:00h.
Sábados y domingos:
Ahorro
: De 00:00h a 08:00h y de 22:00h a 00:00h.
Confort
: De 08:00h a 22:00h.
MODIFICAR PROGRAMAS
Colocamos la rueda de programación en el día que queremos programar (Ej.:
Lunes – 1, Martes – 2,…).
Definimos el tipo de temperatura por periodos horarios de 30 minutos en 30
minutos empezando por las 00:00 horas. Para definir que tipo de temperatura se
aplicará para un periodo horario, se pulsará el botón correspondiente a la
temperatura deseada (Confort:
, Ahorro: , Apagado: ) . Una vez definida la
temperatura se pasa al siguiente periodo horario. Con las teclas
o , se
avanza por los periodos horarios dejando la temperatura que ya estaba asignada.
Para saber que periodo horario se está programando, en el display aparecerá la
hora de comienzo y parpadeará en el cronograma el símbolo correspondiente a la
temperatura de control definida en el programa que estamos modificando.
Si no aparece ningún símbolo parpadeando en el cronograma significa que en el
periodo horario que estamos programando el cronotermostato permanecerá
apagado (el modo anti-hielo permanecerá activo).
El programa queda grabado al pasar la rueda a otro día o a la posición START.
Si durante la programación se está más de 1 minuto sin pulsar ninguna tecla,
aparece en la pantalla “Err” y el relé se desconectará, hasta se vuelva a pulsar
cualquier tecla, para continuar con la programación.
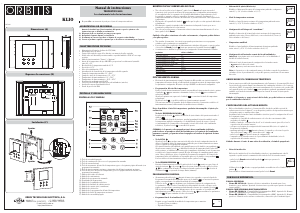
PLACA DE INSTALACIÓN
RUEDA DE
PROGRAMACIÓN
RESET
SELECCIÓN
TEMPERATURA
DE CONFORT
SELECCIÓN
TEMPERATURA
DE AHORRO
ON / OFF
PUESTA EN
HORA / DIA
INCREMENTAR /
AVANZAR
ACCIONAMIENTO
MANUAL
DECREMENTAR /
RETROCEDER
PLACA DE INSTALACIÓN
PLACA DE INSTALACIÓN
1
2
CALEFACCIÓN
3


Join the conversation about this product
Here you can share what you think about the Orbis Mirus Thermostat. If you have a question, first carefully read the manual. Requesting a manual can be done by using our contact form.
reply | This was helpful (13) (Translated by Google)
reply | This was helpful (7) (Translated by Google)
reply | This was helpful (6) (Translated by Google)
reply | This was helpful (2) (Translated by Google)
reply | This was helpful (1) (Translated by Google)
reply | This was helpful (0) (Translated by Google)