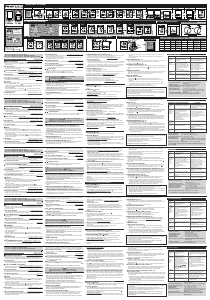
1x 1x
1x
1x 1x 2x 2x 1x 1x 1x 1x 4x
F
G
H I
B C D E
www.o-synce.com _ Ofce Asia/USA: Hong Kong _ Ofce Europe: Weinheim/Germany
J
A
Content / Inhalt / Contenu / Inhoud Installation / Montage / Installation / Installatie
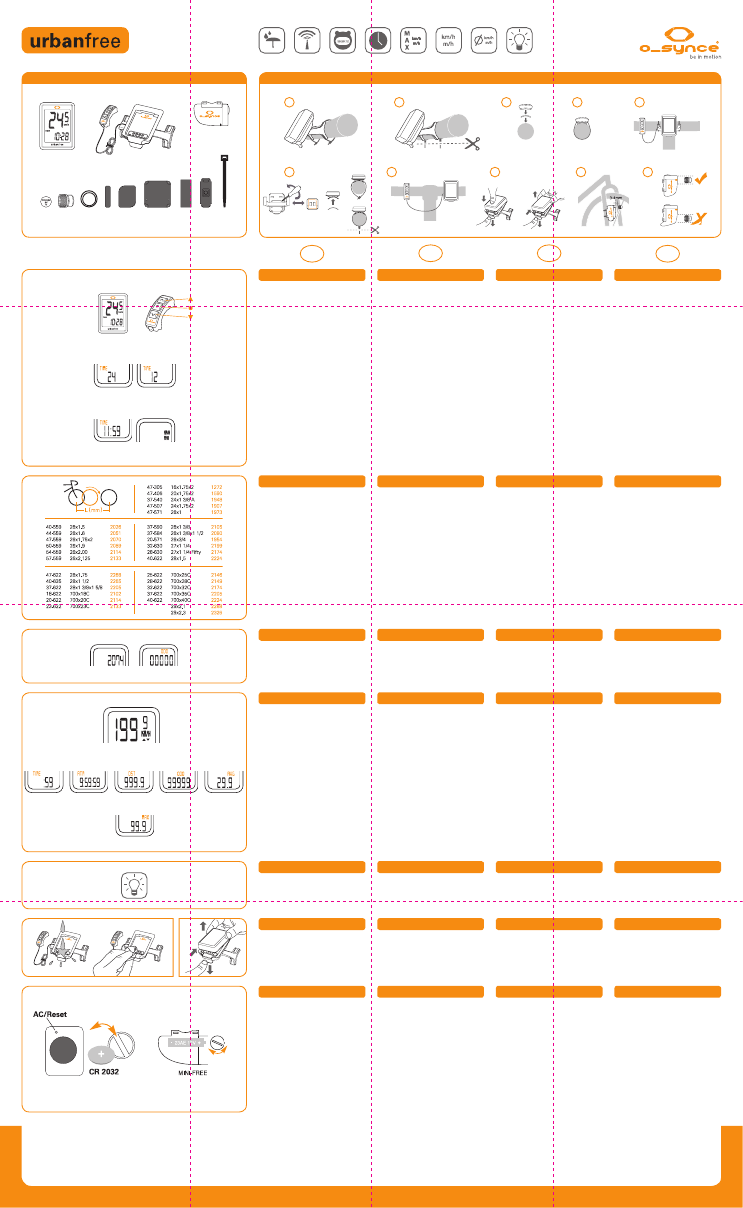
To adjust settings, hold button
●
pressed for
4 seconds.
Clock Mode
„24“ is blinking. Choose „12“ or „24“
with ▼ or ▲. Approve with
●
.
Time, Units
Time set: Enter TIME menu by ▼ ▲ in the
lower line, and hold
●
for 4 seconds. Select
hours, minutes, km/h or mi/h each with ▼ or
▲, and confirm by pressing
●
.
Note: By holding the buttons, counting up and
down will be accelerated.
Setting of tire size, units and Odometer:
Enter ODO menu by ▼ ▲ in the lower line, and
hold
●
for 4 seconds.
Um Einstellungen vorzunehmen, halten Sie die
Taste
●
für 4 Sekunden gedrückt.
Stunden-Modus
„24“ blinkt. Mit ▼ oder ▲ „12“ oder „24“
auswählen. Mit
●
bestätigen.
Uhrzeit, Einheiten
Uhrzeit einstellen: Begeben Sie sich mit ▼ ▲
in der unteren Zeile ins TIME-Menü und halten
Sie die mittlere Taste 4 Sekunden gedrückt.
Stunden, Minuten, km/h oder mi/h jeweils mit
▼ oder ▲ auswählen und mit
●
bestätigen.
Hinweis: Durch halten der Tasten wird das Auf-
bzw. Abzählen beschleunigt.
Einstellen von Radumfang, Einheiten und
Gesamtkilometern: Begeben Sie sich mit ▼ ▲
in der unteren Zeile ins ODO-Menü und halten
Sie die mittlere Taste 4 Sekunden gedrückt.
Pour régler les différents paramètres, tenez le
bouton «
●
» enfoncé pendant 4 secondes.
Horloge sur 12 h ou 24 h
Le chiffre « 24 » clignote. Sélectionnez « 12
» ou « 24 » à l’aide des flèches (▼ ou ▲).
Confirmez votre sélection en appuyant sur le
bouton «
●
».
Heure et unités de mesure de la vitesse
Pour régler l’heure : Accédez au menu TIME
(heure) à l’aide des flèches (▼ et ▲), puis
maintenez le bouton «
●
» enfoncé pendant 4
secondes. Sélectionnez les heures, les minu-
tes, les km/ h ou les mi/h à l’aide des flèches
(▼ ou ▲), puis confirmez votre sélection en
appuyant sur le bouton «
●
».
Remarque : Le fait de maintenir les boutons
enfoncés accélère l’incrémentation et la
décrémentation.
Réglage de la taille des pneus, des unités
de vitesse et de l’odomètre : Accédez au
menu ODO à l’aide des flèches (▼ et ▲), puis
maintenez le bouton «
●
» enfoncé pendant
4 secondes.
The tire size can be measured most accurately
by rolling up the wheel. Otherwise, determine
the value from the ETRTO-table. Enter each
digit with ▼ or ▲ feed, confirm with
●
and
change to the next figure.
Der Radumfang wird am genauesten durch
Abrollen festgestellt. Er kann aber auch aus der
ETRTO-Tabelle ermittelt werden. Jede Stelle mit
▼ oder ▲ eingeben, mit
●
bestätigen und zur
nächsten Stelle wechseln.
La façon la plus précise de mesurer la taille
d’un pneu est de faire pivoter la roue. Vous
pouvez également vous reporter au tableau
de l’Organisation technique européenne du
pneumatique et de la jante (ETRTO — European
Tyre and Rim Technical Organization). Sélection-
nez chaque chiffre à l’aide des flèches (▼ ou
▲), puis confirmez votre sélection en appuyant
sur le bouton «
●
». Le chiffre suivant sera
automatiquement sélectionné.
Set each digit with ▼ or ▲, confirm with
●
and
change to the next figure.
Jede Stelle mit ▼ oder ▲ eingeben, mit
●
bestätigen und zur nächsten Stelle wechseln.
Sélectionnez chaque chiffre à l’aide des flèches
(▼ ou ▲), puis confirmez votre sélection en
appuyant sur le bouton «
●
». Le chiffre suivant
sera automatiquement sélectionné.
Short pressing of
●
activates the backlight for
3 seconds.
The upper line constantly shows the speed (up
to 199,9 km/h). The arrows ▼ and ▲ indicate,
if the current speed is higher or lower than the
present average speed.
The lower line can be switched over by using
buttons ▼ and ▲ between the following data:
Time – stopwatch – distance – odometer – ave-
rage speed – maximum speed. By holding ▼
for 2 seconds in the mode TIME, ATM, DST, ODO
and AVG, all current tour data will be deleted.
By holding ▼ for 2 seconds in the mode MAX,
only the value of the maximum speed will
be reset.
Durch kurzes drücken der Taste
●
wird die
Hintergrundbeleuchtung für 3 Sekunden
eingeschaltet.
Appuyez brièvement sur le bouton «
●
» pour
actionner le rétroéclairage (d’une durée de
3 secondes).
To save batteries, please remove the bike
computer after training from the holder.
Bitte entfernen Sie den Radcomputer nach dem
Training von der Halterung, um die Batterie zu
schonen.
Pour économiser la pile, veuillez retirer
le cyclomètre de son socle après chaque
entraînement.
Change of Battery (CR2032) is necessary after
approx. one year, or when display or backlight
become weak. Before change, note down
wheel size and odometer, and enter after again.
Turn the battery compartment cover with a
fitting coin to left. Remove the cover plate ca-
refully. Insert the battery with correct polarity.
You should see the „+“, when compartment
is open. Check the seal fitting and replace, if
required.
Der Batteriewechsel (CR2032) erfolgt nach
etwa einem Jahr, oder wenn Anzeige oder
Hintergrundbeleuchtung schwächer werden. Vor
dem Wechsel müssen Radgröße und Gesamt-
strecke notiert und anschließend wieder neu
eingegeben werden. Den Batteriedeckel mit
einer Münze nach links drehen und vorsichtig
entnehmen. Batterie mit der Plus-Seite nach
oben zeigend einlegen. Auf richtigen Sitz der
Dichtung achten und gegebenenfalls gegen
eine neue ersetzen.
Il est nécessaire de remplacer la pile (CR2032)
après environ un an, ou lorsque l’affichage ou
le rétroéclairage est de faible intensité. Avant
de remplacer la pile, veuillez noter la taille des
pneus et la valeur affichée à l’odomètre, car
vous devrez entrer ces valeurs une fois la pile
remplacée. À l’aide d’une pièce de monnaie,
faites tourner le couvercle du compartiment de
la pile dans le sens contraire des aiguilles d’une
montre. Retirez le couvercle délicatement.
Insérez la nouvelle pile en vous assurant de
respecter les polarités. Une fois le couver-
cle du compartiment de la pile ouvert, vous
devriez voir le symbole « + ». Vérifiez le joint
d’étanchéité et remplacez-le si nécessaire.
In der oberen Zeile wird die Geschwindigkeit
angezeigt (bis 199,9 km/h). Die Pfeile ▼ und ▲
zeigen an, ob die Momentangeschwindigkeit
höher oder niedriger liegt, als die bisherige
Durchschnittsgeschwindgkeit.
In der unteren Zeile kann mit den Tasten ▼ und
▲ zwischen folgenden Werten umgeschaltet
werden: Uhrzeit – Stoppuhr – Distanz –
Odometer – Durchschnittsgeschwindigkeit
– Maximalgeschwindigkeit. Durch Halten von
▼ für 2 Sekunden in den Ansichten TIME,
ATM, DST, ODO und AVG werden alle aktuellen
Tourdaten gelöscht.
Durch halten von ▼ für 2 Sekunden in der
Ansicht MAX wird nur die bisherige Maximal-
geschwindigkeit zurückgesetzt.
La ligne supérieure affiche constamment la vi-
tesse (jusqu’à 199,9 km/h). Les symboles ▼ et
▲ indiquent si la vitesse actuelle est supérieure
ou inférieure à la vitesse moyenne.
Quant à la ligne inférieure, elle affiche l’un des
paramètres suivants, que vous pouvez sélec-
tionner à l’aide des flèches (▼ et ▲) : heure,
chronomètre, distance, odomètre, vitesse mo-
yenne et vitesse maximale. Si vous maintenez
le bouton « ▼ » enfoncé pendant 2 secondes
en mode TIME, ATM, DST, ODO ou AVG, toutes
les données relatives à la randonnée actuelle
seront effacées.
Si vous maintenez le bouton « ▼ » enfoncé
pendant 2 secondes en mode MAX, seule la
vitesse maximale sera remise à zéro.
EN
DE FR
2 Radumfang L (mm)
3 Total distance, ODO 3 Gesamtstrecke ODO 3
Distance totale et odomètre
4 Functions 4 Funktionen 4 Fonctionnalités
5 Light 5 Licht 5 Rétroéclairage
6 General remarks 6 Allgemeine Hinweise 6 Remarque générale
7 Battery change 7 Batteriewechsel 7
Remplacement de la pile
1 Settings 1 Réglages1 Einstellungen
2 Tire size L (mm) 2 Taille des pneus (mm)
NL
Om de computer te configureren, hou de
●
knop 4 seconden ingedrukt.
Clock modus
„24“ knippert. Kies „12“ of „24“ met ▼ of ▲.
Bevestig met
●
.
Time, Units
Tijd instellen: Activeer TIME menu door ▼ ▲ in
de onderste regel en hou
●
4 seconden inge-
drukt. Kies hours, minutes, km/h of mi/h met
▼ of ▲, en bevestig door
●
in te drukken.
Let op: Door de knoppen ▼ of ▲ ingedrukt te
houden, versnelt u het op- en aftellen.
Instellen van bandenmaat, units en Odome-
ter: activeer het ODO menu door ▼ ▲ in de
onderste regel, en hou
●
4 seconden ingedrukt.
De bandenmaat kan eenvoudig opgemeten
worden door het wiel op te meten of de maat
af te lezen vanaf de zijkant van de buitenband.
Een andere mogelijkheid is de maat aflezen
van de ETRTO-tabel. Voer ieder getal in met ▼
of ▲ , bevestig met
●
en ga verder met het
volgende cijfer.
Voer ieder getal in met ▼ of ▲ , bevestig met
●
en ga verder met het volgende cijfer.
Het kort indrukken van de knop
●
activeert de
achtergrondverlichting voor 3 seconden.
De bovenste regel laat continue de snelheid
zien (tot 199,9 km/h). De pijlen ▼ en ▲ laten
zien, of de huidige snelheid hoger of lager is
dan de gemiddelde snelheid.
De onderste regel kan veranderd worden, door
het gebruik van de knoppen ▼ en ▲. De vol-
gende gegevens kunnen opgevraagd worden:
Tijd – stopwatch – afstand – totale afstand – ge-
middelde snelheid – maximum snelheid. Door
▼ 2 seconden in te drukken in de mode TIME,
ATM, DST, ODO en AVG, verwijderd u ALLE op
dat moment beschikbare data.
Door ▼ 2 seconden in te drukken in modus
MAX, reset u alleen de waarde van de maxi-
mum snelheid.
Spaar de batterij door de computer uit de
houder te verwijderen na gebruik.
Het vervangen van de batterij (CR2032) is
nodig na ongeveer een jaar, of als het display
zwakker wordt. Noteer de bandenmaat en de
kilometerstand voordat u de batterij vervangt en
voer deze naderhand weer in zoals beschreven
in deze handleiding.
Draai het batterijkapje naar links met een pas-
send muntstuk. Verwijder het kapje voorzichtig.
Verwijder de oude batterij en plaats de nieuwe
batterij, met de polen op de juiste wijze, terug
in het apparaat. U moet de „+“ kunnen zien
als het kapje nog verwijderd is. Controleer de
afdichting, vervang deze indien nodig en plaats
het batterijkapje terug.
1 Instellingen
3 Totale afstand, ODO
4 Functies
5 Licht
6 Algemene opmerking
7 Battery change
2 Bandemaat L (mm)


Join the conversation about this product
Here you can share what you think about the O-Synce urbanfree Cycling Computer. If you have a question, first carefully read the manual. Requesting a manual can be done by using our contact form.
reply | This was helpful (0)