Allgemeine Hinweise
• Um die Sicherheit Ihres Kindes zu gewährleisten, lesen die bitte die
Gebrauchsanleitung sorgfältig durch. • Der Safety ist gemäß den europäischen
Bestimmungen zugelassen und eignet sich für Kinder von Geburt bis 4 Jahren.
Die Zulassung wurde erteilt für Kinder von 0 bis 18 Kg Körpergewicht. • Der
Safety kann nur bei korrekter Anwendung seine Sicherheit gewährleisten. •
Der Safety kann mit einem Dreipunkt-Sicherheitsgurt sowohl auf dem
Beifahrersitz als auch auf dem Rücksitz befestigt werden. • Der Safety darf
nicht allein mit dem Beckengurt befestigt werden. • Die Autosicherheitsgurte
müssen gemäß ECE-Regelung 16 oder einer entsprechenden Regelung
zugelassen sein. • Autosicherheitsgurte haben je nach Fabrikat, Typ und
Baujahr verschiedene Ausführungen und Gurtlängen. Daher sollte der Safety
erst ausprobiert werden, bevor Sie Ihr Kind hineinsetzen. • Die Sicherheit des
Safety wird vom Hersteller nur dann garantiert wenn er vom Erstkäufer benutzt
wird. Es empfiehlt sich aus diesem Grunde nicht, einen Sitz aus zweiter Hand zu
kaufen. • Der Kindersitz sollte nach maximal 12 Jahren nicht mehr benutzt
werden. Die Qualität des Sitzes kann unter Umständen durch starke
Inanspruchnahme unwahrnehmbar beeinträchtigt werden. • Das Kind sollte im
Safety nie unbeaufsichtigt bleiben. • Halten Sie Ihr Kind dazu an, niemals mit
dem Gurtschloss zu spielen.
Wichtige Hinweise
• Bewahren Sie diese Gebrauchsanleitung an einem sicheren Ort auf. •
Befestigen Sie den Safety nur auf in Fahrtrichtung gerichteten Autositzen. •
Umklappbare Sitze müssen fest eingerastet sein. • Die Rückenlehne des
Autositzes muss in ganz aufrechte Position gestellt werden. • Im Auto muss der
Safety immer mit den Autogurten gesichert sein, auch wenn sich kein Kind darin
befindet. Ein locker angebrachter Sitz kann bei einer Notbremsung oder einem
Unfall Autoinsassen verletzen. • Halten Sie Ihr Kind niemals auf dem Schoß.
Gegen die immensen Kräfte, die bei einem Unfall frei werden, können Sie Ihr
Baby nicht mehr festhalten. • Legen Sie niemals den Autogurt um sich und das
Kind. • Am Safety und an den Sicherheitsgurten dürfen keine Veränderungen
vorgenommen werden. • Vergewissern Sie sich, dass der Sicherheitsgurt nicht
beschädigt und voll funktionsfähig ist. • Alle Gurte, die zum Befestigen des
Safety bestimmt sind, müssen gespannt werden. Die Gurte, mit denen das Kind
gehalten wird, müssen straff anliegen. Achten Sie darauf, dass die Gurte nicht
verdreht sind. • Nach einem Unfall können nicht wahrnehmbare
Beschädigungen die Sicherheit des Sitzes beeinträchtigt haben. Sie sollten den
Sitz dann ersetzen. • Der Safety darf auch auf dem Beifahrersitz verwendet
werden. Ist das Fahrzeug mit einem Beifahrer-Airbag ausgestattet, muss der
Fahrzeugsitz möglichst weit nach hinten geschoben werden, um eine
Gefährdung durch den Airbag auszuschließen. Beachten Sie dazu auch den
Hinweis im Handbuch Ihres Fahrzeuges.
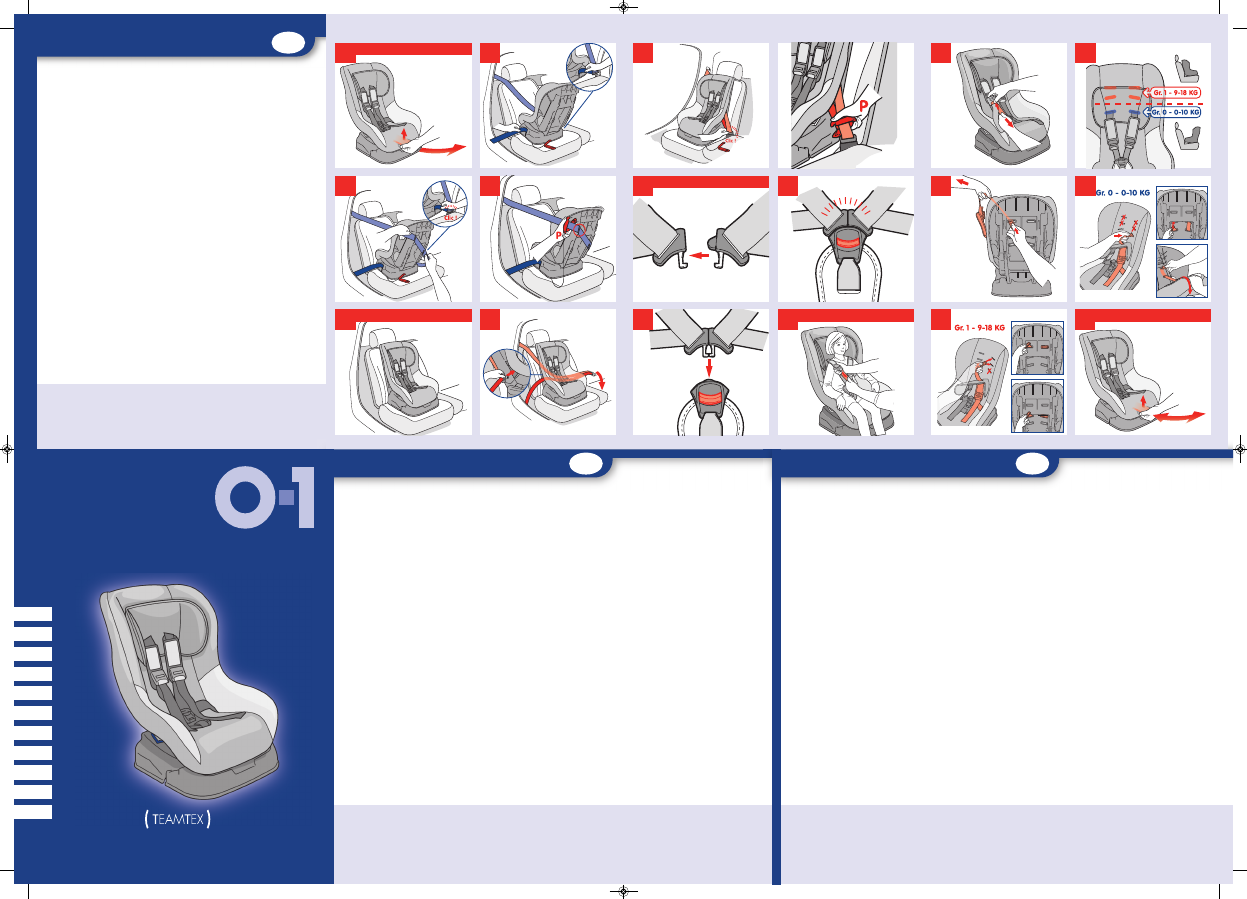
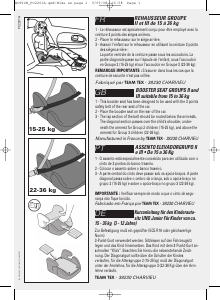
1. Gruppe 0. Einbau entgegen der Fahrtrichtung. Von
Geburt bis 10 Kg
Gebrauch nur mit einem 3-Punkt Sicherheitsgurt möglich.
Stellen Sie Ihren Safety in die äußerste Liegeposition
. Stellen
Sie den Safety entgegen der Fahrtrichtung auf den Beifahrersitz
oder auf die Rückbank, Führen Sie das Schlossteil durch die beiden
Öffnungen am Fuß des Sitzes, klicken Sie den Gurt in das
Gurtschloß ein >>KLICK<<
. Nehmen Sie nun den Schultergurt
Ihres 3-Punkt Sicherheitsgurtes und führen Sie diesen durch die
Gurtführung auf der Rückseite Ihres Safety. Straffen Sie den Gurt,
indem Sie diesen kräftig nach oben ziehen
. Bringen Sie die
Gurtklammer P am Diagonalgurt, neben der Gurtführung an der
Rückseite der Schale, wie abgebildet an. Vergewissern Sie sich,
dass der Gurt nicht verdreht, beschädigt und nirgends
eingeklemmt ist
.
2. Gruppe 1. Einbau in Fahrtrichtung . Von 9 bis 18 Kg
Gebrauch nur mit einem 3-Punkt Sicherheitsgurt möglich. Stellen
Sie den Safety in äußerster Sitzposition auf den Beifahrer, oder auf
die Rückbank
. Lösen Sie den 3-Punkt-Gurt und führen Sie
diesen durch die Öffnungen zwischen Rückenlehne und
Sitzpolsterung
. Klicken Sie den Gurt in das Gurtschloß ein
>>KLICK<<. Straffen Sie den Gurt indem Sie ihn kräftig nach oben
ziehen
. Arretieren Sie nun den Schultergurt mit der
Gurtklammer P. Vergewissern Sie sich, dass der Gurt nicht
verdreht, beschädigt und nirgends eingeklemmt ist.
3. Der Kinderautositzgurt
3.1. Schließen des Schlosses
Führen Sie die beiden Schlossteile zusammen
. Führen Sie die
die beiden zusammengeführten Teile in das Gurtschloss bis sie
hörbar einrasten
. Zum öffnen drücken Sie die rote Taste am
Schloss.
3.2 Anpassen des Gurtes
Hosenträgergurt straffen: Ziehen Sie an den Gurtstraffern, die sich
an den Hosenträgergurten befinden. Die Verstelltasten müssen
dafür nicht gedrückt werden
. Hosenträgergurt lockern: Drücken
Sie auf die Verstelltasten, die sich am oberen Ende der
Hosenträgergurte befinden. Fassen Sie die unteren Gurtenden,
und ziehen Sie gleichzeitig daran
.
3.3 Verstellen der Schultergurte entsprechend der Größe
Ihres Kindes.
Zum Anpassen der Hosenträgergurte können drei verschiedene
Höhen gewählt werden
. Um die Höhe der Hosenträgergurte
einzustellen, müssen Sie eines der oberen Enden des
Hosenträgergurts herausziehen. Drehen Sie dazu die
Metallschnalle hinten an der Rückenlehne, und ziehen Sie
anschließend das Gurtende durch die Schlitze in der Rückenlehne
der Schale und im Bezug
. Wiederholen Sie den Vorgang für das
zweite obere Gurtende. Positionieren Sie die oberen Gurtenden
auf der für Ihr Kind geeigneten Höhe. Verwenden Sie dazu gemäß
der gewählten Konfiguration die gleichen Schlitze im Bezug und
der Schale: Bei der Konfiguration mit Rücken in Fahrtrichtung (Gr.
0, 0 bis 10 kg) :
. Bei der Konfiguration mit Gesicht in
Fahrtrichtung (Gr. 1, 9 bis 18 kg) :
.
4. Das Enfernen der Gurte und des Bezuges
Bitte befolgen Sie die unter 3.3 genannten Schritte. Um das
Gurtsystem vollständig auszubauen
(um z. B. den Bezug abzunehmen) müssen Sie zusätzlich die
Plastik-Arretierung am rechten Gurtende unter dem Sitz entfernen.
5. Verstellen in Sitz- Liegeposition.
Der Safety kann in 5 Sitz- und Liegepositionen verstellt werden.
Drücken Sie den roten Verstellgriff, der sich unter der Vorderseite
der Schale befindet nach oben. Ziehen Sie den Sitz zu sich heran,
bzw. drücken Sie ihn von sich weg, bis die gewünschte Position
erreicht wird.
Haben Sie fragen zu Ihrem KIDS IM SITZ Kindersitz oder zur
Kindersicherheit allgemein, wenden Sie sich an Ihren Fachhändler
oder direkt an.
Stützkissen, Gurt- und
Schlosspolster nur
bei Safety Plus
BABY- UND KINDER AUTOSITZ
SAFETY PLUS (BABY)
DE
DE-HINWEIS 1-
Dies ist ein “universelles” Kinderrrückhaltesystem. Es ist nach ECE R 44 zur algemeinene Benutzung in Fahrzeugen
zugelassen und wird auf die meisten, aber nicht auf alle Fahrzeugsitze passen.
2- Ein korrekter Einbau ist wahrscheinlich, wenn der Fahr-
zeughersteller im Fahrzeug-Handbuch erklärt, daß das Fahrzeug für eine “universelle” Kinderrrückalte-Einrichtung dieser Altersgruppe geeig-
net ist.
3- Dieses Kinderrückalte-System ist unter strengeren Bedigungen als “ universelle” eingestuft warden, als dies bei früheren, Modellen,
die diesen Hinweis nicht tragen, der Fall war.
4- Nur für Fahrzeuge geeignet, die mit einem genehmigten 3-Punkt-Sicherheitsgurt (mit oder
ohne Aufrollvorrichtung) ausgerüstet sind. Der 3-Punkt-Sicherheitsgurt muß der UN/ECE N° 16 oder einer vergleichbaren Norm entsprechen.
5- In Zweifelsfällen wenden Sie sich bitte an den Hersteller oder den Verkäufer der Kinderrückhalte-Einrichtung.
WICHTIG!
Der Safety darf nicht auf Beifahrersitzen mit Airbag benutzt werden. Ggf. den Airbag deaktivieren
lassen (wenden Sie sich an Ihren Autohändler)
de la naissance à 4 ans
Groupes 0 & 1 de la naissance à 18 kg
SIEGE AUTO
DE SECURITE
FR
Lire ces instructions avec attention avant utilisation
et conserver ce guide pour les futurs besoins de
référence. Si vous ne respectez pas ces instru ctions,
la sécurité de votre enfant pourrait être affectée.
1. Groupe 0. Position dos à la route. De la
naissance à 10 kg.
A utiliser avec une ceinture 3 points seulement.
Mettre le siège auto en position inclinée au
maximum
. Placer le sur le siège passager à
l’avant ou à l’arrière du véhicule en position dos à
la route.Tirer complètement la ceinture du véhicule
et passer la partie abdominale de la ceinture sous
la base du siège auto
. Passer la partie Epaule
de la ceinture dans les guides sangle au dos du
siège auto. Fixer la boucle de la ceinture et tendre
la ceinture vers l’enrouleur
. Positionner la pince
(P) sur la partie épaule de la ceinture du véhicule,
contre le guide ceinture supérieur de la coque,
comme indiqué sur le dessin. Assurez-vous que la
ceinture n’est pas vrillée ou abîmée et qu’elle est
bien tendue
.
2. Groupe 1. Position face à la route. De 9 kg
à 18 kg.
A utiliser avec une ceinture 3 points seulement.
Mettre le siège auto en position assise,face à la
route
. Tirer la ceinture du véhicule et passer la
boucle à travers le dossier du siège auto entre la
coque plastique et le fond mousse
. Fixer la
boucle de la ceinture. Tendre la ceinture à fond en
tirant dessus et en appuyant sur le siège auto pour
le caler contre la banquette du véhicule
. Mettre
en place la pince plastique P sur la ceinture du
véhicule près de la boucle sur la partie Epaule.
Assurez-vous que la ceinture n’est pas vrillée ou
abîmée et qu’elle est bien tendue.
3. Le harnais du siège auto
3.1. Fermeture de la boucle.
Placer les 2 languettes de la boucle ensemble
.
Enclencher les 2 languettes dans la boucle jusqu’à
entendre un CLIC
. Pour ouvrir la boucle,
appuyer sur le bouton rouge de la boucle. Assurez-
vous régulièrement que la boucle est bien fermée.
3.2. Réglage du harnais.
Pour serrer le harnais: Tirez sur les sangles de
réglage situées sur les harnais, il n’est pas
nécessaire d’appuyer sur les boutons des ajusteurs
. Pour desserrer le harnais: Appuyez sur les
boutons des ajusteurs situés sur les brins
supérieurs des harnais, saisissez la partie
inférieure des harnais et tirez simultanément
.
3.3. Réglage de la hauteur du harnais en
fonction de la hauteur des épaules de
l’enfant.
Les harnais peuvent être réglés sur trois hauteurs
. Pour ajuster la hauteur des harnais, retirez un
des brins supérieurs des harnais en faisant pivoter
sa butée de retenue métallique située à l’arrière du
dossier de la coque puis tirez-le à travers les fentes
de la coque du dossier et de la housse
. Répétez
cette opération sur le second brin supérieur.
Positionnez les brins supérieurs des harnais à la
hauteur adaptée à votre enfant en utilisant les
mêmes fentes, tant dans la housse que dans la
coque selon la configuration choisie :
En configuration dos à la route (Gr. 0, de 0 à 10 kg) :
. En configuration face à la route (Gr. 1, de 9 à 18
kg) :
.
Veiller à ce que les sangles sous-abdominales
soient portées aussi bas que possible,pour bien
maintenir le bassin.
4. Démontage et remontage du harnais et de
la housse.
Effectuer les mêmes opérations que pour le
réglage de la hauteur du harnais mais en l’enlevant
complètement. Enlever la boucle entrejambe en
passant la sangle à travers la coque et la housse ;
Enlever la housse et les accessoires tissus suivant
les modèles (fourreaux, doux nid, oreillers).
Pour le remontage, effectuer les mêmes opérations
en sens inverse.
Assurez-vous que le harnais est bien remonté, et
que les sangles ne sont pas vrillées, ni abîmées.
5. Inclinaison du siège auto.
Le siège auto peut être incliné à votre convenance
pour le confort de votre enfant. Pour incliner le
siège auto, utiliser la poignée située à l’avant du
siège auto entre la base et la coque
. Après
chaque changement d’inclinaison, assurez-vous
que la ceinture du véhicule est bien tendue et que
le harnais est bien en place.
6. Recommandations
• Ne jamais laisser votre enfant seul sur le siège
dans la voiture sans surveillance.
• Les crans d’arrêt de la banquette et du siège
passager doivent être bloqués.
• Après un accident le siège ne doit plus être utilisé.
• Utilisez le siège de sécurité même si vous n’avez
qu’un petit trajet à faire : ces accidents sont les
plus nombreux.
• Pour des raisons de sécurité, fixer le siège auto
dans votre voiture, même si vous ne transportez
pas votre enfant.
• Les éléments rigides et les pièces en matière
plastique d’un siège auto doivent être situés et
installés de telle manière qu’ils ne puissent pas,
dans les conditions normales d’utilisation du
véhicule, se coincer sous un siège mobile ou
dans la porte du véhicule.
• Ne pas utiliser le siège auto sans la housse.
• Ne pas remplacer la housse du siège auto par
une autre housse que celle recommandée par le
constructeur, car elle intervient directement dans
le comportement du siège auto.
• Ne laissez aucun objet sur la banquette ou sur la
plage arrière : en cas de freinage violent, il
pourrait blesser votre enfant.
• Ce dispositif ne doit ni être modifié ni être
complété.
• La sécurité n’est garantie que si le siège a été
correctement monté sur les conseils de cette
fiche et qu’il n’a pas été modifié.
• Laver à l’eau savonneuse à 30°C.
“Ne pas utiliser la position face vers l’avant
si l’enfant pèse moins de 9 kg”.
FR-AVERTISSEMENT 1 - Ce siège auto est un dispositif de retenue "Universal" pour enfant. Homologué selon le règlement N°44. Il est adapté à une utilisation générale dans les vé-
hicules, et compatible avec la plus grande majorité (sauf exception) des sièges de véhicules. 2 - La parfaite compatibilité est plus facilement obtenue lorsque le constructeur du véhicule déclare
que ses véhicules sont adaptés à recevoir des dispositifs de retenue "Universal". 3 - Ce dispositif de retenue est classé "Universal", selon les critères d'homologation les plus strictes, par rap-
port aux modèles précédents qui ne correspondent plus à ces nouvelles dispositions. 4 - Adaptable uniquement sur les véhicules munis de ceintures de sécurité à 3 points d'ancrage, fixes ou
avec enrouleurs, homologuées selon le règlement UN/ECE N° 16 ou autre norme équivalente. 5 - En cas d'incertitude, contacter le fabricant du dispositif de retenue, ou votre revendeur. S’as-
surer que tous les dispositifs de verrouillage sont enclenchés avant utilisation. Il est dangereux de poser ce transat en hauteur. Non recommandé pour les enfants qui peuvent s’asseoir tout seul
(âgé environ 9 mois, soit environ à partir de 9 kg). Ne jamais laisser l’enfant dans le transat sans surveillance.
IMPORTANT : Ne pas utiliser le siège auto à la place avant dans un véhicule équipé d’un Airbag®.
From birth to 4 years
Groups 0 & 1from birth to 18 kg
CHILD’S
CAR SEAT
GB
Please read these instructions carefully before use
and keep the guide for future reference. Failure to
follow these instructions could compromise the
child’s safety.
1. Group 0. Rear-facing position. From birth
to 10 kg.
Use only with a three-point lap and diagonal
seatbelt. Recline the child seat to its maximum
position (fig.
). Place it on the front passenger
seat or on the back seat, with the back of child
seat facing the road. Pull the vehicle seatbelt tight
and pass the lap part under the base of the child
seat (fig.
). Pass the shoulder part of the vehicle
seatbelt through the strap holders on the back of
the child seat. Fasten the seatbelt and pull it tight
(fig.
). Position the lock-off (P) on the diagonal
part of the belt, behind the rear guide of the shell,
as shown in diagram. Ensure that the seatbelt is
not twisted or damaged and that it is taut (fig.
).
2. Group 1. Forward-facing position. From 9
kg to 18 kg.
Use only with a three-point lap and diagonal
seatbelt. Place the child seat in the upright
position facing the road (fig.
). Pull the vehicle
seatbelt and pass the buckle through the back unit
of the child seat between the plastic body and the
foam padding (fig.
). Fasten the seatbelt. Pull
the seatbelt tight, at the same time pushing on the
child seat in order to block it against the vehicle
seat (fig.
). Fix the plastic clip P onto the vehicle
seatbelt, close to the buckle on the shoulder part.
Ensure that the seatbelt is not twisted or damaged
and that it is taut.
3. The child seat harness
3.1. Fastening the buckle.
Join the two ends of the buckle together, (fig.
).
Fasten the two ends in the buckle until they click
(figs.
). To unfasten, press the red button on
the buckle. Check regularly that the buckle is
fastened correctly.
3.2. Adjustment of the harness.
To tighten the harness: Pull on the adjusting straps
positioned on the harness. You do not need to
press on the adjuster buttons
.
To loosen the harness: Press on the adjuster
buttons positioned on the upper section of the
harness, grasp the lower section and pull
simultaneously
.
3.3.Adjusting harness height according to
the child’s shoulder height
The harness can be adjusted to three different
heights
.To adjust the height of the harnesses,
remove the upper section of one of the harness
straps by pivoting the metal anchor located behind
the back rest and then pulling it through the slots
of the shell and cover.
. Repeat the operation on
the upper section of the second strap. Feed the
ends of the harness straps through the slots at
identical level in both the cover and the shell,
according to the chosen configuration:
For a rear-facing configuration (Gr. 0, from 0 to 10
kg) :
. For a front-facing position (Gr. 1, from 9 to
18 kg) :
.
Make sure that the straps under the stomach are
as lowas possible, in order to support the pelvis.
4. Removal and reassembly of the harness
and cover
Carry out the same steps as when adjusting the
height of the harness but remove it completely.
Remove the crotch buckle by passing the strap
through the seat base and the cover. Remove the
cover as well as any fabric accessories, (according
to the model: sleeves, padding etc.). To
reassemble, carry out the same steps in the
reverse order. Ensure that the harness is correctly
fitted and that the straps are not twisted or
damaged.
5. Reclining the child seat
The child seat can be reclined for the child’s
comfort. Use the handle located at the front of the
child seat between the base and the body (fig.
).
Each time the reclining position is changed, ensure
that the vehicle’s seatbelt is taut and that the
harness is in the correct position.
6. Recommendations
• Never leave a child in the seat in the vehicle
alone and unsupervised.
• The stop notches of the back and passenger
seats must be locked.
• The car seat should no longer be used after an
accident.
• Use the car seat even for short journeys: more
accidents occur during this type of journey than
any other.
• For safety reasons, attach the car seat in your car
even when not carrying a child.
• The rigid and plastic parts of the car seat must be
positioned and installed so that, through normal
use of the vehicle, they cannot become trapped
under a mobile seat or in the vehicle door.
• Do not use the car seat without the cover.
• Only replace the car seat cover with one
recommended by the manufacturer, as the cover
has a direct effect on the performance of the car
seat.
• Do not leave anything on the back seat or parcel
shelf: sudden braking could cause injury to the
child.
• The car seat must not be altered or added to in
any way.
• Safety can only be guaranteed if the seat has
been correctly fitted according to these
instructions and if it has not been altered in any
way.
• Wash in soapy water at 30°C.
helpline number
team tex uk - tel: 01455 559334
GB-NOTICE 1 - This is a "Universal" Child restraint. It is approved to Regulation N° 44 series of amendments, for general use in vehicles and it will fit most, but
not all, car seats. 2 - A correct fit is likely if the vehicle manufacturer has declared in the vehicle handbook that the vehicle is capable of accepting a "Universal" child
restraint for this age group. 3 - This child restraint has been classified as "Universal" under more stringent conditions than those which applied to earlier designs wich
do not carry this notice. 4 - Only suitable if the vehicle is fitted with a type approved 3 point static or retractor safety belt in compliance with standard UN/ECE 16 or
other equivalent standards. 5 - If in doubt, consult either the child restraint manufacturer or the retailer.
IMPORTANT : Never use the car seat in the front of a vehicle equipped with an Airbag®
BASIC / BASIC LUXE
BASIC SP
CHALLENGER
EXPLORER
O - 4 ans/years
FC1201
FR
GB
DE
IT
ES
PT
NL
PL
GR
TR
RU
Type D6
1 - GROUPE 0 : 0 - 10 kg
1


Join the conversation about this product
Here you can share what you think about the Nania First Basic Comfort Car Seat. If you have a question, first carefully read the manual. Requesting a manual can be done by using our contact form.