Tire scale L(mm)
14 x 1,5 1020
14 x 1,75 1055
16 x 1,5 1185
16 x 1,75 1195
18 x 1,5 1340
18 x 1,75 1350
20 x 1,75 1515
20 x 1-3/8 1615
22 x 1-3/8 1770
22 x 1-1/2 1785
24 x 1 1753
24 x 3/4 Tubular 1785
24 x 1-1/8 1795
24 x 1-1/4 1905
24 x 1,75 1890
24 x 2,00 1925
24 x 2,125 1965
26 x 7/8 1920
26 x 1 (59) 1913
26 x 1 (65) 1952
26 x 1,25 1953
26 x 1-1/8 1970
26 x 1-3/8 2068
26 x 1-1/2 2100
26 x 1,4 2005
26 x 1,5 2010
Tire scale L(mm)
26 x 1,75 2023
26 x 1,95 2050
26 x 2.0 2055
26 x 2,1 2068
26 x 2,125 2070
26 x 2,35 2083
26 x 3 2170
27 x 1 2145
27 x 1-1/8 2155
27 x 1-1/4 2161
27 x 1-3/8 2169
650 x 35A 2090
650 x 38A 2125
650 x 38B 2105
700 x 18C 2070
700 x 19C 2080
700 x 20C 2086
700 x 23C 2096
700 x 25C 2105
700 x 28C 2136
700 x 30C 2146
700 x 32C 2155
700C Tubular 2130
700 x 35C 2168
700 x 38C 2180
700 x 40C 2200
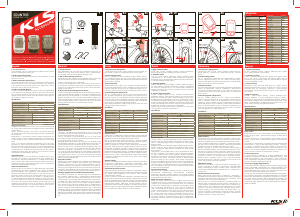
r
max 600mm
max
30º
1
2a 2a 2b
4a3a
2c
4b3b 4c 5a
2d 2e
Wheel size
Deutsch
1. Teile Check Liste
Bitte überprüfen sie, dass alle Teile vorhanden sind, bevor sie
beginnen. CY-500 Series Rad Computer, Sensor, Speichenmag-
net, Gummi, Halterung, Kabelbinder, Aufl age-Pads
2. Wie sie die Halterung montieren:
Verwenden sie den Gummi, um die Halterung am Lenker oder
Vorbau zu fi xieren und mit den Kabelbindern festziehen
3. Wie sie den Speed-Sensor montieren:
Suchen sie eine geeignete Stelle an der Gabel um den Sensor
zu montieren. Der Abstand zwischen Radcomputer und Sensor
soll max. 60 cm betragen. Befestigen sie den Sensor mit Kabel-
bindern an der Gabel
4. Wie sie den Speichenmagneten montieren:
Fixieren sie den Speichenmagneten an einer Speiche des Vorder-
rades mit der Schraube. Stellen sie sicher, dass die Magnetseite
dem Speed-Sensor zugewandt ist. Die max. Distanz zwischen
Magnet und Sensor soll 5 mm nicht überschreiten Wenn alle
Teile in der richtigen Position sind, steht einer Ausfahrt nichts
mehr im Wege. Hinweis: Bitte stellen sie sicher, dass alle Teile
korrekt fi xiert sind, bevor sie eine Ausfahrt starten!
Spezifi kationen:
Empfänger Sensor
Arbeits-Temperatur 0-40°C
Lager-Temperatur -10-50°C
Sende-Frequenz N/A 122k +- 5%
Batterie 3 Volt Lithium 2032 Cell
Gewicht 30,6 Gramm 20 Gramm
Zeit Rahmen: 0-29 (Std): 59 (min): 59 (Sec)
aktuelle Geschwindigkeit: 9-99,9 km / 0-62 Meilen
Durchschnittsgeschwindigkeit: 0-99,9 km / 0-62 Meilen
Max. Geschwindigkeit: 0-99,9 km / 0-62 Meilen
(Tages)Distanz: 0-999,99 km / 0-600 Meilen
Gesamtkilometer: 0-99999 km / 0-62000 Meilen
Batterie Austausch:
Computer: Schrauben sie die Rückwand ab. Die (+) Seite sollte
nach oben schauen. Entfernen sie die Batterie und ersetzen sie
sie mite einer Neuen des Typs CR2032
Sensor: Schrauben sie die Abdeckung ab. Die (+) Seite sollte
nach oben schauen. Entfernen sie die Batterie und ersetzen sie
sie mit einer Neuen des Typs CR2032.
Wartung: Wenn der Kontrast des Displays sich verändert oder
die Zahlen blass werden, ist es Zeit die Batterie zu tauschen. Sie
sollten gleichzeitig auch die Batterien des Sensors tauschen.
Setzen sie den CY513 Computer keiner extremen Kälte oder
Hitze aus, d.h. lassen sie die Einheit nicht für lange Zeit im
direktem Sonnenlicht. Überprüfen sie die Position des Sen-
sors und des Speichenmagneten in regenmäßigen Abständen.
Für genaue Messungen sollte der Sensor und der Magnet nicht
nass werden bzw. rosten, sonst können Funktionsstörungen
auftreten. Diese Gegenstände können mit klarem Wasser und
milder Seife gereinigt werden.
Begrenzte Garantie:
Garantie gilt nicht für die Batterien, Schäden durch Missbrauch,
Misshandlung oder Unfällen, gesprungene oder zerbrochene
Gehäuse, Unterlassung von Vorsichtsmaßnahmen, unsach-
gemäße Wartung oder gewerbliche Nutzung. Die Garantie er-
lischt, wenn die Reparatur durch nicht autorisiertes Service du-
rchgeführt wird. Während dieser Garantiezeit (1 Jahr) wird das
Produkt anstandslos entweder repariert oder ersetzt werden.
Wichtige Angaben über Gesundheit und Datenschutz:
Verwenden Sie niemals den Fahrradcomputer in Kombination
mit anderen medizinischen / implantierten elektronischen
Teilen und Geräten (vor allem Herzschrittmacher, EKG Gerät,
TENS Geräten, Herz-Lungen-Maschinen und Herzschrittmach-
er.) Wenn Sie schwer krank oder schwanger sind, konsultieren
Sie bitte Ihren Arzt, bevor Sie den Zyklus Computer verwen-
den. Halten Sie das Gerät von Kindern fern. Es enthält Batte-
rien, die von Kindern verschluckt werden könnten. Wie bei den
meisten elektronischen Empfangsgeräten, kann es manchmal
Störungen geben, die ungenaue Anzeigen bewirkt. Vermeiden
Sie die Verwendung Ihres Zyklus Computer in der Nähe von den
üblichen Störquellen. Dazu gehören Hochspannungsleitungen,
Klimaanlagen, Leuchtsto röhren, Uhren, Handys und Comput-
ern.
English
1. List of accessories
cyclecomputer, sensor, speed magnet, rubber bracket, plastic
bracket, stabling pads, nylon ties
2. How to mount the bracket:
Use the rubber to tighten the bracket to the handlebar or stem
with the nylon ties.
3. How to mount the Speed Sensor:
Check the position of the front fork to fi nd the suitable point to
attach the speed sensor. The distance between cycle computer
& the speed sensor would be with 60 cm. Mount the seonsor
with nylon ties on the chosen front fork.
4. How to mount the Magnet:
Secure the Speed Magnet on the spoke of the front Wheel with
screw. Make sure the manget side faces the speed sensor zone.
The maximum distance between the speed sensor and the
magnet on the spoke is 5mm. Once above items in the right po-
sition, the user may go for a ride.
Specifi cation:
Receiver Sensor
Operating Temperature 0-40°C
Storage Temperature -10-50°C
Emitted Frequency N/A 122k +- 5%
Battery 3 Volt Lithium 2032 Cell
Weight 30,6 Gramm 20 Gramm
Timer Range: 0-29 (hour): 59 (min): 59 (Sec)
Current Speed Range: 9-99,9 km / 0-62 Mile
Average Speed Range: 0-99,9 km / 0-62 Mile
MAX Speed Range: 0-99,9 km / 0-62 Mile
(Trip) Distance Range: 0-999,99 km / 0-600 Mile
Odometer Range: 0-99999 km / 0-62000 Mile
Battery replacement:
Computer: Unscrew the back cover. The (+) side should be facing
up. Gently remove the battery and replace it with a new battery
model Cr2032.
Sensor: Unscrew the back cover. The (+) side should be facing
up. Gently remove the battery and replace it with a new battery
model Cr2032.
Maintanance: If the display contrast changes and fi gures be-
come faintm it’s time to replace the battery. Consider chang-
ing the computer sensor and transmitter batteries at the same
time.
Note: Do not expose computer to extremely cold or hot tem-
peratures i.e. don’t leave the unit in direct sunlight for extended
period of the time. Check the position of sensor and magnet pe-
riodically. For current measurement, the sensor, magnet should
not get wet/ rust, otherwise it may cause function error. Brack-
er/Magnet/Sensor band, these items can be rinsed in surface
fresh water or washed with a mild soap.
Limited warranty:
Warranty does not cover the batteries, damages due to mis-
use, abuse or accidents, cracked or broken cases, negligence of
precautions, improper maintenance or commercial use. War-
ranty is void if the repairs are done by non authorized service.
During this warranty period(one year)the product will either be
repaired or replaced without charge.
Important Health Notice:
Never use the cycle computer in combination with other medi-
cal/implanted electronic equipment and device (especially
heart pacemakers, EKG equipment, TENS equipment, cardio-
pulmonary machines and pacemakers.) If you are severely ill or
pregnant, please consult your doctor before using cycle com-
puter. Keep this device away from children. It contains batter-
ies, which might be swallowed by children. As with most elec-
tronic receiving devices, there can sometimes be interfe-rence
that causes inaccurate display readouts. Avoid using your cycle
computer near common sources of interference. These include
high voltage power lines, air conditioning motor units, fl uores-
cent lights, wristwatches, mobiles, and computers.
Česky
1. Příslušenství k cyklopočítači
cyklopočítač série CY-500, senzor, magnet, plastový držák, gu-
mový držák, vymezovací stabilizační pásky, vázací pásky
2. Montáž cyklopočítače
obr. 2a : cyklopočítač, plastový držák, gumový držák, vymezo-
vací stabilizační pásky, obr. 2b : držák, vázací pásky, použijte
gumový držák na připevnění držáku na řidítka nebo představec
pomocí vázacích pásků
3. Montáž vysílače
Zkontrolujte polohu vidlice (viz. obrázek) a najděte nejvhod-
nější místo na připevnění senzoru. Vzdálenost cyklopočítače od
senzoru nemá být větší než 60 cm. Připevněte senzor na zvo-
lené místo pomocí vázacích pásků ( stabilizační pásek, senzor).
4. Montáž magnetu cyklopočítače
obr. 4a – šroubek, magnet, obr. 4b – senzor, zóna snímání, mag-
net, upevněte magnet na špici předního kola pomocí části se
závitem. Ujistěte se, že je magnetická část otočená směrem k
zóně snímání vysílače. Maximální vzdálenost mezi magnetem
a zónou snímání vysílače nemá přesáhnout 5mm. Při dodržení
všech bodů je cyklopočítač připraven k použití.
Upozornění: před jízdou se vždy ujistěte, zda jsou všechny části
cyklopočítače ve správné poloze.
Specifi kace:
Přijímač Senzor
Pracovní teplota 0°C - 40°C
Teplota skladování 0°C - 50°C
Frekvence vysílání N/A 122k ± 5%
Baterie 3V lithiová typ 2033
Hmotnost 30,6 g 20 g
Údaj času: 0 -29 hodin: 59 minut: 59 sekund
Aktuální rychlost: 0-99,9Km/hod. / 0-62 mil/hod.
Průměrná rychlost: 0-99,9Km/hod. / 0-62 mil/hod.
Maximální rychlost: 0-99,9Km/hod. / 0-62 mil/hod.
Denní vzdálenost: 0-999,99Km / 0 – 600 mil
Celková vzdálenost: 0 – 99999 Km / 0-62 000 mil
Výměna baterie:
Cyklopočítač: uvolněte zadní uzávěr. Pól baterie + má být umístěn
tak, aby byl při otevření krytu viditelný. Jemně uvolníte baterii a
vyměníte ji za novou. Model baterie musí být CR2032.
Senzor: uvolněte zadní uzávěr. Pól baterie + má být umístěn
tak, aby byl při otevření krytu viditelný. Jemně uvolníte baterii a
vyměňte ji za novou. Model baterie musí být Cr2032.
Údržba: v případě, že se mění ostrost zobrazování na displeji a
jednotlivé symboly blednou, vyměňte baterii počítače za novou.
Doporučuje se vyměnit současně i baterii vysílače. Nevystavu-
jte počítač extrémním teplotám ani mrazům ( nenechávejte na
přímém slunečním záření delší čas). Pravidelně kontrolujte polohu
vysílače. Pro získání správně měřených hodnot, udržujte senzor i
magnet suchý a čistý. V opačném případě, může nastat porucha
v zobrazení. Jednotlivé částí čistěte čistou vodou, nebo slabým
roztokem saponátu.
Omezení záruky:
Záruka se nevztahuje na funkčnost baterií, poškození způsobené
nesprávným používáním, nevhodným zacházením nebo
poškozením pří pádu, praskliny nebo zlomené části cyklopočítače.
Záruka zaniká v případě opravy v neautorizovaném servisu.
Důležité zdravotní upozornění:
Nikdy nepoužívejte cyklopočítač v kombinaci s lékařským / imple-
mentovaným elektronickým přístrojem nebo zařízením (speciálně
při použití kardiostimulátoru, EKG zařízení, TENS zařízení,
srdečně-plicního zařízení).
Pokud se léčíte na onemocnění vážnějšího charakteru nebo jste
těhotná žena, konzultujte prosím použití cyklopočítače se svojím
lékařem. Skladujte mimo dosah dětí !! Zařízení obsahuje baterie,
které můžou být vdechnuty dětmi. Při použití počítače s většinou
elektronických zařízení, může dojít k rušení signálu a tím ne-
správnému zobrazení údajů. Vyvarujte se použítí cyklopočítače v
blízkosti vedení vysokého napětí, klimatizačních jednotek, digitál-
ních náramkových hodinek, mobilů a osobních počítačů.
Polski
1. Wyposażenie licznika:
licznik serii CY-500, nadajnik, magnes, uchwyt plastikowy,
uchwyt gumowy, paski stabilizujące, paski mocujące
2. Montaż licznika:
rys. 2a: licznik, uchwyt platikowy, uchwyt gumowy, paski
stabilizujące, rys. 2b: uchwyt, paski mocujące, przy pomocy
pasków mocujących zamontować gumowy uchwyt na kierown-
icy lub wsporniku kierownicy przy
3. Montaż nadajnika:
Należy dokładnie obejrzeć widelec i wybrać najlepsze miejsce
na zamocowanie nadajnika. Odległość licznika od nadajnika
nie może być większa niż 60 cm. Zamontować nadajnik na
wybranym miejscu przy pomocy pasków mocujących (pasek
stabilizujący, nadajnik)
4. Montaż magnesu licznika
rys. 4a – śrubka, magnes, obr. 4b – nadajnik, strefa działania
nadajnika, magnes. Zamontować magnes na szprychę przed-
niego koła za pomocą śrubki. Należy upewnić się, że część
magnetyczna jest prawidłowo ułożona i znajduje się w stre-
fi e działania nadajnika. Maksymalna odłegłość między mag-
nesem i strefą działania nadajnika nie powinna być iwększa niż
5 mm. Jeśli wymienione wcześniej czynności zostały wykonane
prawidłowo, licznik jest gotowy do użytkowania.
Uwaga: przed jazdą należy zawsze sprawdzić czy wszystkie
częsci licznika są na właściwym miejscu.
Specyfi kacja:
Odbiornik Nadajnik
Temperatura pracy 0°C - 40°C
T. przechowywania 0°C - 50°C
Częstotliwość
przesyłania danych
N/A 122k ± 5%
Bateria 3V litowa typ 2033
Ciężar 30,6 g 20 g
Dane czasu: 0 – 29godzin: 59 minut: 59 sekund
Prędkość aktualna: 0 – 99,9Km/godz. / 0-62 mil/godz.
Prędkość średnia: 0 – 99,9Km/godz. / 0-62 mil/godz.
Prędkość maksymalna: 0 – 99,9Km/godz. / 0-62 míl/godz.
Dystans dzienny: 0 – 999,99Km / 0 – 600 Míl
Dystans całkowity: 0 – 99999 Km / 0 – 62 000 Míl
Wymiana baterii:
Licznik: otworzyć spodnią pokrywę licznika. Bateria ma być
umieszczona tak, aby po otwarciu pokrywy było widać oznac-
zenie +. Delikatnie wyjąć baterię i wymienić na nową. Model
baterii Cr2032.
Nadajnik: otworzyć spodnią pokrywę nadajnika. Bateria ma być
umieszczona tak, aby po otwarciu pokrywy było widać oznac-
zenie +. Delikatnie wyjąć baterię i wymienić na nową. Model
baterii Cr2032.
Utrzymanie: w przypadku kiedy ostrość wyświetlania zmie-
nia się, a symbole i cyfry bledną, zaleca się wymianę baterii
licz-nika. Równocześnie należy wymienić baterię nadajnika.
Nie należy wystawiać licznika na ekstremalne upały ani mrozy
(zwłaszcza nie należy zostawiać licznika w bezpośrednim
słońcu na dłuższy czas postoju). Stale należy kontrolować
położenie nadajnika. Aby wskazania licznika były prawidłowe,
magnes i nadajnik powinny być suche i czyste. W przeciwnym
razie może dojść do błędów w pomiarach i wskazaniach liczni-
ka. Poszczególne części można czyścić samą wodą lub lekkim
roztworem z detergentem.
Ograniczenia gwarancji:
Gwarancja nie obejmuje działania baterii, uszkodzeń spo-
wodowanych niewłaściwym użytkowaniem, uszkodzeń
powstałych w wyniku upadku, pęknięć oraz złamań elemen-
tów licznika. Gwarancja traci swą ważność w przypadku napraw
w nieupoważnionym serwisie.
Ważne informacje zdrowotne:
Nigdy nie należy używać licznika w pobliżu elektronicznych
urządzeń medycznych, szczególnie w pobliżu sztucznego roz-
rusznika serca, urządzeń EKG, urządzeń TENS, itp. Używanie
licznika należ skonsultować z lekarzem w przypadku, kiedy
jego użytkownik przewlekle się leczy lub jest kobietą w
ciąży. Przechowywać w miejscu niedostępnym dla dzieci!!!
Licznik zawiera baterie, które mogą zostać połknięte przez
dzieci. Jak w większości urządzeń odbiorczych może dojść
do czasem zakłócenia sygnału, powodując błędne odczyty
na wyświetlaczu. Unikać używania licznika w pobliżu linii
wysokiego napięcia, urządzeń klimatyzacyjnych, świetlówek,
zegarków cyfrowych, telefonów komórkowych i komputerów
osobistych
.
Slovensky
1.Príslušenstvo cyklopočítača:
cyklopočítač série CY-500, senzor, magnet, držiak plastový,
držiak gumový, vymedzovacie stabilizačné pásiky, viazacie
pásiky
2. Montáž cyklopočítača:
obr. 2a. : cyklopočítač, držiak plastový, držiak gumový, vymed-
zovacie stabilizačné pásiky, obr. 2b : držiak, viazacie pásiky,
použite držiak gumový na pripevnenie držiaku na riadidlá alebo
predstavec pomocou viazacích pásikov
3. Montáž vysielača:
Skontrolujte polohu vidlice (viď obrázok) a nájdite naj-vhodnejšie
miesto na pripevnenie senzoru. Vzdialenosť cyklopočítača
od senzoru nemá byť väčšia ako 60 cm. Pripe-vnite senzor na
zvolené miesto pomocou viazacích pásikov (Obr. 4: stabilizačný
pásik, senzor).
4. Montáž magnetu cyklopočítača:
obr. 4a – skrutka, magnet, obr. 4b – senzor, zóna snímania,
magnet, upevnite magnet na špicu predného kolesa pomocou
časti so závitom. Uistite sa, že magnetická časť je otočená
smerom k zóne snímania vysielača. Maximálna vzdialenosť
medzi magnetom a zónou snímania vysielača nemá presiahnuť
5mm. Pri dodržaní bodov vyššie je cyklopočítač pripravený na
použitie. Upozornenie: pred jazdou sa vždy uistite, že všetky
časti cyklopočítača sú v správnej polohe.
Špecifi kácia:
Prijímač Senzor
Pracovná teplota 0°C - 40°C
Teplota skladovania 0°C - 50°C
Frekvencia vysielania N/A 122k ± 5%
Batéria 3V lítiová typ 2033
Hmotnosť 30,6 g 20 g
Údaj času: 0 – 29hodín: 59 minút: 59 sekúnd
Aktuálna rýchlosť: 0 – 99,9Km/hod. / 0-62 míľ/hod.
Priemerná rýchlosť: 0 – 99,9Km/hod. / 0-62 míľ/hod.
Maximálna rýchlosť: 0 – 99,9Km/hod. / 0-62 míľ/hod.
Denná vzdialenosť: 0 – 999,99Km / 0 – 600 Míľ
Celková vzdialenosť: 0 – 99999 Km / 0 – 62 000 Míľ
Výmena batérie:
Cyklopočítač: uvoľnite zadný uzáver. Pól batérie + má byť umi-
estnený tak, aby bol pri otvorení krytu viditeľný. Jemne uvoľnite
batériu a vymeňte ju za novú. Model batérie musí byť Cr2032.
Senzor: uvoľnite zadný uzáver. Pól batérie + má byť umiestnený
tak, aby bol pri otvorení krytu viditeľný. Jemne uvoľnite batériu
a vymeňte ju za novú. Model batérie musí byť Cr2032.
Údržba: v prípade, že sa mení ostrosť zobrazovania displeja a
jednotlivé symboly blednú, vymeňte batériu počítača za novú.
Odporúča sa vymeniť súčasne aj batériu vysielača. Nevystavu-
jte počítač extrémnym horúčavám ani mrazom (nenechávajte
na priamom slnečnom žiarení dlhý čas). Pravidelne kontrolu-
jte polohu vysielača. Pre získanie správne meraných hodnôt,
udržujte senzor aj magnet suchý a čistý. V opačnom prípade,
môže nastať porucha v zobrazení. Jednotlivé časti čistite čistou
vodou, alebo slabým roztokom saponátu.
Obmedzenie záruky:
Záruka sa nevzťahuje na funkčnosť batérií, poškodenia spô-
sobené nesprávnym použitím, nevhodným zaobchádzaním
alebo poškodením pri páde, praskliny alebo zlomené časti
cyklopočítača. Záruka zaniká v prípade opravy v neautorizova-
nom servise.
Dôležité zdravotné upozornenia:
Nikdy nepoužívajte cyklopočítač v kombinácii s lekárskym /
implementovaným elektronickým prístrojom alebo zariadením
(špeciálne pri použití kardiostimulátora, EKG zariadenia, TENS
zariadenia, srdcovo-pľúcneho zariadenia).
Ak sa liečite na ochorenie vážnejšieho charakteru alebo ste
tehotná žena, konzultujte prosím použitie cyklopočítača so
svojim lekárom. Skladujte mimo dosahu detí !! Zariadenie ob-
sahuje batérie, ktoré môžu byť vdýchnuté deťmi. Pri použití
počítača s väčšinou elektronických zariadení môže prísť k
rušeniu signálu a tým nesprávnemu zobrazeniu údajov. Vy-
varujte sa použitia cyklopočítača v blízkosti vedení vysokého
napätia, klimatizačných jednotiek, digitálnych náramkových
hodiniek, mobilov a osobných počítačov.
Magyar
1. Computer tartozékai:
CY-500 computer, szenzor, mágnes, műanyag tartó, gumis
tartó, gumis alátétek, szorítószalag
2. Computer szerelése:
1. kép : computer, műanyag tartó, gumis tartó, gumis aláté-
tek, 2. kép : tartó, szorítószalag, használja a gumis tartót a
kormányra vagy a kormányszárra való szerelésénél és rögzítse
szorítószalagokkal (3. kép)
3. Jeladó szerelése:
Ellenőrizze a villa pozícióját (lásd ábra) és a jeladó szenzor
legmegfelelőbb helyen rögzítse. A jeladó és a szenzor közötti
távolsága max. 60 cm legyen. Szenzort a szorítószalagok
segítségével a kiválasztott helyre rögzíse. (4. Kép: gumisalá-
tét, szenzor)
4. Mágnes szerelése:
4a.kép – csavar, mágnes, 4b.kép – szenzor, érzékelési zóna,
mágnes. Mágnest a csavar segítségével rögzítse a küllőre,
ügyeljen arra, hogy a mágnes az érzékelő felé nézzen. Maximá-
lis távolság a mágnes és az érzékelési zóna közöt max. 5 mm
lehet. Figyelmeztetés: kerékpározás előtt ellenőrizze a com-
puter összes részének megfelelő beállítását.
Műszaki adatok:
JELADÓ SZENZOR
Működési hőmérséklet 0°C - 40°C
Tárolási hőmérséklet 0°C - 50°C
Műkodési frekvencia N/A 122k ± 5%
Elem 3V lithium, typ 2033
Súly 30,6 g 20 g
Óra adata: 0 – 29óra: 59 perc: 59 másodperc
Aktuális sebesség: 0 – 99,9Km/ó. / 0-62 Mérföld/ó.
Átlag sebesség: 0 – 99,9Km/ó. / 0-62 Mérföld/ó.
Maximális sebesség: 0 – 99,9Km/ó. / 0-62 Mérföl/ó.
Napi távolság: 0 – 999,99Km / 0 – 600 Mérföld
Össz távolság: 0 – 99999 Km / 0 – 62 000 Mérföld
Elem cseréje:
Computer: távolítsa el az elem fedelét. Az új elemet helyezze
be úgy, hogy az elem + pólusa látható legyen. Az elem típusa
CR2032.
Szenzor: távolítsa el az elem fedelét. Az új elemet helyezze
be úgy, hogy az elem + pólusa látható legyen. Az elem típusa
CR2032.
Karbantartás: Amennyiben a computer kijelzője rendszertelen
képeketjelez ki, vagy a jelek láthatósága csökken , cserélje ki
az elemet. A computert ne tegye extrém hő vagy alacsony
hőmérséklet hatására. Kerékpározás előtt ellenőrizze a com-
puter összes részének megfelelő beállítását. A mágnest és a
szenzort tartsa szárázan és rendszeresen tisztítsa.
Korlátozott garancia:
A garancia nem vonatkozik az elemek működésére, nem
megfelelő használattal keletkezett meghibásodásokra, nem
megfelelő kezeléssel vagy esés-baleset okozta károsodá-
sokra, repedésekre vagy letört computer részeire. A garanciát
elveszíti, ha nem a márkaszervíz javítja.
Fontos egészségügyi fi gyelmeztetés:
Sohasem használja a computert együtt az egészségügyi/beül-
tetett elektronikus műszerekkel (pl. kardiosztimulátor, EKG
berendezések, TENS berendezések, szív-tüdő berendezések).
Komolyabb betegsége esetén, vagy amennyiben terhes, kon-
zultálja a computer használatát az orvosával.
Tartsa távol a gyermekektől !! A berendezés elektromos eleme-
ket tartalmaz, melyeket a gyermek belélegezhet. Az egyidejű
elektromos berendezések használata zavarhatja az elektro-
mos jelek adását és hibás adatok kijelzéséhez vezethet. Ne
használja a computert magas feszültségű vezeték, légkondi-
cionáló egységek, digitális karórák, mobiltelefonok ás számító-
gépek közelében.
Instruction Manual Rad Computer Manuál k
cyklopočítači
Instrukcja obsługi licznika Manuál
cyklopočítača
használati útmutató Computer
Rad Computer Cyklopočítač Licznik Computer
COUNTER
CYCLECOMPUTER


Join the conversation about this product
Here you can share what you think about the Kellys Counter KLS Cycling Computer. If you have a question, first carefully read the manual. Requesting a manual can be done by using our contact form.
reply | This was helpful (24) (Translated by Google)
reply | This was helpful (23) (Translated by Google)
reply | This was helpful (12) (Translated by Google)
reply | This was helpful (4) (Translated by Google)
reply | This was helpful (2) (Translated by Google)
reply | This was helpful (2) (Translated by Google)
reply | This was helpful (1) (Translated by Google)
reply | This was helpful (0) (Translated by Google)