Adjustment For 90° Cuts
1. Disconnect plug from power supply.
2. Place a right angle against the blade and the shoe and adjust the shoe to 90°.
3. The 0° mark on the quadrant plate should line up with mark on shoe. If adjustment is
necessary, loosen screw on quadrant plate and adjust as necessary.
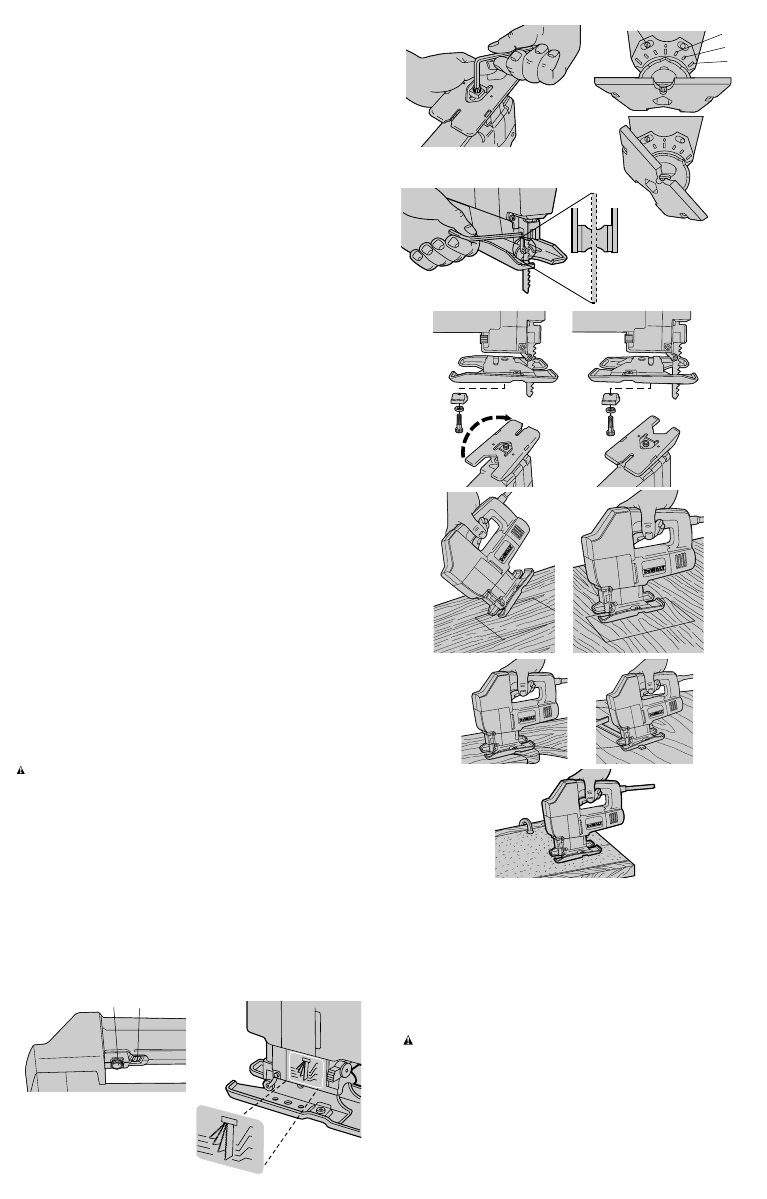
Attaching Blades (Fig. 4)
Cycle the tool on and off as necessary to make the blade clamp stop in a position where you
can reach the blade clamping screw. NEVER REMOVE THE BLADE CLAMP GUIDE.
Disconnect tool from extension cord or wall receptacle. Loosen screw at side of blade clamp.
Insert blade in blade clamp as far as it will go (about 13 mm). Make sure the back edge of the
blade fits into the support roller as shown in Fig. 4 and tighten the screw against the blade.
Anti-Splintering Shoe (Fig. 5)
This jig saw has a special double-ended shoe with a wide opening at one end for general cut-
ting and bevel cutting and a very narrow slot at the other end for use only with hollow ground
blades.This narrow slot acts as an anti-splintering device particularly useful when cutting ply-
wood.
NOTE: Use only hollow ground blades in the slotted end of the shoe. Use of any other blades
will damage the shoe.The anti-splintering feature should be used only when making straight
cuts or circle cuts with a rip fence & circle guide, not for bevel cutting, pocket cutting or metal
cutting.
Reversing Shoe Position
(UNPLUG TOOL)
To reverse the shoe position remove the screw from the bottom of the tool, as shown in Figure
5, and remove the shoe from the jig saw. (Be careful to note the position of the clamp. This
clamp must be re-installed the same way or the shoe will not fit properly.) Turn the shoe around
and re-install noting carefully that, when the slot is forward, the screw goes through the hole
in the shoe and when the wide opening is forward, the screw passes through the slot in the
shoe.
NOTE: Study Figure 5 before attempting to reverse shoe.
Pocket Cutting (Figs. 6 & 7)
A pocket cut is an easy method of making an inside cut. The saw can be inserted directly into
a panel or board without first drilling a lead or pilot hole. In pocket cutting measure the surface
to be cut and mark clearly with a pencil. Next tip the saw forward until the front end of the shoe
sits firmly on the work surface. Switch the tool on and allow it to attain maximum speed. Grip
the saw firmly and lower the back edge of tool slowly until the blade reaches its complete
depth. Hold the shoe flat against the wood and begin cutting. Do not remove blade from cut
while it is still moving. Blade must come to a complete stop.
Wood Cutting (Fig. 8)
Be sure board is firmly positioned. Don’t attempt to turn on when blade is against material to
be cut. This could stall the motor. Place front of shoe on material to be cut and hold jig saw
shoe firmly against the wood while cutting. Don’t force the tool; let the blade cut at its own
speed. Whenever possible, clamp or support work close to the line of cut; when the cut is com-
pleted, shut off power, let blade come to a complete stop and then lay the saw aside before
loosening the work. Use the higher speed setting for cutting wood.
Rip & Circle Cutting (Fig. 9)
Ripping and circle cutting without a pencil line are easily done with an accessory rip fence and
circle guide (available at small extra cost). When using the rip fence and circle guide, the shoe
must be in the anti-splintering position. When ripping: insert rip fence in either side of saw with
cross bar facing down; adjust to width of cut and tighten screw. When circle cutting: Insert rip
fence from either side with cross bar facing up; adjust rip fence so that distance from blade to
hole in cross bar is the desired radius and tighten screw; place saw so that center of hole in
cross bar is over center of circle to be cut (make pocket cut, drill hole for blade or cut inward
from edge of material to get blade into position). When saw is properly positioned, drive a small
nail through hole in cross bar into exact center of circle to be cut. Using rip fence as a pivot
arm, begin cutting circle.
Metal Cutting (Fig. 10)
In cutting thin gauge sheet metals, it is best to clamp wood or plywood to the bottom of sheet
metal; this will insure a clean cut without the danger of vibration or tearing of metal. Always remem-
ber to use a finer blade for ferrous metals (for those that have a high iron content); and use a coars-
er blade for non-ferrous metals (those that do not have an iron content). Use a high speed setting
for cutting soft metals (aluminium, copper, brass, mild steel, galv. pipe, conduit sheet metal, etc.).
Use lower speed to cut plastics, tile, formica, hard metals, cast iron.
Lubrication
It is recommended that, at least once a year, you take or send the tool to an authorized serv-
ice center for a thorough cleaning, inspection and lubrication of the gear case.
Accessories
Recommended accessories for use with your tool are available at extra cost from your distributor
or authorized service center.
CAUTION: The use of any non-recommended accessory may be hazardous. If you need
any assistance in locating any accessory, please contact D
EWALT Industrial Tool Co., 701 East
Joppa Road, Baltimore, MD 21286 or call 1-800-4-D
EWALT
(1-800-433-9258).
Important
To assure product SAFETY and RELIABILITY, repairs, maintenance and adjustment (includ-
ing brush inspection and replacement) should be performed by authorized service centers or
other qualified service organizations, always using identical replacement parts.
Full Warranty
DEWALT heavy duty industrial tools are warranted for one year from date of purchase. We will
repair, without charge, any defects due to faulty materials or workmanship. For warranty repair
information, call 1-800-4-D
EWALT. This warranty does not apply to accessories or damage
caused where repairs have been made or attempted by others. This warranty gives you spe-
cific legal rights and you may have other rights which vary in certain states or provinces.
In addition to the warranty, D
EWALT tools are covered by our:
30 DAY NO RISK SATISFACTION GUARANTEE
If you are not completely satisfied with the performance of your D
EWALT heavy duty industri-
al tool, simply return it to the participating seller within 30 days for a full refund. Please return
the complete unit, transportation prepaid. Proof of purchase may be required.
FREE WARNING LABEL REPLACEMENT: If your warning labels become illegible or are
missing, call 1-800-4-DEWALT for a free replacement.
FIG. 1
“A”
“B”
FIG. 2
FIG. 3
15°
30°
45°
FIG. 4
FIG. 5
FIG. 6 FIG. 7
FIG. 8 FIG. 9
FIG. 10
RÈGLES DE SÉCURITÉ GÉNÉRALES
AVERTISSEMENT! Vous devez lire et comprendre toutes les instructions. Le non-
respect, même partiel, des instructions ci-après entraîne un risque de choc électrique, d’in-
cendie et/ou de blessures graves.
CONSERVEZ CES INSTRUCTIONS.
Double isolation (Modèles DW313, DW318, DW318-220)
Les outils à double isolation comportent deux couches distinctes d’isolant électrique ou une
double épaisseur d’isolant qui protègent l’utilisateur contre les risques de blessures provenant
du système électrique de l’outil. Ce système de double isolation élimine le besoin de mettre
les outils à la terre. En effet, l’outil est muni d’une fiche à deux broches, ce qui permet d’utilis-
er une rallonge ordinaire sans avoir à se soucier d’assurer la mise à la terre.
NOTE : La double isolation ne dispense pas des mesures de sécurité normales lors de l’utili-
sation de l’outil. Elle vise à procurer une protection supplémentaire contre les blessures que
peut entraîner une défectuosité de l’isolant électrique à l’intérieur de l’outil.
MISE EN GARDE : LORS DE L’ENTRETIEN, N’UTILISER QUE DES PIÈCES DE
RECHANGE IDENTIQUES. Réparer ou remplacer les cordons endommagés.
Fiche polarisée(Modéles DW313, DW318)
Afin de réduire les risques de secousses électriques, l’outil est muni d’une fiche polarisée (une
lame plus large que l’autre). Ce genre de fiche n’entre que d’une façon dans une prise polar-
isée. Lorsqu’on ne peut insérer la fiche à fond dans la prise, il faut tenter de le faire après avoir
inversé les lames de côté. Si la fiche n’entre toujours pas dans la prise, il faut communiquer
avec un électricien certifié afin qu’il installe une prise appropriée. Il ne faut en aucun cas mod-
ifier la fiche.
Aire de travail
• Veillez à ce que l’aire de travail soit propre et bien éclairée. Le désordre et le manque de
lumière favorisent les accidents.
• N’utilisez pas d’outils électriques dans une atmosphère explosive, par exemple en
présence de liquides, de gaz ou de poussières inflammables. Les outils électriques
créent des étincelles qui pourraient enflammer les poussières ou les vapeurs.


Join the conversation about this product
Here you can share what you think about the DeWalt DW318G Jigsaw. If you have a question, first carefully read the manual. Requesting a manual can be done by using our contact form.