
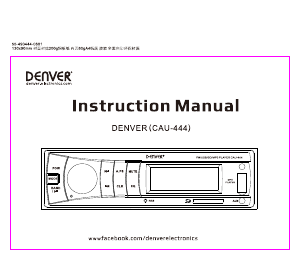
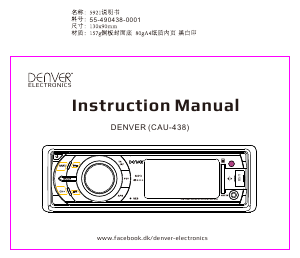
P.2 P.3
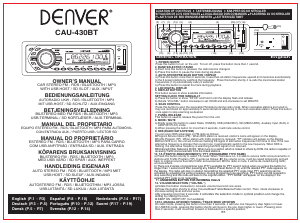
1. LIGAR/DESLIGAR
Premir o botão para “LIGAR” ou “DESLIGAR” a alimentação.
2. SELECTOR DE BANDA / PAUSA
a) De cada vez que premir este botão, a banda de rádio é alterada.
b) Premir este botão para parar a faixa durante a reprodução.
3. BOTÃO GRAVAÇÃO AUTOMÁTICA/PRÉ-BUSCA / REPETIR
a) Premir este botão mais do que 2 segundos, busca todas as frequências acima e memoriza automaticamente
até 6 estações pré-definidas pela captura da frequência. Premir este botão ligeiramente rechama as frequências
de estação memorizadas (1-6) automaticamente a cada 5 segundos.
b) Premir este botão para repetir a faixa durante a reprodução.
17. AUXILIARY INPUT
Press MODE button (8) until the “AUX” mode is shown on display. The unit is ready to play files from the external
audio device.
19. USB HOST
Press MODE button (8) until the “USB” mode is shown on display. The unit is ready to play files from the USB
device.
18. SD CARD SLOT
Press MODE button (8) until the “SD CARD” mode is shown on display. The unit is ready to play files from the
SD card.
4. VISOR DIGITAL LCD
5. BOTÃO VISOR
Este botão serve para mostrar informação disponível
7. SOLTAR O PAINEL
Este botão é usado para soltar o painel da unidade.
8. SELECÇÃO DE MODO
Premir este botão para seleccionar modo Rádio (SINTONIZADOR), USB (USB), SD (CARTÃO SD) ou Entrada
Auxiliar (AUX).
9. RDS (RADIO DATA SYSTEM) / ESTÉREO/MONO
a) Pode aproveitar as vantagens RDS no rádio FM como se segue:
Nome do Programa de Serviço (PS): Quando a estação RDS é recebida, o nome da estação aparecerá no visor.
Programa de Tráfego (TP): Quando a estação com programa de tráfego é recebida, o indicador “TP” aparecerá
no visor.
Frequências Alternativas (AF): A unidade continuará a verificar o sinal de frequências alternativas de tempos a
tempos. Se a nova frequência alternativa for mais forte que a actual, mudará automaticamente para a nova
frequência. Premir este botão ligeiramente, o estado do modo de comutação AF aparecerá no visor, como se
segue:
1) RDS está ligado: AF está ligado e o sinal RDS é recebido.
2) RDS está desligado: AF está desligado.
3) RDS está a piscar: AF está a buscar mas o sinal RDS não é recebido.
b) Premindo mais do que 2 segundos, pode seleccionar recepção “FM STEREO” ou “FM MONO”.
13/14. SINTONIA MANUAL CIMA/BAIXO / BUSCA DE FAIXA CIMA/BAIXO
No modo rádio, premindo este botão mais do que 2 segundos, sintonizará uma frequência superior ou inferior. No
modo USB/SD, premindo este botão ligeiramente mudará para uma faixa superior ou inferior. Premindo mais do que
2 segundos, avança ou recua rapidamente para uma posição específica.
15. BOTÃO DE ESTAÇÃO PRÉ-DEFINIDA (1-6)
a) Cada estação pré-definida pode ser guardada em F1, F2 ou F3 (18FM). Premir este botão ligeiramente rechama a
frequência da estação que foi memorizada.
b) Podem ser memorizadas manualmente as estações das frequências em estações pré-definidas específicas pela
pressão de 2 segundos na estação pré-definida específica desejada.
c) Premir o 2 pré-definido para buscar os primeiros 10 segundos de todas as faixas durante o modo USB/SD.
d) Premir os pré-definidos 5/6 para buscar faixa -10/+10 durante o modo USB/SD.
17. ENTRADA AUXILIAR
Premir o botão MODO (8) até que o modo “AUX” seja mostrado no visor. A unidade está pronta a ler ficheiros do
dispositivo áudio externo.
16. REINICIAR
O botão reiniciar está localizado na frente do painel principal. O circuito de reinicialização é fornecido para
proteger o microprocessador da unidade. Sempre que o botão reiniciar é activado, todo o conteúdo de memórias
pré-definidas será apagado. Deverá ser activado somente nas condições abaixo:
a) Instalação inicial depois de todas as ligações completadas.
b) Funcionamento anormal.
6. SEM SOM
Premir este botão para controlo do volume para silenciar e “MUT” piscará no visor.
11. CONTROLO PTY (NOME DO TIPO DE PROGRAMA) / CONTROLO LOCAL/DISTANTE
a) Premir ligeiramente, então rodar o botão “VOL/SEL” até aparecer no visor do código PTY desejado. Premir o
botão “VOL/SEL” outra vez para activar a função BUSCA PTY. “NÃO COINCIDE” aparecerá no visor se o código
PTY seleccionado não é recepcionável.
b) Premindo mais do que 2 segundos, pode seleccionar “BUSCA LOC” para evitar que estações locais mais fortes
se sobreponham a estações mais fracas ou “BUSCA DX” para a distância em funcionamento normal.
19. USB ANFITRIÃO
Premir o botão MODO (8) até que o modo “USB” seja mostrado no visor. A unidade está pronta a ler ficheiros do
dispositivo USB.
18. ENTRADA CARTÃO SD
Premir o botão MODO (8) até que o modo “CARTÃO SD” seja mostrado no visor. A unidade está pronta a ler
ficheiros do cartão SD.
microprocessor. Whenever the reset button is activated, all preset memories content will be erased. It should only
be activated under the below conditions: a) Initial installation after all wires are completed. b) Abnormal operation.
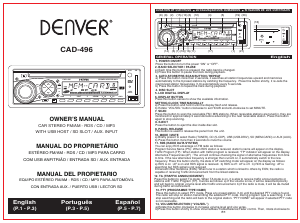
REMOVAL KEYS
INSTALLATION
METAL
MOUNTING
STRIP
DASHBOARD
MOUNTING
CASE
CONSOLE
HEXAGON
NUT
HEXAGON
BOLT
UNIT REMOVAL
1. Remove Front Panel and Frame.
2. Insert the removal keys into the slot and gently
to remove mounting case.
3. Keep removal keys in a safe
place for future removal
of unit.
END OF LIFE DISPOSAL
Electric and electronic equipment contains materials, components and substances that can be hazardous to
your health and the environment, if the waste material (discarded electric and electronic equipment) is not
handled correctly. Electric and electronic equipment is marked with the crossed out trash can symbol, seen left.
This symbol signifies that electric and electronic equipment should not be disposed of with other household
waste, but should be disposed of separately. All cities have established collection points, where electric and
electronic equipment can either be submitted free of charge at recycling stations and other collection sites, or
be collected from the households. Additional information is available at the technical department of your city.
FUNCIONAMENTO EM GERAL
Português
WIRE CONNECTION
ISO CONNECTOR
FROM CABLE SIDE
FOR 4 SPEAKERS
B
RIGHT REAR + RIGHT REAR
RIGHT FRONT + RIGHT FRONT
LEFT FRONT + LEFT FRONT
LEFT REAR + LEFT REAR
(GRAY) (GRAY/BLACK)
(PURPLE)
(PURPLE/BLACK)
(GREEN)
(GREEN/BLACK)
(WHITE) (WHITE/BLACK)
2
4
6
8
1
7
5
3
2
4
6
8
1
7
5
3
MEMORY
GROUND
IGNITION
(YELLOW)
(BLACK)
(RED)
POWER
ANTENNA
(BLUE)
POWER
FROM CABLE SIDE
A
ISO CONNECTOR
A
B
FUSE 10A
ANTENNA
RCA LINE OUT
10. TA (AVISOS DE TRÁFEGO) / ACÚSTICO
a) Premir este botão ligeiramente para seleccionar o modo TA. Quando o modo TA está ligado, está apto a
receber avisos de tráfego ou estações com Programa de Tráfego (TP). Funciona como se segue:
1) Se o volume está baixo, aumentará temporariamente e volta ao nível de volume original depois dos avisos de
tráfego.
2) Se o rádio está silenciado, o som será activado durante o aviso de tráfego.
b) Premindo mais do que 2 segundos, pode activar o circuito de ruído que compensa as perdas de frequências
altas ou baixas durante níveis de volume baixos.
12.
l
l
VOLUME/SELECÇÃO (“VOL/SEL”)
a) Rodar este botão no sentido horário para aumentar o nível de volume e vice-versa.
b) Premir este botão ligeiramente para mostrar o controlo de Volume/Graves/Agudos/Balanço/Potência. Então,
rodar no sentido horário para aumentar o nível de definição e vice-versa.
c) Premir mais do que 2 segundos, activa o modo selecção na posição cíclica.
EQ-DESLIGADO / FLAT / POP / ROCK / CLASS
RELÓGIO (rodar botão “VOL/SEL” no sentido horário para definir MINUTOS e anti-horário para definir HORA)
LIGAÇÃO POR FIO
B
2
4
6
8
1
7
5
3
2
4
6
8
1
7
5
3
IGNIÇÃO
MEMÓRIA
TERRA
(VERMELHO)
(AMARELO)
(PRETO)
LIGAÇÃO
ANTENA
(AZUL)
A
A
B
FUSÍVEL 10A
ANTENA
SAÍDA LINHA RCA
PARA 4 ALTIFALANTES
DO LADO DO CABO
CONECTOR ISO
LIGAR
DO LADO DO CABO
CONECTOR ISO
DIREITA TRASEIRO +
(ROXO)
DIREITA TRASEIRO
(ROXO/PRETO)
DIREITA FRENTE + DIREITA FRENTE
(CINZENTO)
(CINZENTO/PRETO)
ESQUERDA FRENTE + ESQUERDA FRENTE
ESQUERDA TRASEIRO + ESQUERDA TRASEIRO
(BRANCO)
(BRANCO/PRETO)
(VERDE)
(VERDE/PRETO)


Join the conversation about this product
Here you can share what you think about the Denver CAU-425 Car Radio. If you have a question, first carefully read the manual. Requesting a manual can be done by using our contact form.